Quickstart #2: Slots & Resolvers
Quickstart #2: Slots & Resolvers
Learning Objectives
In this Quickstart guide, you’ll build on the core concepts covered in Quickstart #1 by building a more complex plugin that enables a user to find and update a feature request. As part of the building process you’ll learn how to:
- Build a Data Type to represent a feature request object.
- Create a Resolver Strategy that enables the AI Assistant to find feature requests when it needs one
- Set up a Plugin that can use the Data Type & Resolver Strategy to power the process of finding the right feature request that a user wants to update.
Prerequisites
- Access to the “Agent Studio” App.
- Completed Quickstart #1: Build Your First Plugin.
What You’ll Build
The Plugin you’re about to build solves a simple, but real-world problem: enable users to find and update a feature request.
Before starting to build, we always recommend that you first map out the desired end user experience and the overall building blocks of the Conversational Process.
Here is an example of the end-user experience we hope to enable:
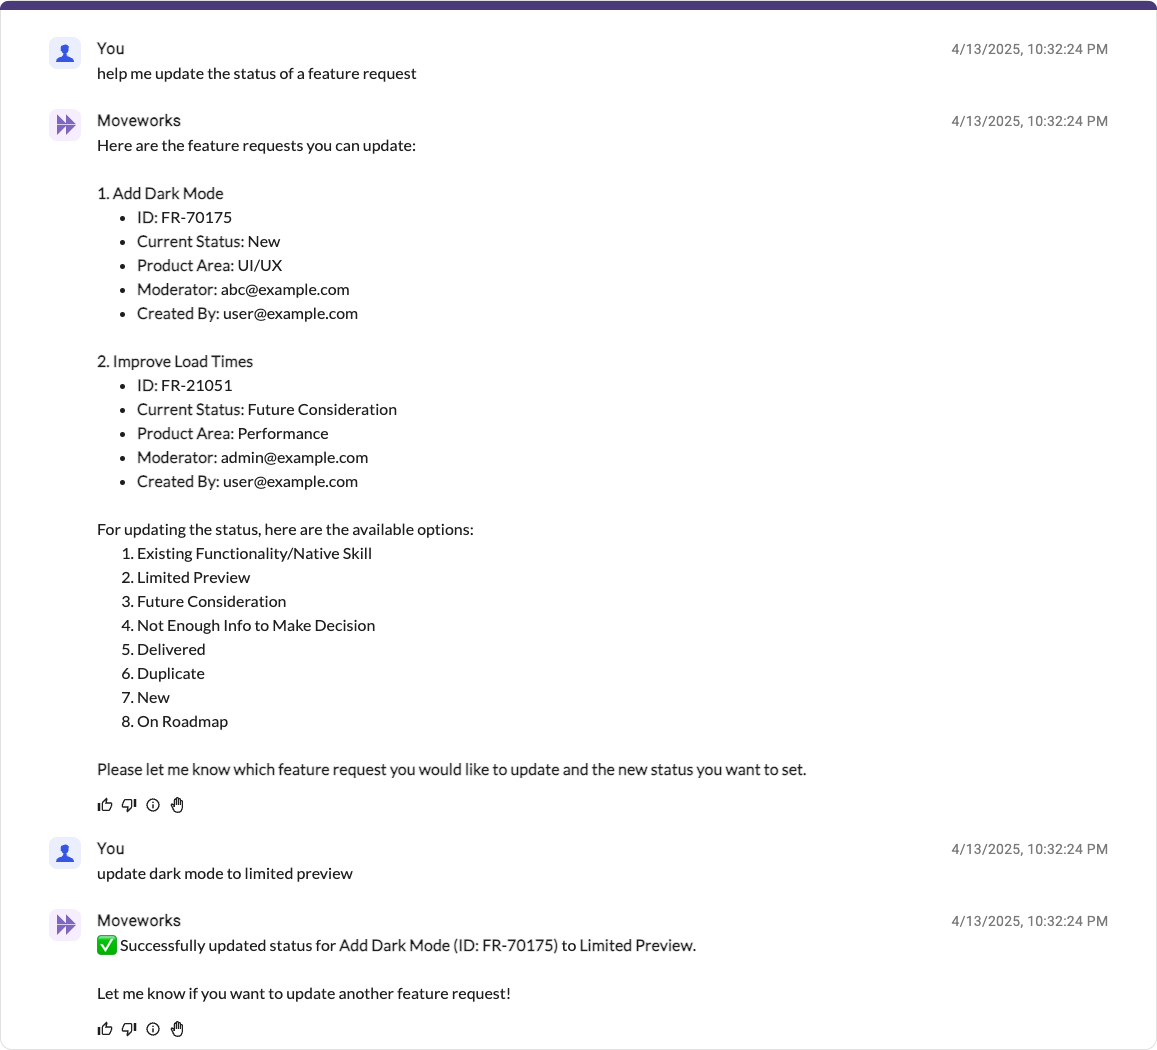
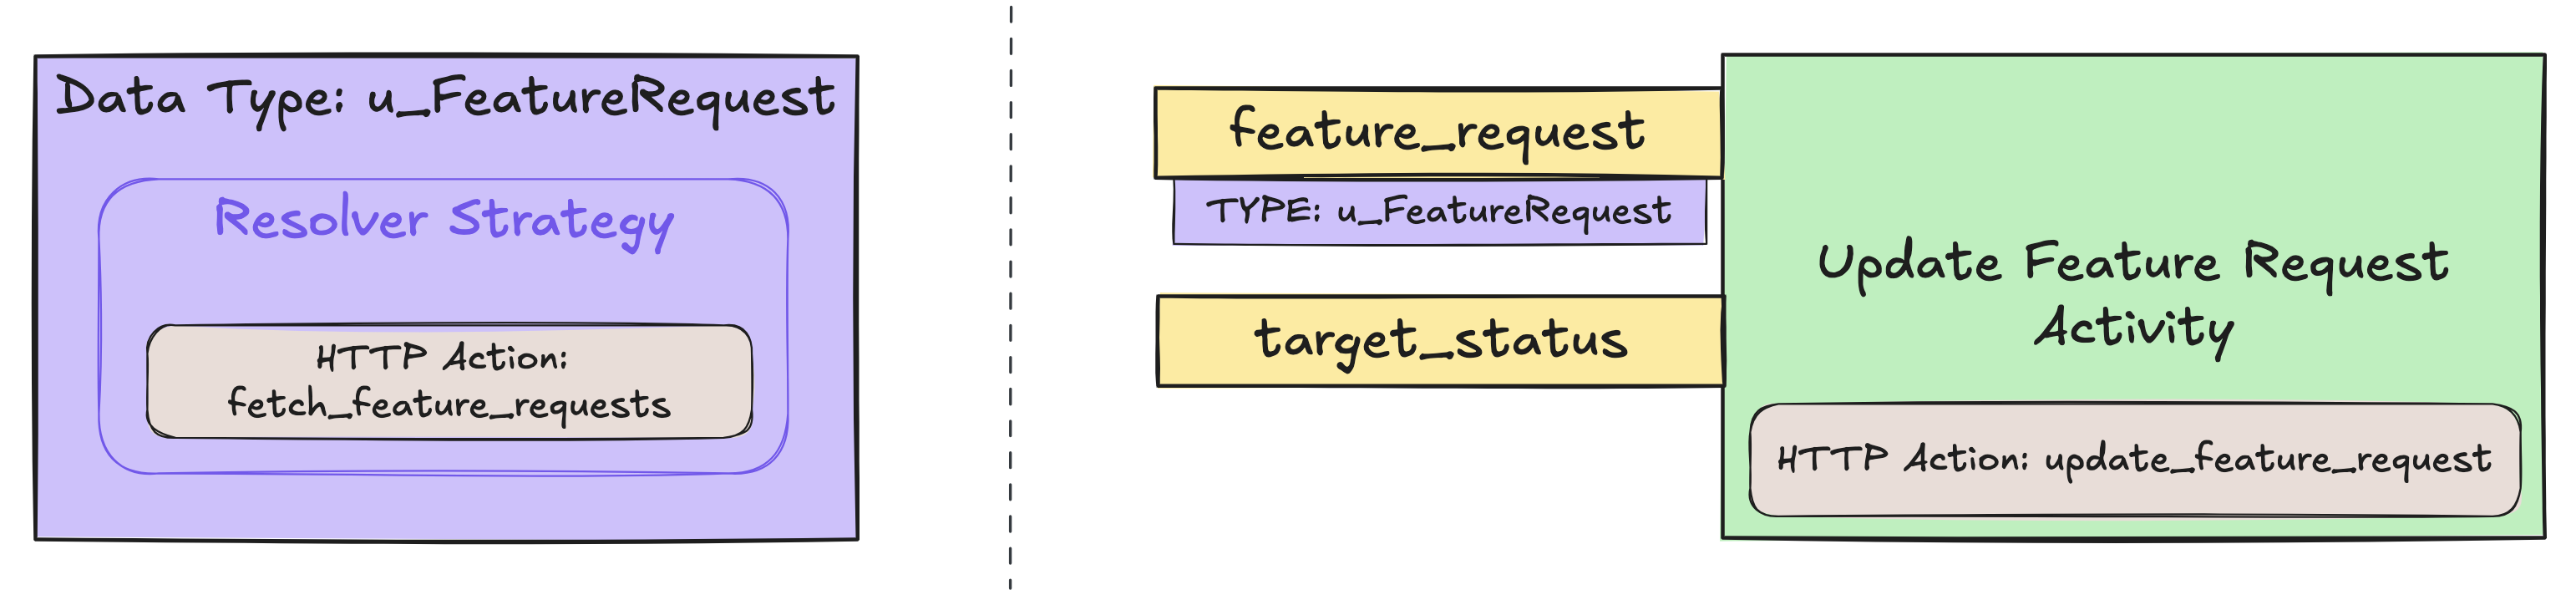
To get to this experience, you can set up a Data Type to represent a “feature request” object, and your core Conversational Process should consist of one Activity (powered by an HTTP Action) and two Slots required in order to run the Activity:
You’ll build an end-to-end working Plugin via these phases:
- Set up 2 (HTTP)Actions: one to fetch available feature requests, and another to update a feature request.
- Set up a “feature request”Data Type, and attach a defaultResolver Strategy to power a feature request object (using the “fetch” Action you created in the previous phase).
- Build the Conversational Process, containing the 1 Activity (using your other “update” Action) and the 2 Slots, as illustrated above.
- Add the Conversational Process to your AI Assistant by launching a Plugin.
Let’s get started!
Phase 0: Set Up the Purple Suite
Already set up?
If you’ve already completed the Purple Suite Setup and have your connector configured, skip to Phase 1A.
Follow the Purple Suite Setup guide to:
- Create a Purple Suite instance at marketplace.moveworks.com/purple-suite
- Get your Instance ID and API Token (PAT)
- Set up a connector in Agent Studio with API Key auth
Phase 1A: Set Up Your “Fetch Feature Requests” Action
️ Import building notes if you are using the Moveworks Developer Labs environment
- If you are working in a Moveworks lab environment, name anything you save (Plugin, Action, Data Type, etc.) with
<fullname>_<descriptive_name>- For example:
lucasrollo_Submit_PTO_Action
- For example:
- When launching your Plugin, make sure to only launch to yourself! You can do this by going to Your Plugin > Launch Configuration > Allow Selected Users > the email on your credential card
Let’s first set up an HTTP Action that will fetch available feature requests. This Action doesn’t require any dynamic inputs, and will just query an external system for a list of feature requests.
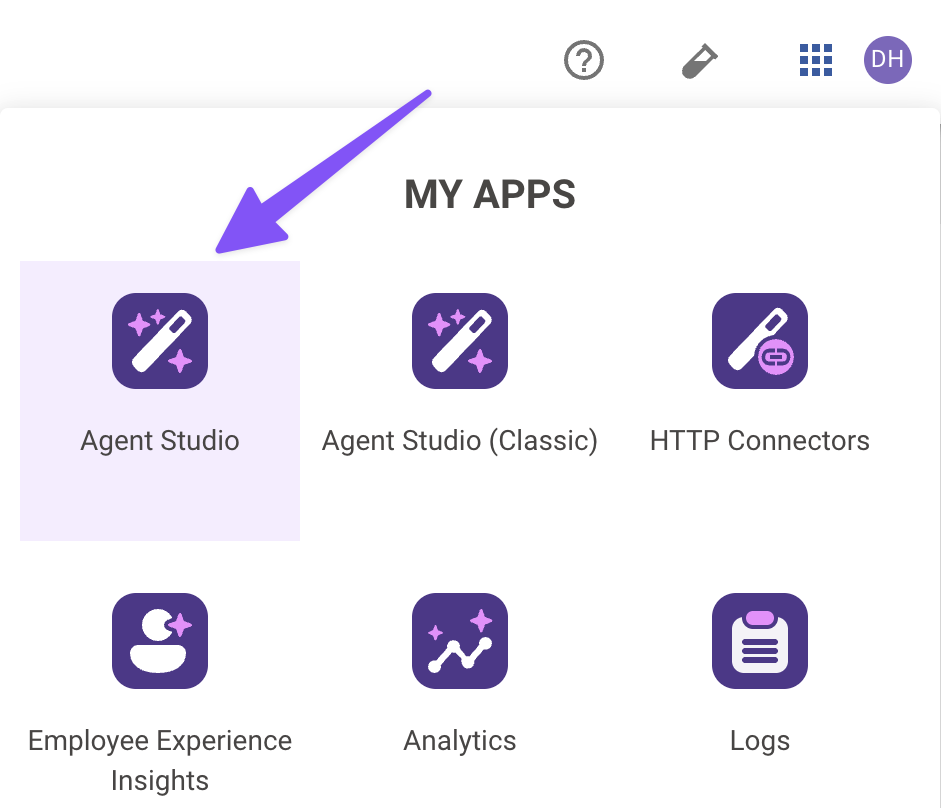
Navigate to Agent Studio
Navigate to the App Picker in the top right corner. Click on “Agent Studio”.

Set the title and description
Set the following title and description for your Action (be sure to replace “firstname” and “lastname” with your corresponding information).

Import the API details
Enter the details of your API:
-
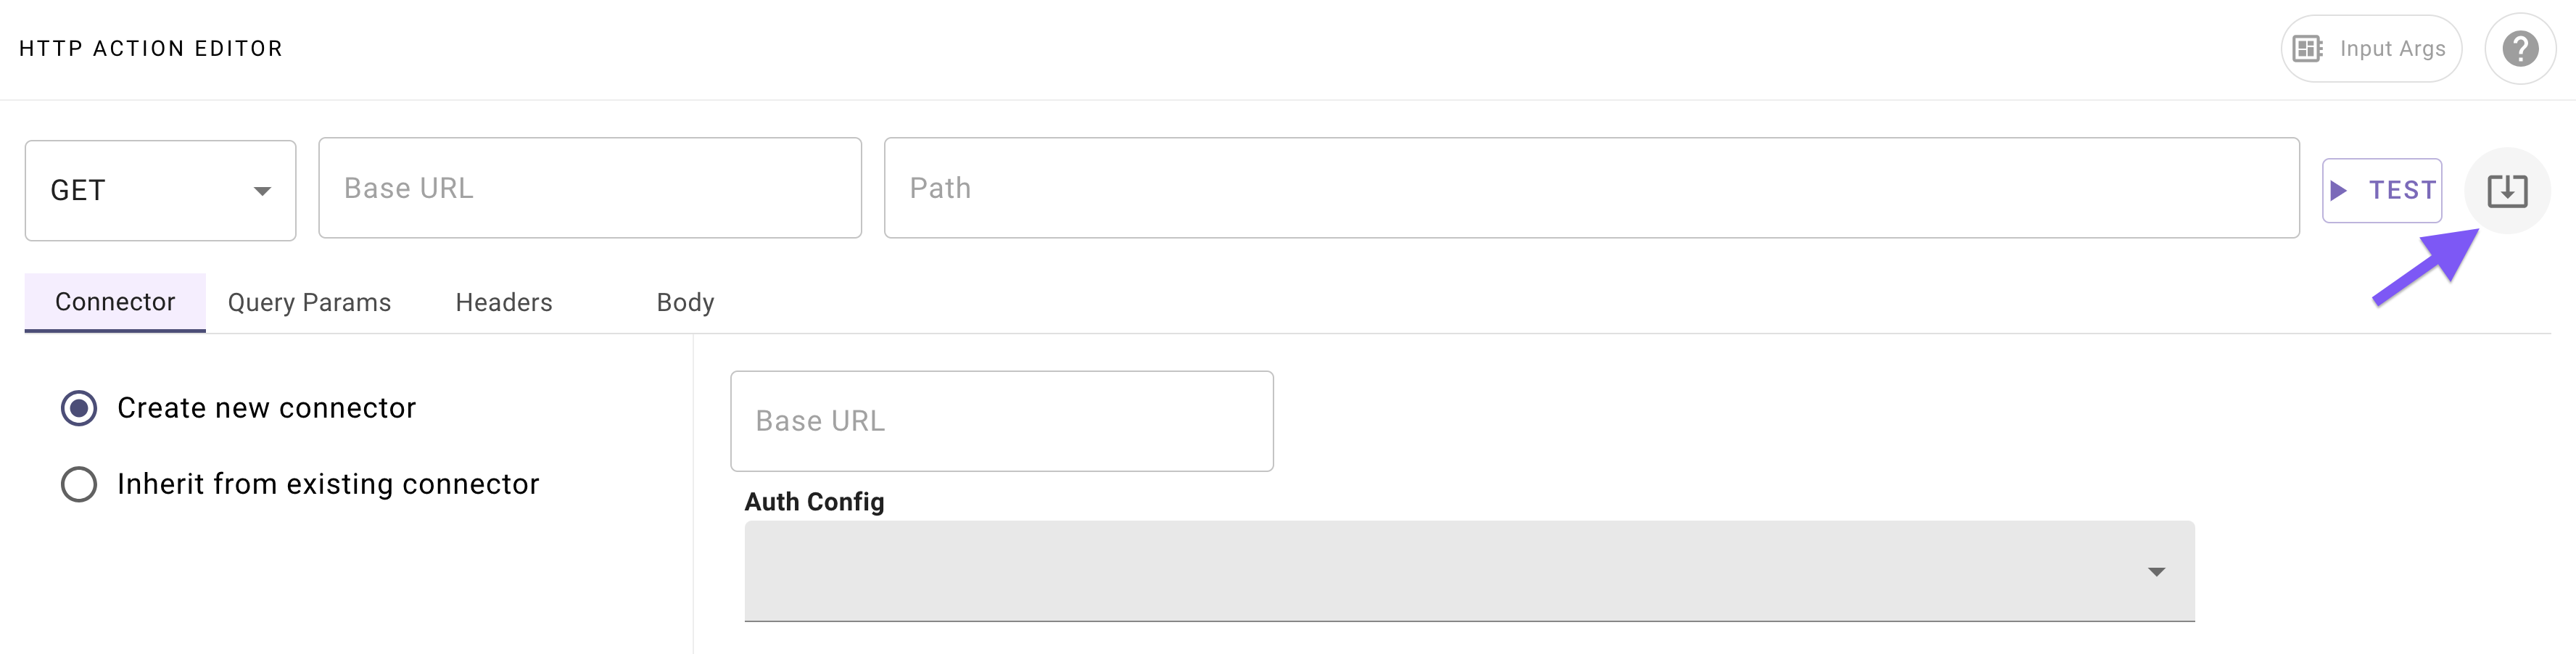
Click on the “Import” icon to the right of the “TEST” button.
-
Paste (don’t click “Import” yet) the following almost-ready cURL command:
-
Replace
YOUR_PATandYOUR_INSTANCE_IDin the pasted command with your actual API Token (PAT) and Instance ID from the Purple Suite setup. -
Click “Import” (your Action should now be auto-populated with details).
Add your connector
Add your Connector:
-
Navigate to the “Connector” tab.
-
Select “Inherit from existing connector”.
-
Select the Connector you created in Phase 0 (e.g.
firstname_lastname_moveworks_purple).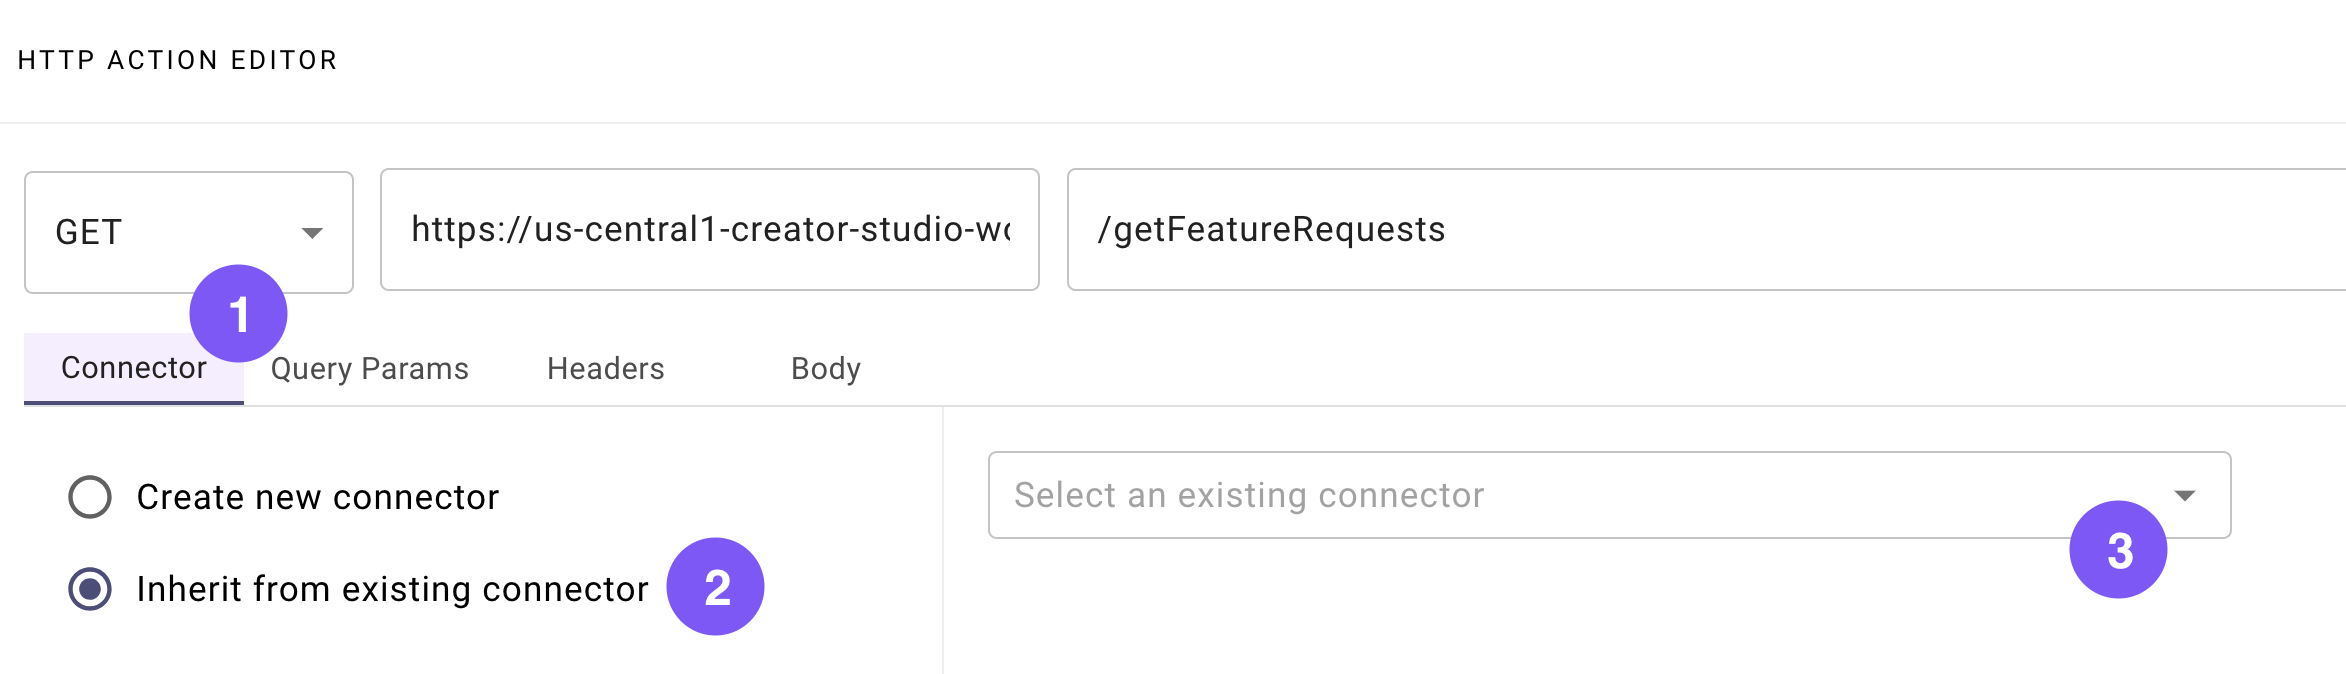
Nice! You've just set up 1 Action to fetch feature requests — 1 more Action to go.
In the next section, we’ll build the final Action that this Plugin requires: an Action to update the status of the feature request object in the external database.
Phase 1B: Set Up Your “Update Feature Request” Action
️ Import building notes if you are using the Moveworks Developer Labs environment
- If you are working in a Moveworks lab environment, name anything you save (Plugin, Action, Data Type, etc.) with
<fullname>_<descriptive_name>- For example:
lucasrollo_Submit_PTO_Action
- For example:
- When launching your Plugin, make sure to only launch to yourself! You can do this by going to Your Plugin > Launch Configuration > Allow Selected Users > the email on your credential card
Now, we’ll build an Action that can apply a status update to a single feature request. This Action will require two dynamic inputs (feature_request_id and new_status), and should update the feature request record in your instance’s database.
Set the title and description
Set the following title and description for your Action (be sure to replace “firstname” and “lastname” with your corresponding information).
Import the API details
Enter the details of your API:
-
Click on the “Import” icon to the right of the “TEST” button.
-
Paste (don’t click “Import” yet) the following almost-ready cURL command:
-
Replace
YOUR_PATandYOUR_INSTANCE_IDin the pasted command with your actual API Token (PAT) and Instance ID from the Purple Suite setup. -
Click “Import” (your Action should now be auto-populated with details).
Add your connector
Add your Connector:
-
Navigate to the “Connector” tab.
-
Select “Inherit from existing connector”.
-
Select the Connector you created in Phase 0 (e.g.
firstname_lastname_moveworks_purple)
Define input arguments
Define 2 formal input arguments to represent the “feature request id” and “new status” inputs that this Action requires:
-
Click on the “Input Args” button near the top right corner of the editor.

-
Click “Create New” in the “Input Arguments” pop up.
-
Fill out the following details for your
feature_request_idargument: -
Hit “Save”.
-
Click “Create New” again in the “Input Arguments” pop up.
-
Fill out the following details for your
new_statusargument: -
Hit “Save” and hit the “X” icon to close this “Input Arguments” pop up.
All done with Actions!
You’re ready to move on — time to create your first Data Type to represent feature request objects.
Phase 2: Create a “Feature Request” Data Type & Resolver Strategy
️ Import building notes if you are using the Moveworks Developer Labs environment
- If you are working in a Moveworks lab environment, name anything you save (Plugin, Action, Data Type, etc.) with
<fullname>_<descriptive_name>- For example:
lucasrollo_Submit_PTO_Action
- For example:
- When launching your Plugin, make sure to only launch to yourself! You can do this by going to Your Plugin > Launch Configuration > Allow Selected Users > the email on your credential card
To power the process of updating a feature request, creating a formal Data Type to represent a “feature request” object can help us encapsulate the properties of a feature request. Furthermore, one of the critical properties of this Data Type is that there’s a particular way to fetch values for the object: that’s what the Resolver Strategy you’re also about to build will take care of!
We’ll build the “feature request” Data Type with its Resolver Strategy in this phase:

Set the title and description
Set the following title and description for your Data Type (be sure to replace “firstname” and “lastname” with your corresponding information). Note that the title will autofix itself to the appropriate formal type name (in u_ prefixed format).
Provide the schema
Provide the schema for an object of this type:
-
Click “Import JSON” near the top right corner of the editor.

-
Paste the following JSON sample object into the popup (this will allow you to auto-generate the schema):
JSON -
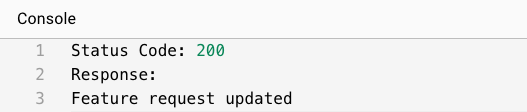
Click “Generate”, and verify that the auto-populated schema looks correct (matches the structure of the sample object).
Configure the Resolver Strategy
Configure your Resolver Strategy. This strategy will contain one Dynamic Resolver Method, which is essentially a resolver that fetches candidate options from a dynamic source (in this case, from the “fetch feature requests” HTTP Action you configured in Phase 1A).
-
Navigate to the “Resolver Strategy” tab.

-
Fill out the following details for your Resolver Strategy Method:
-
And just like that... you've created a fully-fledged Data Type!
Awesome work. Time to finally put this Data Type and the rest of these Actions to work in a Conversational Process.
Phase 3: Build Your Conversational Process
️ Import building notes if you are using the Moveworks Developer Labs environment
- If you are working in a Moveworks lab environment, name anything you save (Plugin, Action, Data Type, etc.) with
<fullname>_<descriptive_name>- For example:
lucasrollo_Submit_PTO_Action
- For example:
- When launching your Plugin, make sure to only launch to yourself! You can do this by going to Your Plugin > Launch Configuration > Allow Selected Users > the email on your credential card
This Conversational Process, like the one in Quickstart #1, will also appear to be a simple single-Activity process. Its added complexity will be in the form of two Slots, where one of these Slots will be powered by the “feature request” Data Type you just created in Phase 2.
Here’s a reminder of the bird’s eye view for our Process (2 Slots, 1 Action Activity):

To build this Conversational Process:
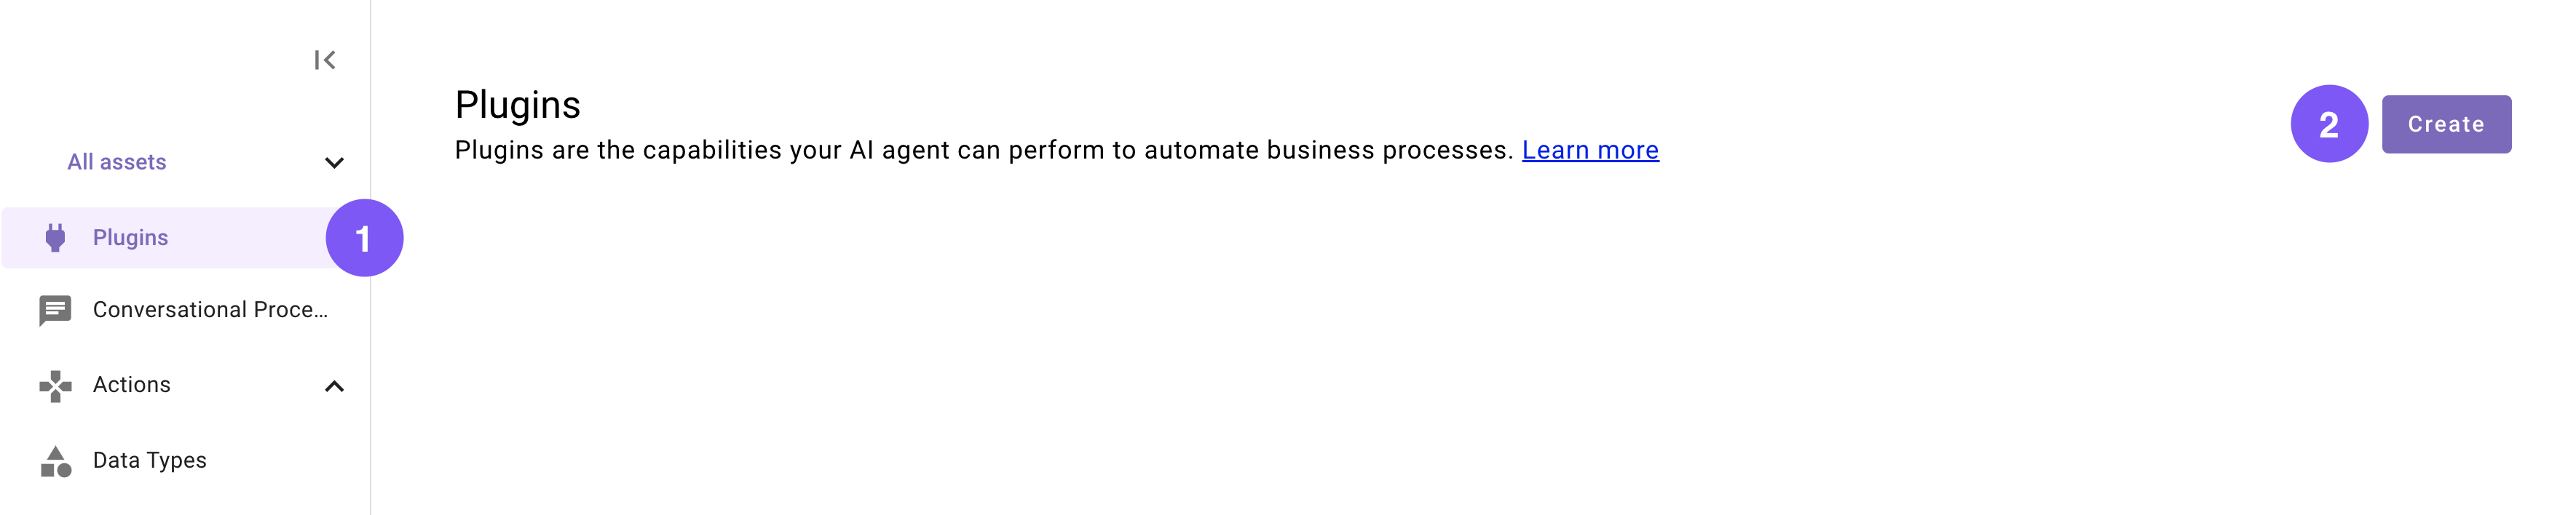
Create a new Conversational Process
Navigate to a new Conversational Process (navigate to the library and click “Create”).

Set the title and description
Set the following title and description for your Conversational Process (be sure to replace “firstname” and “lastname” with your corresponding information).
Add Slots
Add TWO new Slots for the Process to interact with. One will represent the feature_request to update, and the other will be the target_status to set on the feature request. 📖Learn more about Slots.
-
Click on the “Slots” button near the top right corner of the editor.

-
Click “Create New” in the “Slots” pop up.
-
Fill out the following details for your first
feature_requestSlot: -
Hit “Save” (scroll to the bottom of the popup).
-
Click “Create New” again in the “Slots” pop up to build your second Slot.
-
Fill out the following details for your second
target_statusSlot: -
Before saving this slot, you’ll add an Inline Resolver Strategy to this
target_statusSlot. We want to power this Slot with a **Static Resolver**(aka a resolver which is backed by static multiple choice options).-
Scroll to the very bottom of this Slot creation popup and click “Add Inline Resolver Strategy”.
-
Click ”+ Add Method”.
-
Fill out the following initial details for your Method.
-
Add the following Static Options for your Static Resolver Method. (Note: the “Raw Value” column contains the actual values that your “update feature request” HTTP Action expects in order to successfully update the status on the feature request).
Refer to marketplace.moveworks.com/purple-suite/community#PATCH/feature_requests/{id} for documentation on the status enums. (marketplace.moveworks.com/purple-suite -> Purple Community -> “API Docs” in top right (requires active instance) -> “Update feature request”)
-
Click the “X” in the top right corner of the “Strategy Definition” pop up.
-
-
Hit “Save” (scroll to the bottom of the popup) and hit the “X” icon to close this “Slots” pop up.
Build an Action Activity
Build an Action Activity that will post the status update to the feature request. 📖 Learn more about Activities.
-
Click on the ”+ Add a block to your process” button in the main section of the editor.
-
Click on “Action Activity”.
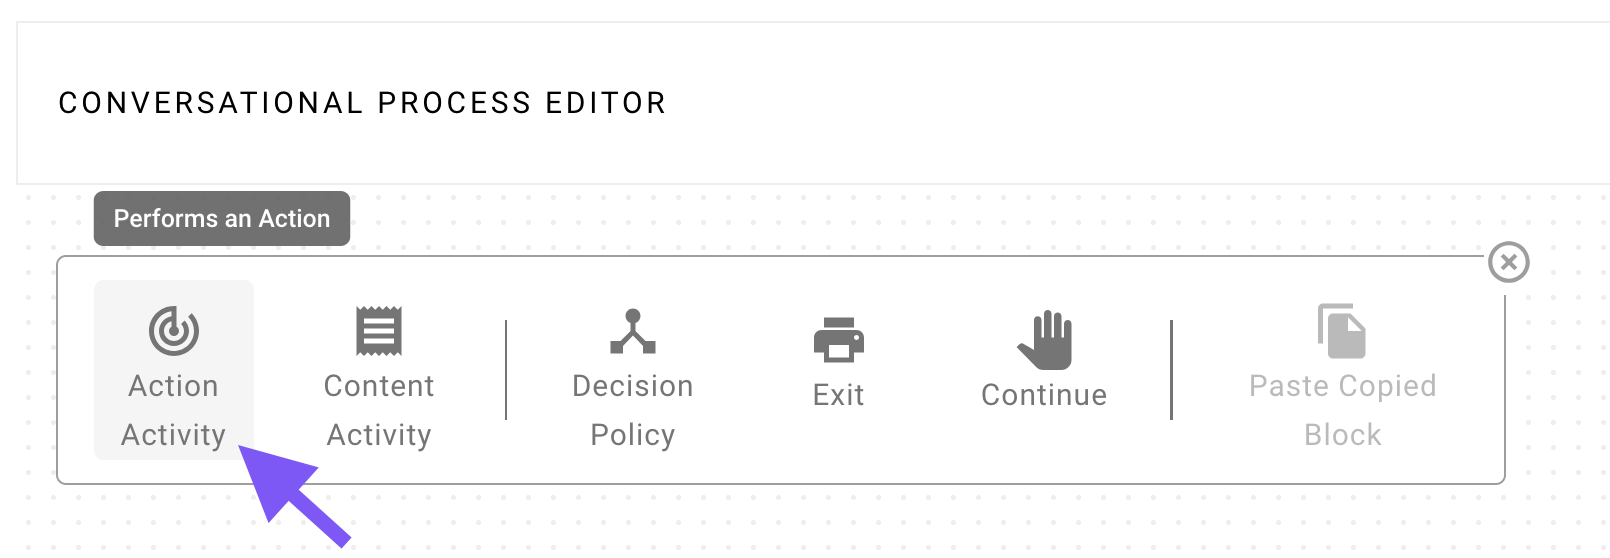
-
Fill out the following details for your Action Activity, which mostly involves connecting your Slot to the input(s) of the HTTP Action (and mapping the result of the Action back to the Conversational Process):
Validate
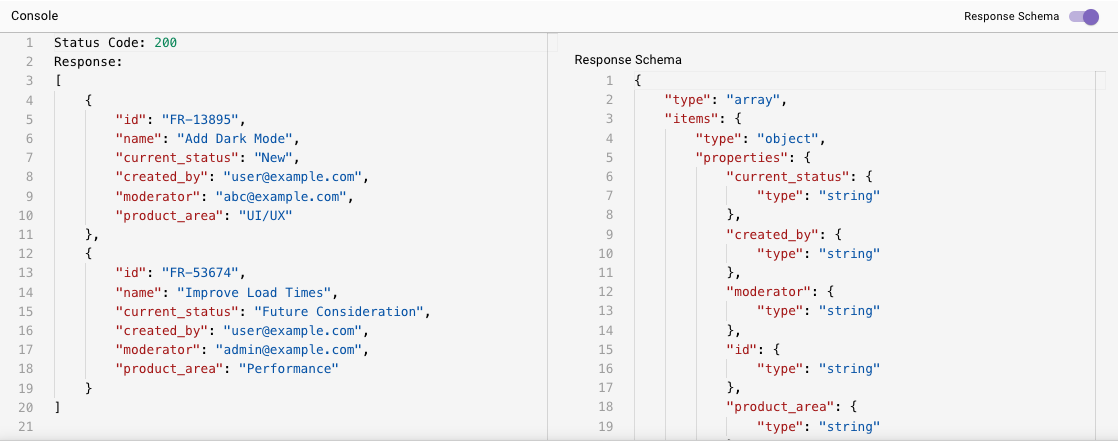
Click “Validate” (Located in the top right corner. Click on the caret icon next to the Publish button). If everything went well so far, the Console (bottom of the editor) will say “Validation successful”.
-
💡Pro-tip: You can also use the following hotkeys to validate without pressing the button:
Awesome! You've just built the main part of this Plugin: the Conversational Process.
We’re ready for the last step: now you’ll launch a Plugin — this packages the Conversational Process into a tool that your AI Assistant can use directly.
Phase 4: Launch a Plugin
️ Import building notes if you are using the Moveworks Developer Labs environment
- If you are working in a Moveworks lab environment, name anything you save (Plugin, Action, Data Type, etc.) with
<fullname>_<descriptive_name>- For example:
lucasrollo_Submit_PTO_Action
- For example:
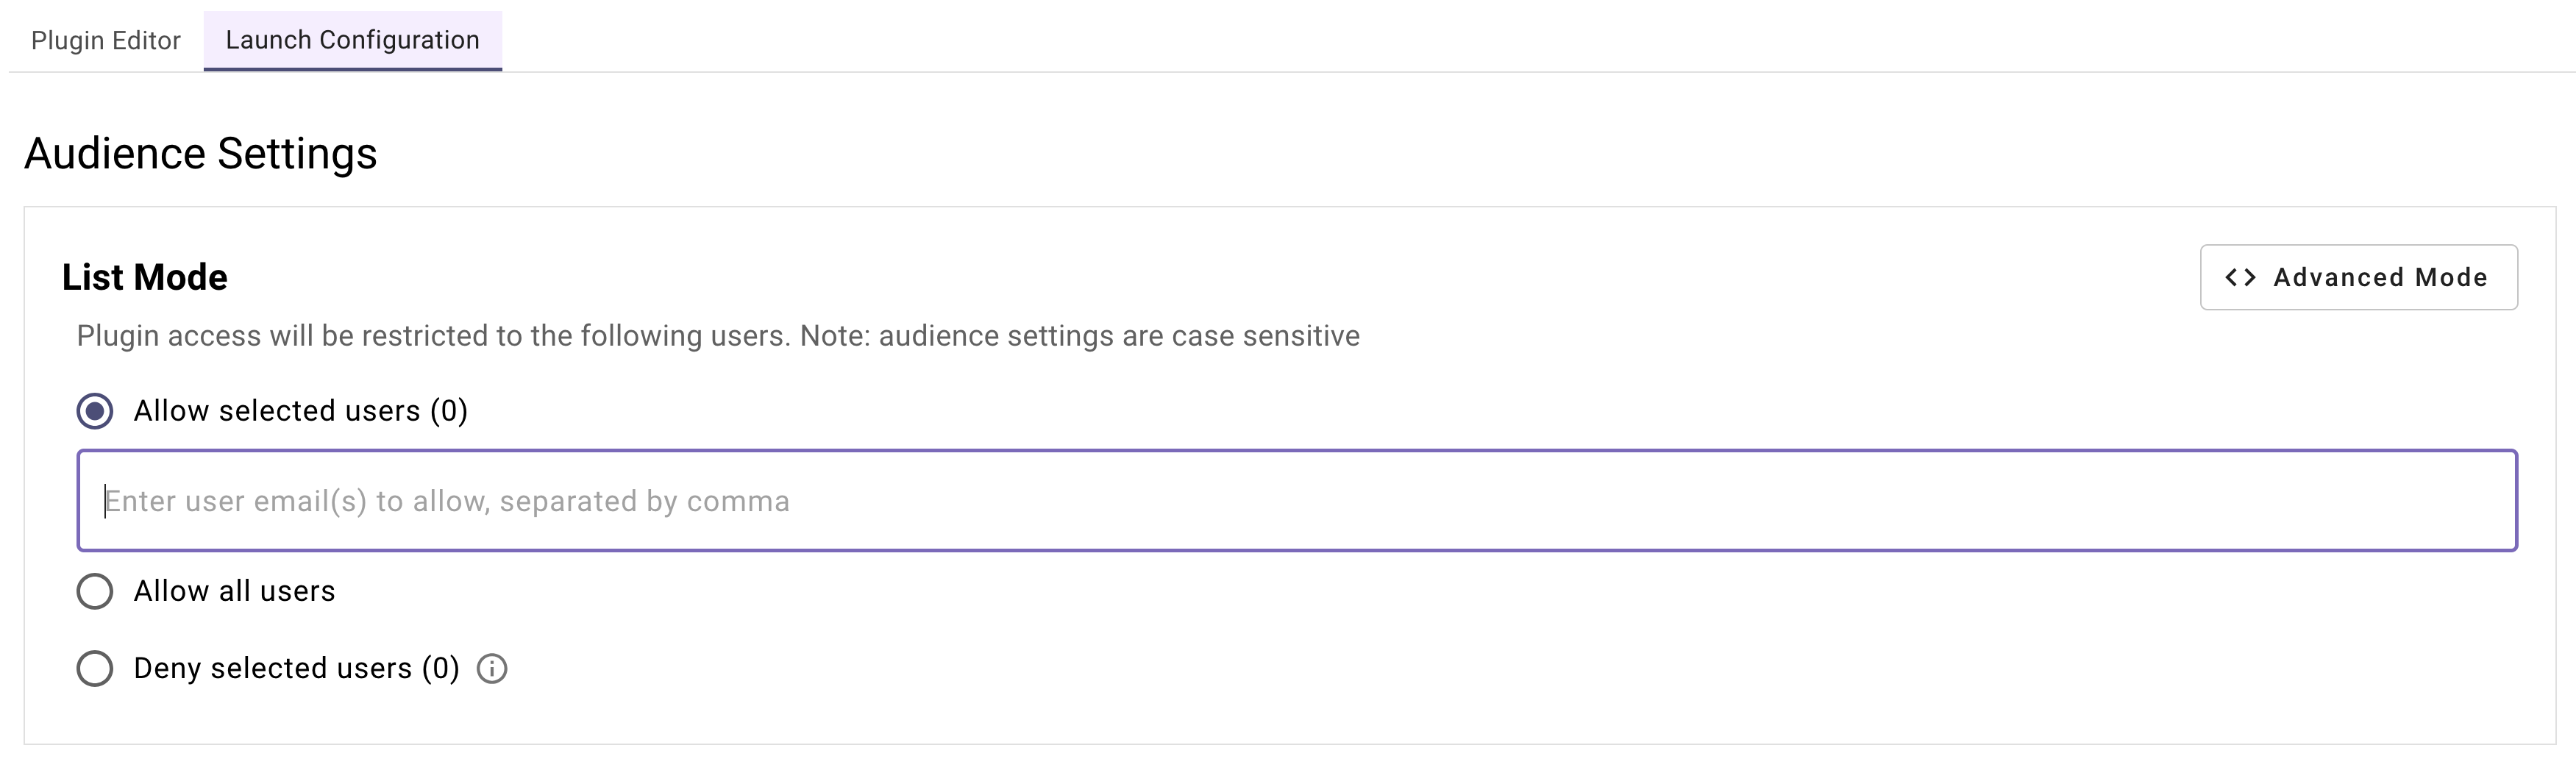
- When launching your Plugin, make sure to only launch to yourself! You can do this by going to Your Plugin > Launch Configuration > Allow Selected Users > the email on your credential card
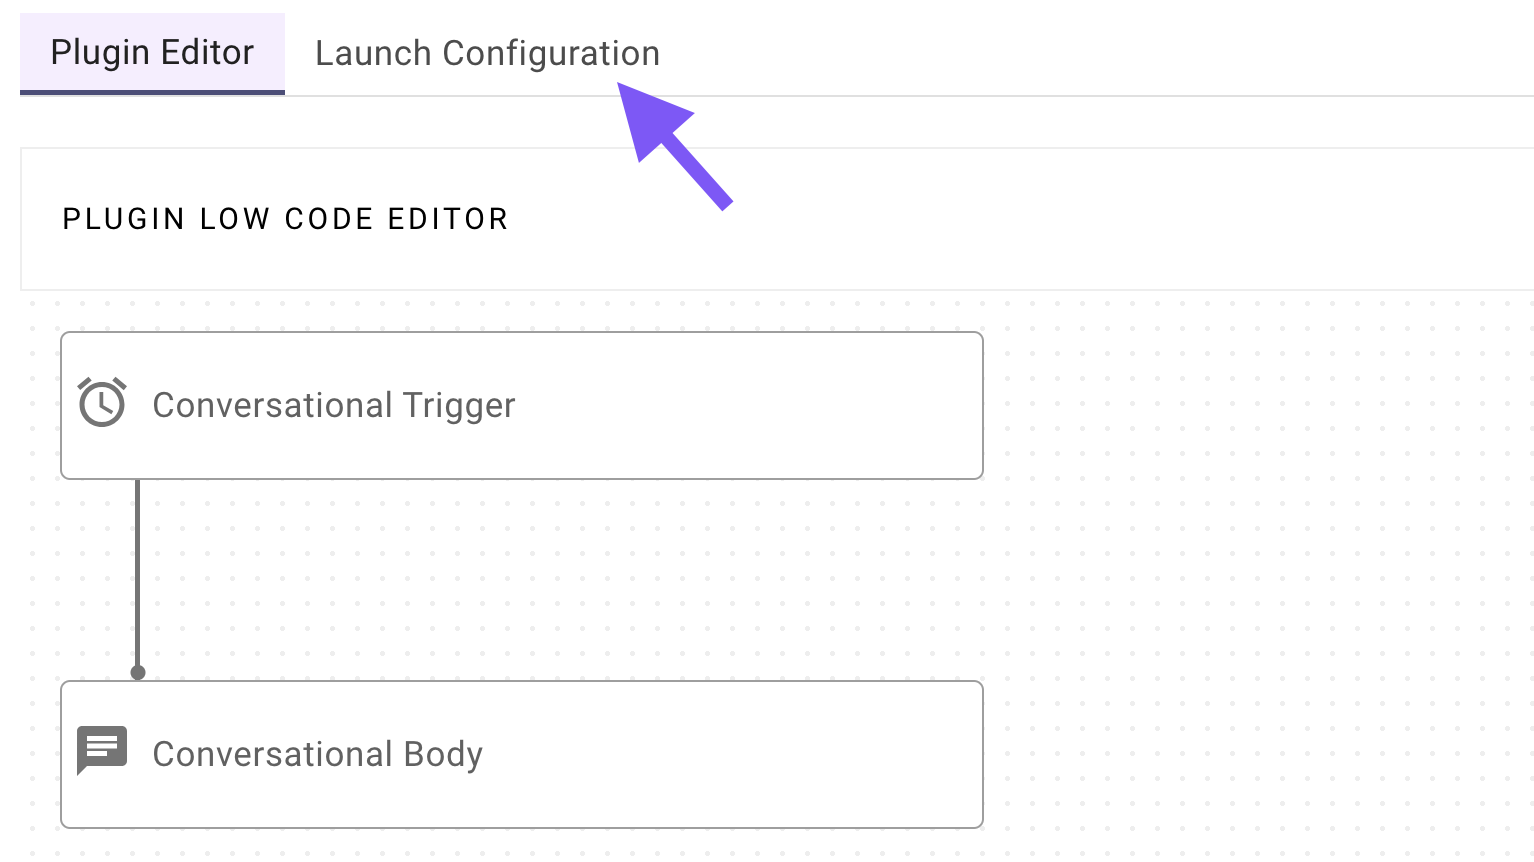
In our final section, you’ll learn how to add your Conversational Process to a Plugin, and control the Triggering scenarios of your Plugin, and specify which end users are allowed to use your Plugin.
Set the title and description
Set the following title and description for your Plugin (be sure to replace “firstname” and “lastname” with your corresponding information).
Define a Conversational Trigger
Define a Conversational Trigger. 📖 Learn more about Natural Language Triggers.
-
Click on “No triggers configured”.
-
In the panel that appears on the right, either:
-
Approve (click “Trigger”) 5 of the auto-generated suggested positive examples, or
-
Add the following recommended utterances:
-
Choose your Conversational Process
Choose your Conversational Process (the one you built in Phase 2).
- Click on “No body configured”.
- In the panel that appears on the right, search for and select the Conversational Process that you built in Phase 2 (should be named
firstname_lastname_update_feature_request_process)
And just like that — you've finished building your Plugin, and now it's ready to use!
Use one of your triggering examples (e.g. “update feature request”) to access the Plugin in conversation. If all goes well, you’ll be greeted with a list of feature requests to choose from.
Try refreshing your sample feature requests in your Purple Suite instance to see the updates take effect in real time!
Reflecting On This Plugin
This Plugin involved a good number of core concepts in Agent Studio, with some special focus on the concept of Resolver Strategies. You’ve created a plugin that:
- Fetches available feature requests from a dynamic external source via an HTTP Action.
- Interactively gathers details from users to choose which feature request to update or status to update to.
- Ensures accurate and API-compatible values are passed to your Actions.
- Executes for the right users at the right moments via Triggering and Launch configurations you’ve set up.
Way to stick through it, and now your Plugin is ready to enable users to seamlessly keep their feature requests up to date!
Next step: Test your plugin. See our Testing & Error Handling guide for how to test, debug, and handle errors in production.