***
title: >-
File Search and KB Ingestion Sharepoint Online Configuration using Azure AD
App-Only Authentication (Streamlined for Enterprise Search Limited Preview!)
excerpt: ''
deprecated: false
hidden: true
metadata:
title: ''
description: ''
robots: index
next:
description: ''
---------------
**Note 1**: File Search requires User Ingestion through the MSGraph API to map Sharepoint user profiles to Moveworks user profiles, in order mirroring your Sharepoint Access Controls (ACLs). If User Ingestion has not been set up previously, or if this is your first time integrating Sharepoint for Search, please contact the Customer Success team for assistance with configuration.
**Note 2**: For Sharepoint Access requirements, Steps 1 and 2 describe separate sets of access that you have to provide to BOTH the Sharepoint Online REST API and the MSGraph API, due to the availability of Sharepoint Online Groups only via the Sharepoint Online REST API. This document outlines using a *single* App Registration for all required APIs, but still requires 2 different types of authentication (due to limitations of Sharepoint APIs) and will result in 2 Moveworks connectors.
# 1. Grant Access to Sharepoint REST API via Azure AD App-Only Authentication Method
*In this step, you will grant access for Moveworks to use the Sharepoint REST API to read file and KB permissions (Sharepoint Groups) from your Sharepoint Sites. The Azure AD App-Only authentication method is the Microsoft-recommended method of granting access to the Sharepoint REST API.*
### Follow all instructions per Microsoft’s Azure AD App-Only Access Requirements
1. Follow the access steps from the [Setting Up an Azure AD App for App-Only Access](https://learn.microsoft.com/en-us/sharepoint/dev/solution-guidance/security-apponly-azuread#setting-up-an-azure-ad-app-for-app-only-access) section from the Microsoft Azure AD App-Only Authentication guide. Use the [New-SelfSignedCertificate cmdlet](https://learn.microsoft.com/en-us/powershell/module/pki/new-selfsignedcertificate?view=windowsserver2022-ps) to generate the certificates. In this step, you will:
1. First generate the **.pfx** and **.cer** files using the Powershell script outlined above.
1. Save the **.pfx** and .**cer** files for the following step.
2. Register an Azure Application for Moveworks in your Azure AD App Directory.
3. Connect your certificate (the **.cer** file) to the Application.
4. \[Important] Grant specifically the ***Sites.Read.All*** access, as **Sites.FullControl.All** is not necessary. Note, this must be done for the **Sharepoint API** during this step.

1. Alternate Option: ***Sites.Selected*** (more information [here](https://learn.microsoft.com/en-us/sharepoint/dev/sp-add-ins-modernize/understanding-rsc-for-msgraph-and-sharepoint-online))
This permission allow you to narrow down Moveworks search to content from only SPECIFIC sub sites in the tenant. This requires additional setup, where instructions can be found [here](https://learn.microsoft.com/en-us/sharepoint/dev/sp-add-ins-modernize/understanding-rsc-for-msgraph-and-sharepoint-online).
2. **Disclaimer:** If using a GCCH Microsoft tenant, the *Sharepoint* permission is not available. You will want to use the **Office 365 Sharepoint Online** permission instead.
2. Note: For each Sharepoint Group, it must have the following setting in order for members of those Sharepoint groups to access the files (unless they have access via another Sharepoint Group, or Azure AD Group):
1. Within "Group Settings", the settle "who can view the membership of this group" must be set to "Everyone", in order for Moveworks to read the group members
2. If it's not set, please change the setting, or rely on Azure AD Groups or other Sharepoint Groups to manage permissions for those files
### Run Powershell Commands to Generate X5t and Private Key values
1. There are two options for generating an X5t value. Either using SHA256 (modern, more secure) or SHA1. Either option below is sufficient.
1. For SHA256, run the following Powershell command to generate the **X5t value** using SHA256 needed for Moveworks’ Sharepoint Connector.
```
$certPath = "path\to\your\certificate.cer"
$cert = New-Object System.Security.Cryptography.X509Certificates.X509Certificate2($certPath)
$sha256 = [System.Security.Cryptography.HashAlgorithm]::Create("SHA256")
$hash = $sha256.ComputeHash($cert.RawData)
$x5t = [Convert]::ToBase64String($hash) -replace '\+','-' -replace '/','_' -replace '='
Write-Output $x5t
```
2. For SHA1, run the following Powershell command, to generate the **X5t value** using SHA1 needed for Moveworks’ Sharepoint Connector.
```
$certPath = "path\to\your\certificate.cer"
$cert = New-Object System.Security.Cryptography.X509Certificates.X509Certificate2($certPath)
$sha1 = [System.Security.Cryptography.HashAlgorithm]::Create("SHA1")
$hash = $sha1.ComputeHash($cert.RawData)
$x5t = [Convert]::ToBase64String($hash) -replace '\+','-' -replace '/','_' -replace '='
Write-Output $x5t
```
2. Save the **X5t value** generated for later Step 3 ([Create Connectors in Moveworks Setup](/ai-assistant/moveworks-classic/classic-search/file-search/self-serve-config-guides/sharepoint-online-azure-ad-auth-new#3-create-connectors-in-moveworks-setup)).
3. Run the following Powershell command, to generate the Private Key needed for the Moveworks’ Sharepoint Connector.
```
openssl pkcs12 -in "C:\path\to\your\file.pfx" -nocerts -nodes -out "C:\path\to\output\privateKey.pem"
```
4. Save the Private Key (the **privateKey.pem** file) value generated for Step 3 ([Create Connectors in Moveworks Setup](/ai-assistant/moveworks-classic/classic-search/file-search/self-serve-config-guides/sharepoint-online-azure-ad-auth-new#3-create-connectors-in-moveworks-setup)).
# 2) Grant Moveworks Access to MSGraph API
In this step, you will grant scopes for Moveworks to execute your file-level ACL permissions by ingesting your Sites, Files, Users, and Groups via the MSGraph API. This is used to enforce that users are only able to search for information from files that they already have access to. For more on the reasons for the scopes, see [File Search - Respecting File Permissions](/ai-assistant/moveworks-classic/classic-search/file-search/file-permissions).
You must grant your Moveworks bot Azure application the following scopes for it over the MSGraph API to support this:
* [https://graph.microsoft.com/Files.Read.All](https://graph.microsoft.com/Files.Read.All)
* [https://graph.microsoft.com/Sites.Read.All](https://graph.microsoft.com/Sites.Read.All)
* \_Alternate Option:[https://graph.microsoft.com/Sites.Selected](https://graph.microsoft.com/Sites.Selected)
This permission Allows Moveworks to read content from SPECIFIC sub sites in the tenant. This requires additional setup, instructions can be found [here](https://learn.microsoft.com/en-us/sharepoint/dev/sp-add-ins-modernize/understanding-rsc-for-msgraph-and-sharepoint-online).
* [https://graph.microsoft.com/Group.Read.All](https://graph.microsoft.com/Group.Read.All)
* [https://graph.microsoft.com/User.Read.All](https://graph.microsoft.com/User.Read.All)
* [https://graph.microsoft.com/Reports.Read.All](https://graph.microsoft.com/Reports.Read.All) -- Enables us to access SharePoint & OneDrive usage data for sites, pages, users, and files within a specified time period. This will be useful for
1. Setup and ingestion monitoring and reporting (estimated time, time remaining, etc).
2. Determining the scale needs to support larger volumes of content as we expand beyond 1M to 10M and beyond
### Add MSGraph Permissions
You can either use the existing App Registration in Azure that you made in Step 1, or make a separate App Registration.
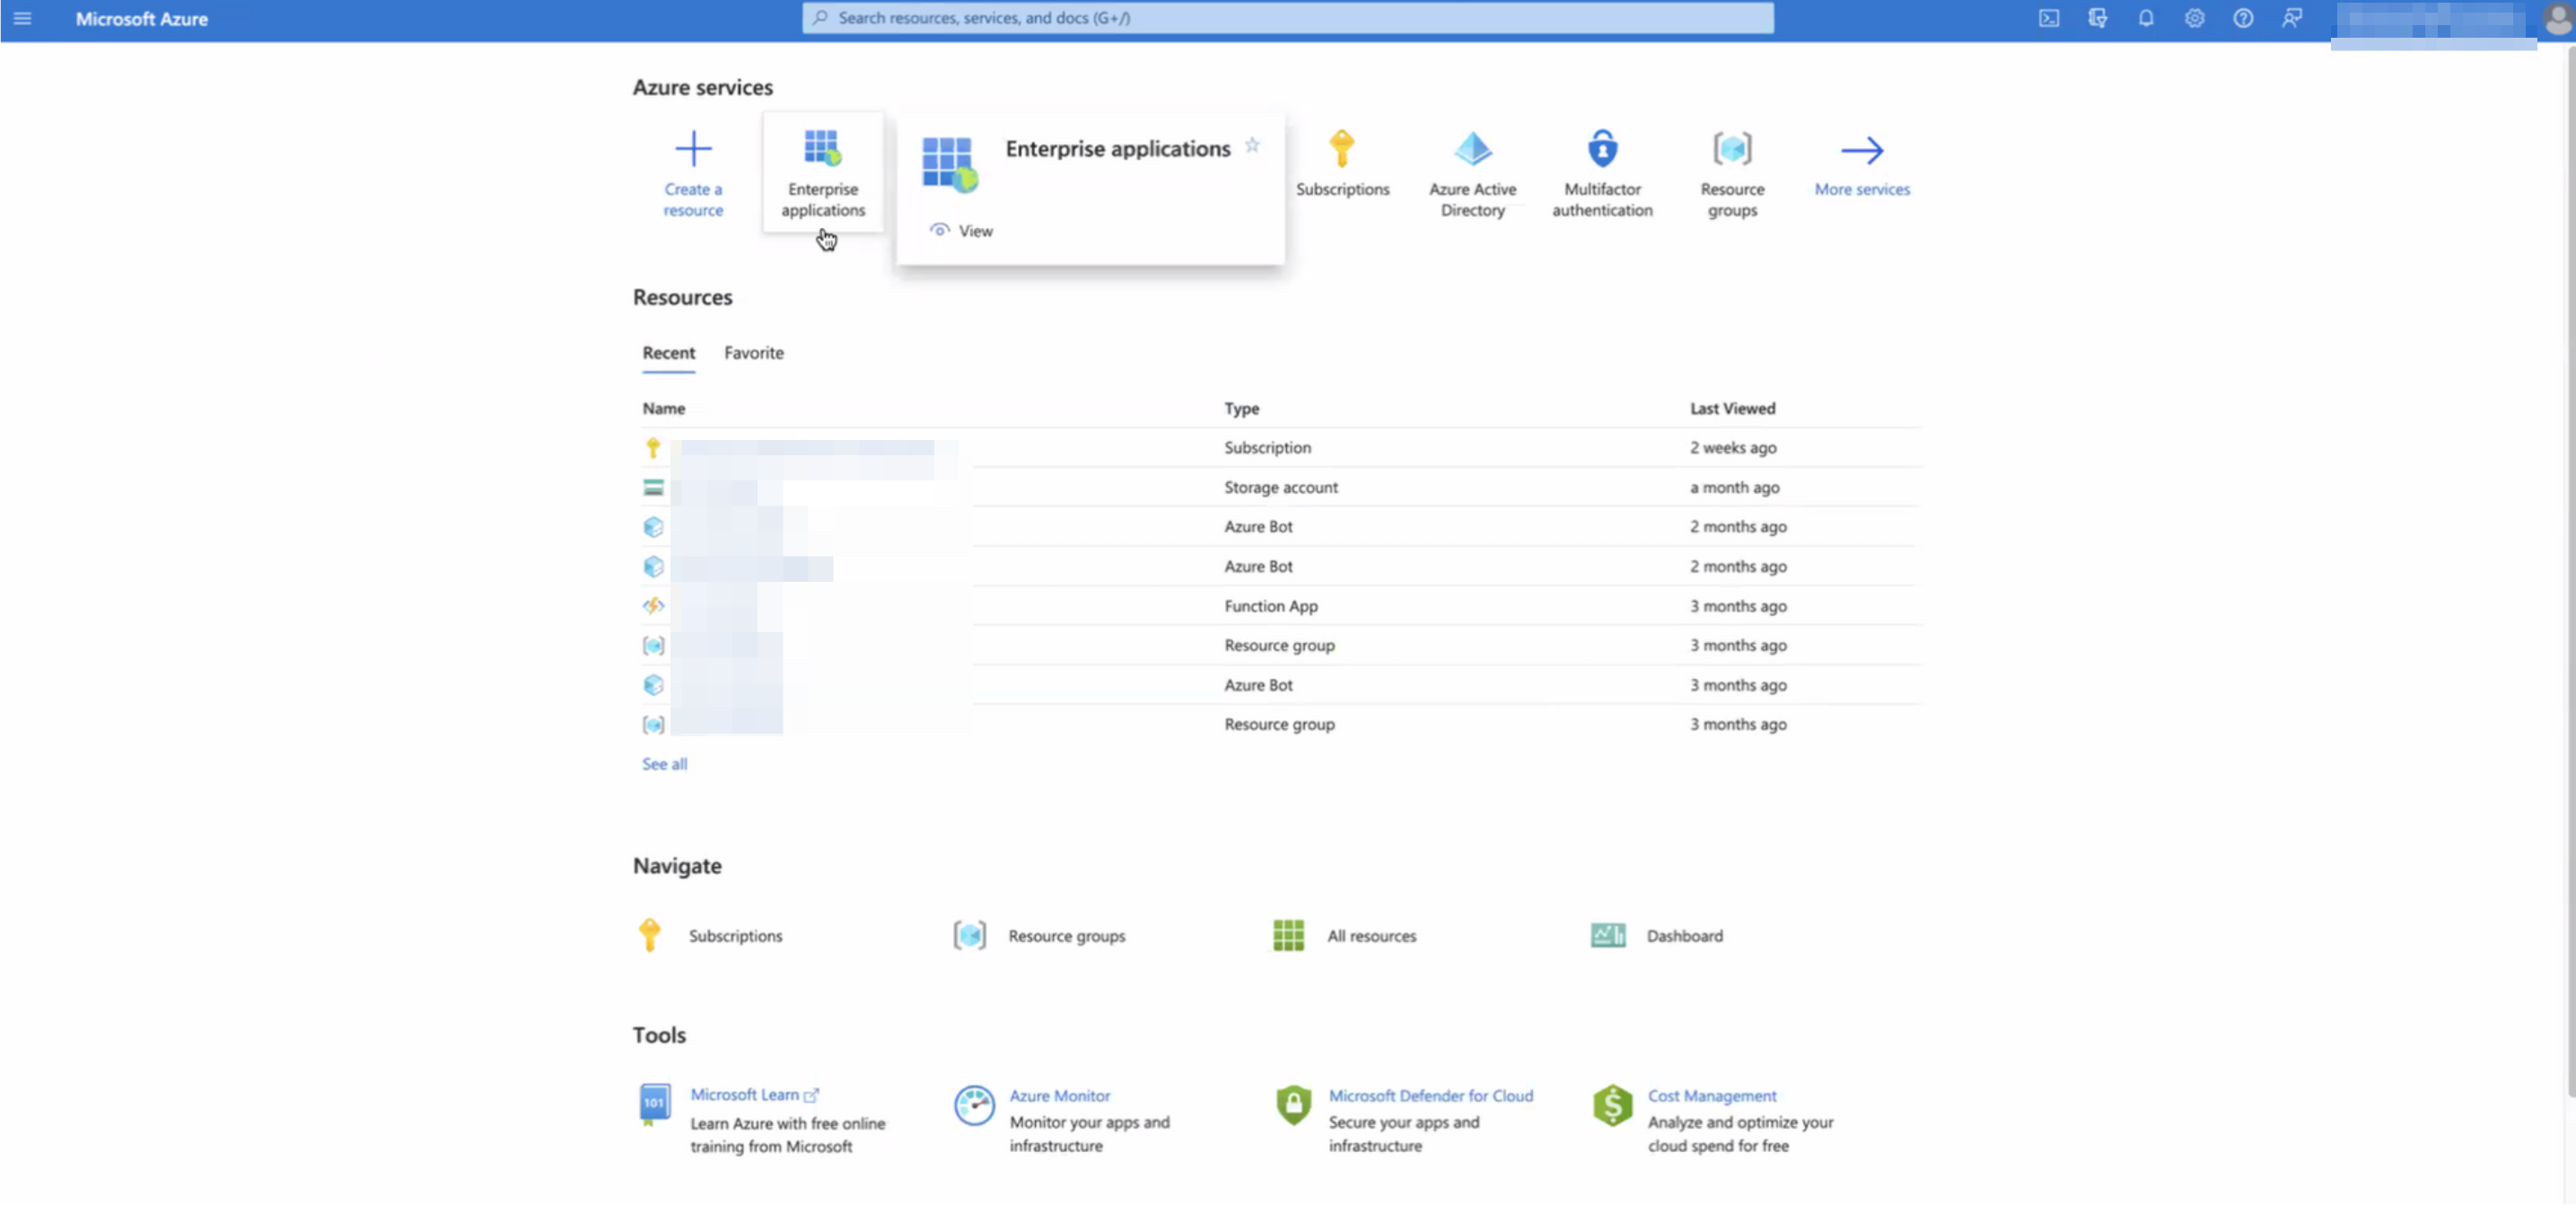
1. Go to your Microsoft Azure portal, and select Enterprise applications.
2. Search for the application to which you’ll be granting the new permissions (or create a new App similar to Step 1). Note down its Application ID (aka App Id).

3. Go to the API Permissions for the Application. If you have trouble finding it, you can navigate to this URL, replacing the end of the URL with your App Id: `https://portal.azure.com/#view/Microsoft_AAD_RegisteredApps/ApplicationMenuBlade/~/CallAnAPI/appId/{Application ID}`
4. This will bring you to the *API Permissions* page for that application. You may already see some permissions configured for this application, some of which may already be ones we need. In the image below, however, you’ll see this app only has User.Read, and that is not one of the four permissions we need, so we need to add all four.

5. Click **Add Permission**.

6. This will open a panel on the right side:
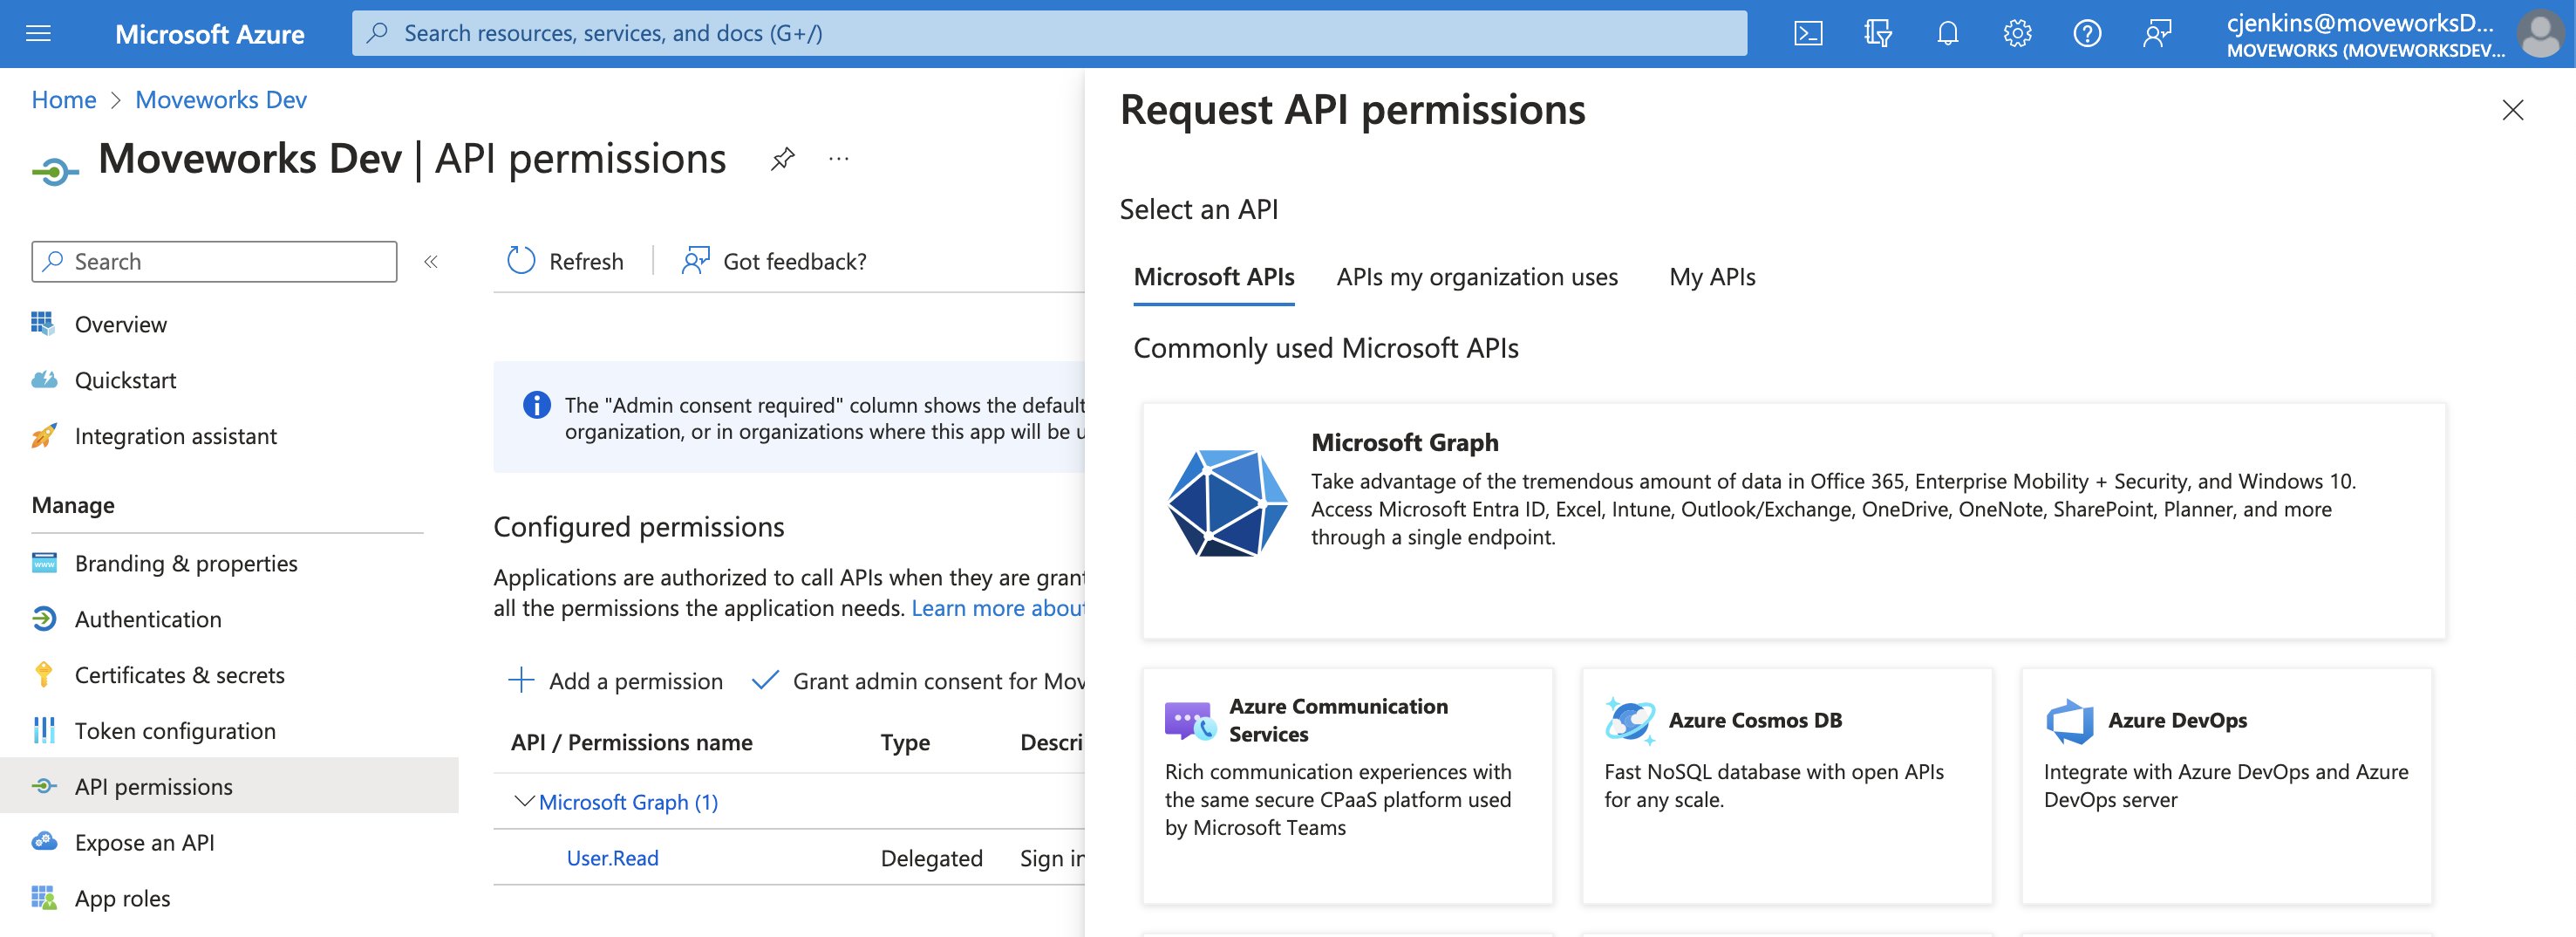
7. Click on **Microsoft Graph**.

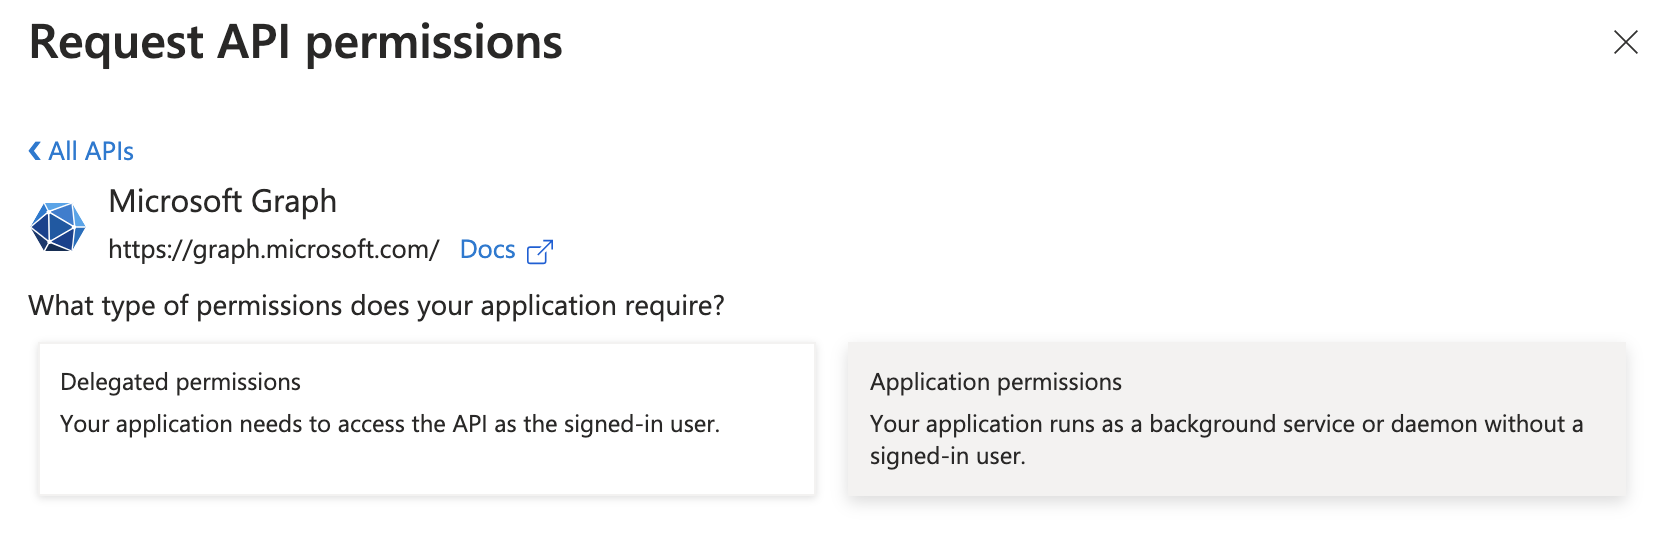
8. Click on **Application permissions**.
9. A search bar will appear.
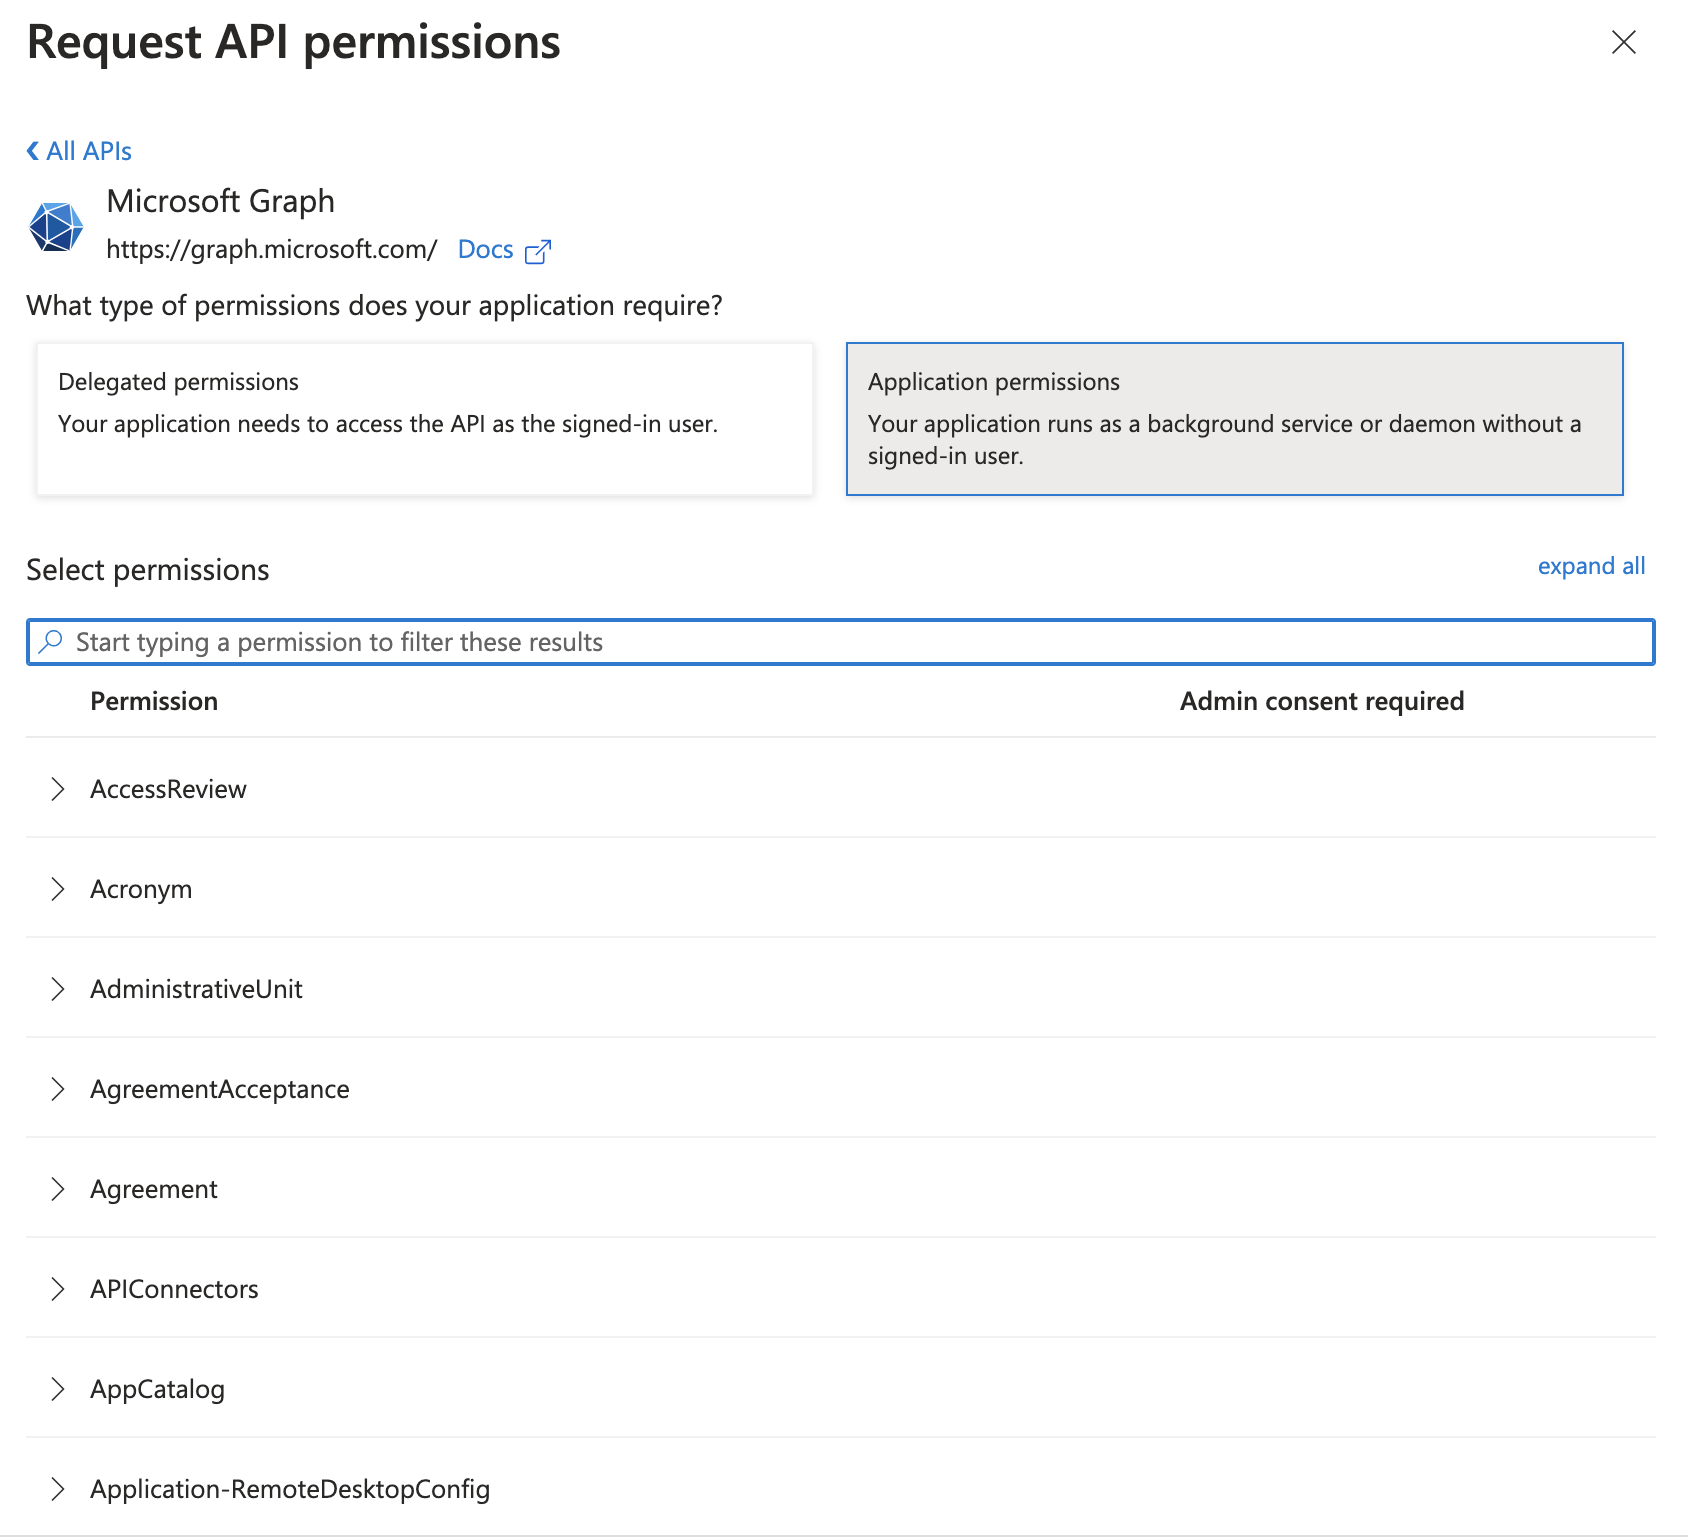
10. Search for the permissions you need to grant (noted above) and check the box for each.
11. Once they’ve all been checked, click **Add permissions**.

12. You’ll now see all the newly added permissions alongside any you previously had granted the app, however, the new ones will have a status of “Not granted for” your organization.
13. To complete the process, click **Grant admin consent for** your organization.

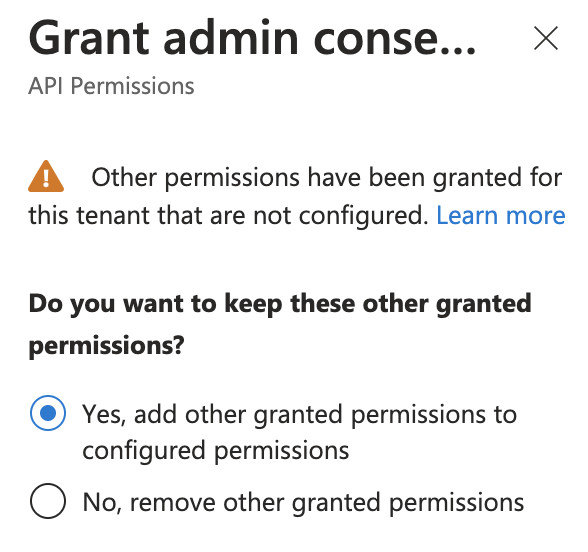
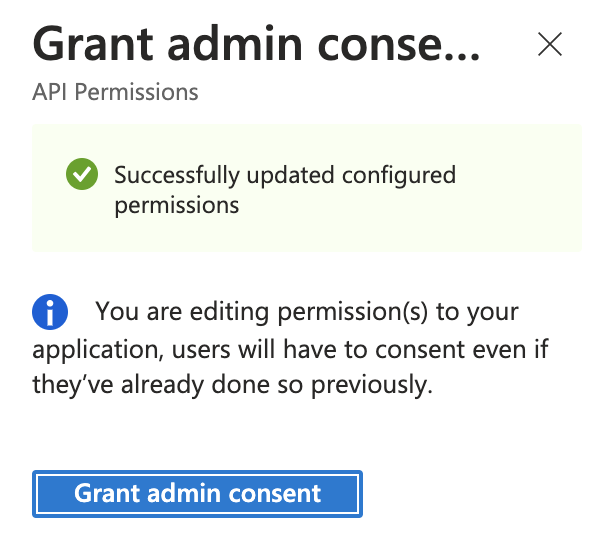
14. If this panel appears, click **Yes, add other granted permissions to configured permissions** then **Save and continue**, then **Grant admin consent,** and then **Yes**.
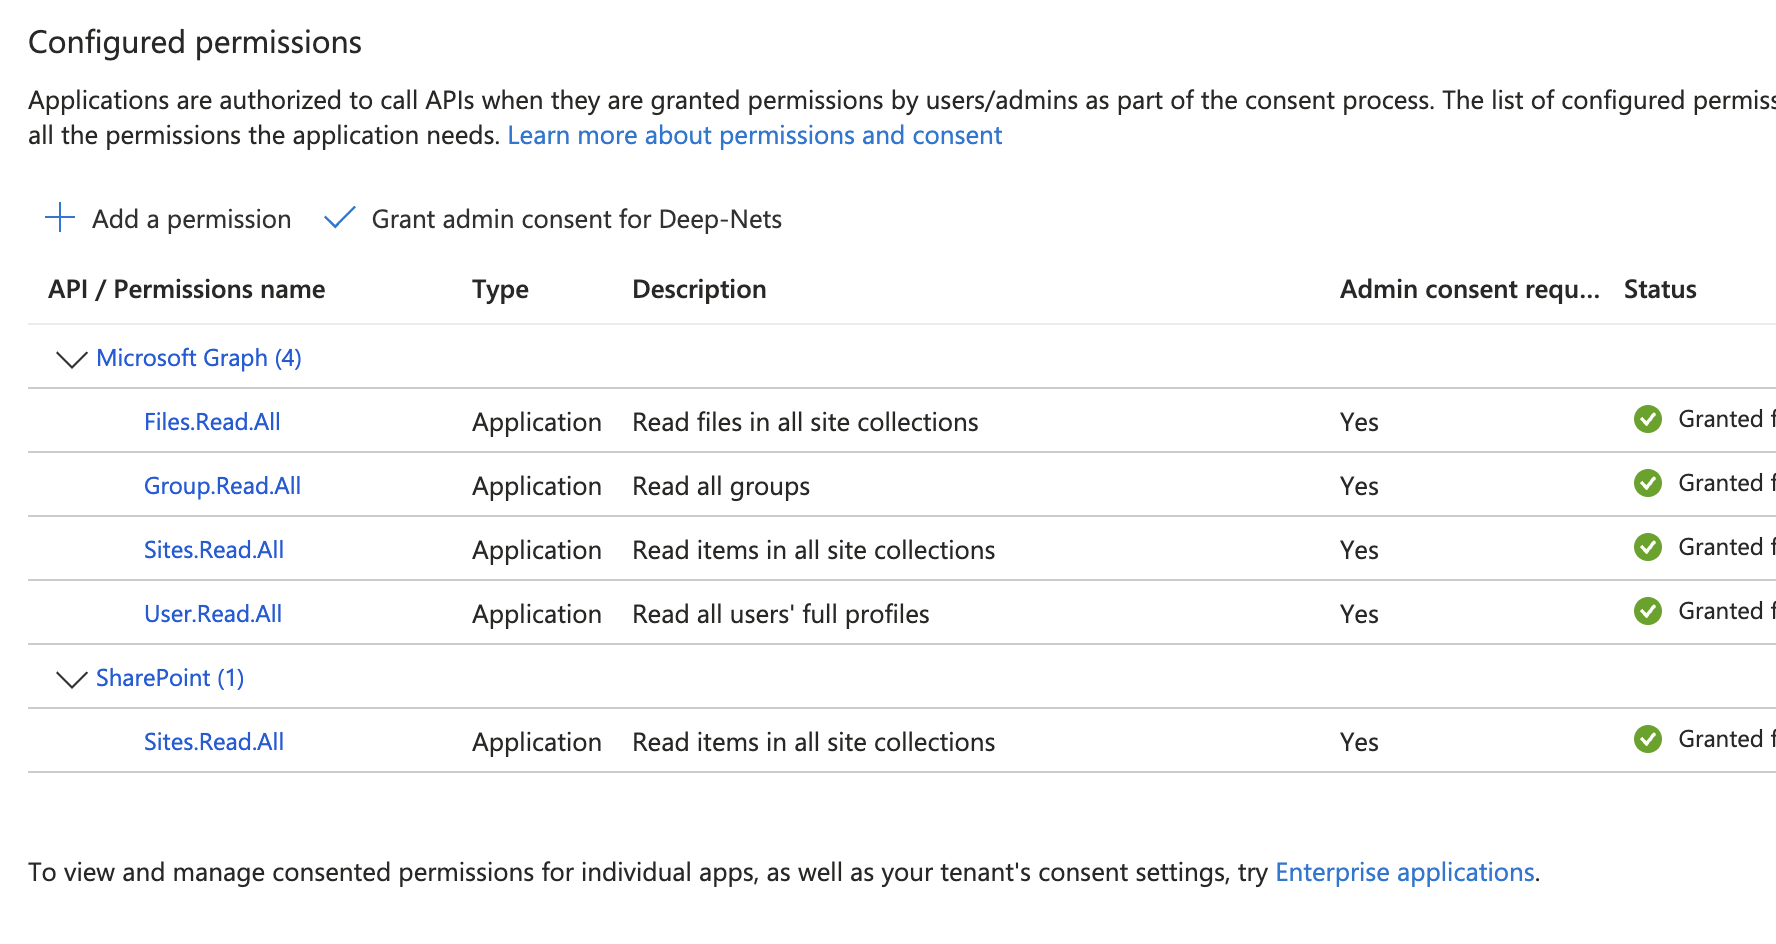
15. You will see green checkmarks on the newly added permissions if this was successful. With Step 1 and Step 2 complete, this is the full list of permissions, between MS Graph and Sharepoint, that you should see:
# 3) Create Connectors in Moveworks Setup
*In this step, you will create a Connector in your Moveworks Setup portal, using the credentials that you have configured above.*
### Get App ID
For the registration that you created in Step 1 and updated in Step 2, navigate to the **Overview** page to retrieve the *Application (client) ID*.
### Create Two Connectors in Moveworks Setup: One MSGraph Connector and One Sharepoint Online Connector
1. Configure one of each of the following connectors, as both will be required for File Search.
2. Start by navigating to the **Connector** module in your Self Serve portal.
3. If you have not already, create the **Microsoft Graph** connector.
1. > 📘Set up the **Microsoft Graph** connector, DO NOT use the "Sharepoint Online (via Microsoft Graph")
>
> DO NOT use the **Sharepoint Online (via Microsoft Graph)**
2. Use OAuth2, select **Client Credentials,** and enter your **Client ID, Client Secret, and Tenant ID**
1. You must create a new **Client Secret** under **Certificates & secrets** for your Application.
4. If you have not already, find the **Sharepoint Online Connector (Classic method)**
When setting up the Sharepoint Online Connector for File Search, select the **Sharepoint Online (Classic method)**.
DO NOT use the **Sharepoint Online (via Microsoft Graph)**
1. If self-serving configurations via Moveworks Setup, create a **Sharepoint Online (Classic Method)** connector
1. Select the following authentication method **Oauth2 Jwt Grant**
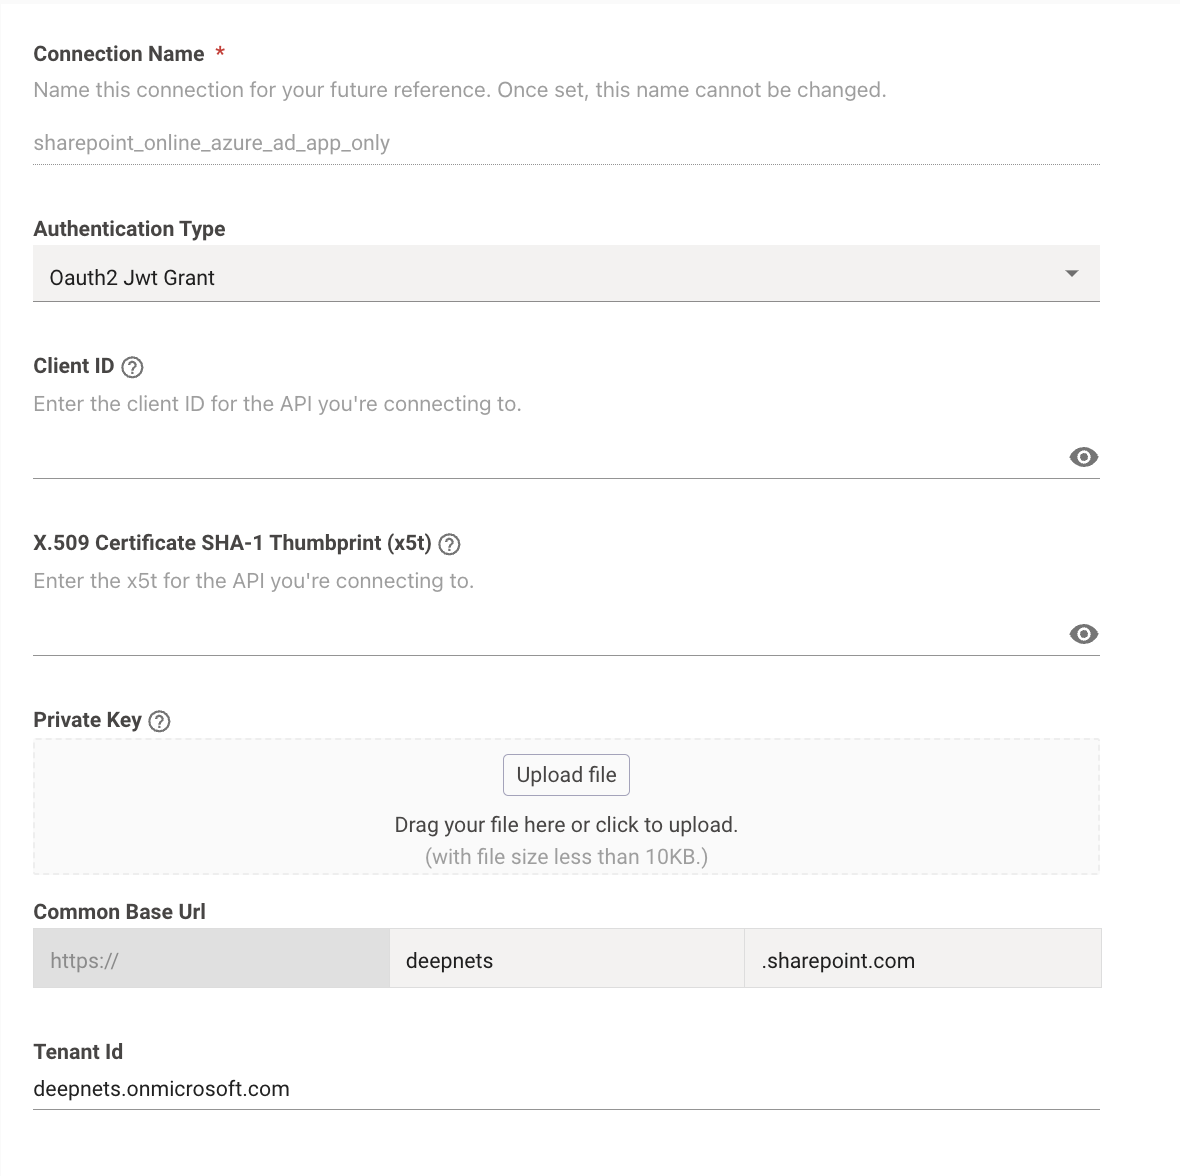
2. Input the following credentials
1. Base URL -- your Sharepoint root URL
2. Client ID -- `Application (client) ID` from the **Overview** page.
3. Tenant ID -- `Directory (tenant) ID` from the **Overview** page.
4. X5t value from **Step 1**
1. To use X5t with SHA256, check the **Use SHA-256 Algorithm** first, and then upload your X5t value from **Step 1**.
2. To use X5t with SHA1, directly input the X5t value from **Step 1**.
5. Private Key from **Step 1**
# 4) Configure File Ingestions in Moveworks Setup
For the Enterprise Search Limited Preview, Moveworks will configure Ingestion on your behalf, once the Connectors have been configured!