***
title: Okta Access Requirements
excerpt: ''
deprecated: false
hidden: false
metadata:
title: ''
description: ''
robots: index
next:
description: ''
---------------
# **Why do we need access to your Okta instance?**
The Moveworks service interacts with your Okta instance to carry out one or more of the following depending on the level of access provided:
* Identify employees (read-only)
* Notify employees of account lockout events (read-only)
* Notify employees of upcoming password expirations (read-only)
* Fulfil employees' software provisioning requests
* Help employees reset passwords
* Unlock locked accounts
* Help employees reset their multi-factor authentication
- In a read only environment, Moveworks will not attempt to take an action directly for the user. In that case, the bot will provide instructions to the user, or direct the user to a preferred portal to execute the action of resetting a password or unlocking an account.
- Not all Moveworks+Okta deployments handle all of the tasks mentioned above. In some deployments, password and account issues are handled through Moveworks' direct interaction with Active Directory.
# General Setup
***
Moveworks supports both Service Account based API Token Authentication and JWT based OAuth Authentication to interact with your Okta instance. Please refer to
### Required Permissions
Depending on the capabilities that you want to enable for your employees using Moveworks, you can provide fine-grained permissions to the Service Account or the App Integration based on your preferred mode of authentication.
**For organizations where Moveworks integrates with Okta for read-only capabilities, the API token must have the following permissions in Okta:**
* Read-only Admin
**For organizations where Moveworks integrates with Okta to give employees access to software, the API token must have the following permissions in Okta:**
* Group Admin
* App Admin
Within Okta, optionally, you can chose to constrain the Group Admin Role to only allow it to operate on a specific subset of groups. This way, the Moveworks token can ONLY access the required groups you would like it to operate on.
**For organizations where Moveworks integrates with Okta to help employees with passwords, account unlock, and multi-factor reset, the API token must have the following permissions in Okta:**
* Help Desk Admin
* Report Admin
For more information on what permissions are entailed in each role, please refer to [Okta's documentation](https://help.okta.com/oie/en-us/content/topics/security/administrators-admin-comparison.htm).
## Service Account Authentication
The **service account** in Okta allows the Moveworks service to read user profile information, account lockout events, and password expiration information, fulfil provisioning requests by adding users to groups in Okta.
### Set up the Service Account
* Create a bot service account dedicated to Moveworks and assign the [roles/permissions to it based on your requirement](/service-management/access-requirements/identity-access-management-systems/okta-full-access#required-permissions).
* Use this service account to create an API Token by following the instructions present in [Okta's documentation](https://help.okta.com/en-us/content/topics/security/api.htm#create-okta-api-token).
### Configure in Moveworks Setup
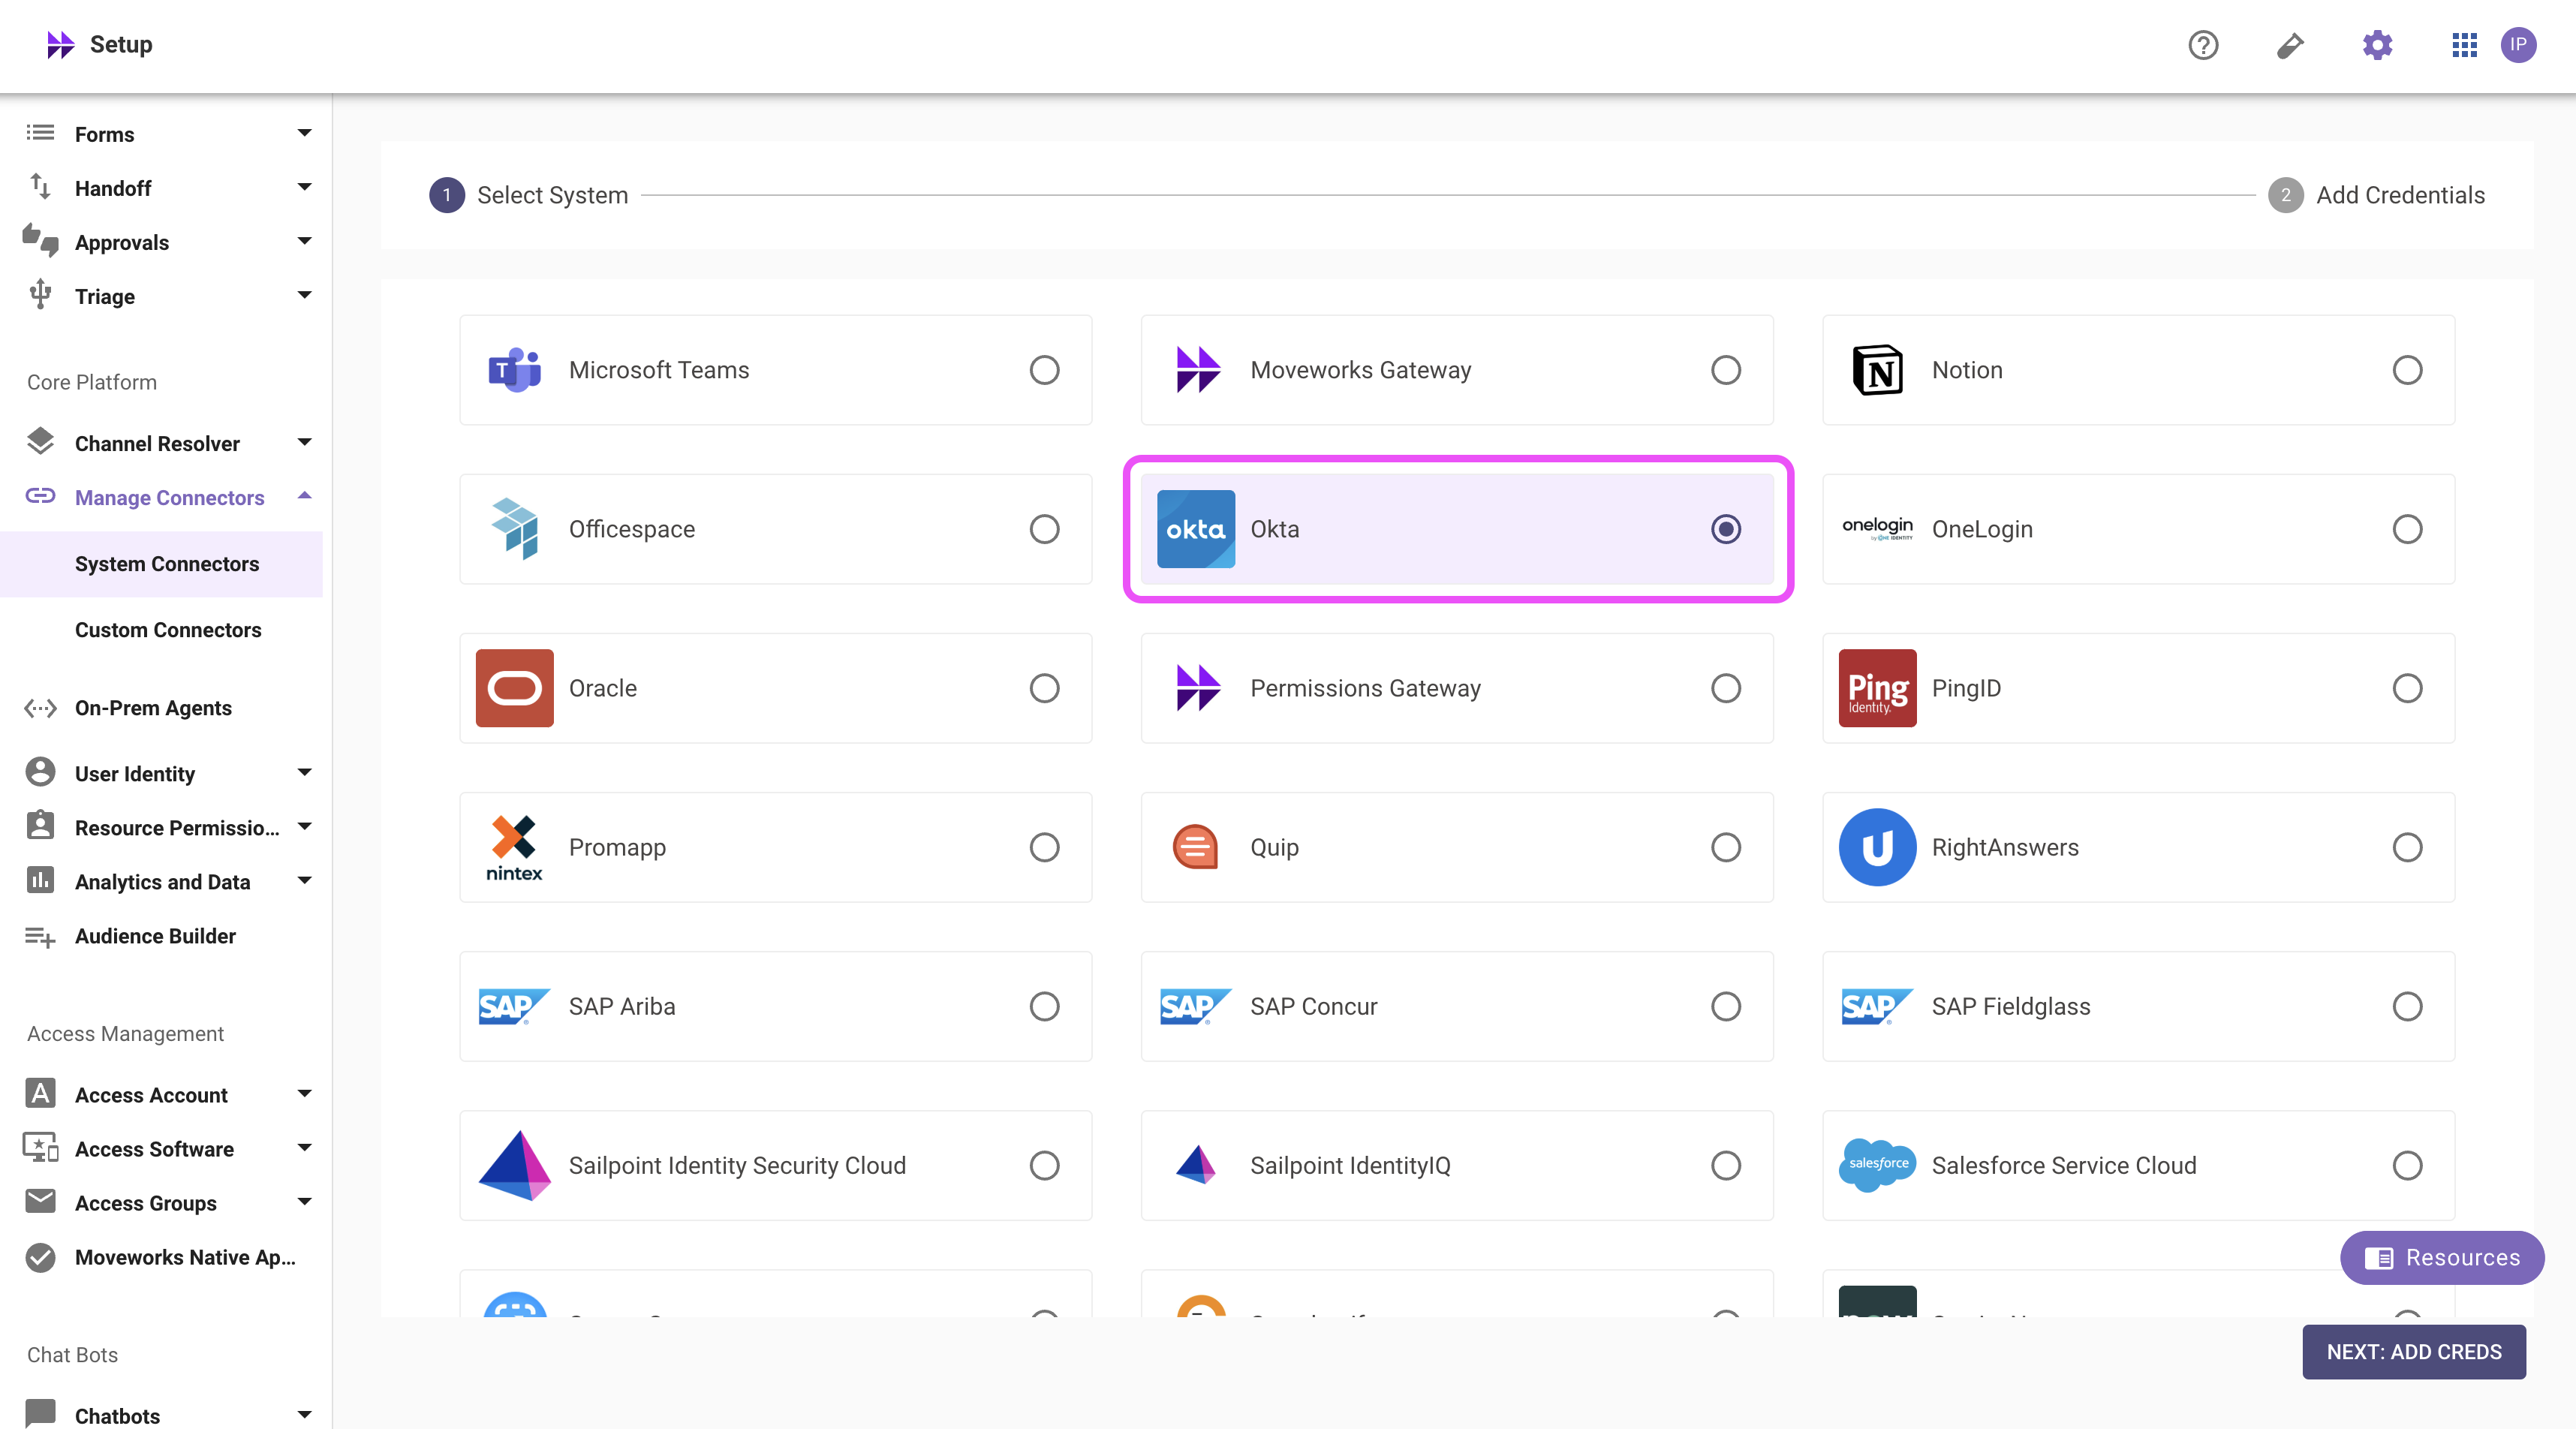
1. Within Moveworks Setup, go to **Manage Connectors** > **System Connectors**, then click on **‘CREATE NEW’**

2. Click on the **‘Okta’** Connector, then click on **‘NEXT: ADD CREDS’**
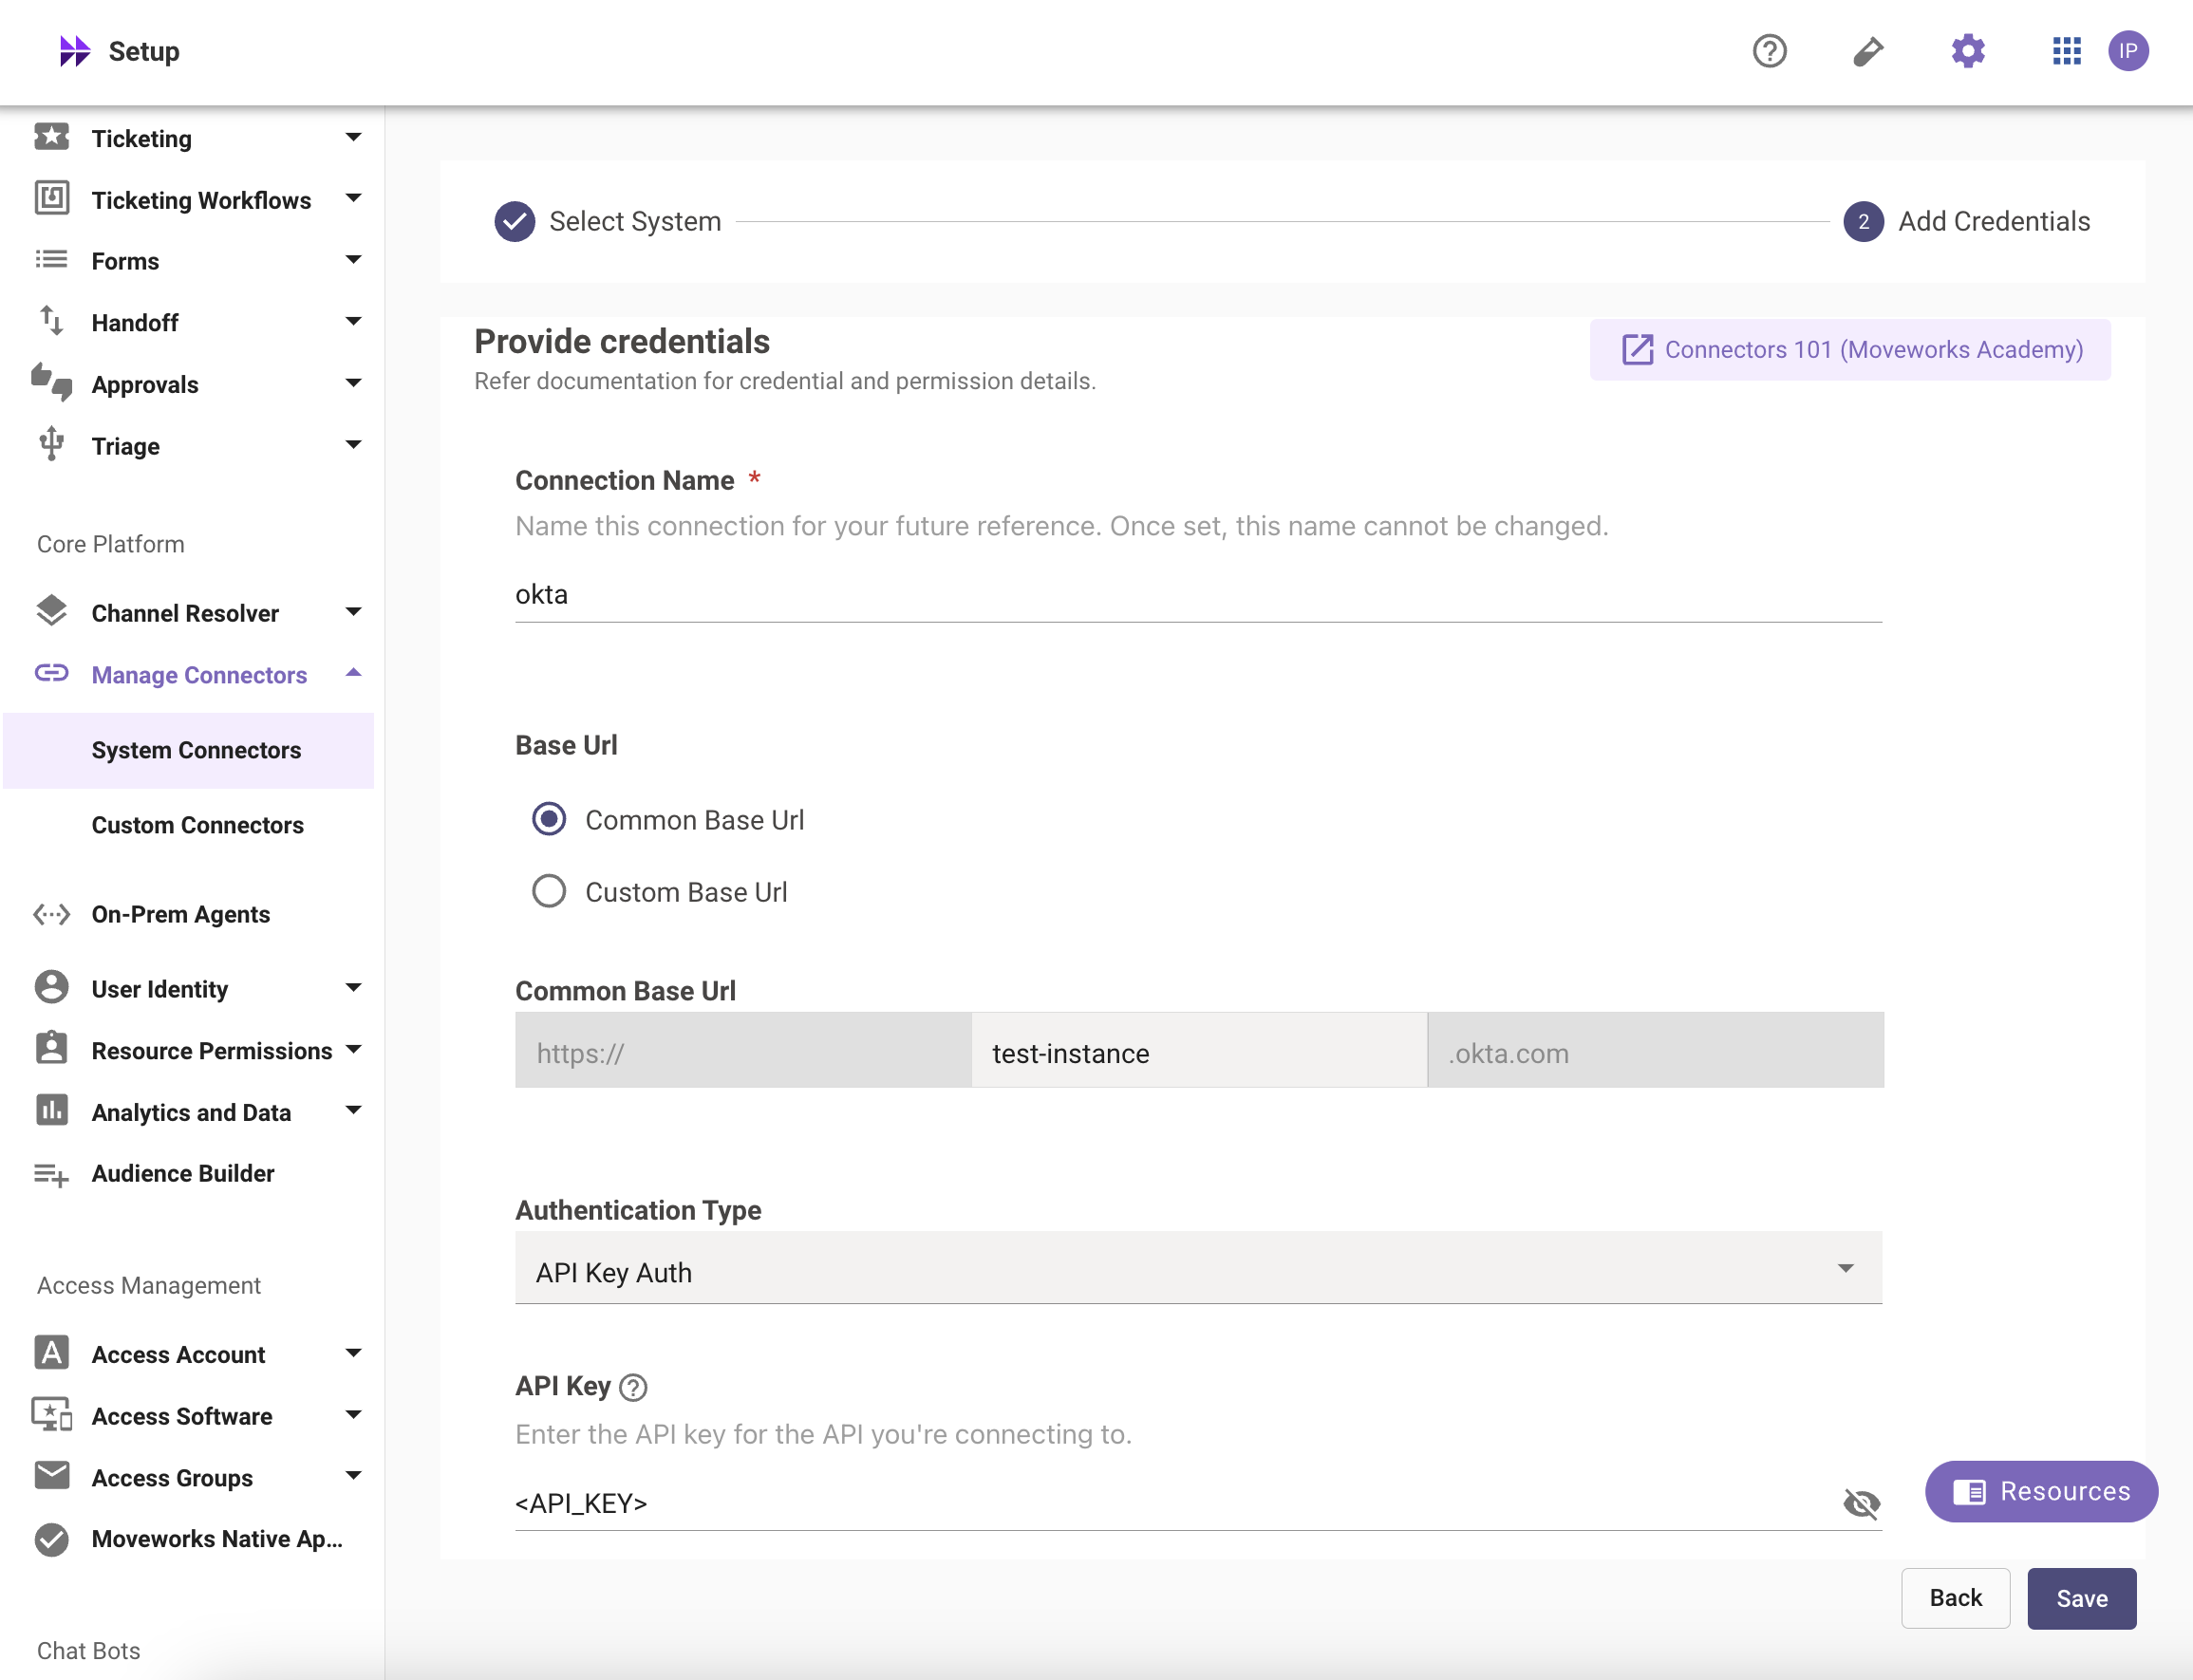
3. Type out the name of the connection, select Common Base URL and enter the name of your instance.
4\. Select the Authentication Type as **API Key Auth**
5\. Enter the API Token you generated previously in the **API Key** field and save the Connector.
Your Okta Connector is now ready to be configured for the relevant skills using Moveworks Setup.
## OAuth 2.0 with JWT-based Authentication
In order to utilize OAuth 2.0, please follow the below steps:
### Create a Service App Integration in Okta
Create an OAuth 2.0 service app integration using the Okta Admin Console.
1. Sign in to your Okta organization as a user with administrative privileges.
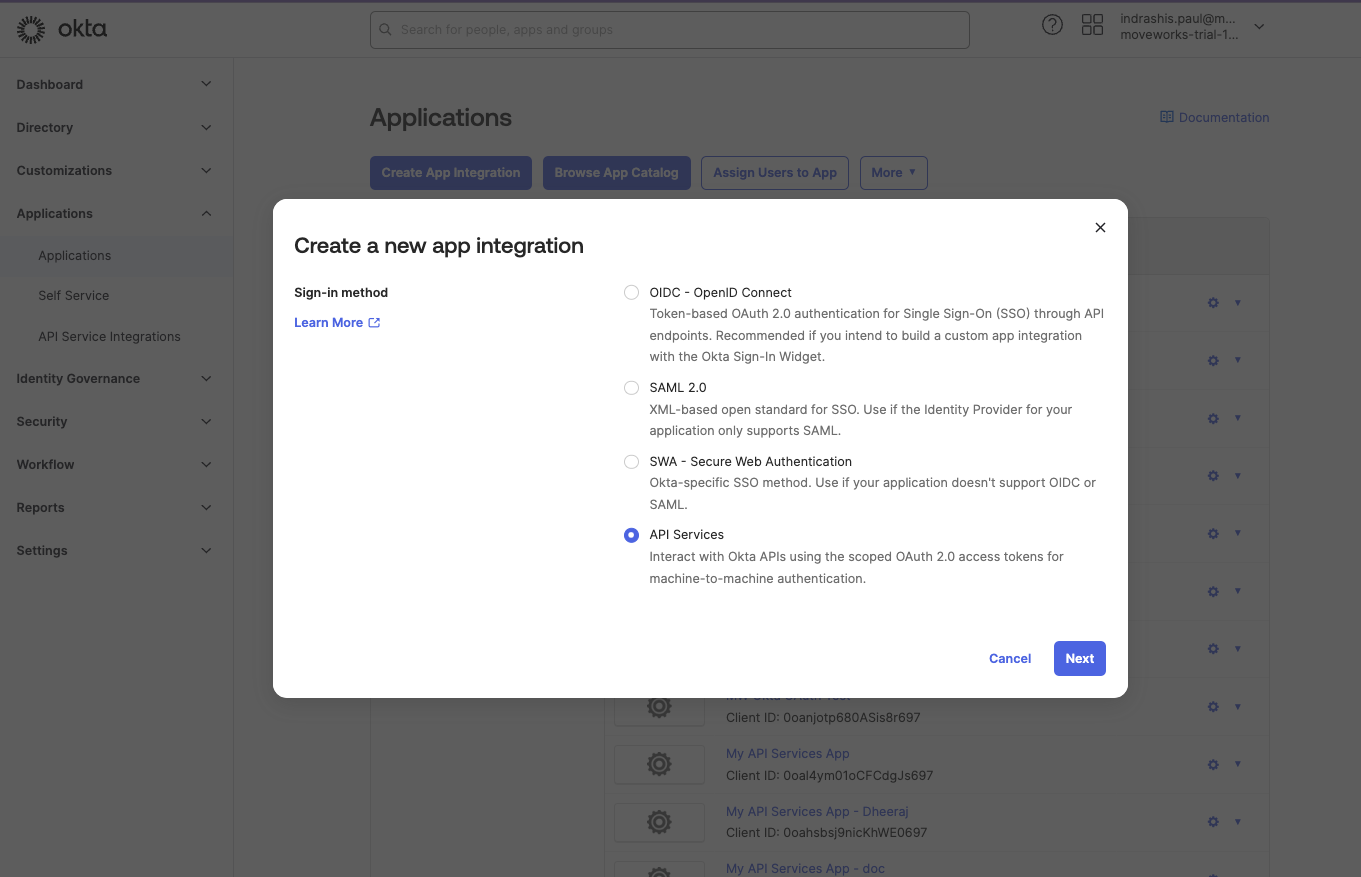
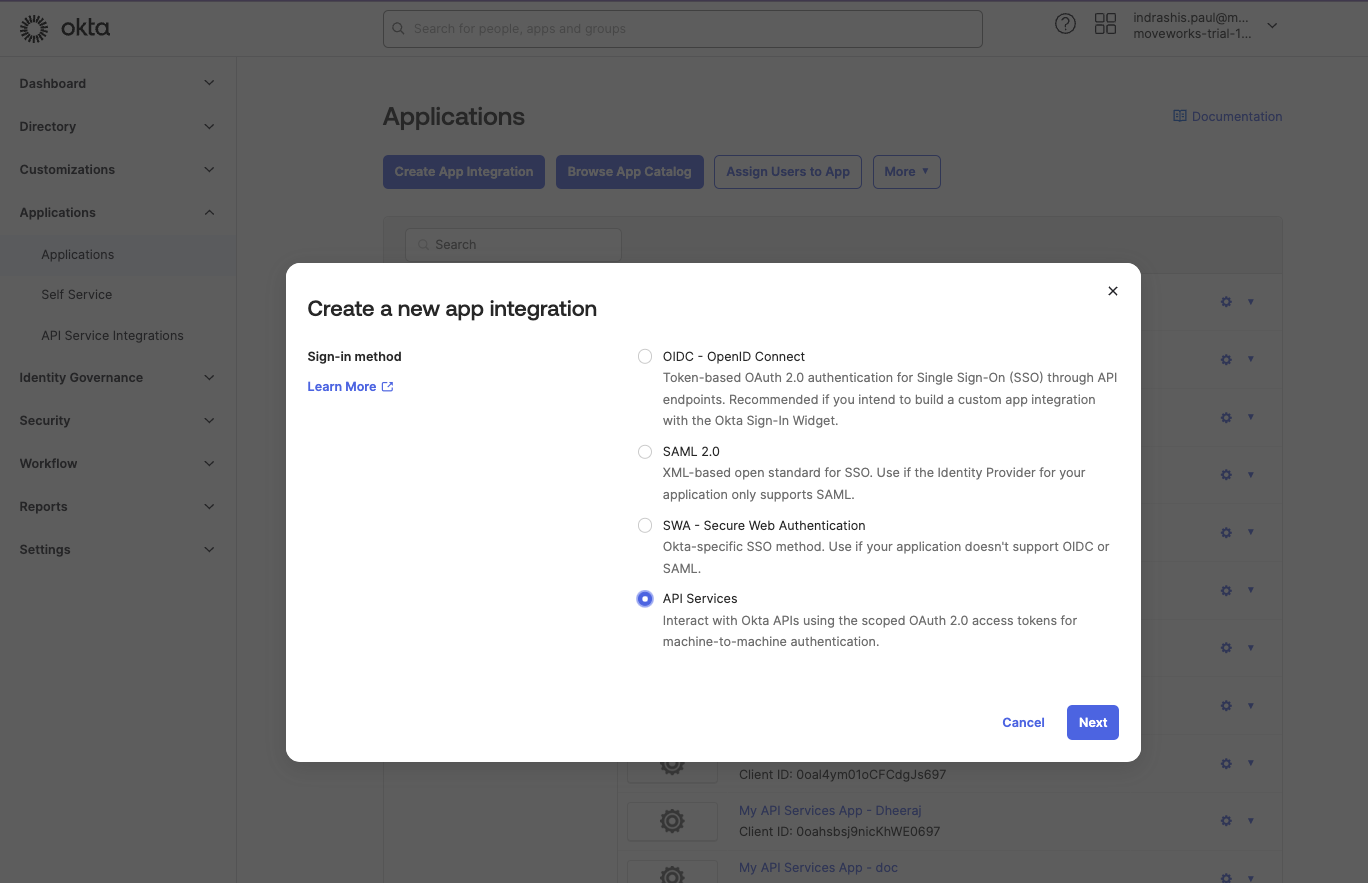
2. In the Admin Console, go to **Applications** > **Applications**, and then click **Create App Integration**. The **Create a new app integration** page appears.
3. Select **API Services** as the **Sign-in method**, and then click **Next**.
4. Enter a name for your app integration and click **Save**.
### Configure the Authentication for your App
1. Once the App is created, it will open the Application page.
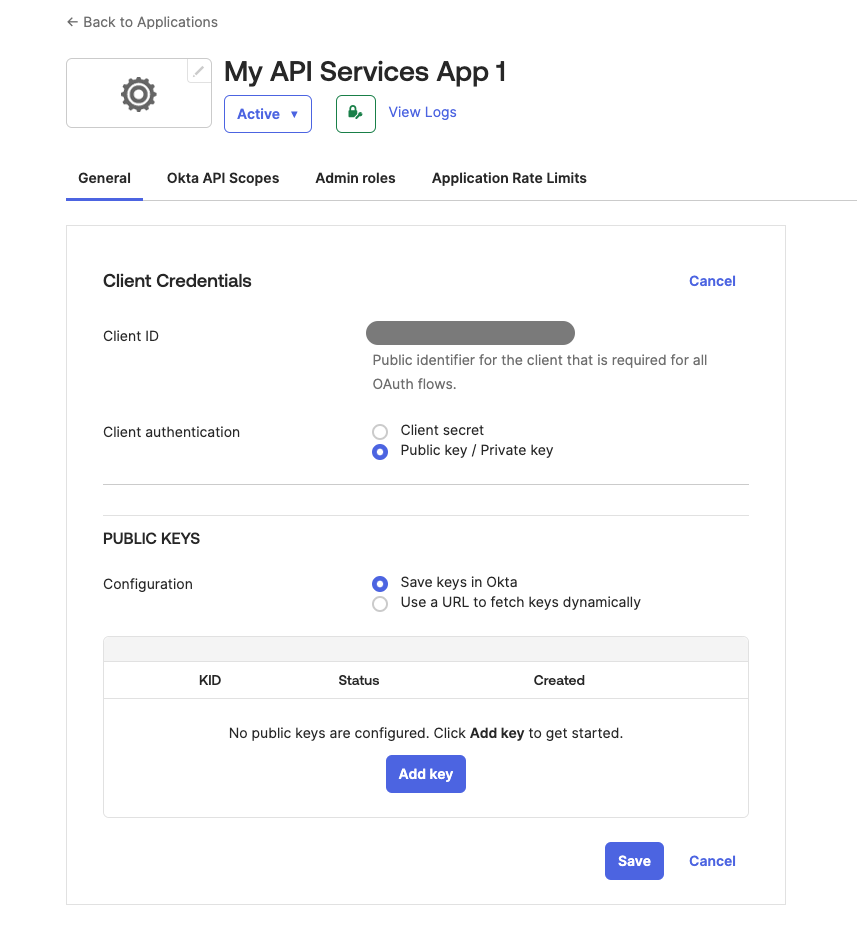
2. Within the **Client Credentials** section, click on the **Edit** button.
3. In the **Client authentication** section, select **Public key / Private key** as our preferred method of authentication.
4. Once selected, the PUBLIC KEYS section would appear. Here, make sure that the **Save keys** in Okta is selected for **Configuration**.
5. Click on **Add key** to add a new public key for your application.
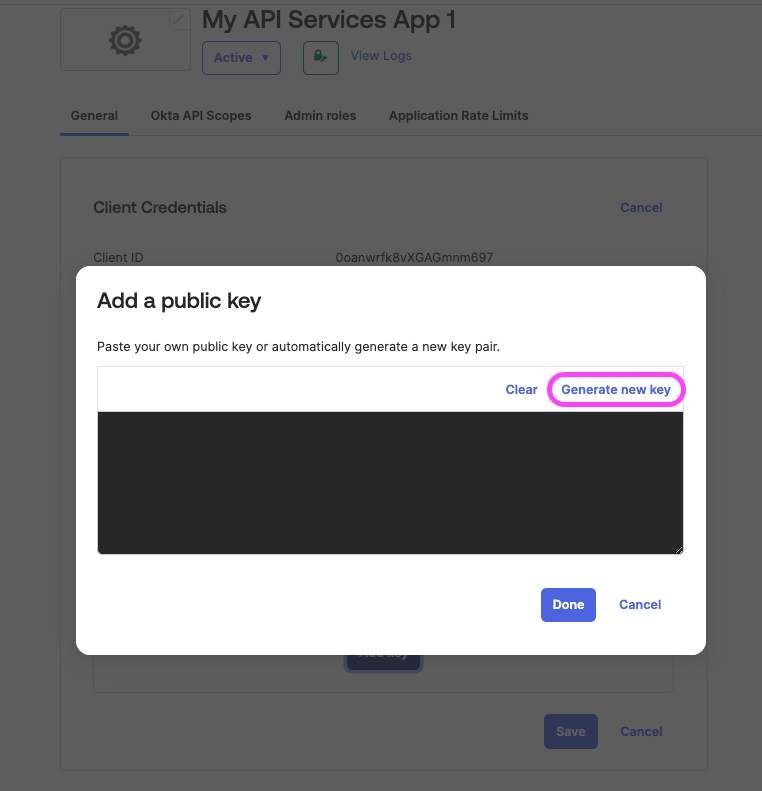
6. In the **Add a public key** page that opens up, click on **Generate new key**.
7. Once your public-private key pair is generated, click on the PEM button to view the certificate and then copy and **save it in a safe storage as a .PEM file extension**. This will be required later on to create the Connector in Moveworks Setup.
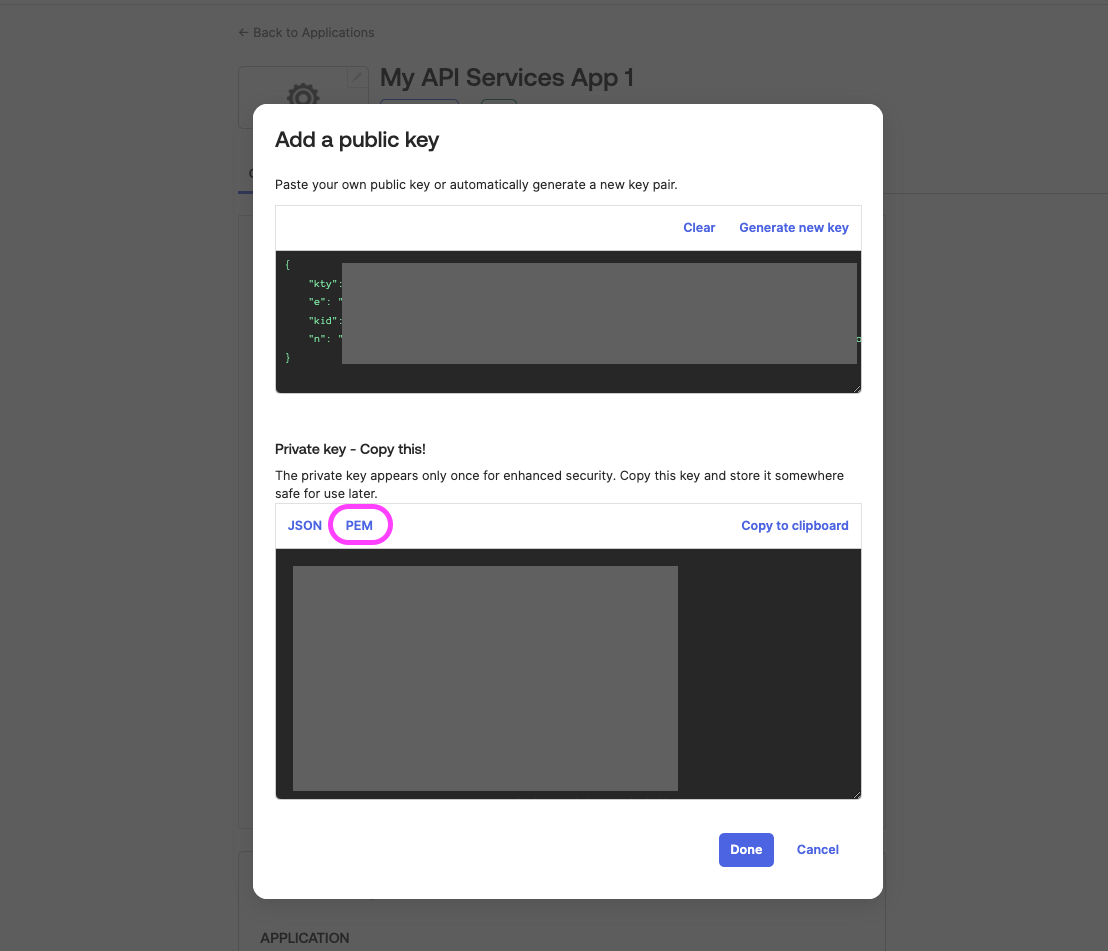
8. Click on **Done** once you have saved the Private key and then click on the **Save** button to save all of your configurations.
9\. A pop-up will show which asks for confirmation if you want to change your authentication method. Click on **Save** again here to make all of the changes.
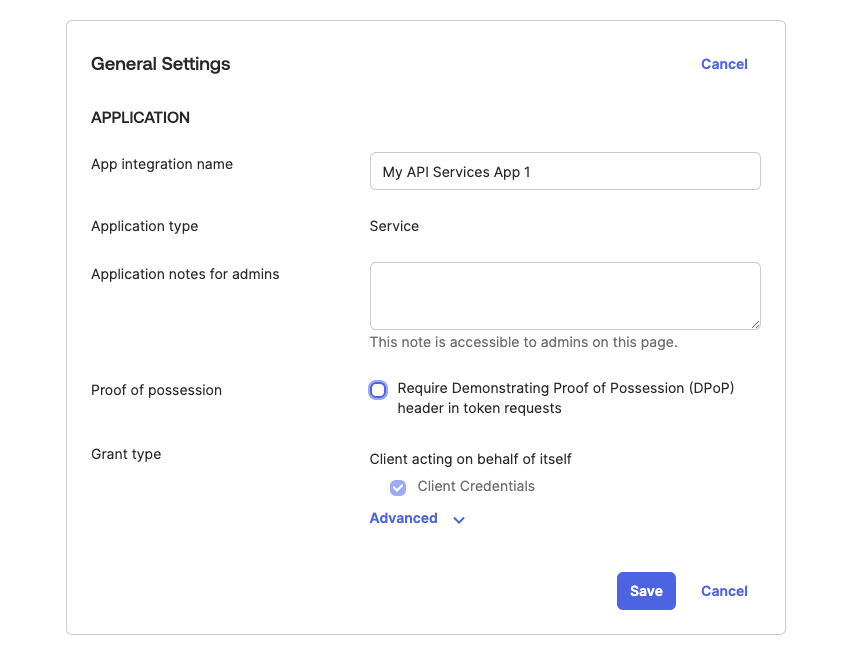
10\. Head over to the **General Settings** section and click on the **Edit** button.
11\. Deselect the **Require Demonstrating Proof of Possession (DPoP) header in token requests** checkbox and click on the **Save** button to save your configurations.
### Grant allowed Scopes to the App
Now that you've created the service app and registered the public key with that service app, you need to [**define the allowed scopes**](https://developer.okta.com/ai-assistant/getting-started/overview/implement-oauth-for-okta/main/#scopes-and-supported-endpoints). When a request is sent to the authorization server's `/token` endpoint, it validates all requested scopes in the request against the service app's grants collection. If the scope exists in the grants collection, the scope is granted.
1. From the service app page, select the **Okta API Scopes** tab.
2. Click **Grant** for each of the scopes that you want to add to the app's grant collection.
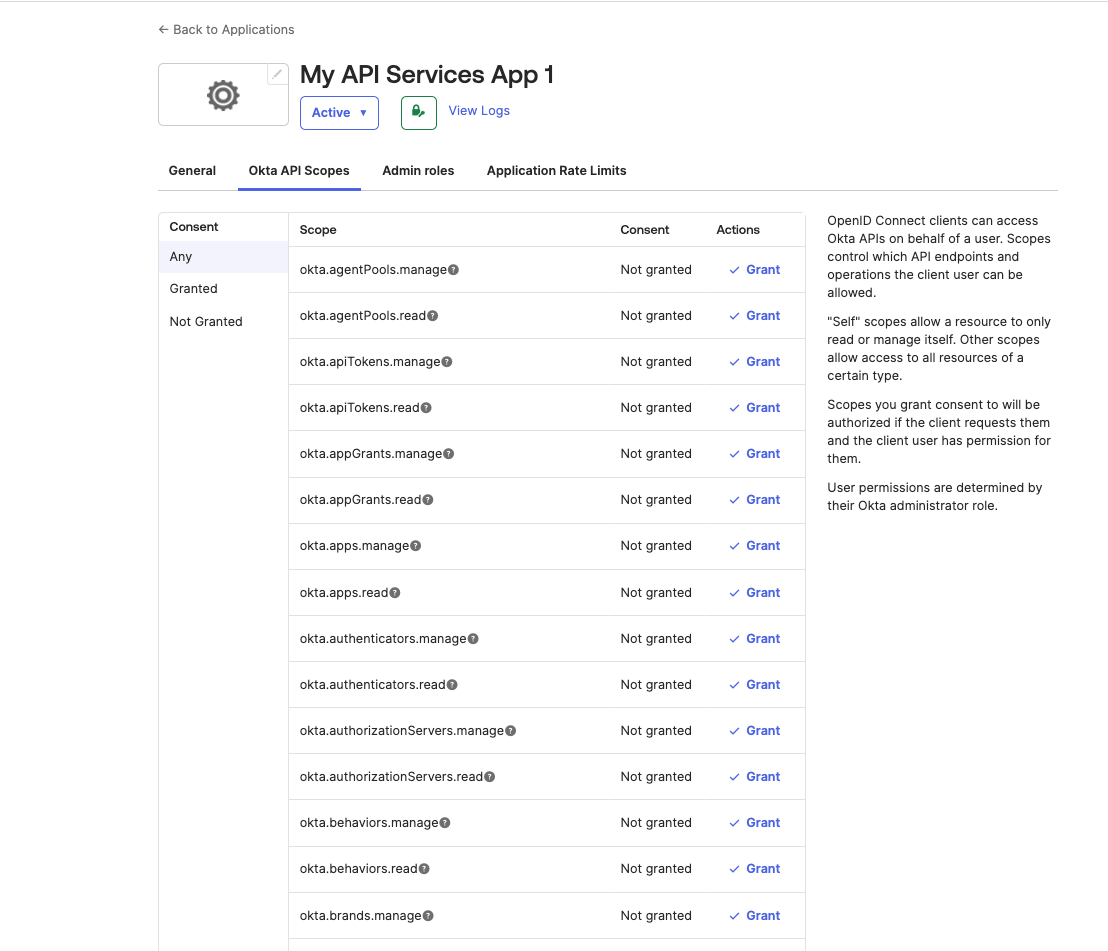
3\. Find the following API Scopes in the page and grant consent for them:
1. okta.apps.read
2. okta.apps.manage
3. okta.factors.read
4. okta.factors.manage
5. okta.groups.read
6. okta.groups.manage
7. okta.users.read
8. okta.users.manage
9. okta.orgs.read
10. okta.logs.read
11. The changes should reflect immediately upon granting consent.
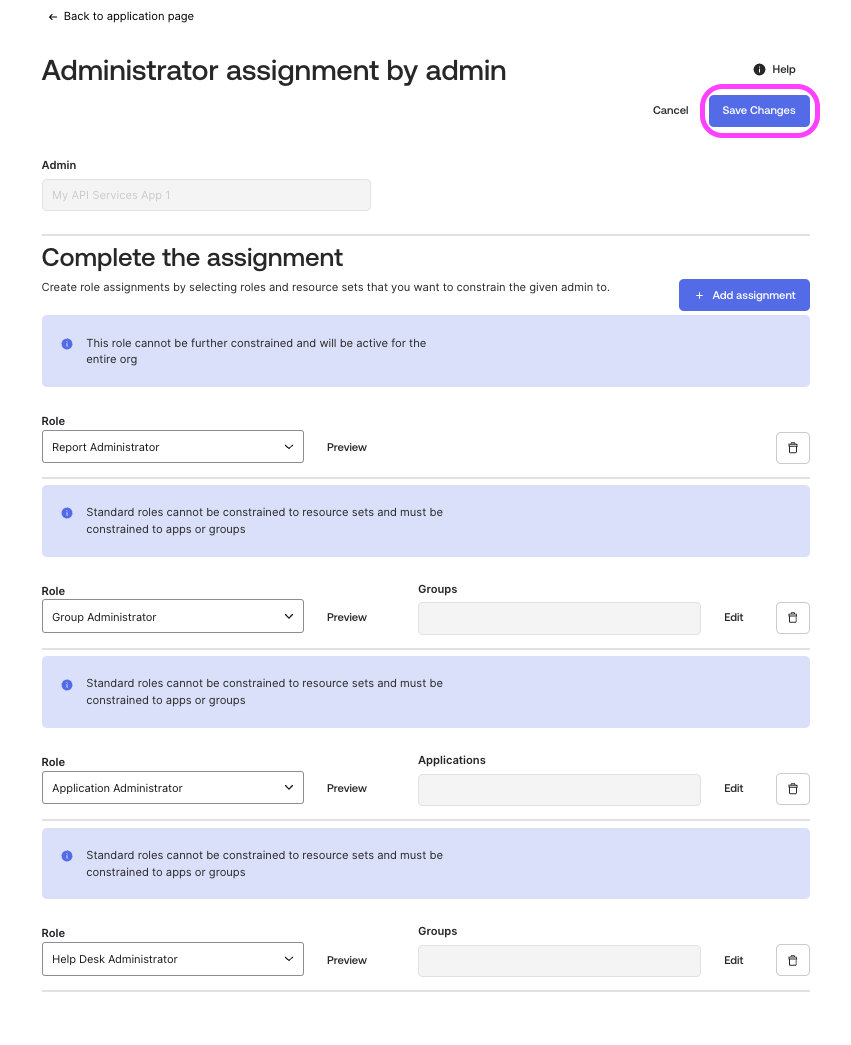
### Assign Admin roles to the App
Assign the correct [roles/permissions to the App based on your requirement](/service-management/access-requirements/identity-access-management-systems/okta-full-access#required-permissions).
1. Ensure that you're signed in as a Super Admin.
2. In the Admin Console, go to **Applications → Applications**.
3. Select the Service App that you just created.
4. Within the App page, go to **Admin roles** tab , you can see **Admin assignments granted to this app**.
5. Add/ Remove assignments using the **Edit assignments** button.
6. To add assignments select the appropriate roles, if present, select the Groups and save it.
7. After adding all the necessary roles, click on **Save Changes** to finalize the changes.
### Gather the credentials
Now that your service app configuration is completed, make sure you have collected the following credentials:
1. **Client ID** of the App
2. **KID** of the generated Public Key configuration
3. **Private Key** in PEM format ([that you generated along with the Public Keys](/service-management/access-requirements/identity-access-management-systems/okta-full-access#oauth-20-with-jwt-based-authentication:~:text=Once%20your%20public%2Dprivate%20key%20pair%20is%20generated%2C%20click%20on%20the%20PEM%20button%20to%20view%20the%20certificate%20and%20then%20copy%20and%20save%20it%20in%20a%20safe%20storage%20as%20a%20.PEM%20file%20extension.%20This%20will%20be%20required%20later%20on%20to%20create%20the%20Connector%20in%20Moveworks%20Setup.))
You can get the **Client ID** and **KID** of your App by:
1. Visit your Application under the **Application -> Application** page.
2. Copy and store the Client ID and the KID from this page.

### Configure in Moveworks Setup
1. Within Moveworks Setup, go to **Manage Connectors** > **System Connectors**, then click on **‘CREATE NEW’**

2\. Click on the **‘Okta’** Connector, then click on **‘NEXT: ADD CREDS’**

3\. Type out the name of the connection, select Common Base URL and enter the name of your instance.
4\. Select the Authentication Type as **OAuth2 with JWT**
5\. Enter the **Client ID** and **KID** you collected previously in the respective fields.
6\. Upload your .**PEM Private Key file** in the Private Key field and click on **Save** to save the Connector configuration.

Your Okta Connector with OAuth authentication is now ready to be configured for the relevant skills using Moveworks Setup.