[New] Configure Ticketing for Jira Service Management
[New] Configure Ticketing for Jira Service Management
This guide walks you through configuring Jira Service Management as a ticketing system in Moveworks. Once configured, employees can create, view and manage Jira tickets directly through the Moveworks AI Assistant.
Pre-Requisites
Please ensure the following are completed before starting:
- Please ensure the required Jira connector has been created with the necessary permissions to support ticket actions. Please refer to the Jira Service Management Access Requirement Document for details
- Please ensure the Service Account configuration in Moveworks Setup exists. This service account is used by Moveworks to connect to Jira.
- Please ensure the Jira service account has access to the Jira projects, issue types, or request types you want to enable. Moveworks will be able to perform Query / Create / Update / Resolve / Reopen actions.
- Please set up the identity configuration for Jira so users are ingested with their external system ID. This is required for filing tickets on behalf of users.
- Please set up the Service Portal configuration for Jira. This is the end-user portal link where users can view and track their tickets. Refer to this section for dedicated guide to set this up. Please ensure you configure this before testing ticketing actions in Moveworks AI Assistant.
- Please ensure you have completed the chat configurations for the AI Assistant to test ticketing flows end-to-end. This is necessary to have a conversation with your AI Assistant and test the ticketing actions.
Ensure you complete the actions above to seamlessly test Jira ticketing integration in the Moveworks AI Assistant. These are necessary for the Moveworks Ticketing skill to work.
Navigate to the new ticketing wizard
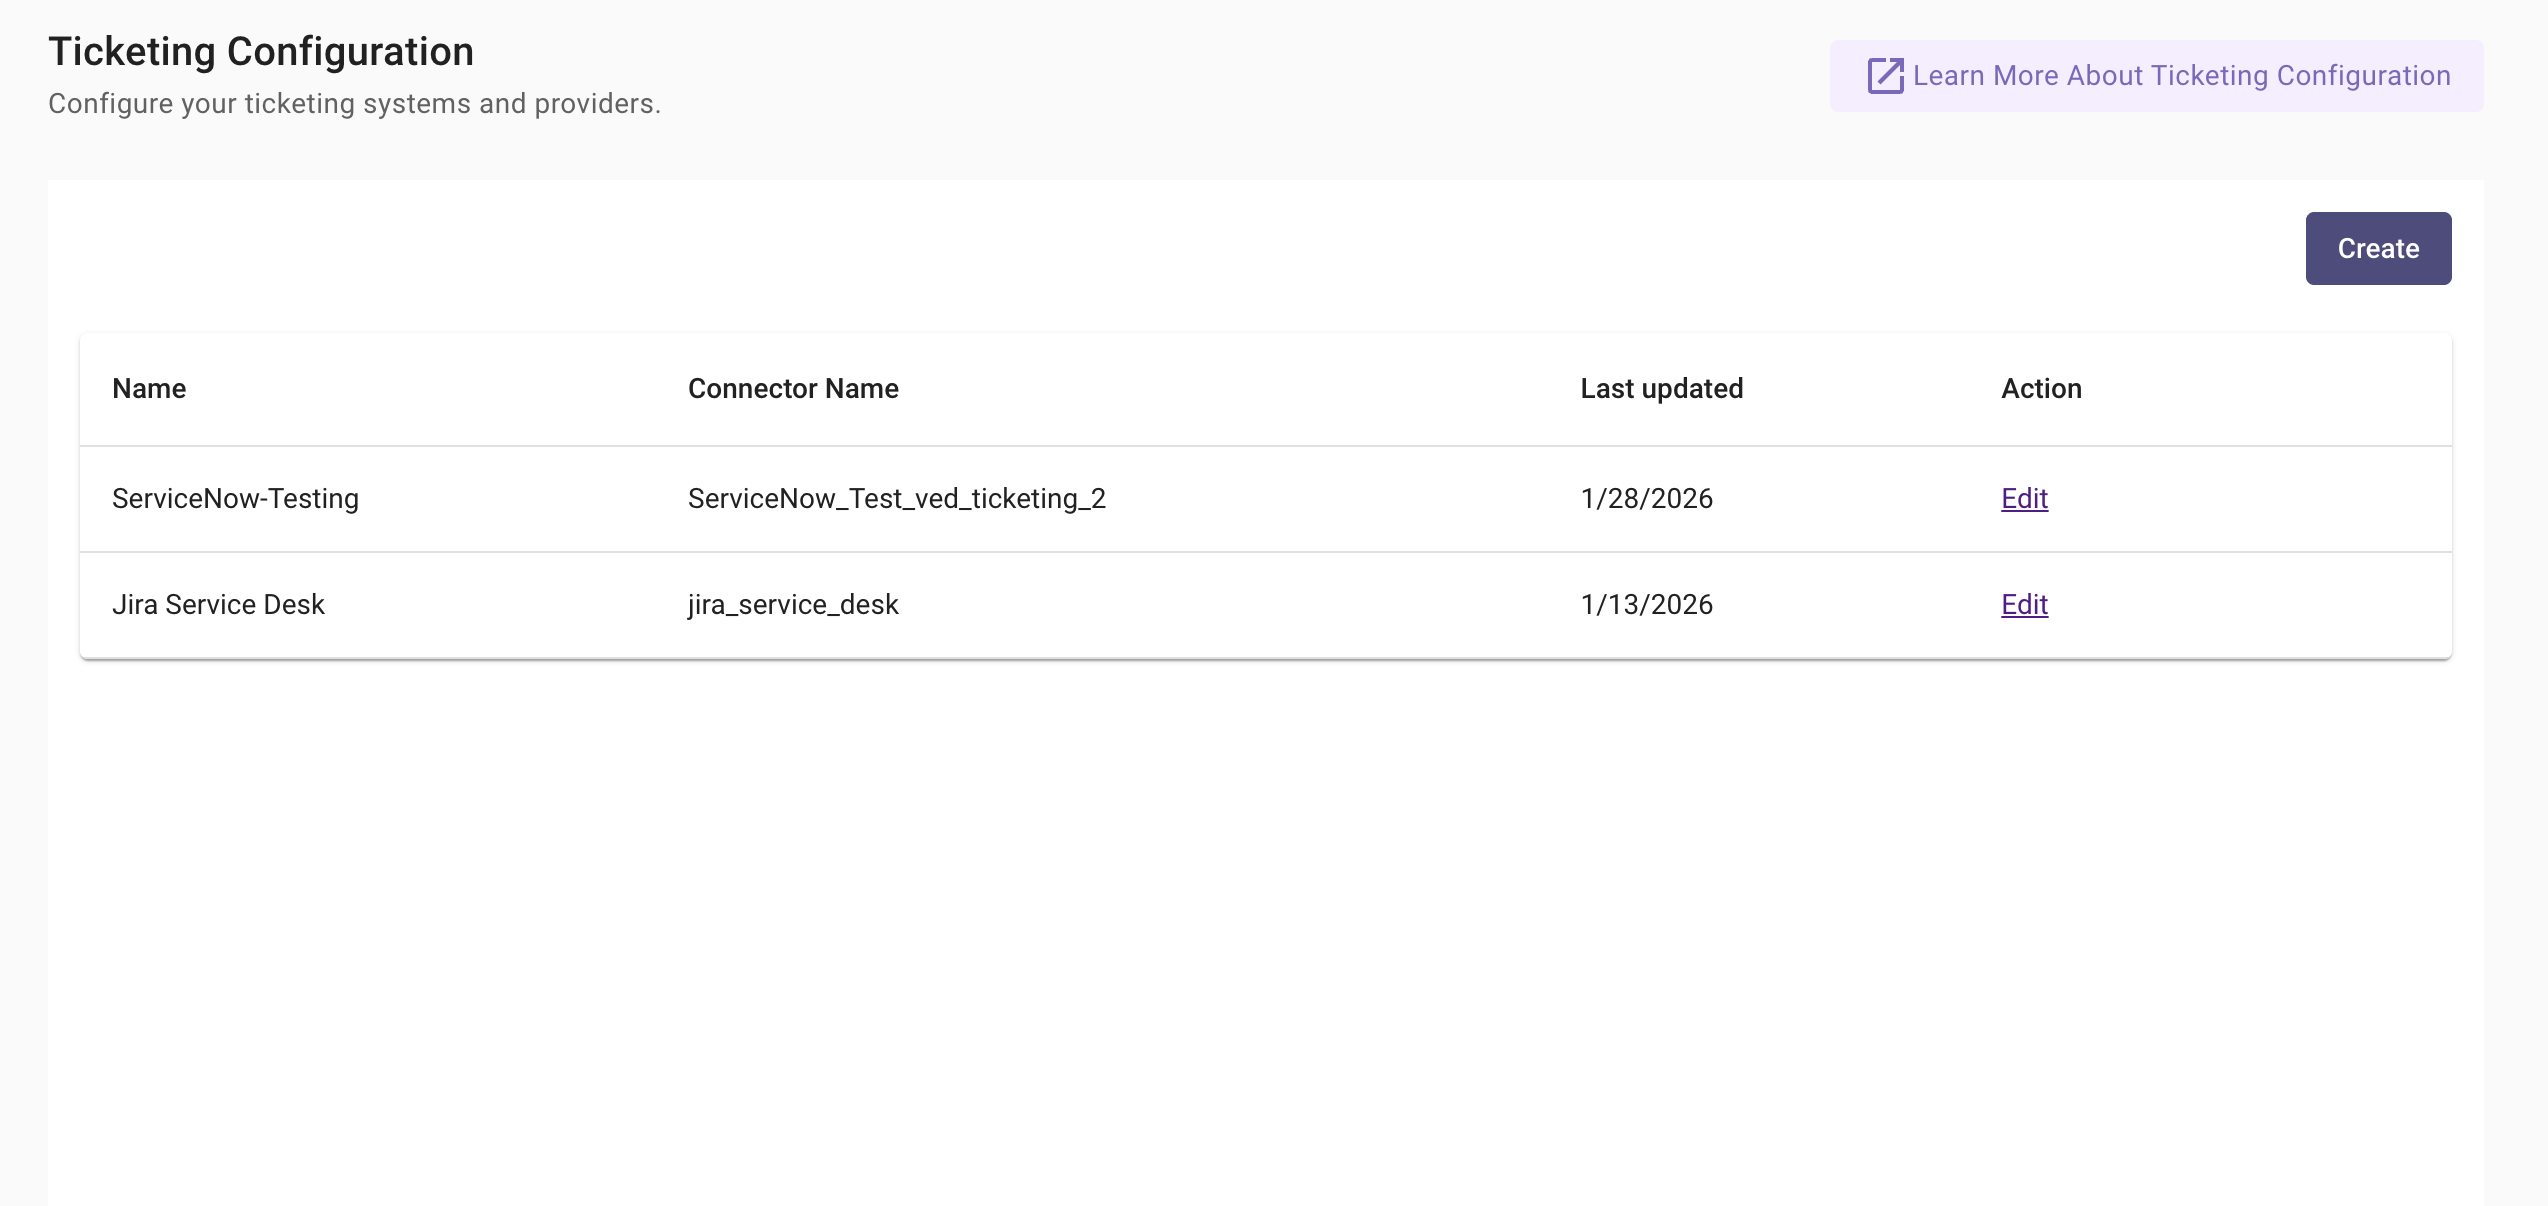
Navigate to Ticketing Automation > Ticketing Configuration, where you can create and manage ticketing configurations for Jira.
-
If you are configuring ticketing for the first time or adding a new ticketing system, click Create.
-
If you want to update settings or add new destinations for an existing configuration, click Edit next to the Jira configuration.
Configuration Structure
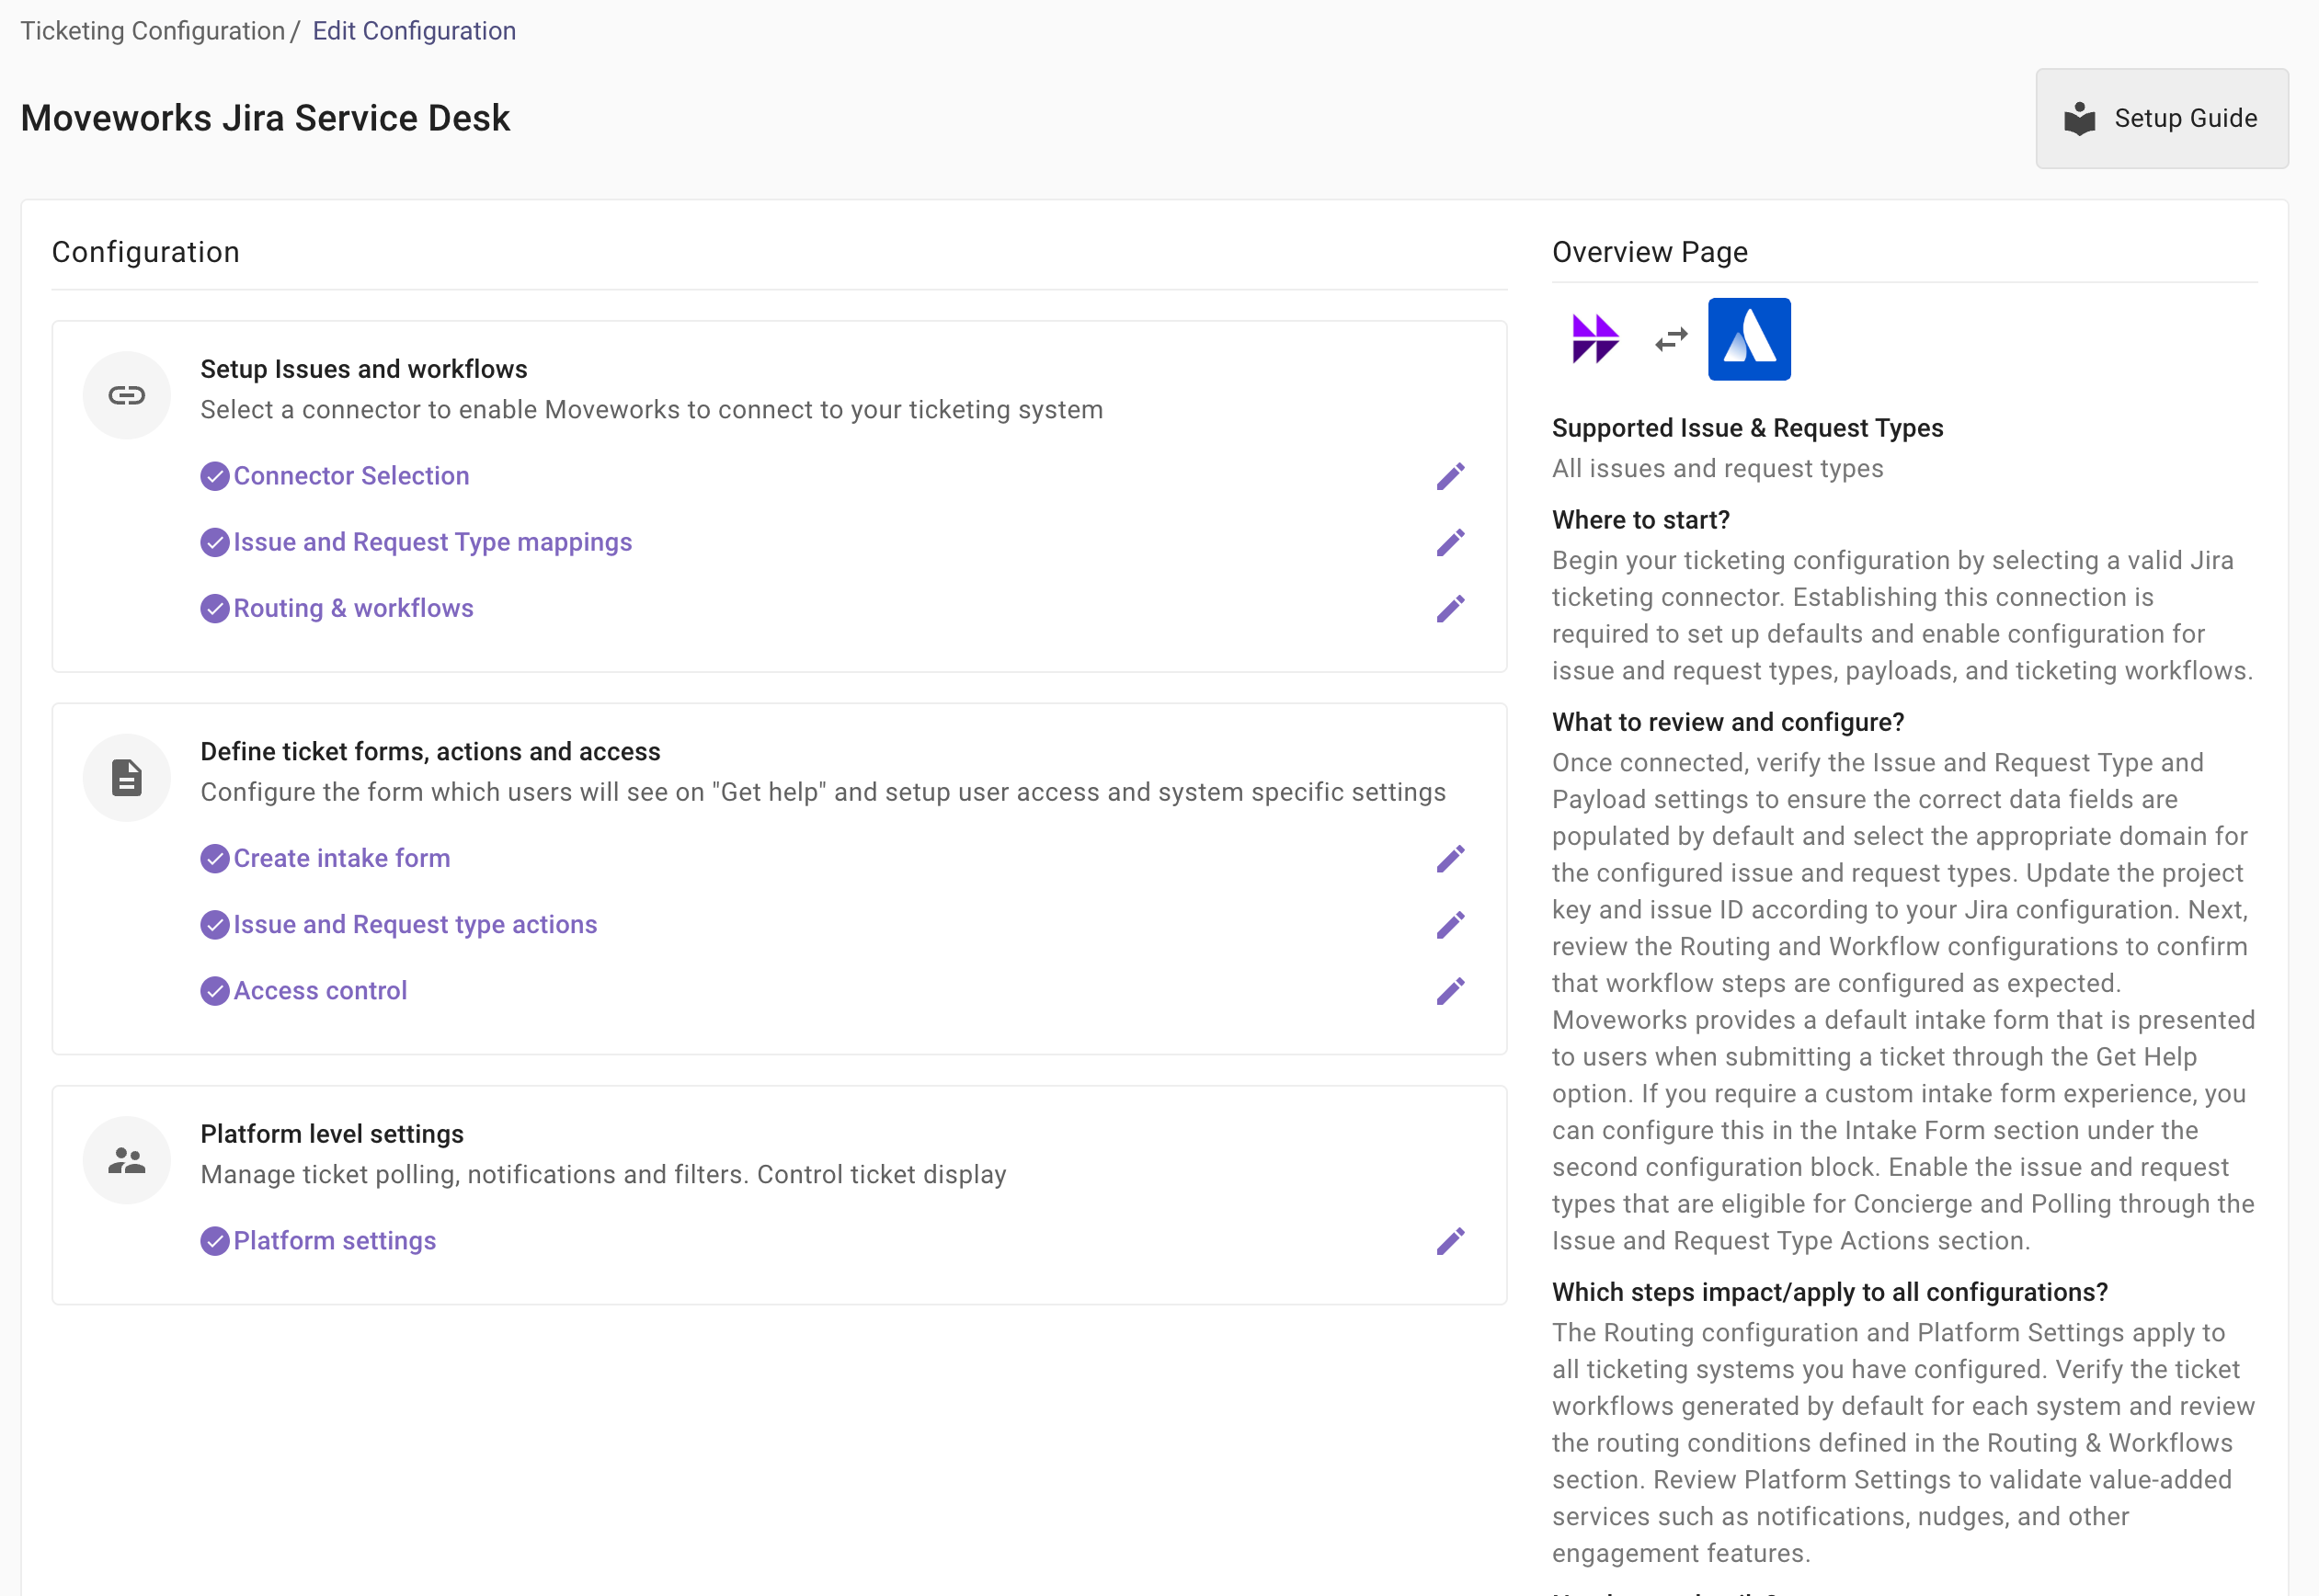
Ticketing configuration is organized into three sections and should be completed in order:
1. Setup destinations and workflows
Connect to your Jira Service Management instance and enable default ticket destinations and workflows. Review the destinations created by default and configure any additional Jira projects, issue types or request types that you want to enable for ticketing. You can also customize workflows and routing rules to control how tickets are created, updated, resolved, and reopened in Jira.
2. Define ticket forms, actions and access
Configure the ticket intake experience for end users. By default, Moveworks provides a standard ticket intake form that collects basic ticket information. You can create custom intake forms if additional information is required.
Enable Jira destinations for concierge updates and ticket polling, and configure which users can access the Jira ticketing integration through Moveworks.
3. Platform settings
Manage platform-level ticketing configurations that apply across Jira ticketing. This includes configuring ticket polling behavior, notification settings, and automated nudge settings to control how and when users receive ticket updates.
1. Setup connector and defaults
-
Select the Jira Service Management connector that Moveworks will use to integrate with your Jira instance. Refer to the Jira connector documentation to complete the connector setup.
-
The connector enables Moveworks to:
- Create tickets
- Retrieve ticket status and updates
- Access ticket fields and metadata
- Perform ticket actions on behalf of users
-
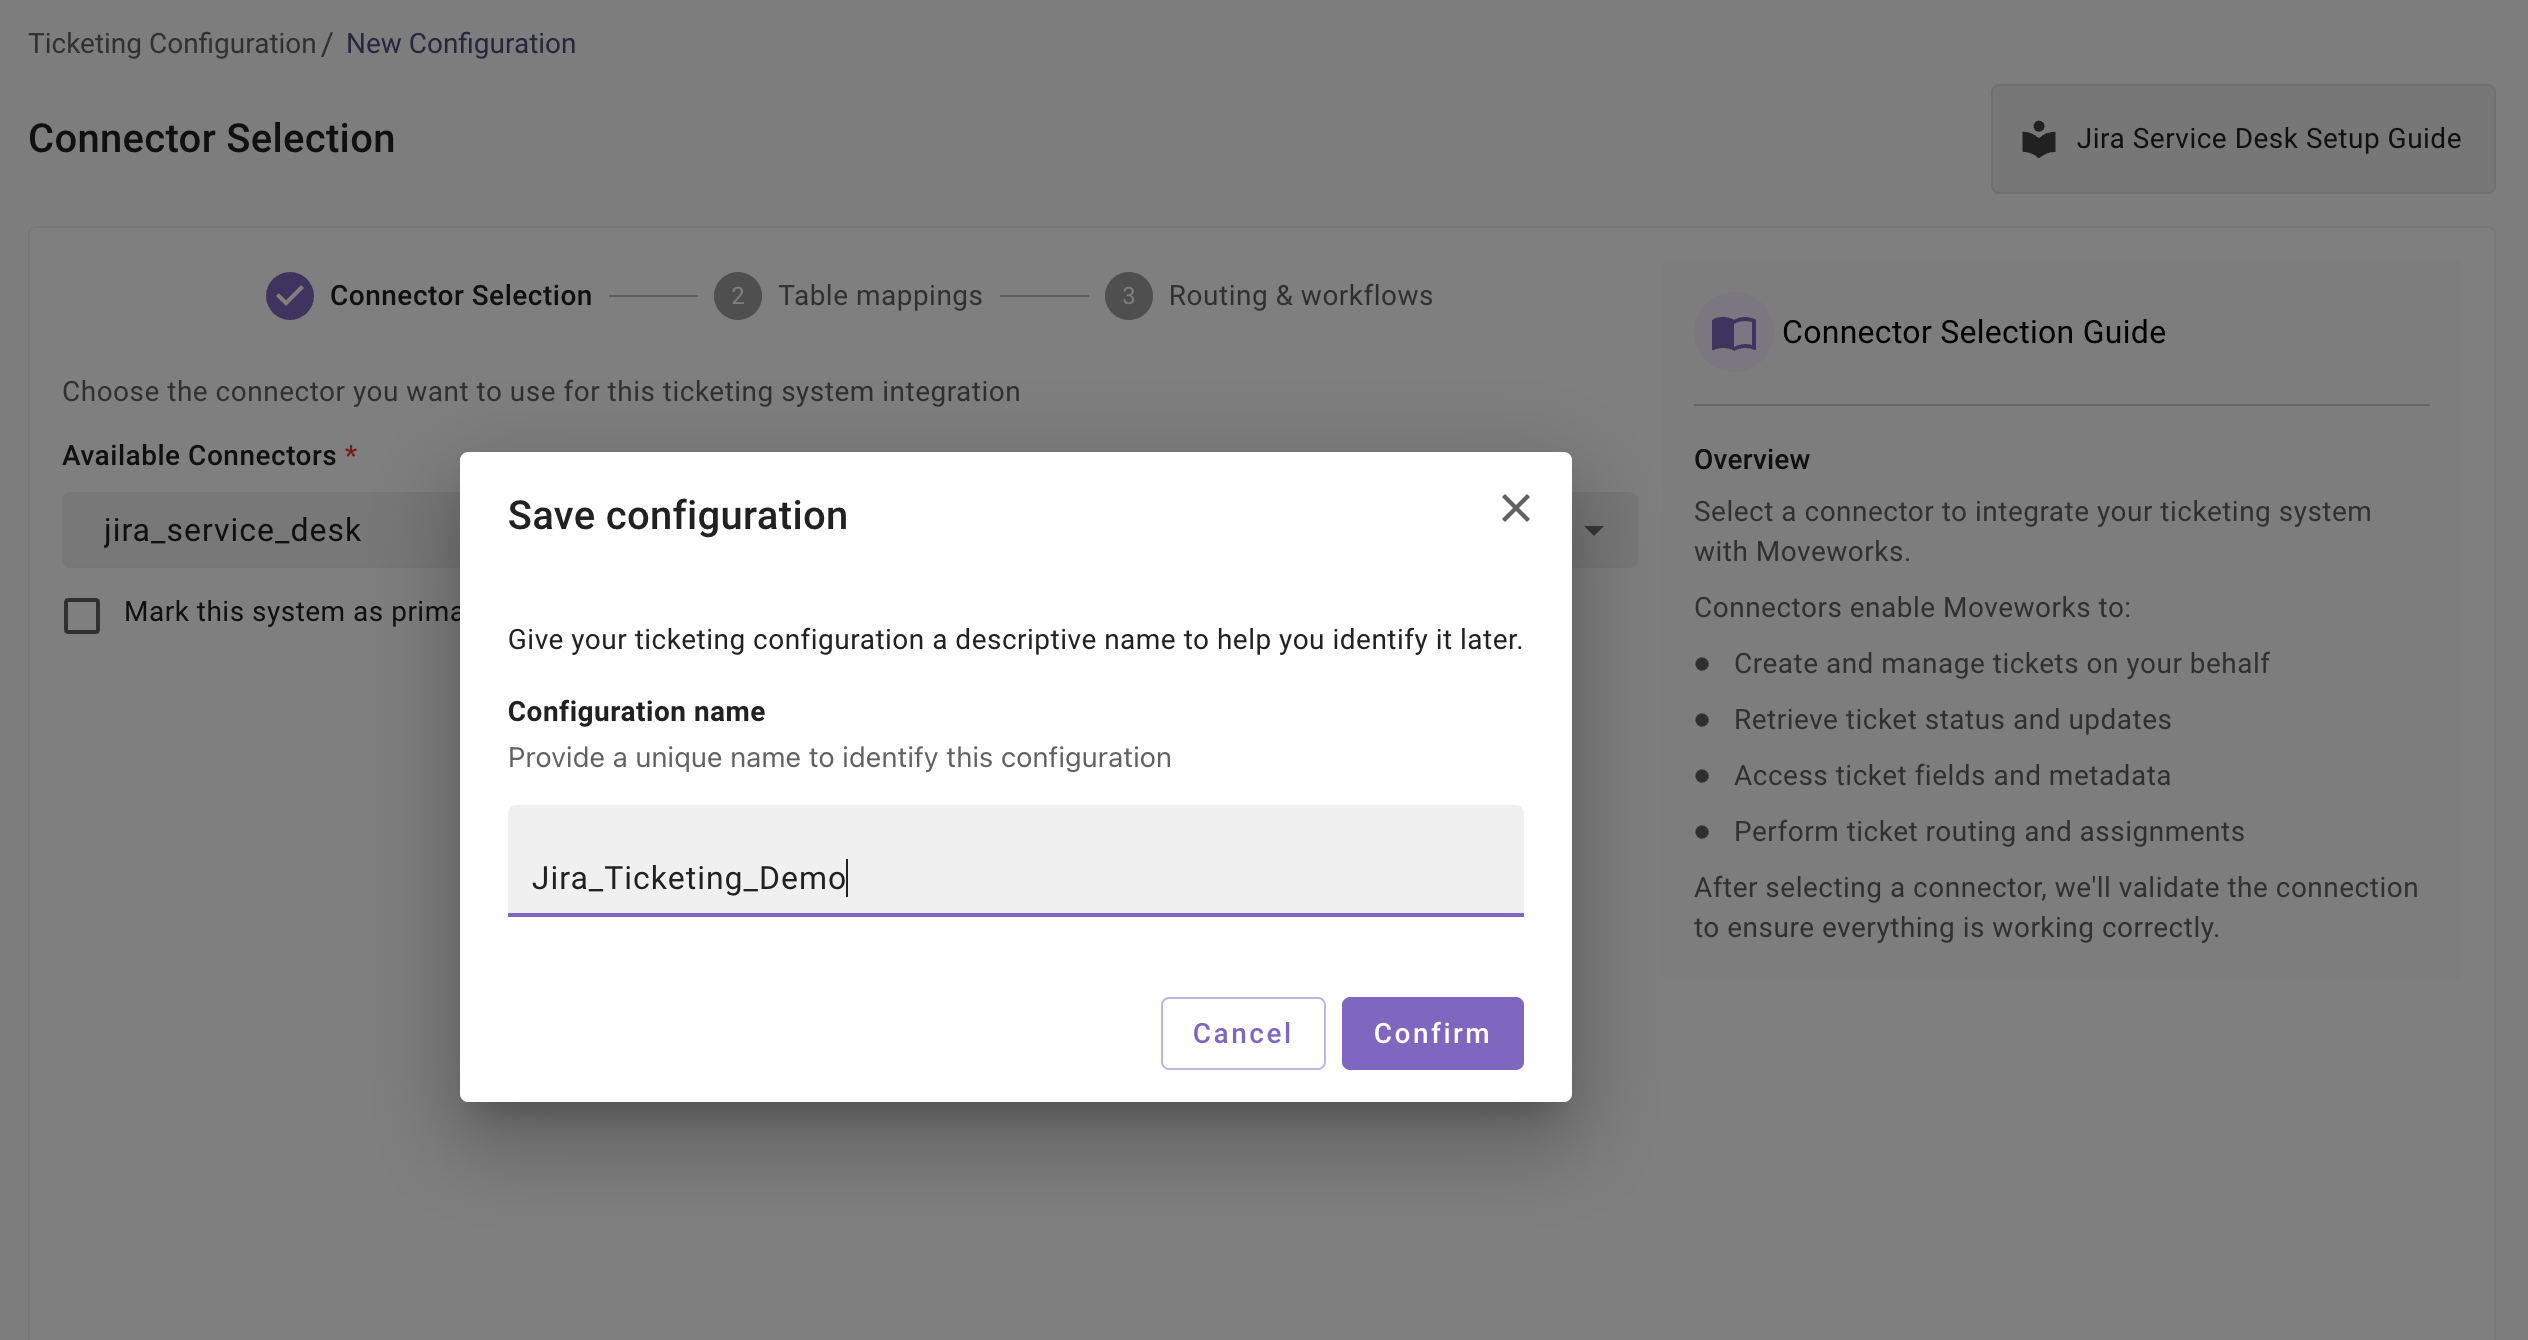
Please select “Mark this system as primary” if this is your first ticketing system.
-
Provide a configuration name to help identify this setup later.
Common mistakes
-
Not marking the system as primary
If your organization does not already have a ticketing system configured, you must mark this system as primary. If the system is not marked as primary, the new ticketing configuration wizard will show an error. The primary system is required so Moveworks knows which ticketing system to use by default.
-
Not configuring a Service Account
A Service Account configuration must exist for the connector you select. If a Service Account is not configured, the wizard will show an error and you will not be able to proceed. Refer to the prerequisites section to complete the Service Account setup before continuing.
-
Selecting a connector that was previously used
The new ticketing journey does not support using a connector that is already associated with an existing ticketing configuration, including legacy configurations. If you attempt to use a previously configured connector, the wizard will show an error. To continue, create and use a new connector for this ticketing setup.
1.1 Enabling defaults
Once you have completed the connector setup, you can enable the default Jira configurations. After saving the connector, you will be redirected to the configuration home page. At the top of the page, you will see a Setup defaults section.
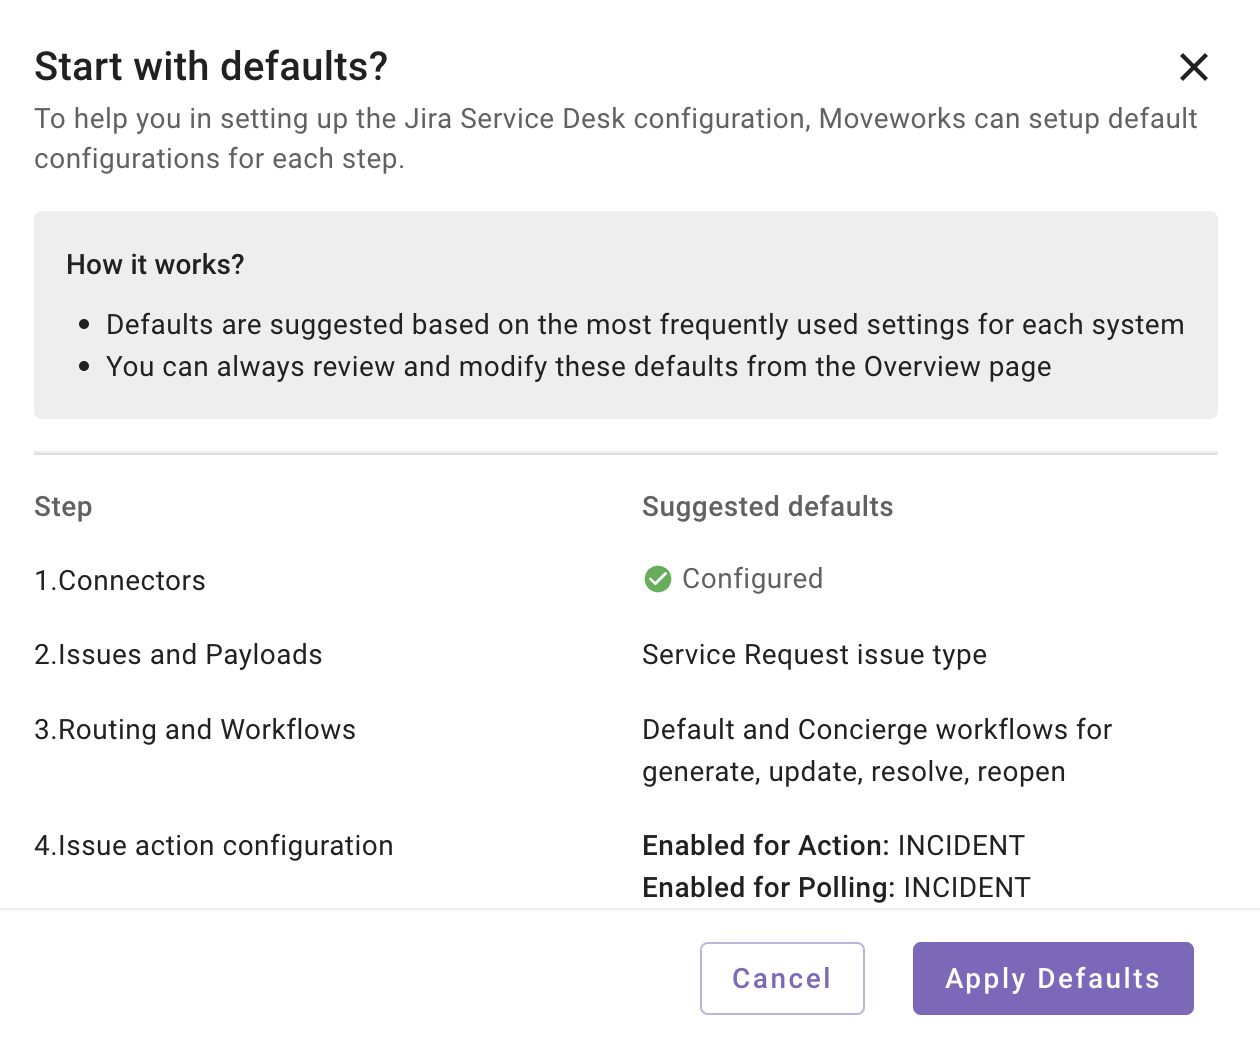
Click Setup defaults. This opens a modal where you can review the configurations that will be created automatically.
Moveworks creates default Jira destinations (project and issue type or request type mappings) along with the default ticketing workflows required to support common ticketing actions.
If this is your first Jira ticketing configuration, Moveworks will also set the default workflows under routing conditions. Review these workflows to ensure they align with your Jira setup.
In the following sections, you will review each configuration step by step and make any required updates before testing the default Jira ticketing workflows.
If this is a secondary ticketing system, you may notice that routing, payload configurations, and intake form settings are already present. This is expected, as routing logic and payload definitions are shared across ticketing configurations. You can update these settings from this journey, and any changes made will apply across all ticketing configurations.
2. Review default created destinations
Navigate to the Issue and Request Type mappings section. Here, you will see the default Jira destinations that Moveworks has created for your Jira Service Management setup.
Each destination represents a combination of:
-
A Project Key
-
And an Issue Type ID or Request Type ID
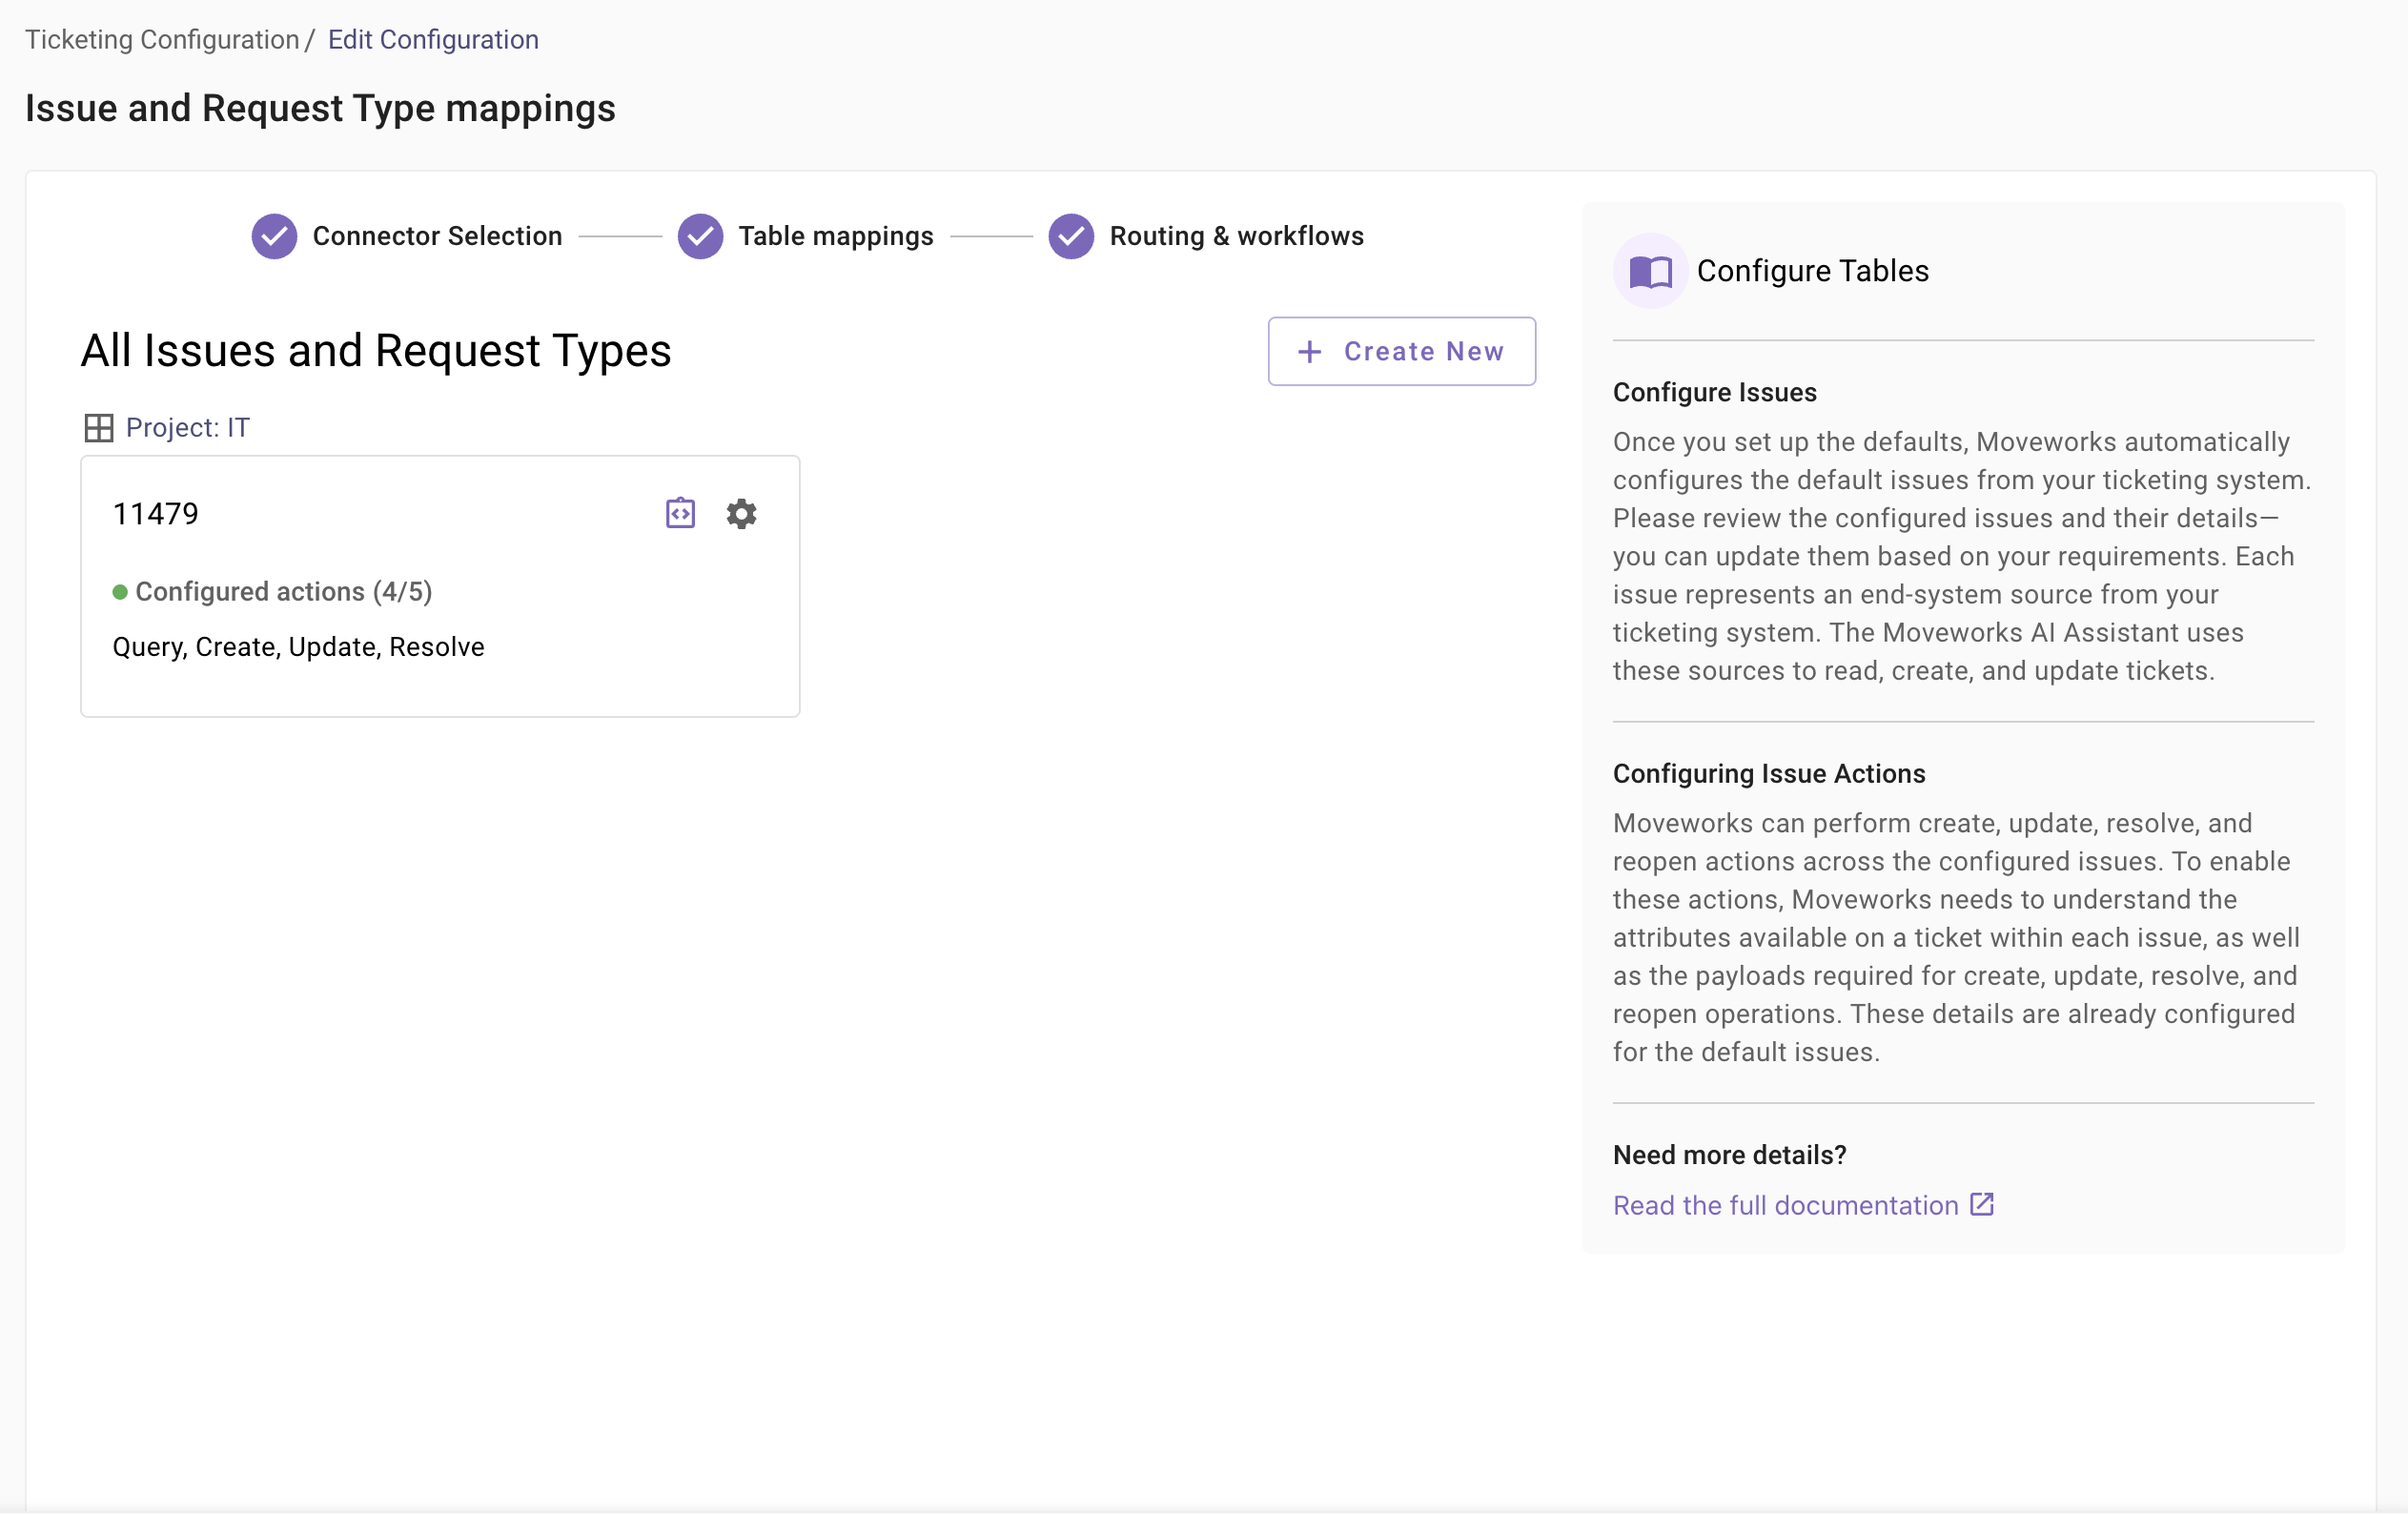
Moveworks automatically populates the destination details and configures the required state mappings and field mappings for each supported ticketing action, including query, create, update, resolve, and reopen. Review these configurations to ensure they are set up correctly for your Jira environment.
Refer to the sections below to learn how to add a new destination and to understand what each field represents in the destination configuration.
3. Review ticket workflows and routing
Click Next to navigate to the Routing and Workflows section.
In this section, you can review the routing configuration for the supported ticketing actions, including query, generate, update, resolve, and reopen. For each action, you will see the workflow that is currently selected, along with any conditional workflows that have been configured.
If this is your primary ticketing setup, Moveworks automatically assigns default workflows for each action. If this is a secondary ticketing setup, existing default workflows are not overridden.
You can add additional routing conditions or associate different workflows as needed.
Navigate to the Workflows section to review the workflows created by default. Moveworks generates a default workflow for each ticketing action, and each workflow may contain one or more steps.
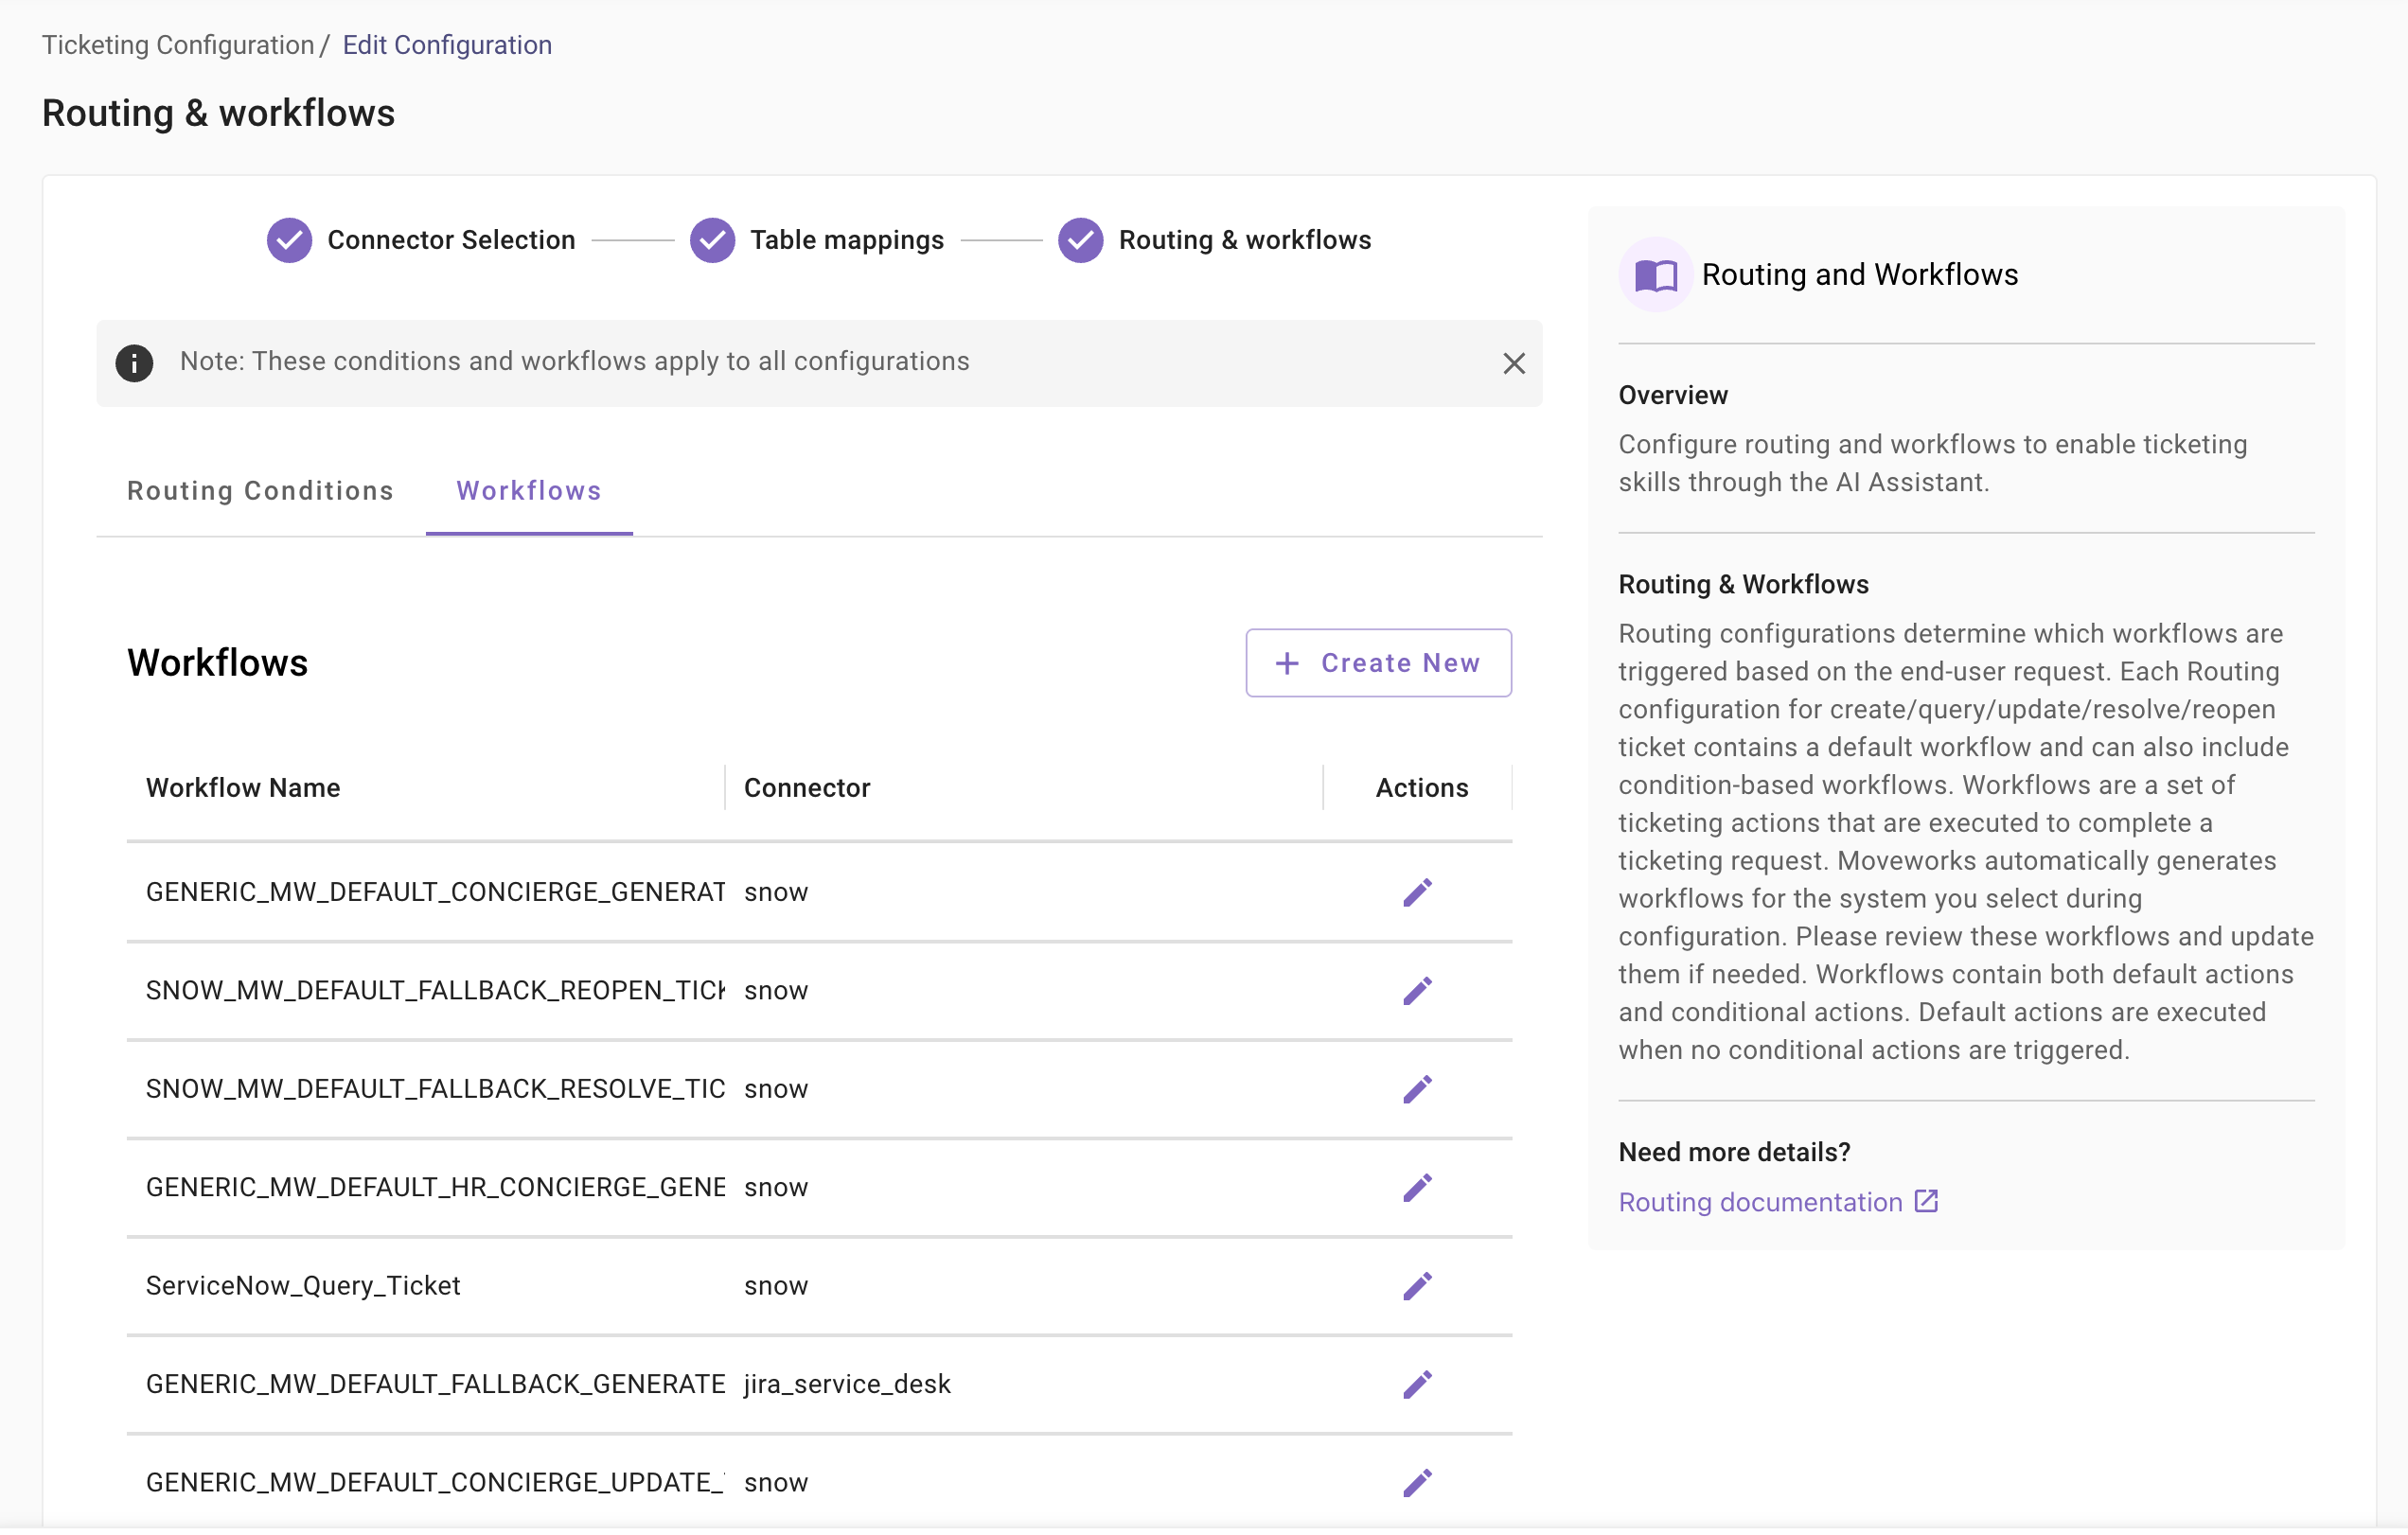
3.1 Updating the default generate workflow
Setup destination for ticket creation
In order to continue testing the default actions within MoveWorks ticketing skills, you will need to put in some few updates on the default generated workflows.
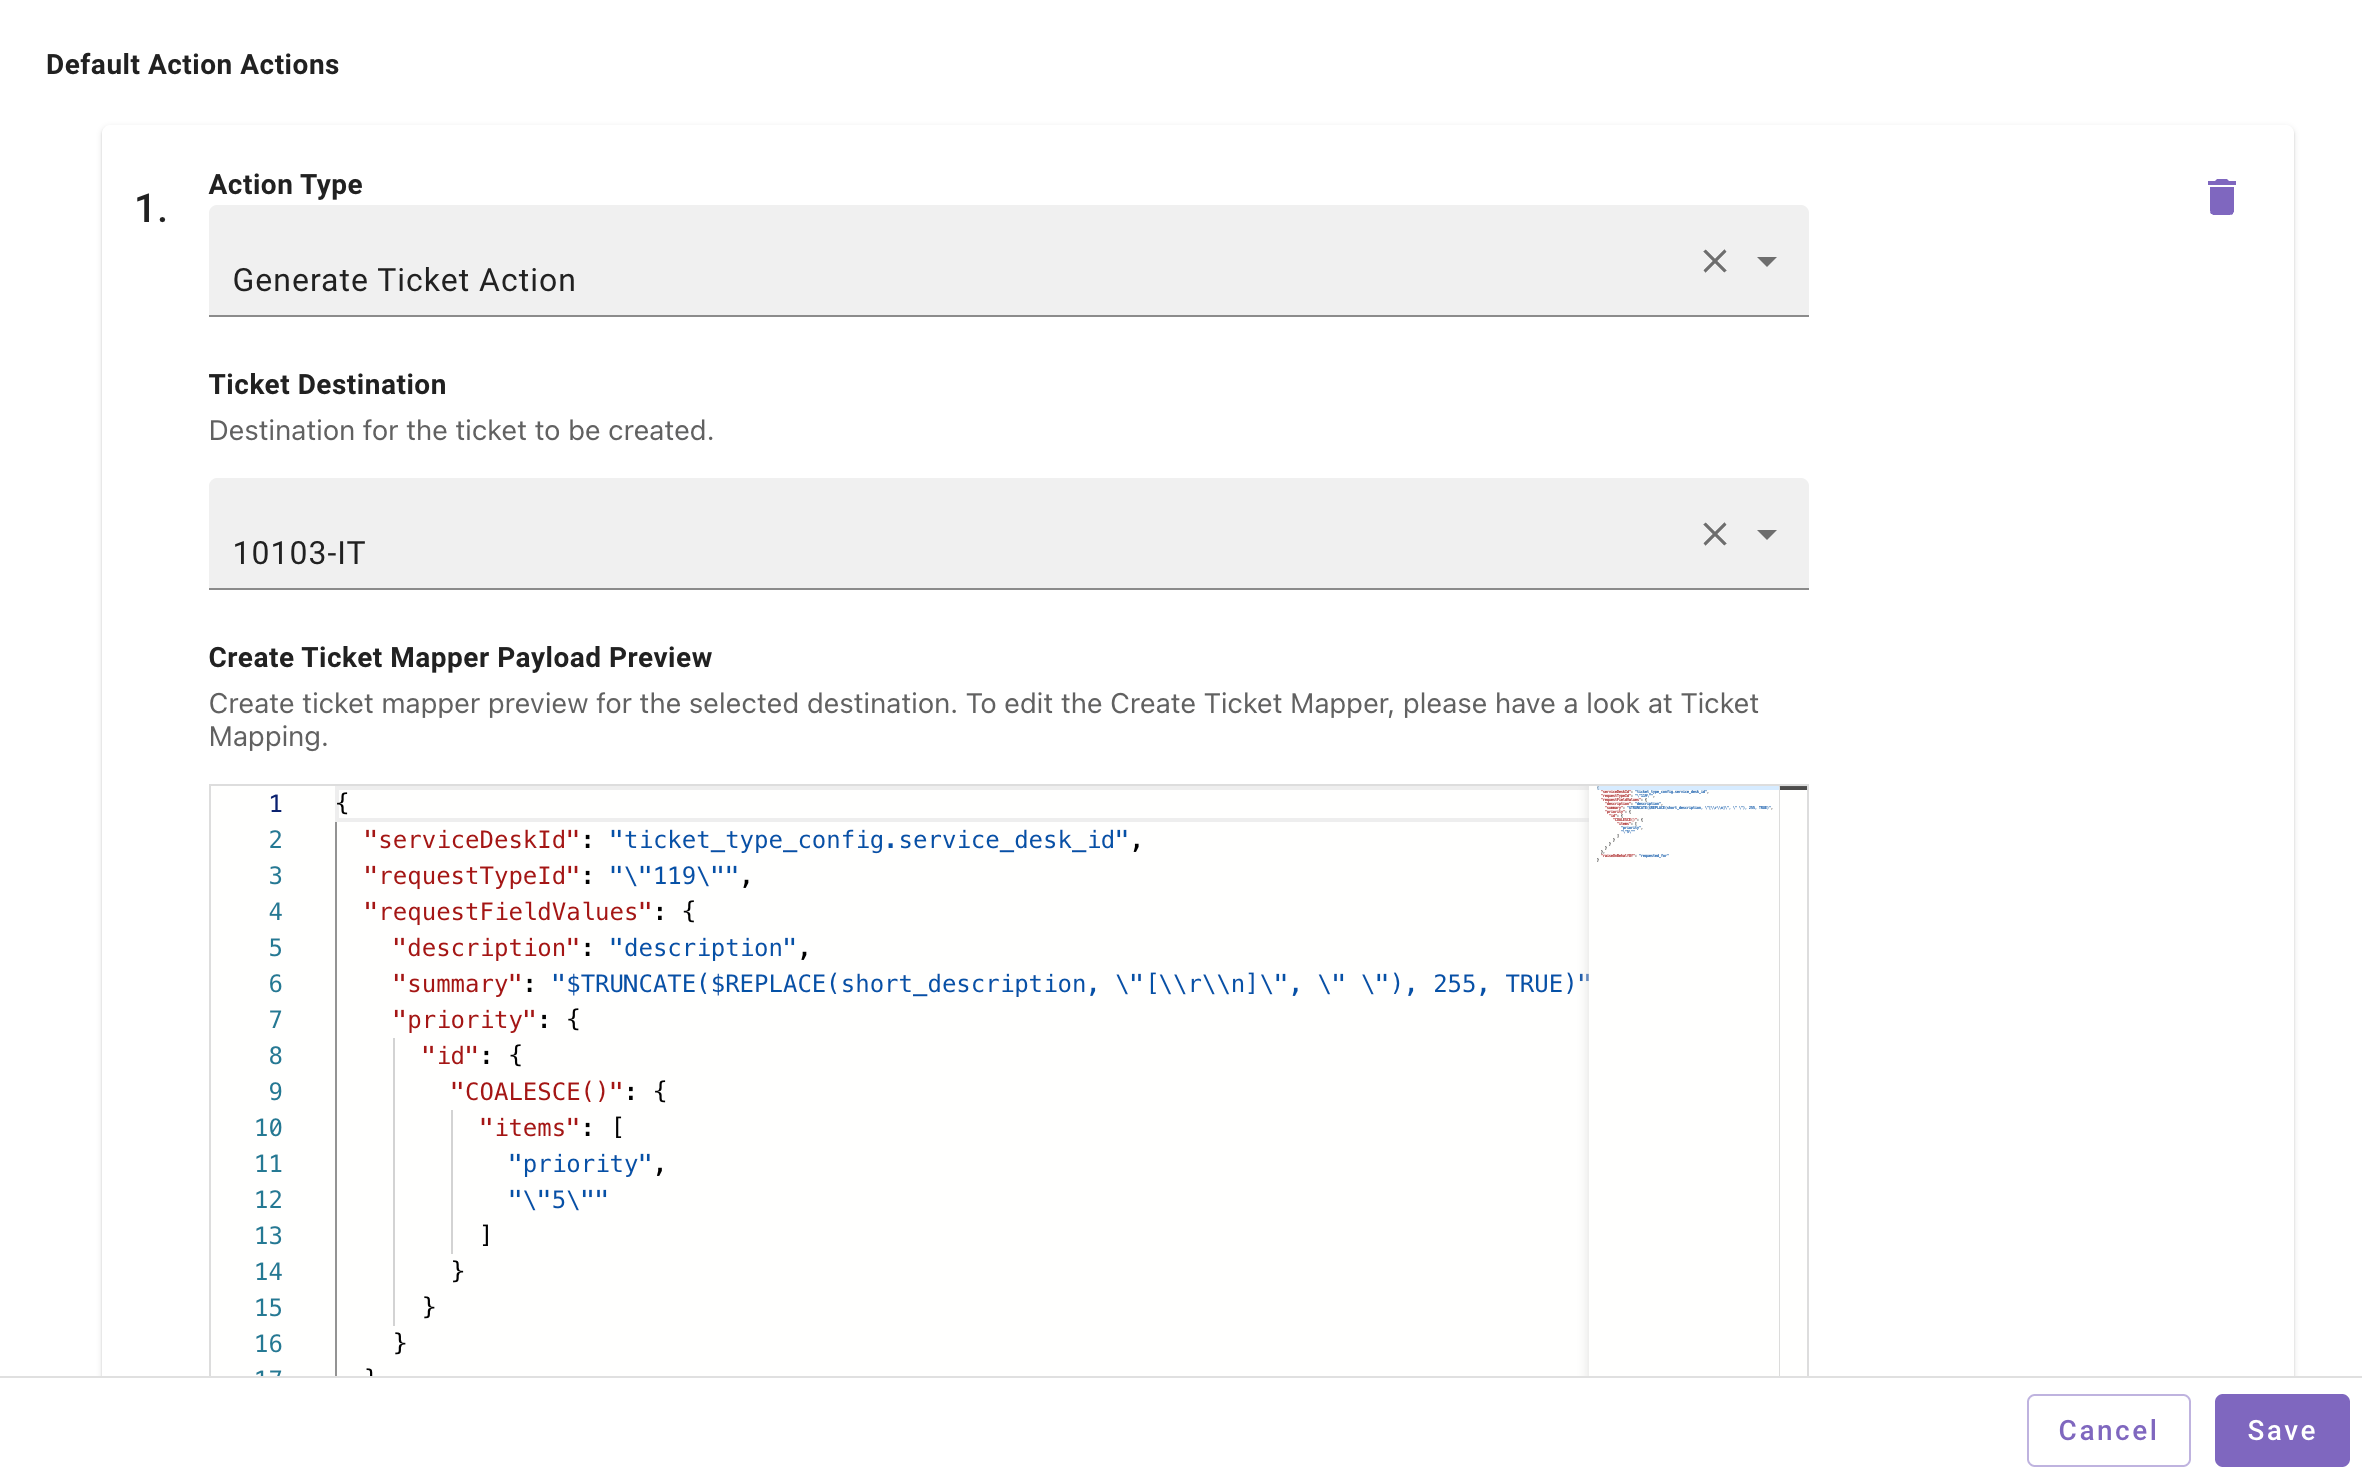
First of all, navigate to the workflows section and select the GENERIC_MW_DEFAULT_FALLBACK_GENERATE_TICKET_WORKFLOW . In this you will find a generate ticket action Select the destination ID that you want the ticket to be filed in.
By default Moveworks supports out-of-the-box incident filing. Please select the destination as incident so you’ll be able to test the incident creation in the next step

4. Test the defaults that are created for your organization
Test the default configurations to ensure ticketing is working as expected.
Before you begin testing, make sure that user identity ingestion is complete and that the Service Portal configuration for Jira is set up. If these prerequisites are not completed, refer to the prerequisites section and complete them before continuing.
Before testing the ticket creation flow, ensure that a handoff configuration exists. Refer to the Handoff configuration guide in Moveworks Setup for more details.
In most cases, the organization setup process already creates a default IT file ticket handoff. Navigate to the Handoff configurations to confirm that this handoff is available.
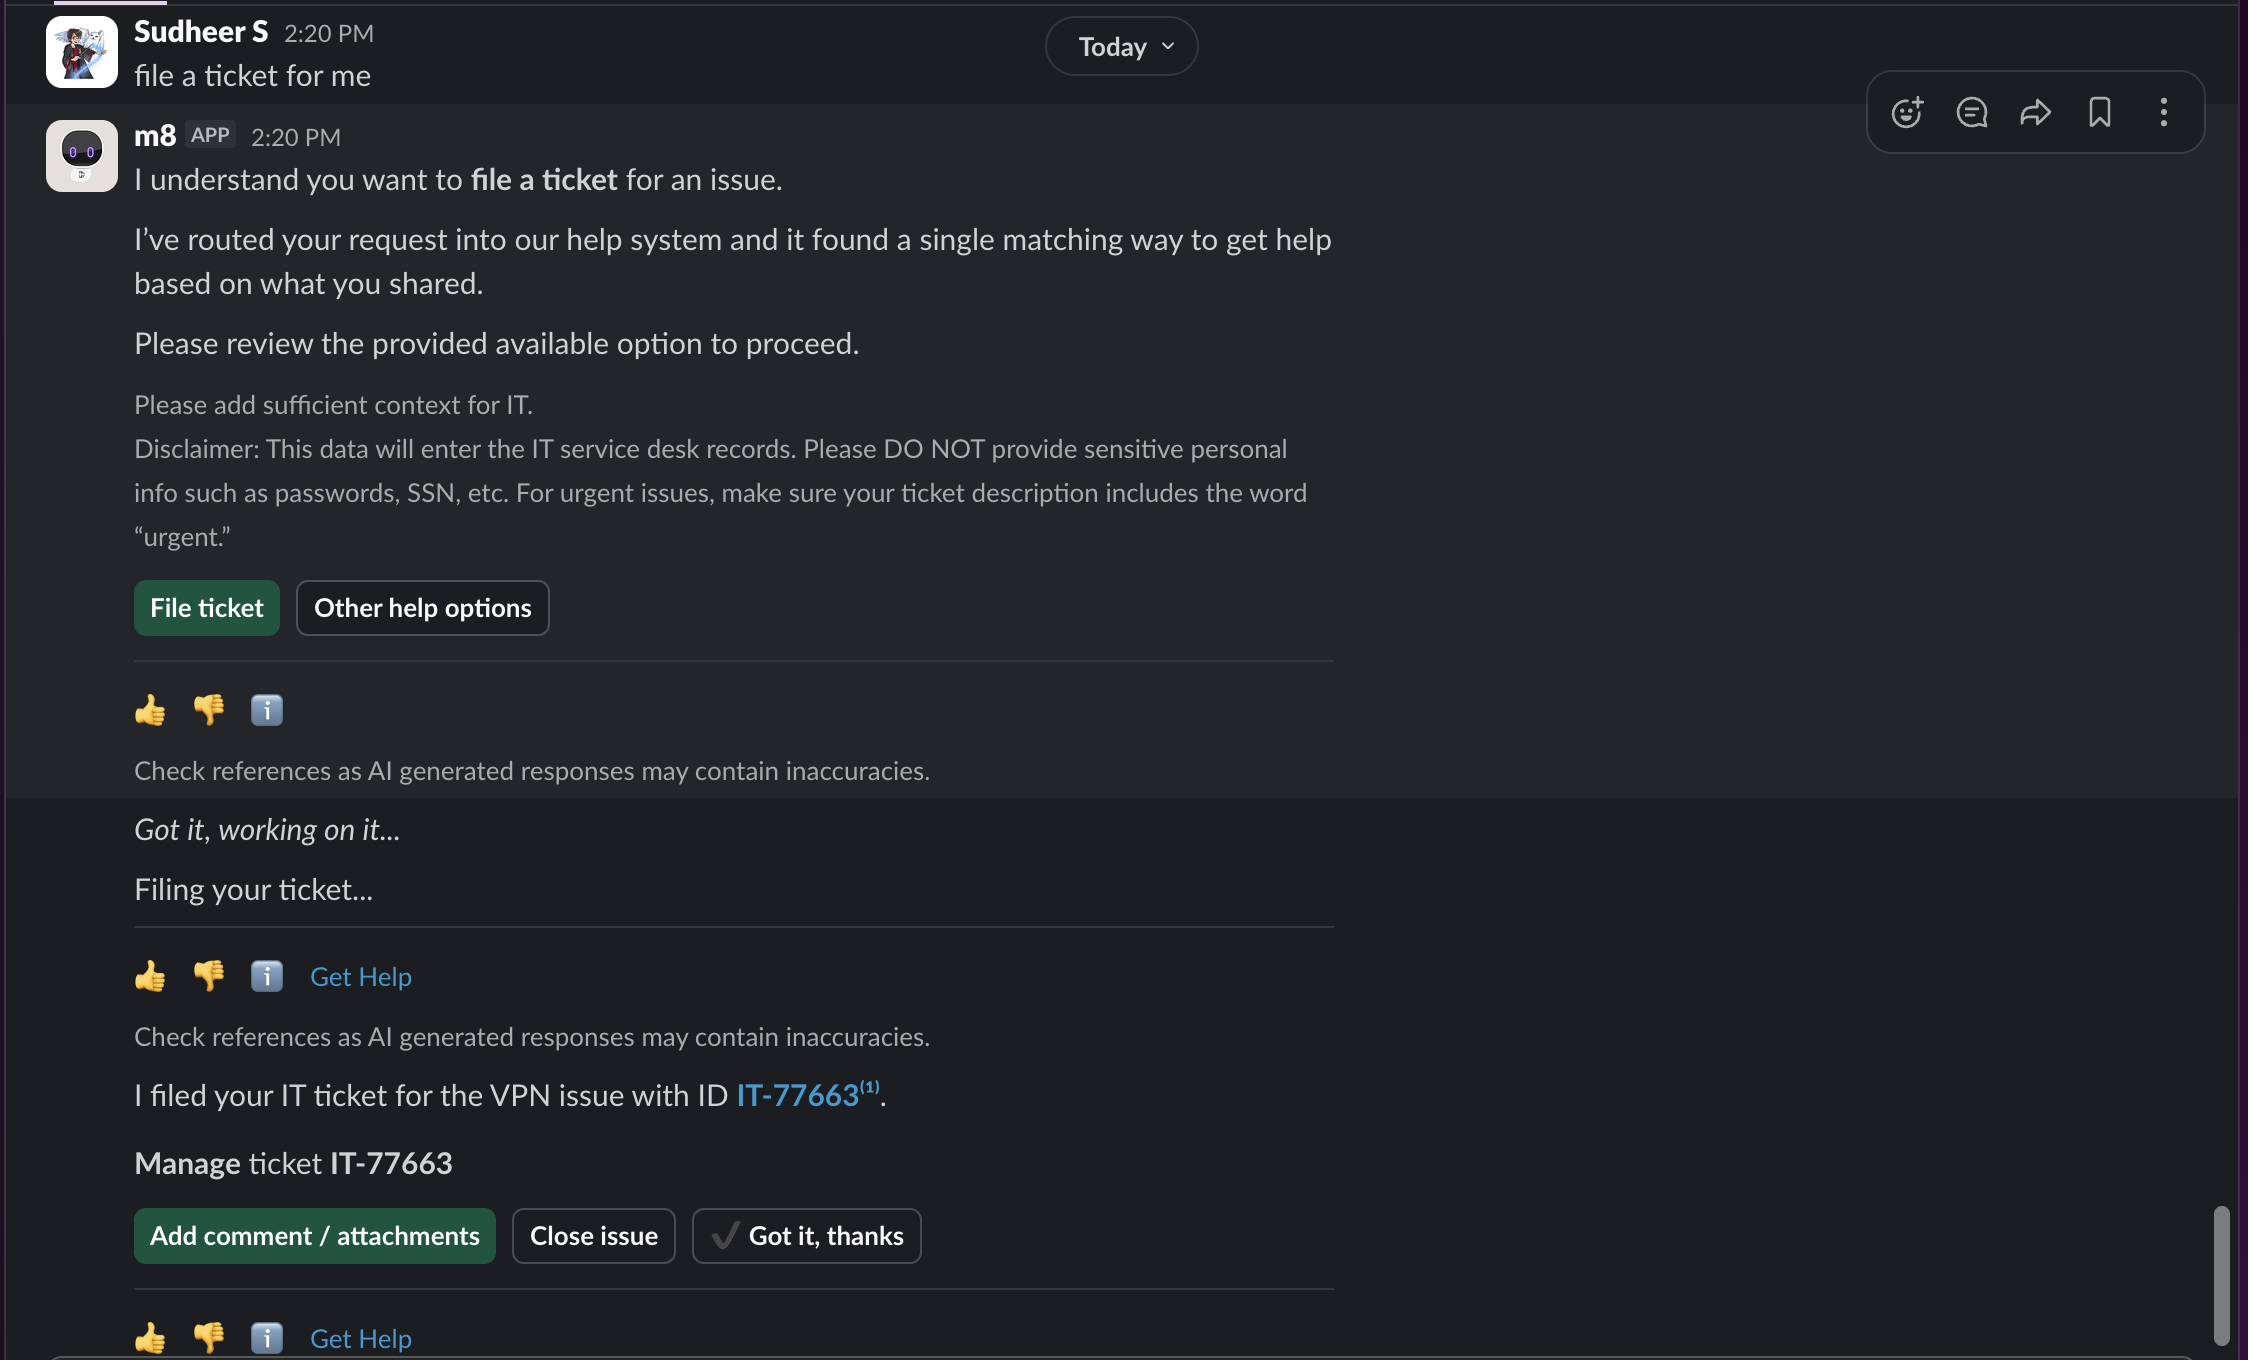
Test file ticket
Ask the Moveworks AI Assistant to file a ticket by entering a sample request, such as “My VPN is not connecting” and then click File Ticket. This action should create a Jira ticket in the configured project and issue or request type.
5. How to add a new destination
After successfully testing the default configuration, you can expand ticketing use cases by adding additional Jira destinations. In Jira, a destination represents a Jira project combined with an issue type or request type.
To add a new destination:
-
Navigate to the Issue and Request Type mappings section.
-
Click Create New in the top-right corner.
-
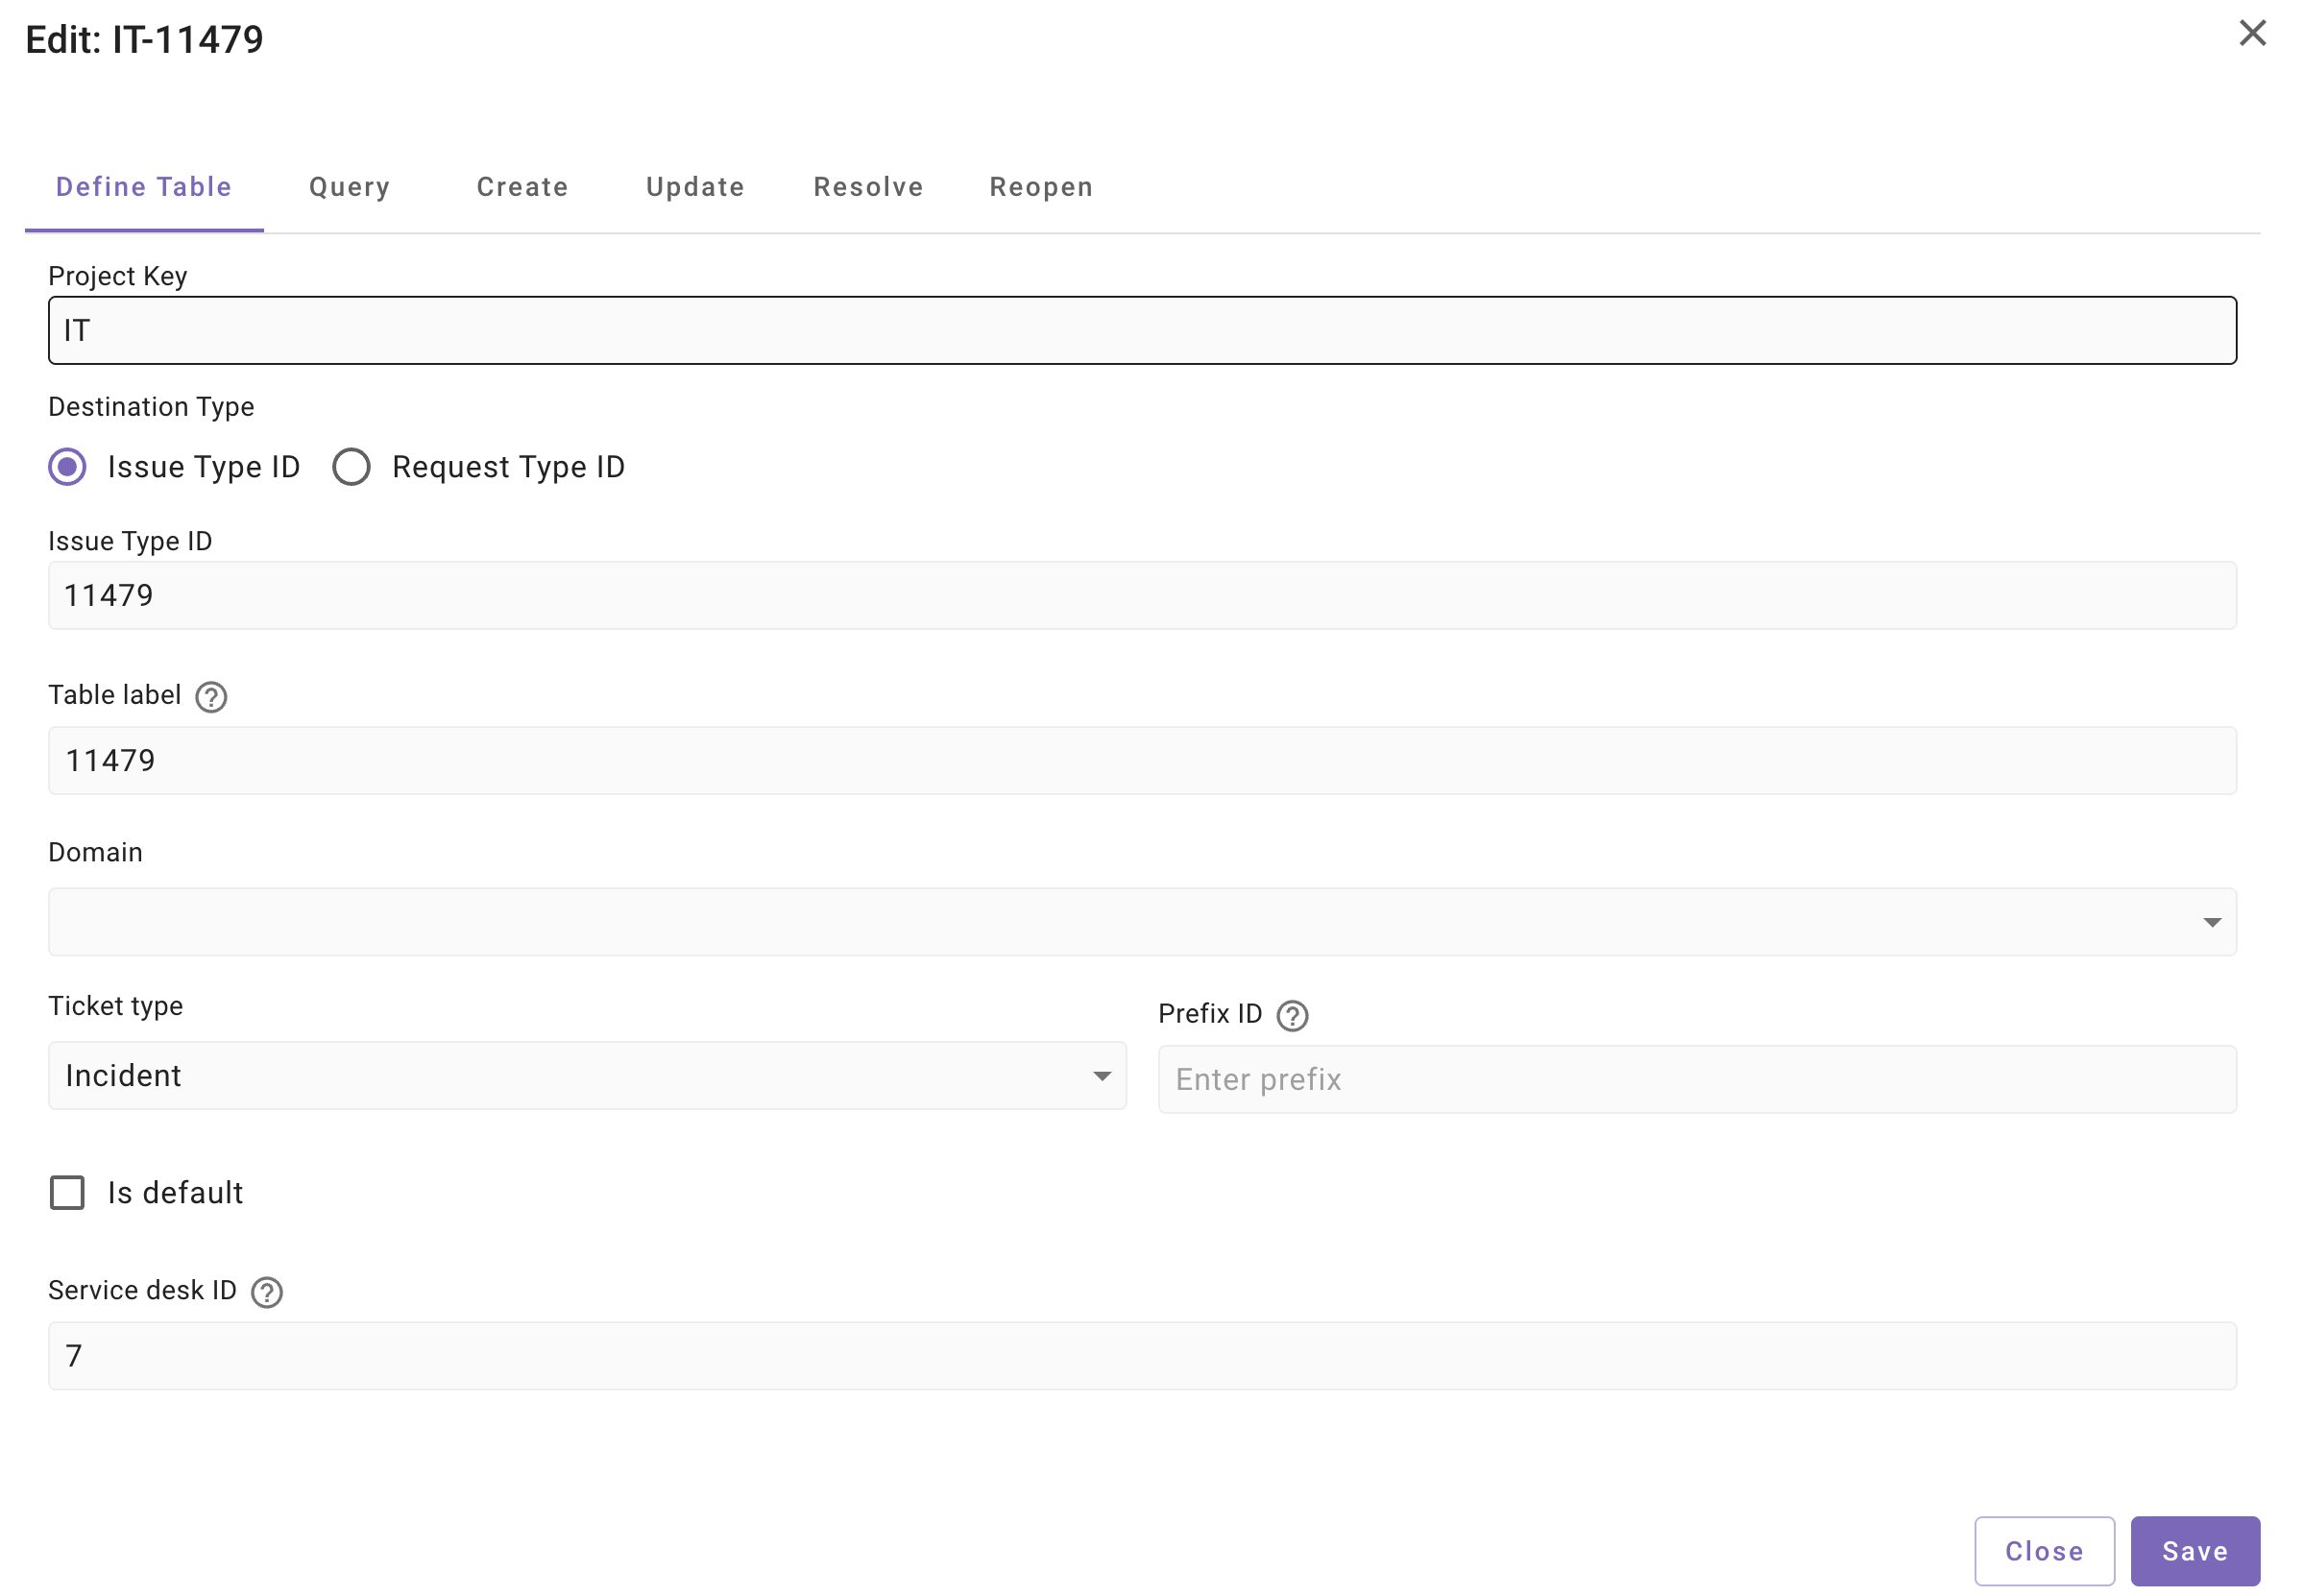
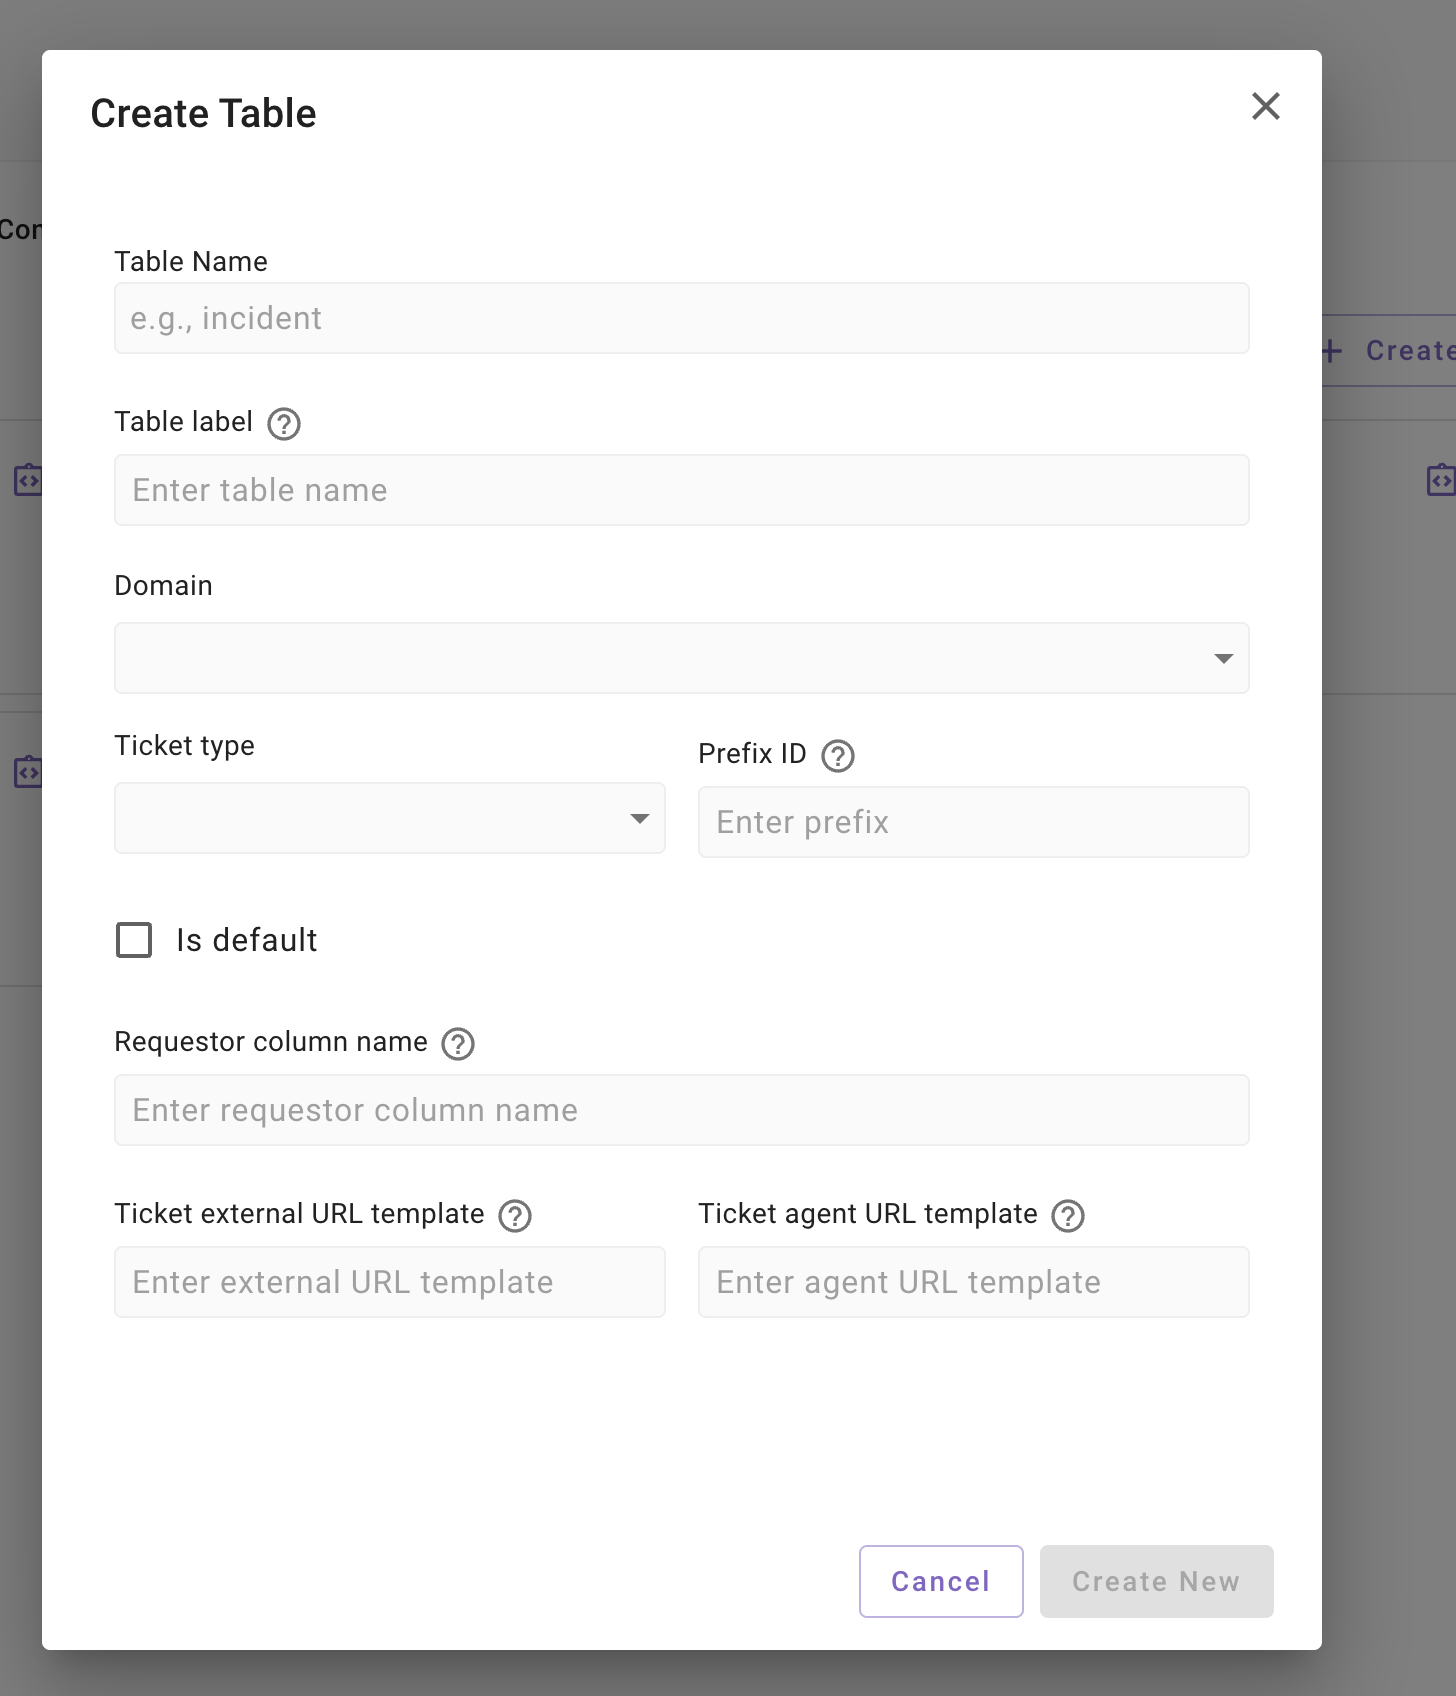
The Create Table modal opens. Complete the fields described below and click Create New.

Field details
- Project Key : Enter the Jira project key where tickets should be created and read. For example:
IT,HELP,HR - Destination Type : Select one of the following:
-
Issue Type ID – for Jira issue types such as Incident or Bug
-
Request Type ID – for Jira Service Management request types shown in the portal
Issue Type ID vs Request Type ID
- Use Issue Type ID when creating standard Jira issues such as Incident, Bug, or Task.
- Use Request Type ID when creating Jira Service Management portal requests that users see in the service portal (for example, Get IT Help or Access Request).
- If you are using a Request Type ID, you must also provide the Service Desk ID.
How to find Issue Type ID and Request Type ID
-
Finding the Issue Type ID
Issue Type IDs can be identified from the browser URL in Jira.
To find the Issue Type ID:
-
Go to ⚙️ Jira Settings → Issues → Issue types (admin access required).
-
Click on the issue type you want to use (for example, Incident or Bug).
-
Look at the URL in your browser.
-
The URL will look similar to:
- The number at the end of the URL (10001 in this example) is the Issue Type ID required in this configuration.
-
-
Finding the Request Type ID
Request Types are the forms shown to users in the Jira Service Management portal (for example, Get IT Help or Access Request).
To find the Request Type ID:
-
Navigate to your Jira Service Management project.
-
Go to Project settings → Request types.
-
Click on the request type you want to enable.
-
Look at the URL in your browser.
-
The URL will look similar to:
- The number at the end of the URL (45 in this example) is the Request Type ID.
-
-
Finding the Service Desk ID
When using a Request Type ID, you must also provide the Service Desk ID.
To find the Service Desk ID:
-
Open your Jira Service Management project.
-
Go to Project settings.
-
Look at the URL in your browser.
-
The URL may look similar to:
- The numeric value in the URL (10003 in this example) is the Service Desk ID.
-
-
- Issue Type ID / Request Type ID : Enter the ID value for the selected issue type or request type.
- Table Label : A Moveworks identifier for this destination. Use a clear, descriptive label such as
it_incidentoraccess_request. - Domain : Select the business domain this destination belongs to, such as IT or HR.
- Ticket Type : Select the ticket category this destination represents, for example:
- INCIDENT
- REQUEST
- Prefix ID : Configure the prefix used when displaying ticket identifiers. For example:
IT,HELP - Is Default : Enable this option only if this destination should be used as the default destination for ticket creation.
- Service Desk ID : Enter the Jira Service Desk ID associated with the request types in this project. This is required for request-type ticket creation.
After creating the destination
Once the destination is created, it appears in the destination list. You must then review and configure the following mappings for that destination:
- Query ticket payload – defines how Moveworks reads tickets from Jira
- Create ticket payload – defines the fields sent when creating a ticket
- Update ticket payload – defines how tickets are updated
- Resolve ticket payload – defines how tickets are resolved
- Reopen ticket payload – defines how tickets are reopened
Moveworks provides default payloads that you can reuse or customize as needed.
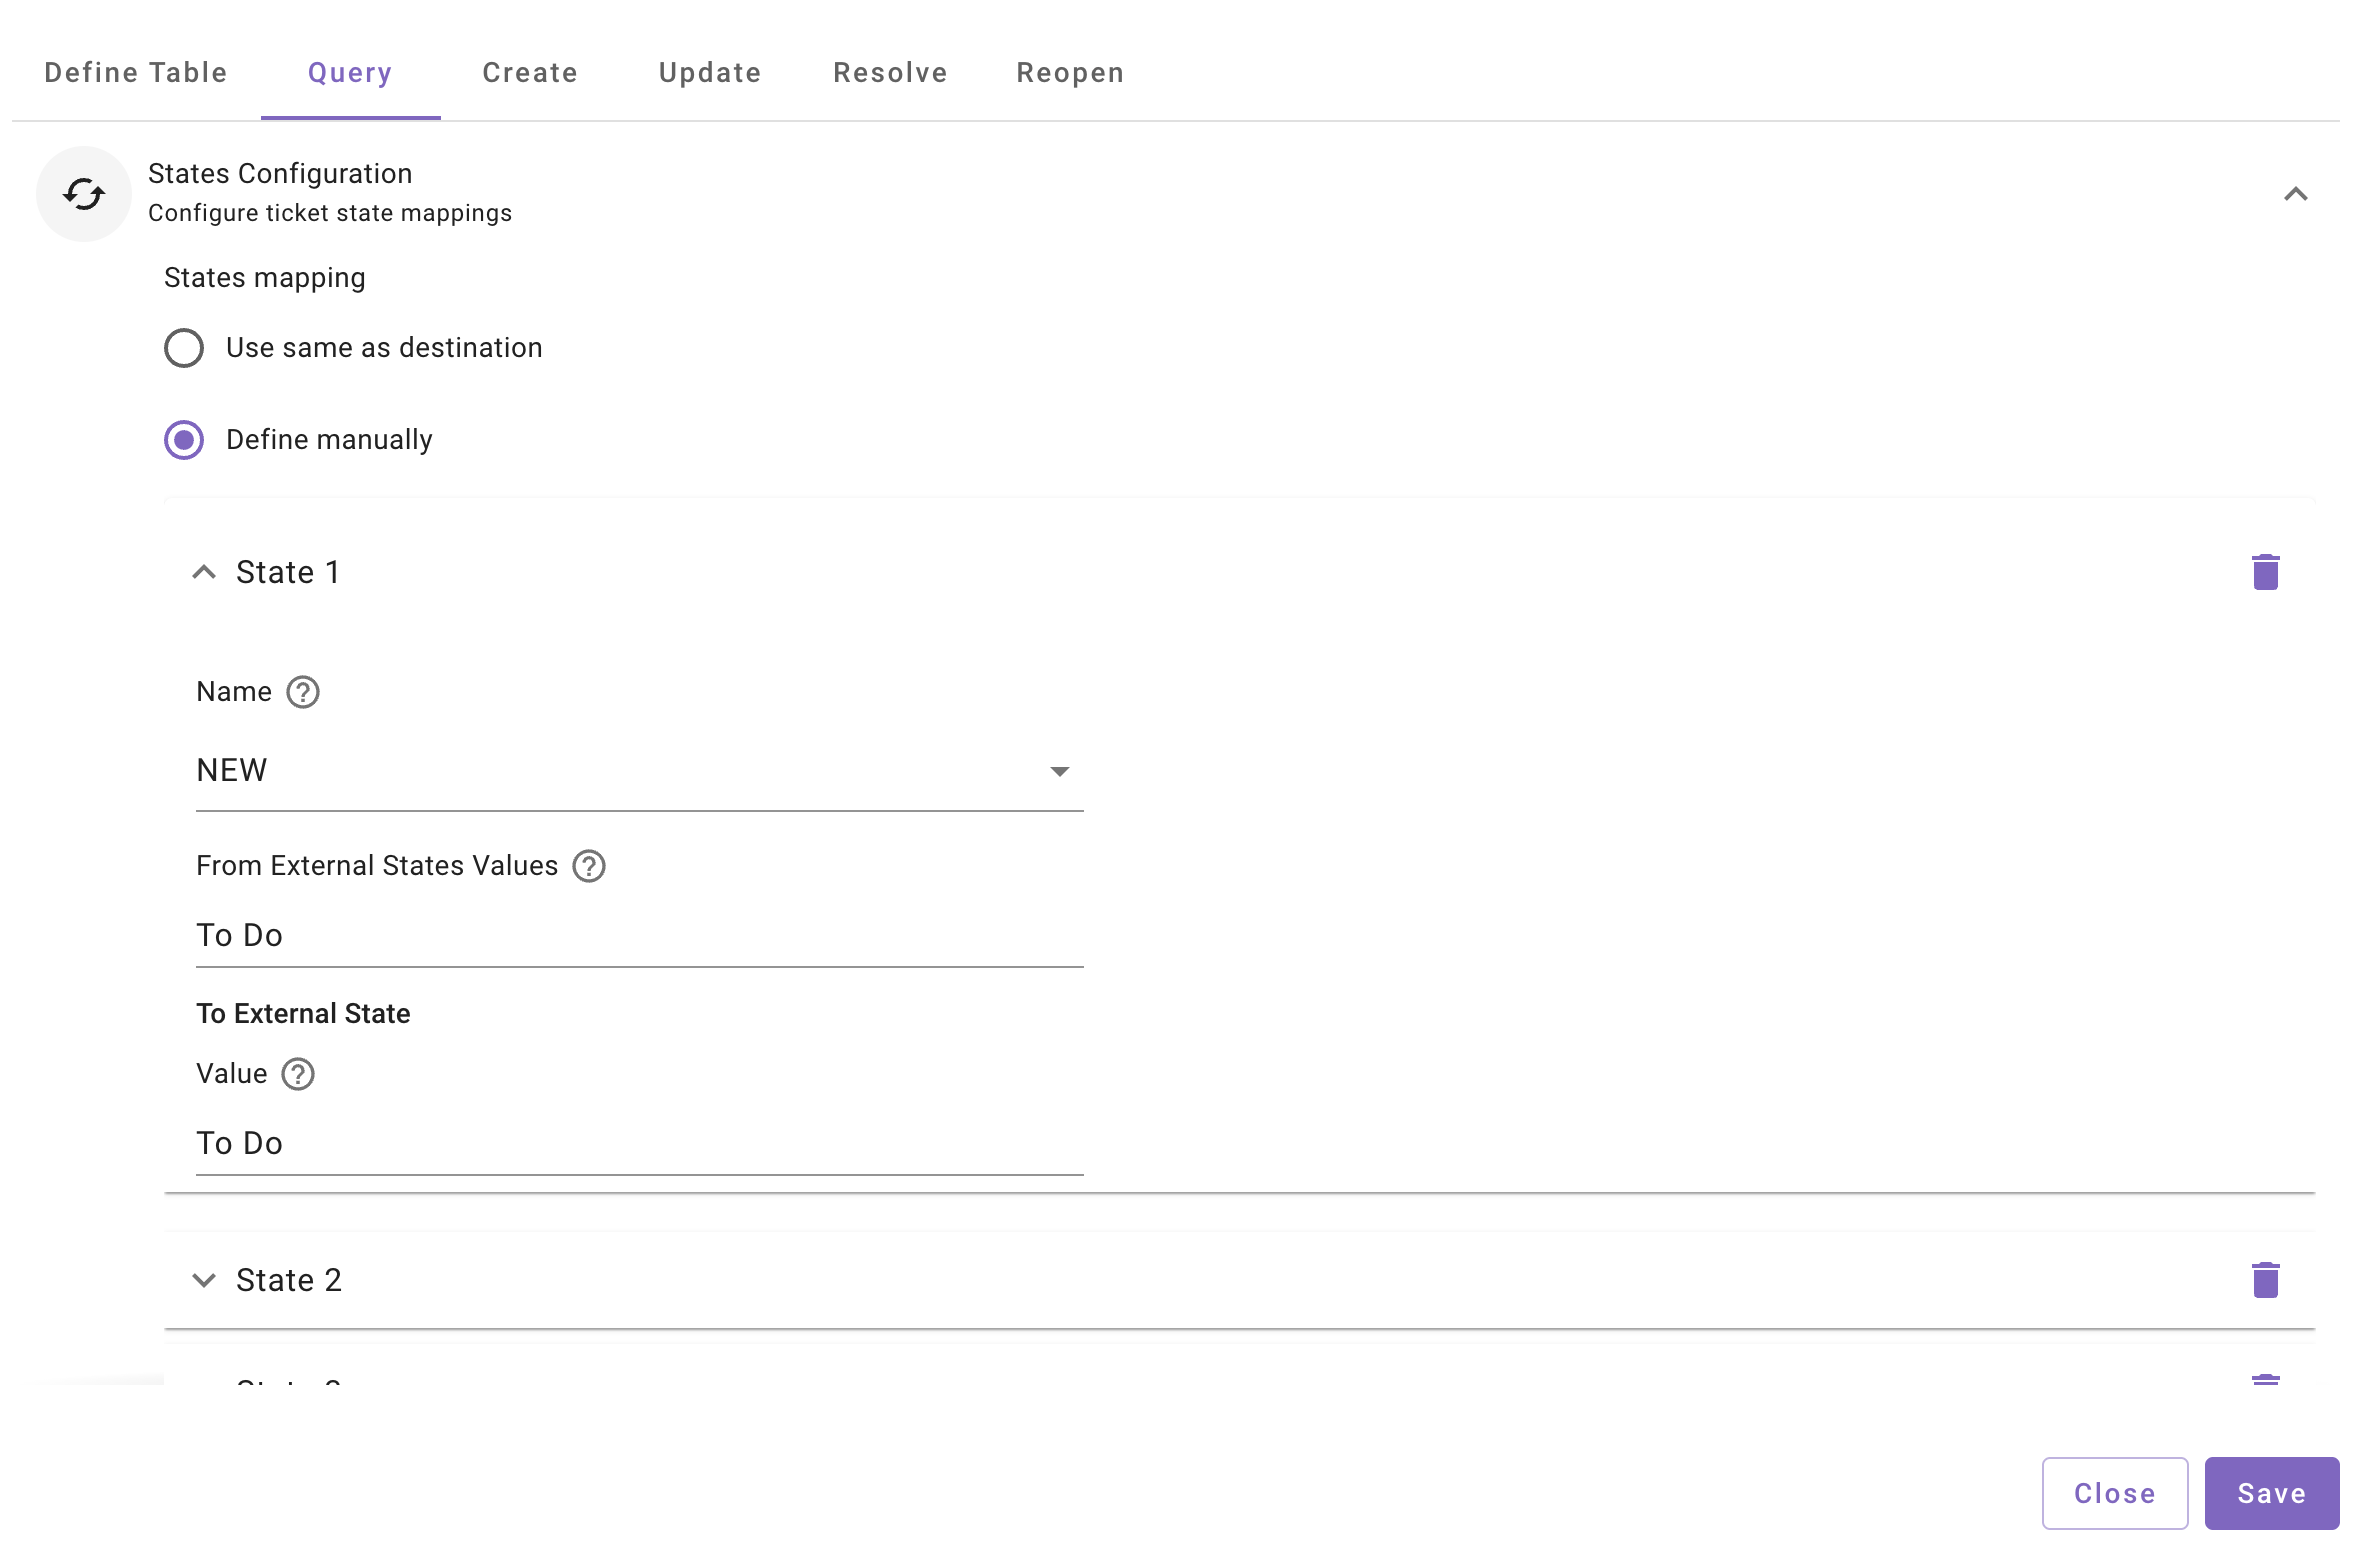
State mapping
Each ticket in Jira moves through a workflow using statuses and transitions. State mapping allows Moveworks to understand how Jira ticket statuses map to Moveworks internal ticket states, and how tickets should transition when actions such as resolve or reopen are performed.
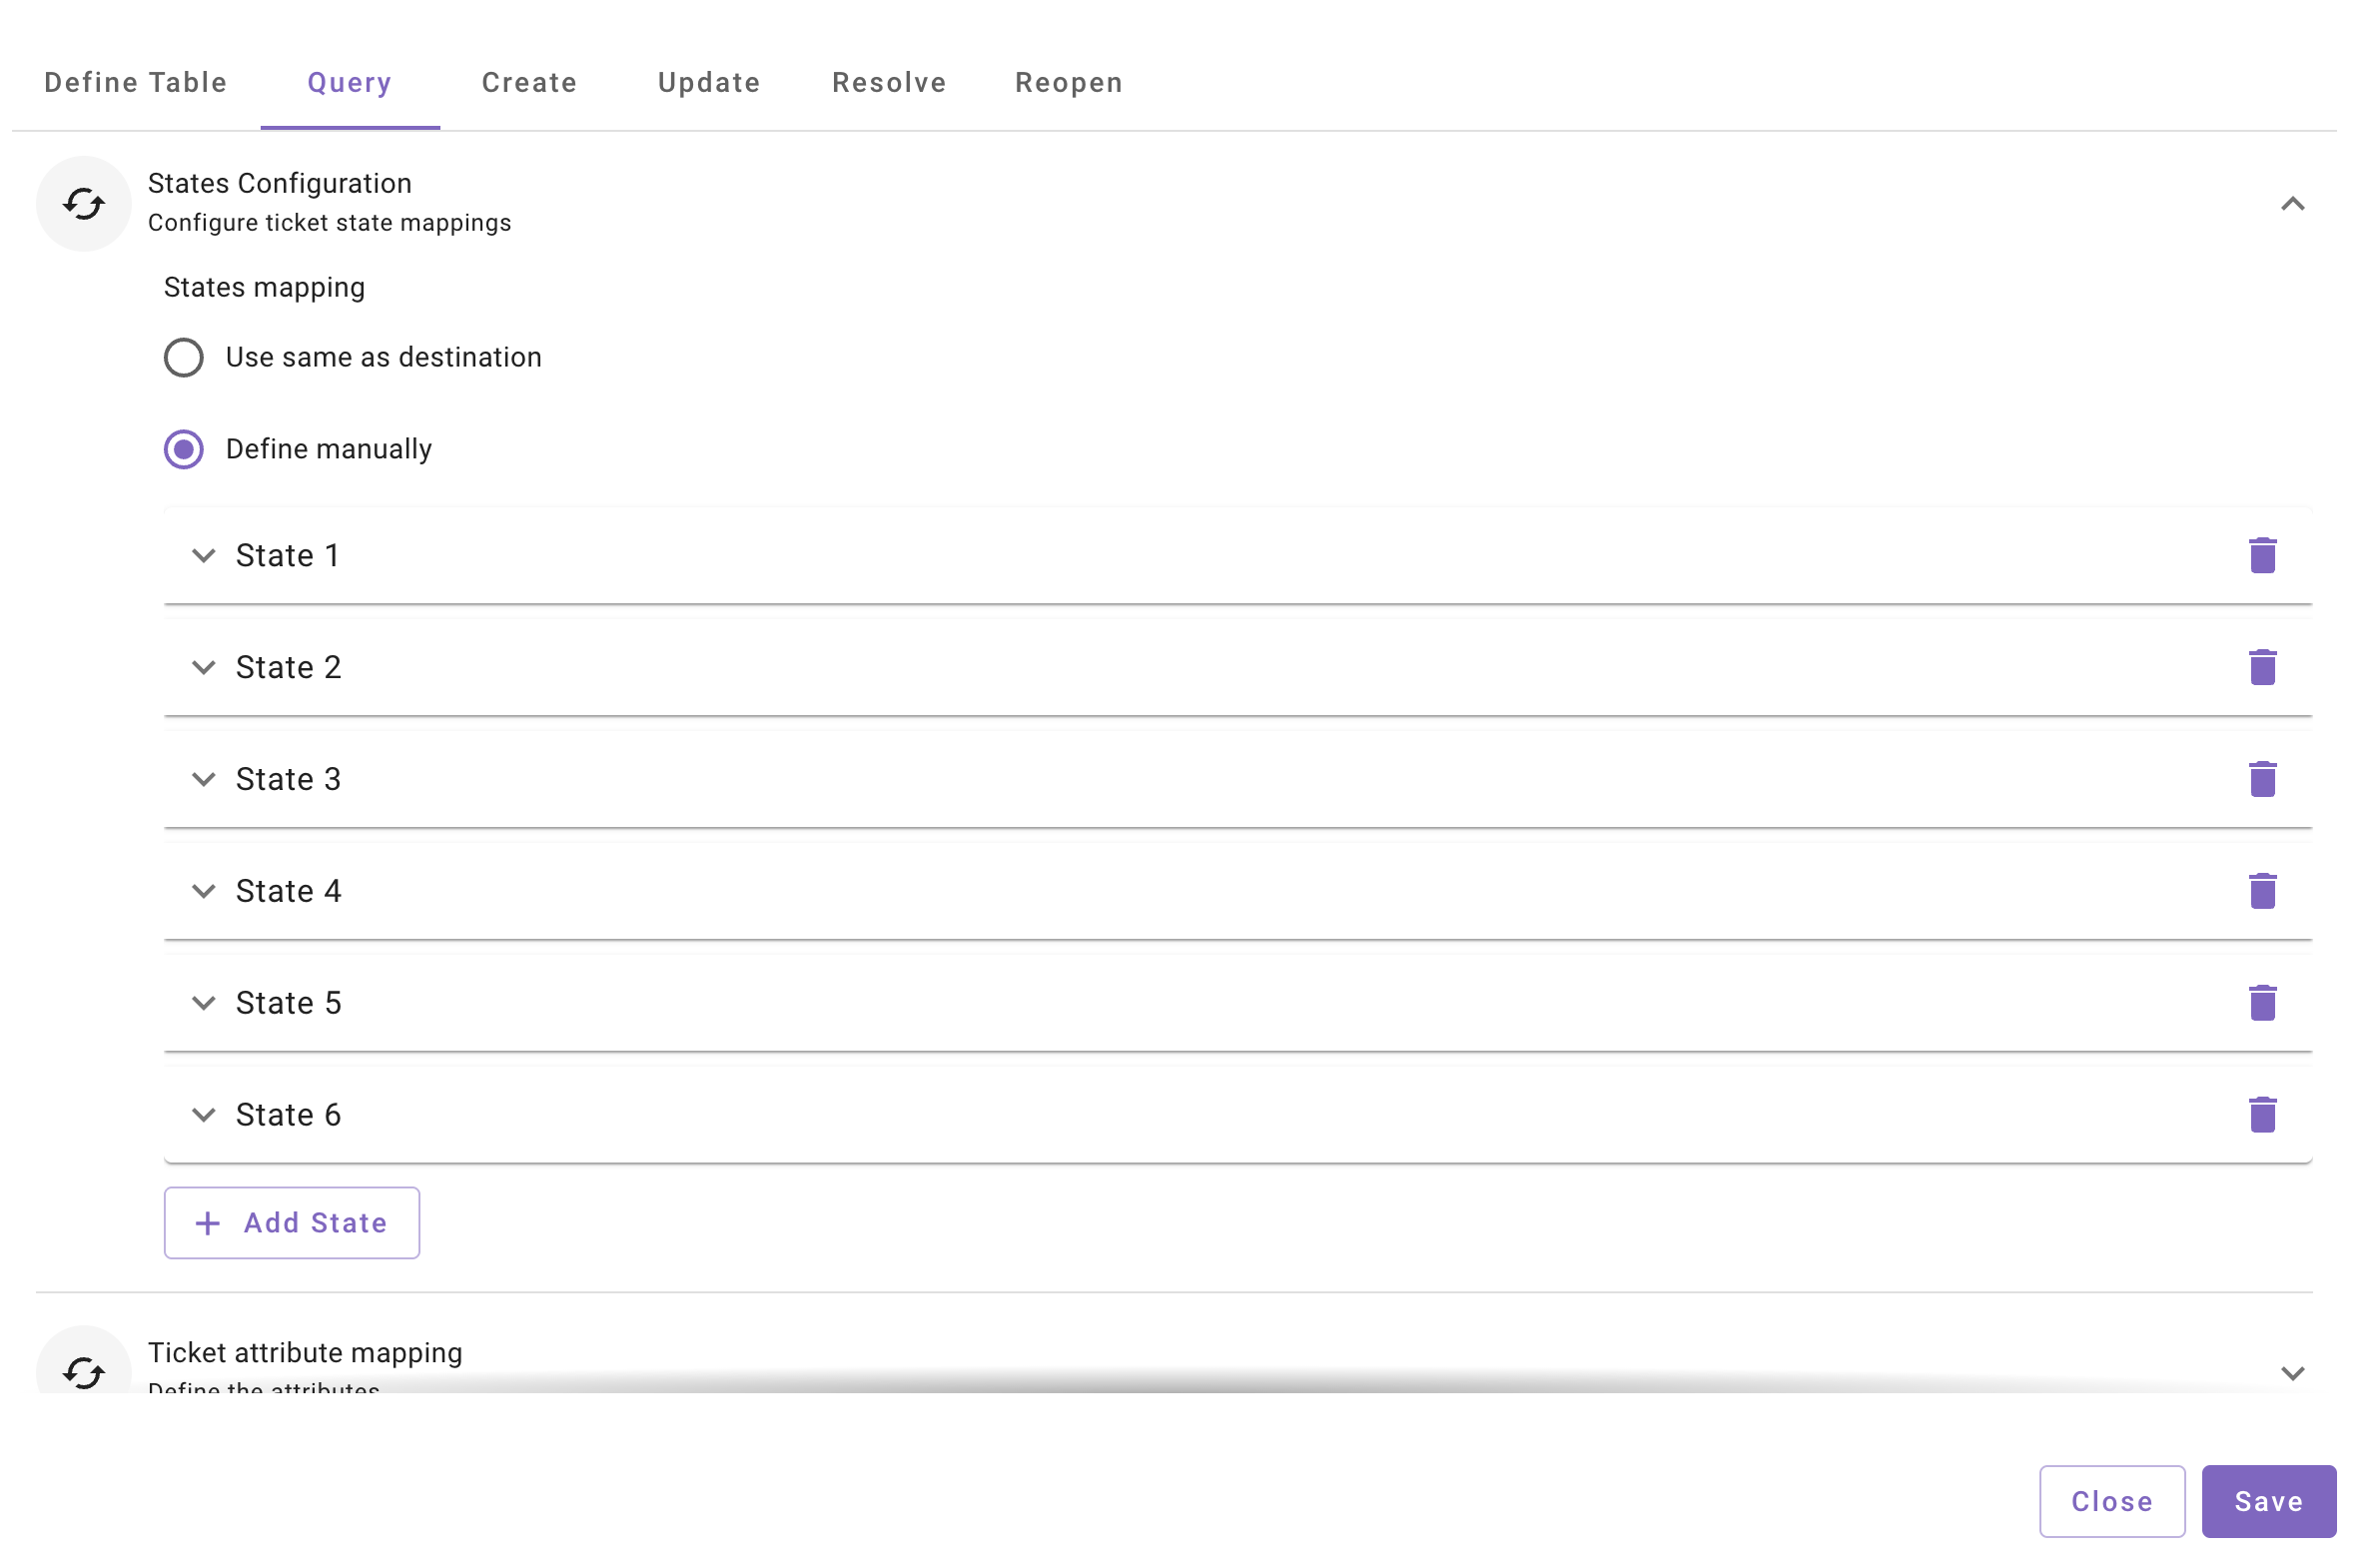
Map each Jira status to a corresponding Moveworks state and configure the following fields:
Name : These are Moveworks internal ticket states. Select the appropriate state from the dropdown.
From External State values : Enter the Jira status names that correspond to the selected Moveworks state. These values should match the status names returned by Jira in the issue payload (for example, Open, In Progress, Waiting for Customer).
To External State value : Enter the transition identifier or mapped transition value that Jira expects when moving the ticket to the target state (for example, resolving or reopening a ticket). Ensure that the configured transitions are valid for the selected Jira project and issue or request type.
Ticket Attribute Mapping
Moveworks needs to understand the structure of a Jira ticket in order to read, create, and update tickets correctly. Ticket attribute mapping defines how fields from the Jira ticket payload map to the internal Moveworks ticket object.
Refer to the Moveworks ticket data object documentation to understand the supported ticket attributes.
There are two ways to configure ticket attribute mapping:
-
Use same as : Reuse the ticket attribute mapping from a previously configured destination.
-
Define manually : In this you will need to enter a JSON mapping of fields from the Jira ticket to Moveworks ticket object. Check the example below for the incident table.
-
Create ticket payload
Moveworks creates tickets in Jira using Jira Service Management APIs. The create ticket payload defines the fields sent when creating a new ticket. You can configure the create ticket payload using one of the following methods:
-
Use same as : Reuse the create ticket payload from a previously configured destination.
-
Define manually : Provide a JSON mapping that defines how Moveworks ticket fields map to Jira request fields.
-
-
Update ticket payload
Moveworks updates Jira tickets in response to user requests, such as adding comments or updating ticket details. Configure the update ticket payload using one of the following methods:
-
Use same as : Reuse the update ticket payload from a previously configured destination.
-
Define manually : Provide a JSON mapping that defines the fields sent to Jira when updating a ticket.
-
-
Resolve ticket payload
Moveworks can resolve Jira tickets based on end-user requests. Jira typically expects a valid workflow transition and, in some cases, additional resolution fields. You can configure the resolve ticket payload using one of the following methods:
Use same as : Reuse the resolve ticket payload from a previously configured destination.
Define manually : Provide a JSON mapping that defines the fields or transition required to resolve the ticket.
-
Reopen ticket payload
Moveworks can reopen resolved tickets based on end-user requests, depending on how the Jira workflow is configured. Configure the reopen ticket payload using one of the following methods:
Use same as : Reuse the reopen ticket payload from a previously configured destination.
Define manually : Provide a JSON mapping that defines how the ticket should be reopened in Jira.
6. Transition configuration
This section is used to define the Jira workflow transitions that Moveworks will use when performing ticket state changes, such as moving a ticket to In Progress or Resolved.
Moveworks uses existing Jira transitions and does not create or modify Jira workflows. You must configure the transition details here so Moveworks knows which Jira transition to invoke for each ticket state change.
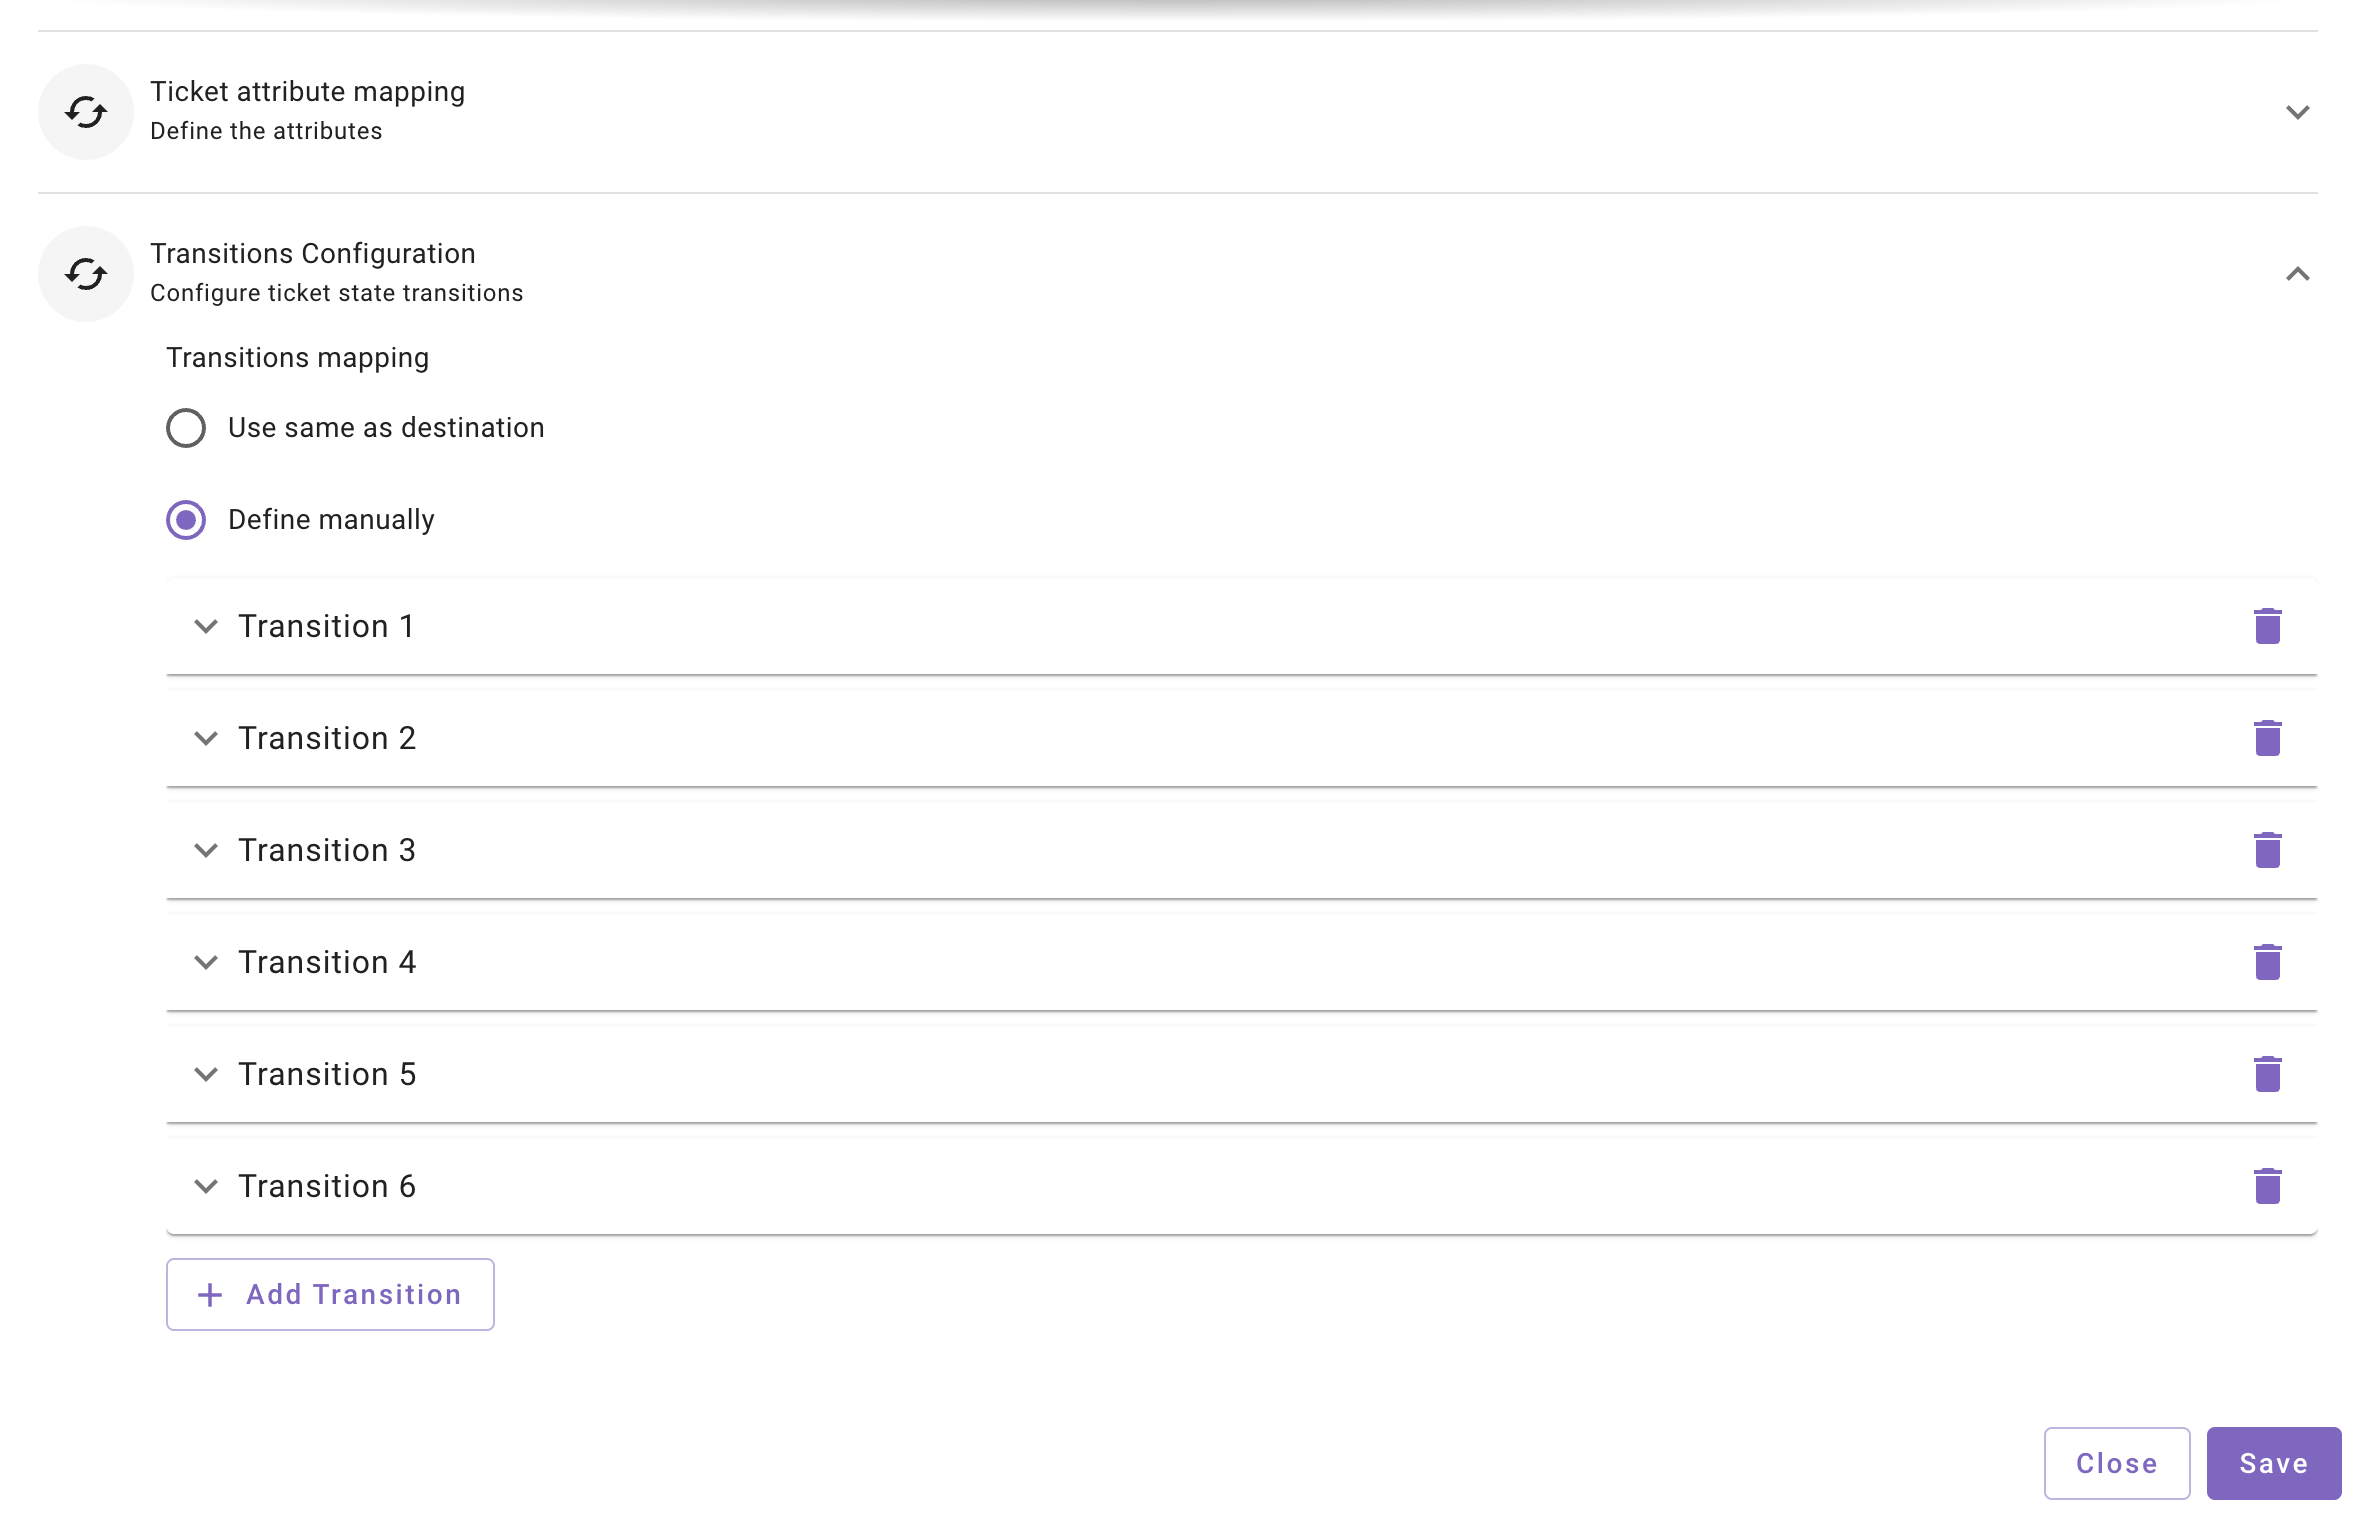
Transitions mapping
You can choose one of the following options:
-
Use same as destination : Reuse the transition configuration from another destination.
-
Define manually : Manually configure the Jira transitions for this destination. Select Define manually to configure transitions individually.
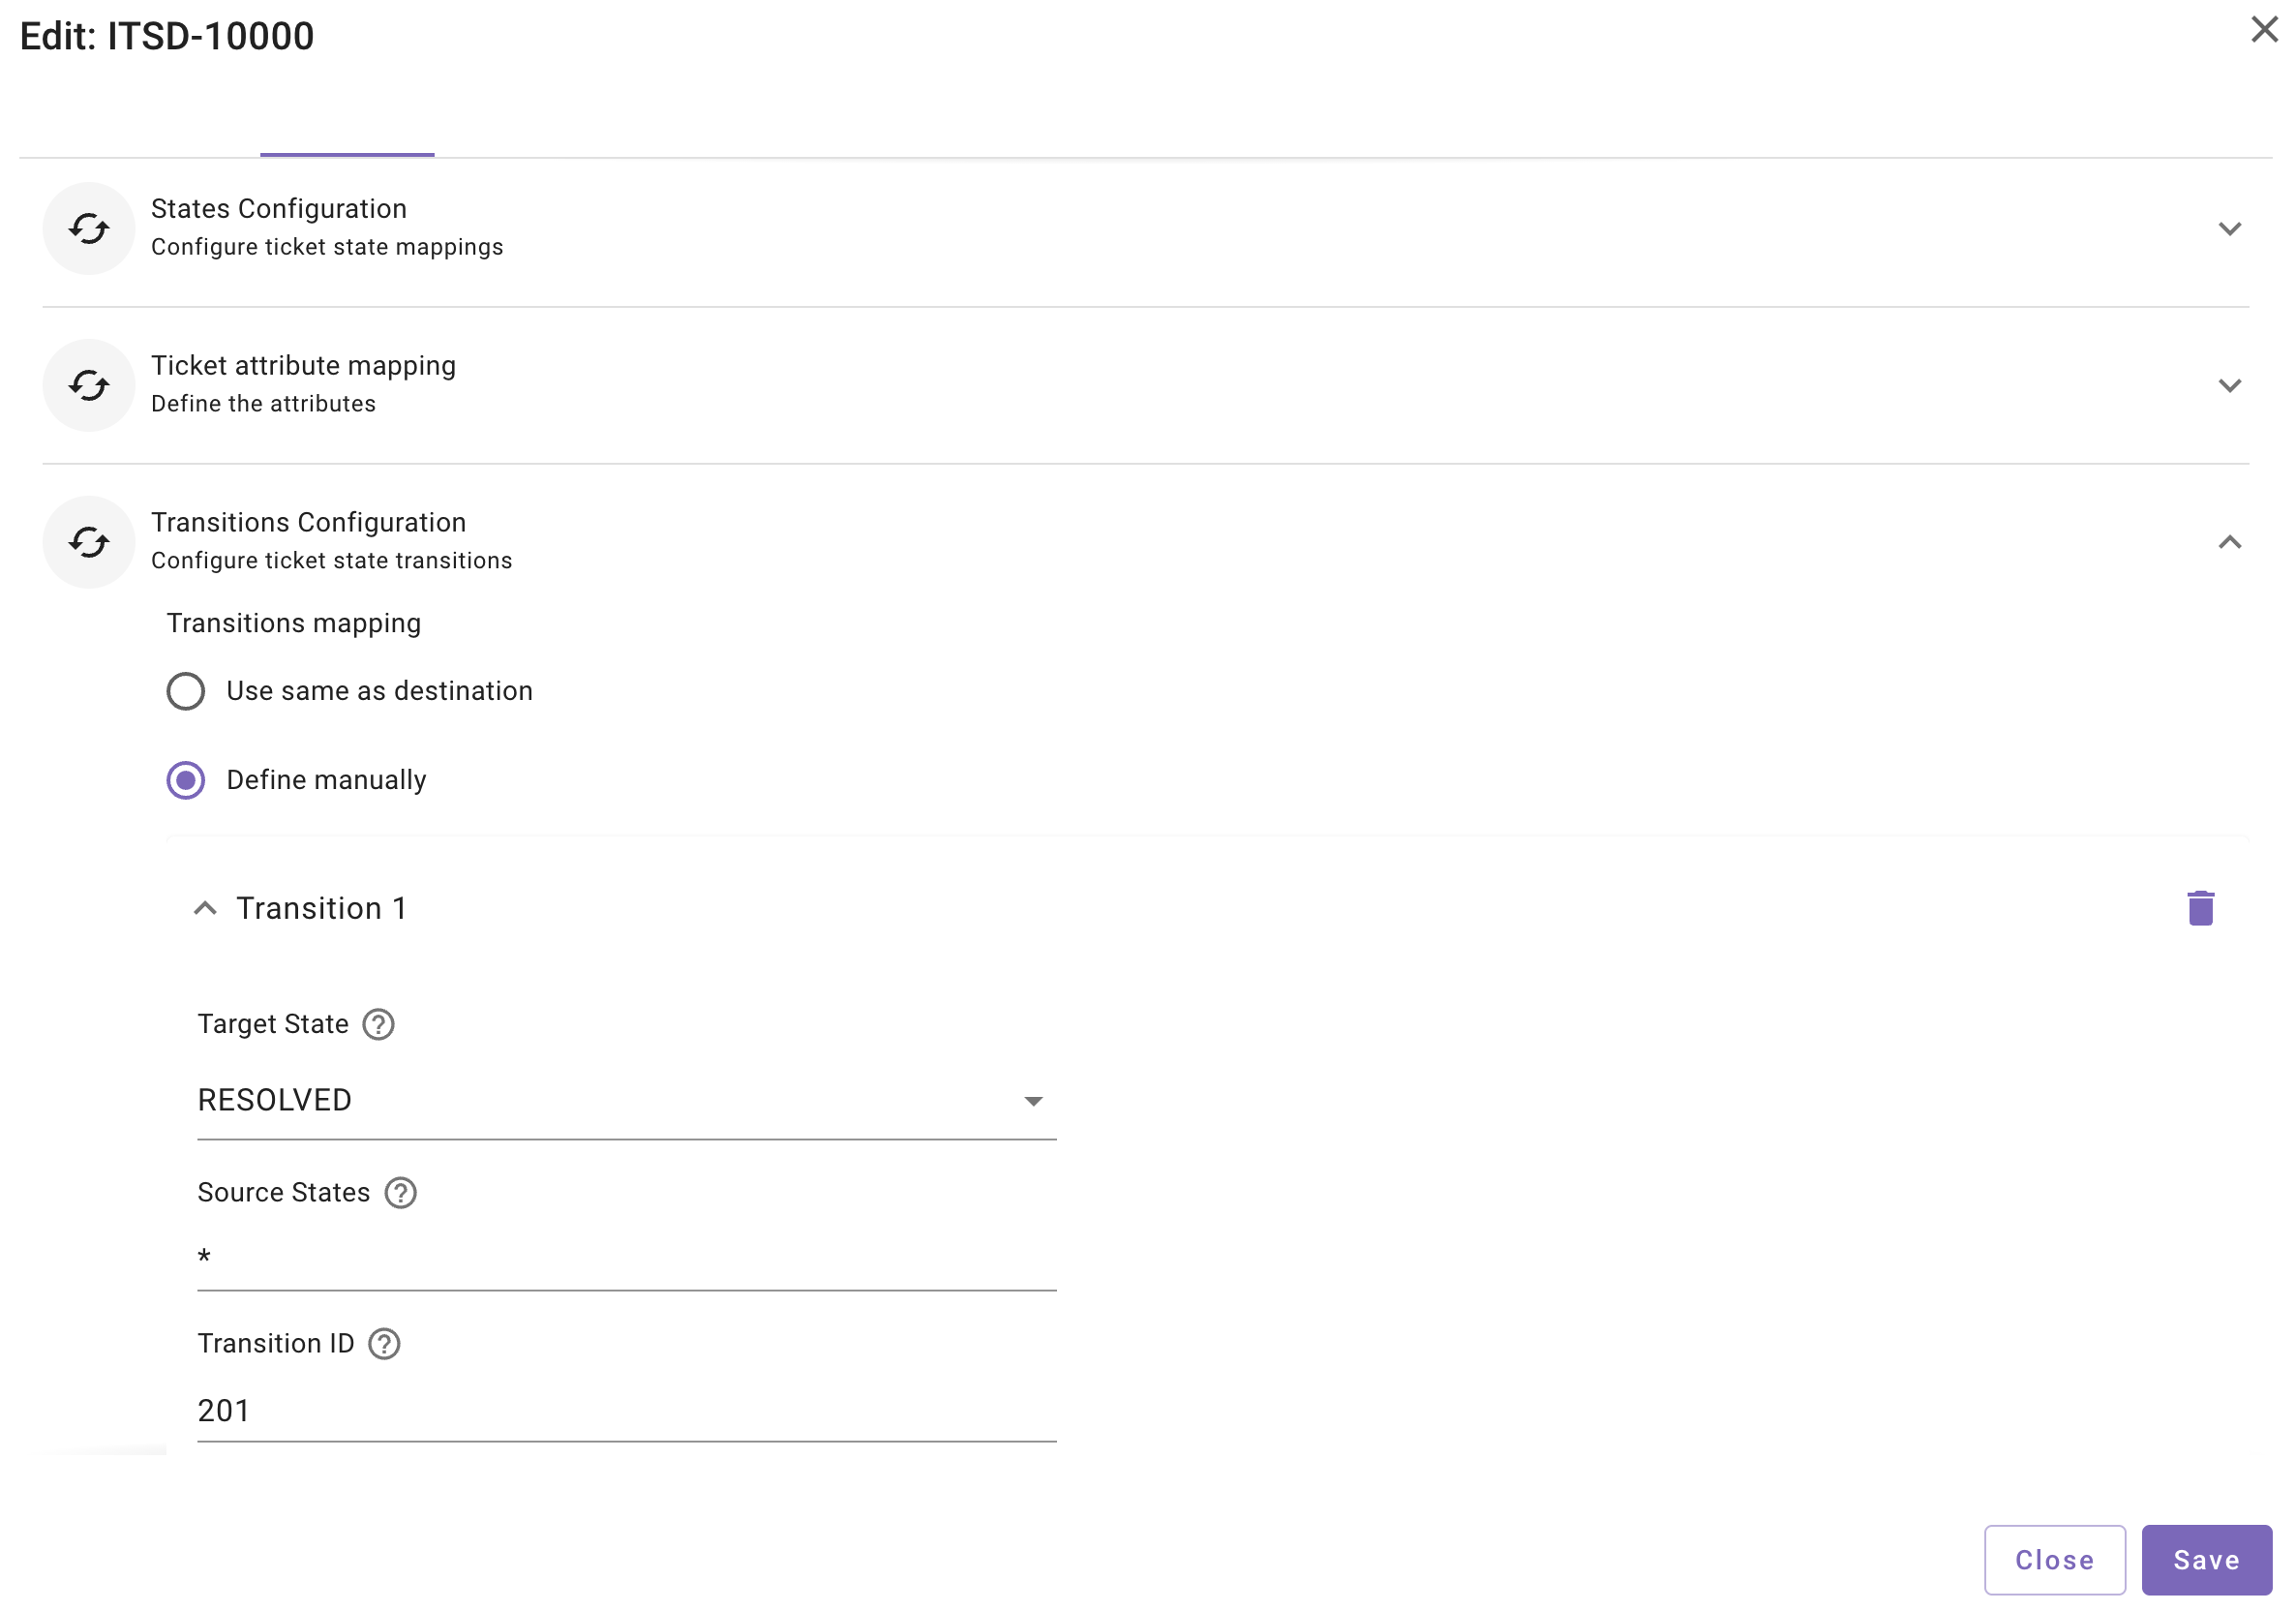
Transition details
For each transition, configure the following fields:
Target State : The Moveworks ticket state that the ticket should move to when this transition is applied. For example: RESOLVED, WIP
Source States : The Jira ticket states from which this transition can be applied.
- Enter a specific Jira state to restrict the transition.
- Use to allow the transition from any Jira state.
Transition ID : The Jira transition ID that moves the ticket from the source state to the target state. This ID must match an existing transition defined in the Jira workflow for the selected project and issue or request type.
Where to find the Transition ID
Each Jira workflow transition has a unique numeric ID. Transition IDs are not visible directly in the Jira workflow UI.
To retrieve the Transition ID:
- Open an existing issue that belongs to the same project and issue or request type you are configuring.
- Identify the workflow action you want to use (for example, Resolve, Done, or Reopen).
- Use the Jira REST API to list the available transitions for that issue.
- Copy the Transition ID corresponding to the desired state change.
Ensure that:
- The transition exists in the workflow applied to the selected project and issue/request type.
- The service account used by Moveworks has permission to execute that transition.
Multiple transitions
You can configure multiple transitions for a single destination.
For example:
- One transition to move tickets to WIP
- Another transition to move tickets to RESOLVED
- Additional transitions for reopen or other custom states
Moveworks evaluates the configured transitions and applies the appropriate transition based on the requested ticket action.

7. Enable generate ticket action for a new destination
To enable ticket creation for a new destination, you must first ensure that the destination has already been created and that the Create ticket payload is configured correctly. The previous section walks through how to set up a destination.
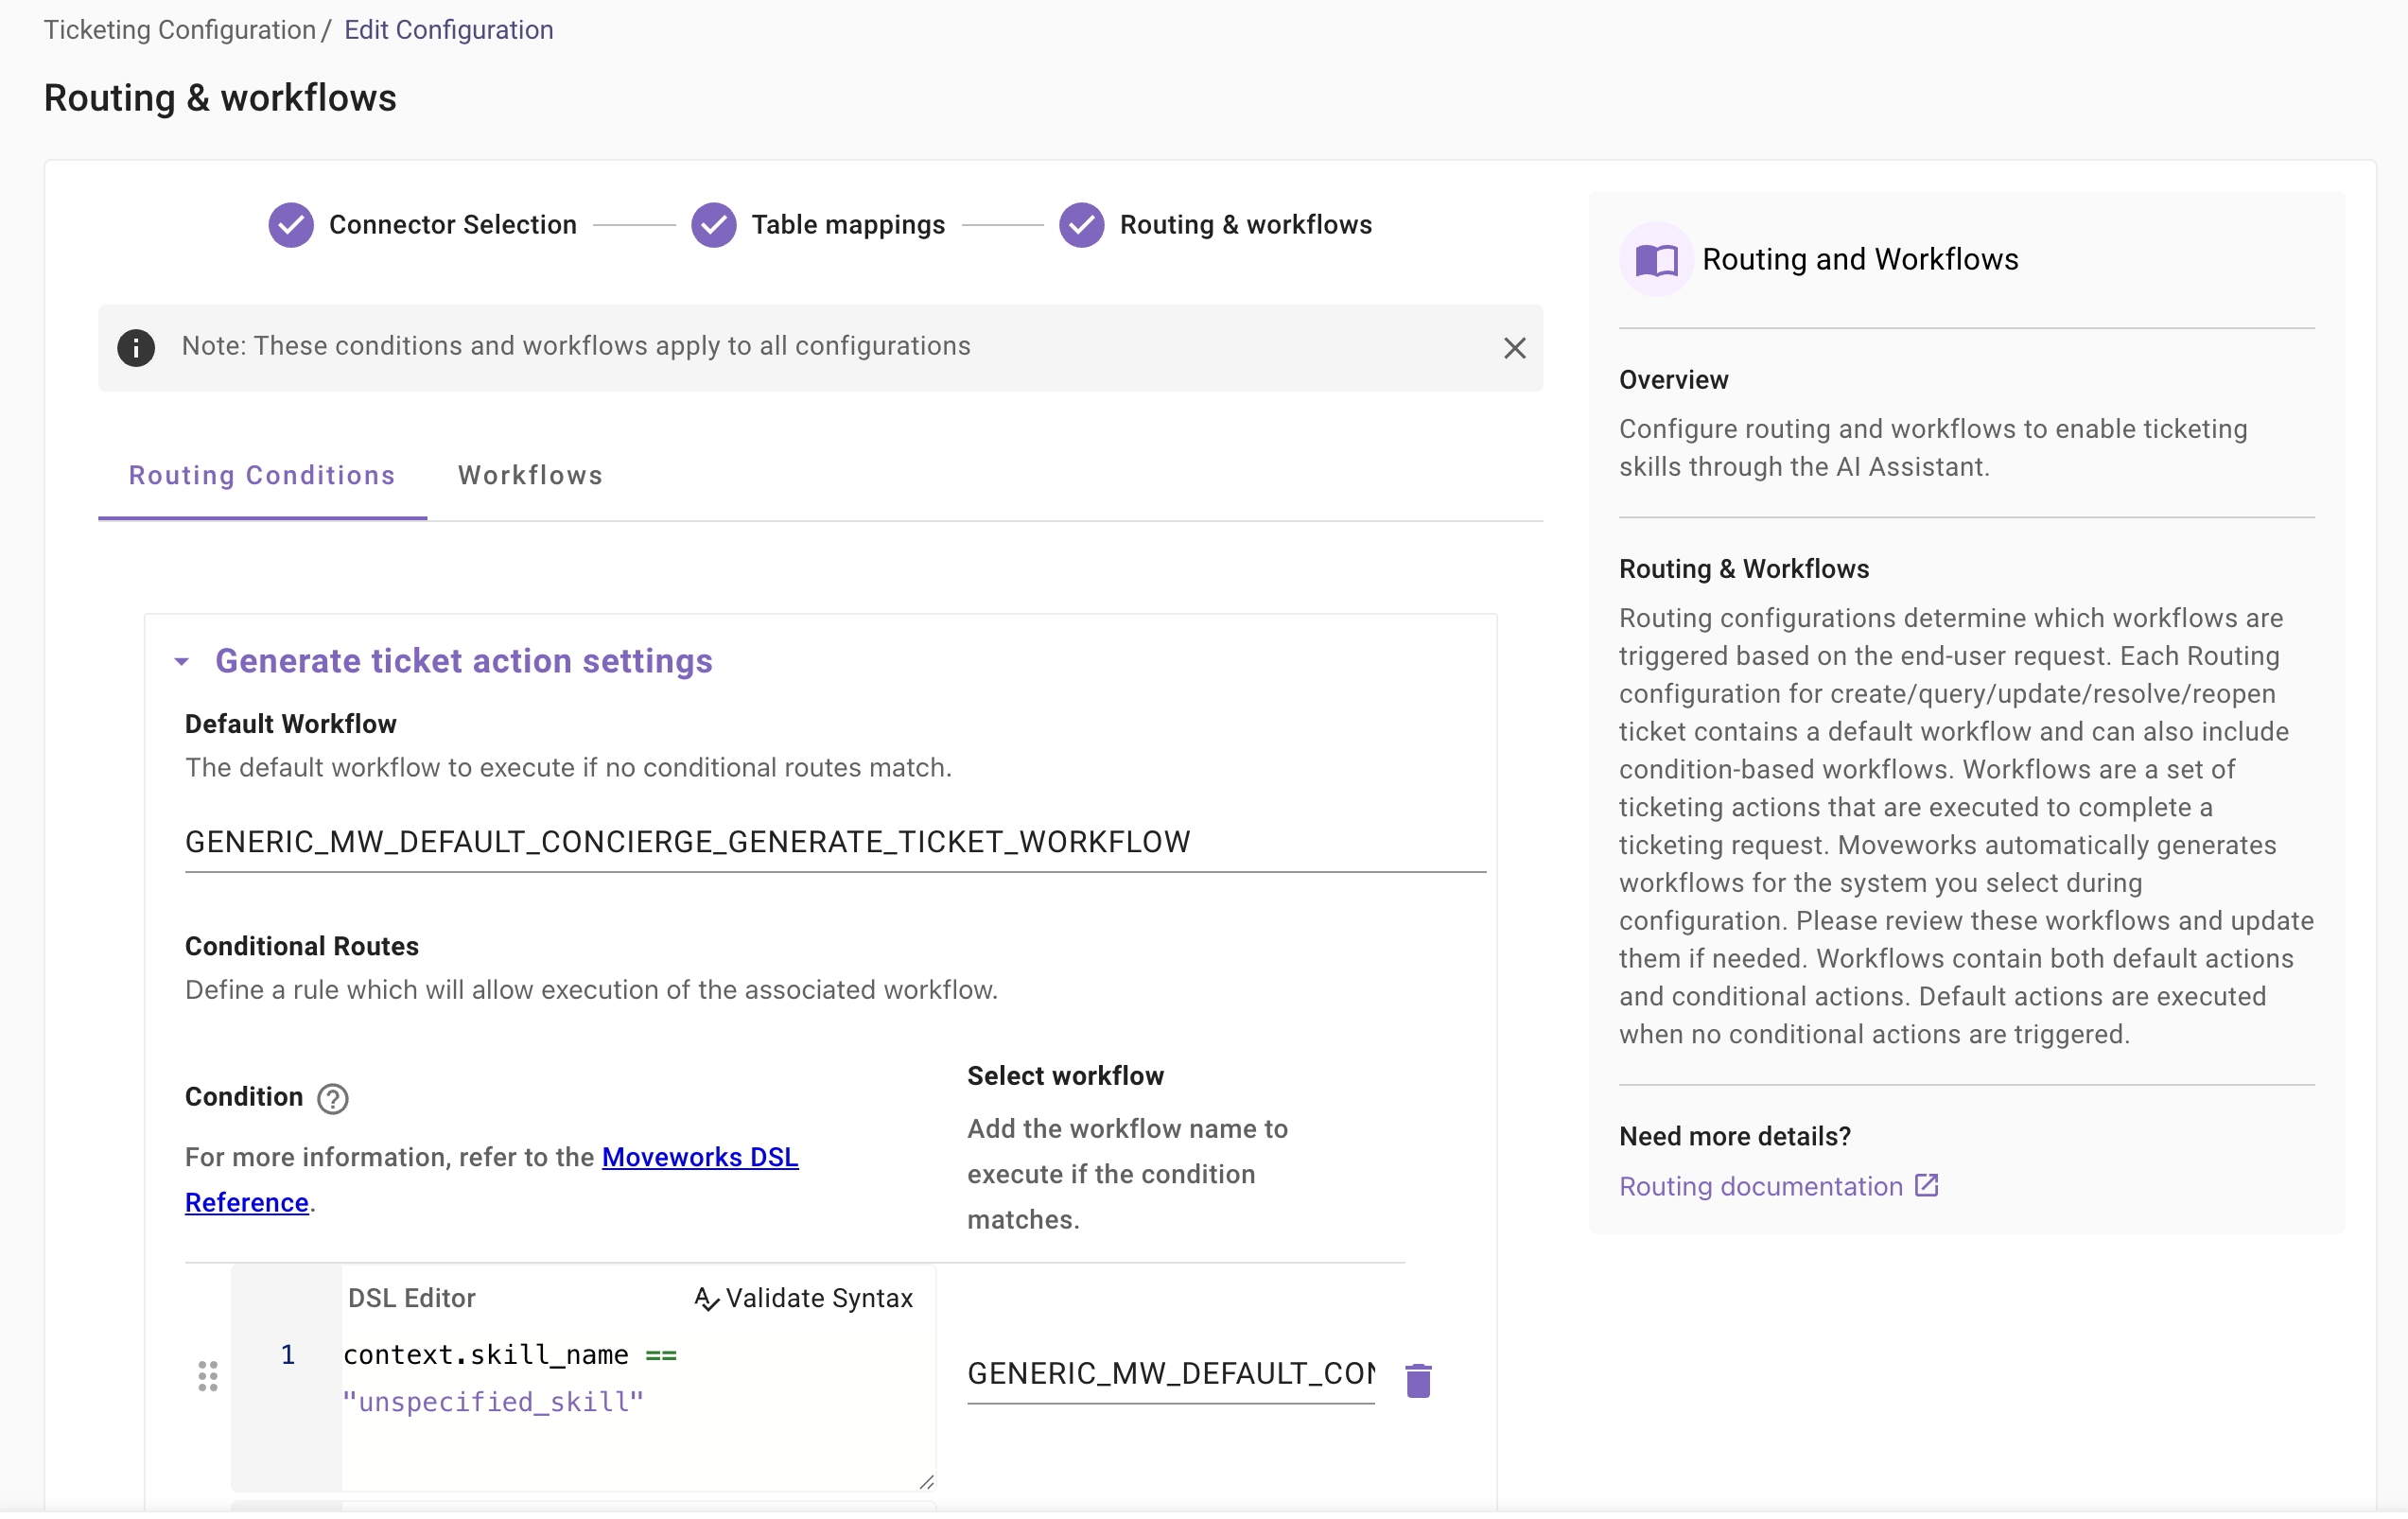
Once the destination is ready, navigate to the Routing & Workflows section to configure how tickets are created through the Moveworks AI Assistant. This section determines which workflows are triggered when a user requests to file a ticket.
In the Routing Conditions tab, locate the Generate ticket action settings. Here, you will see the default workflow that is executed when no conditional routes match, along with any existing conditional routes.
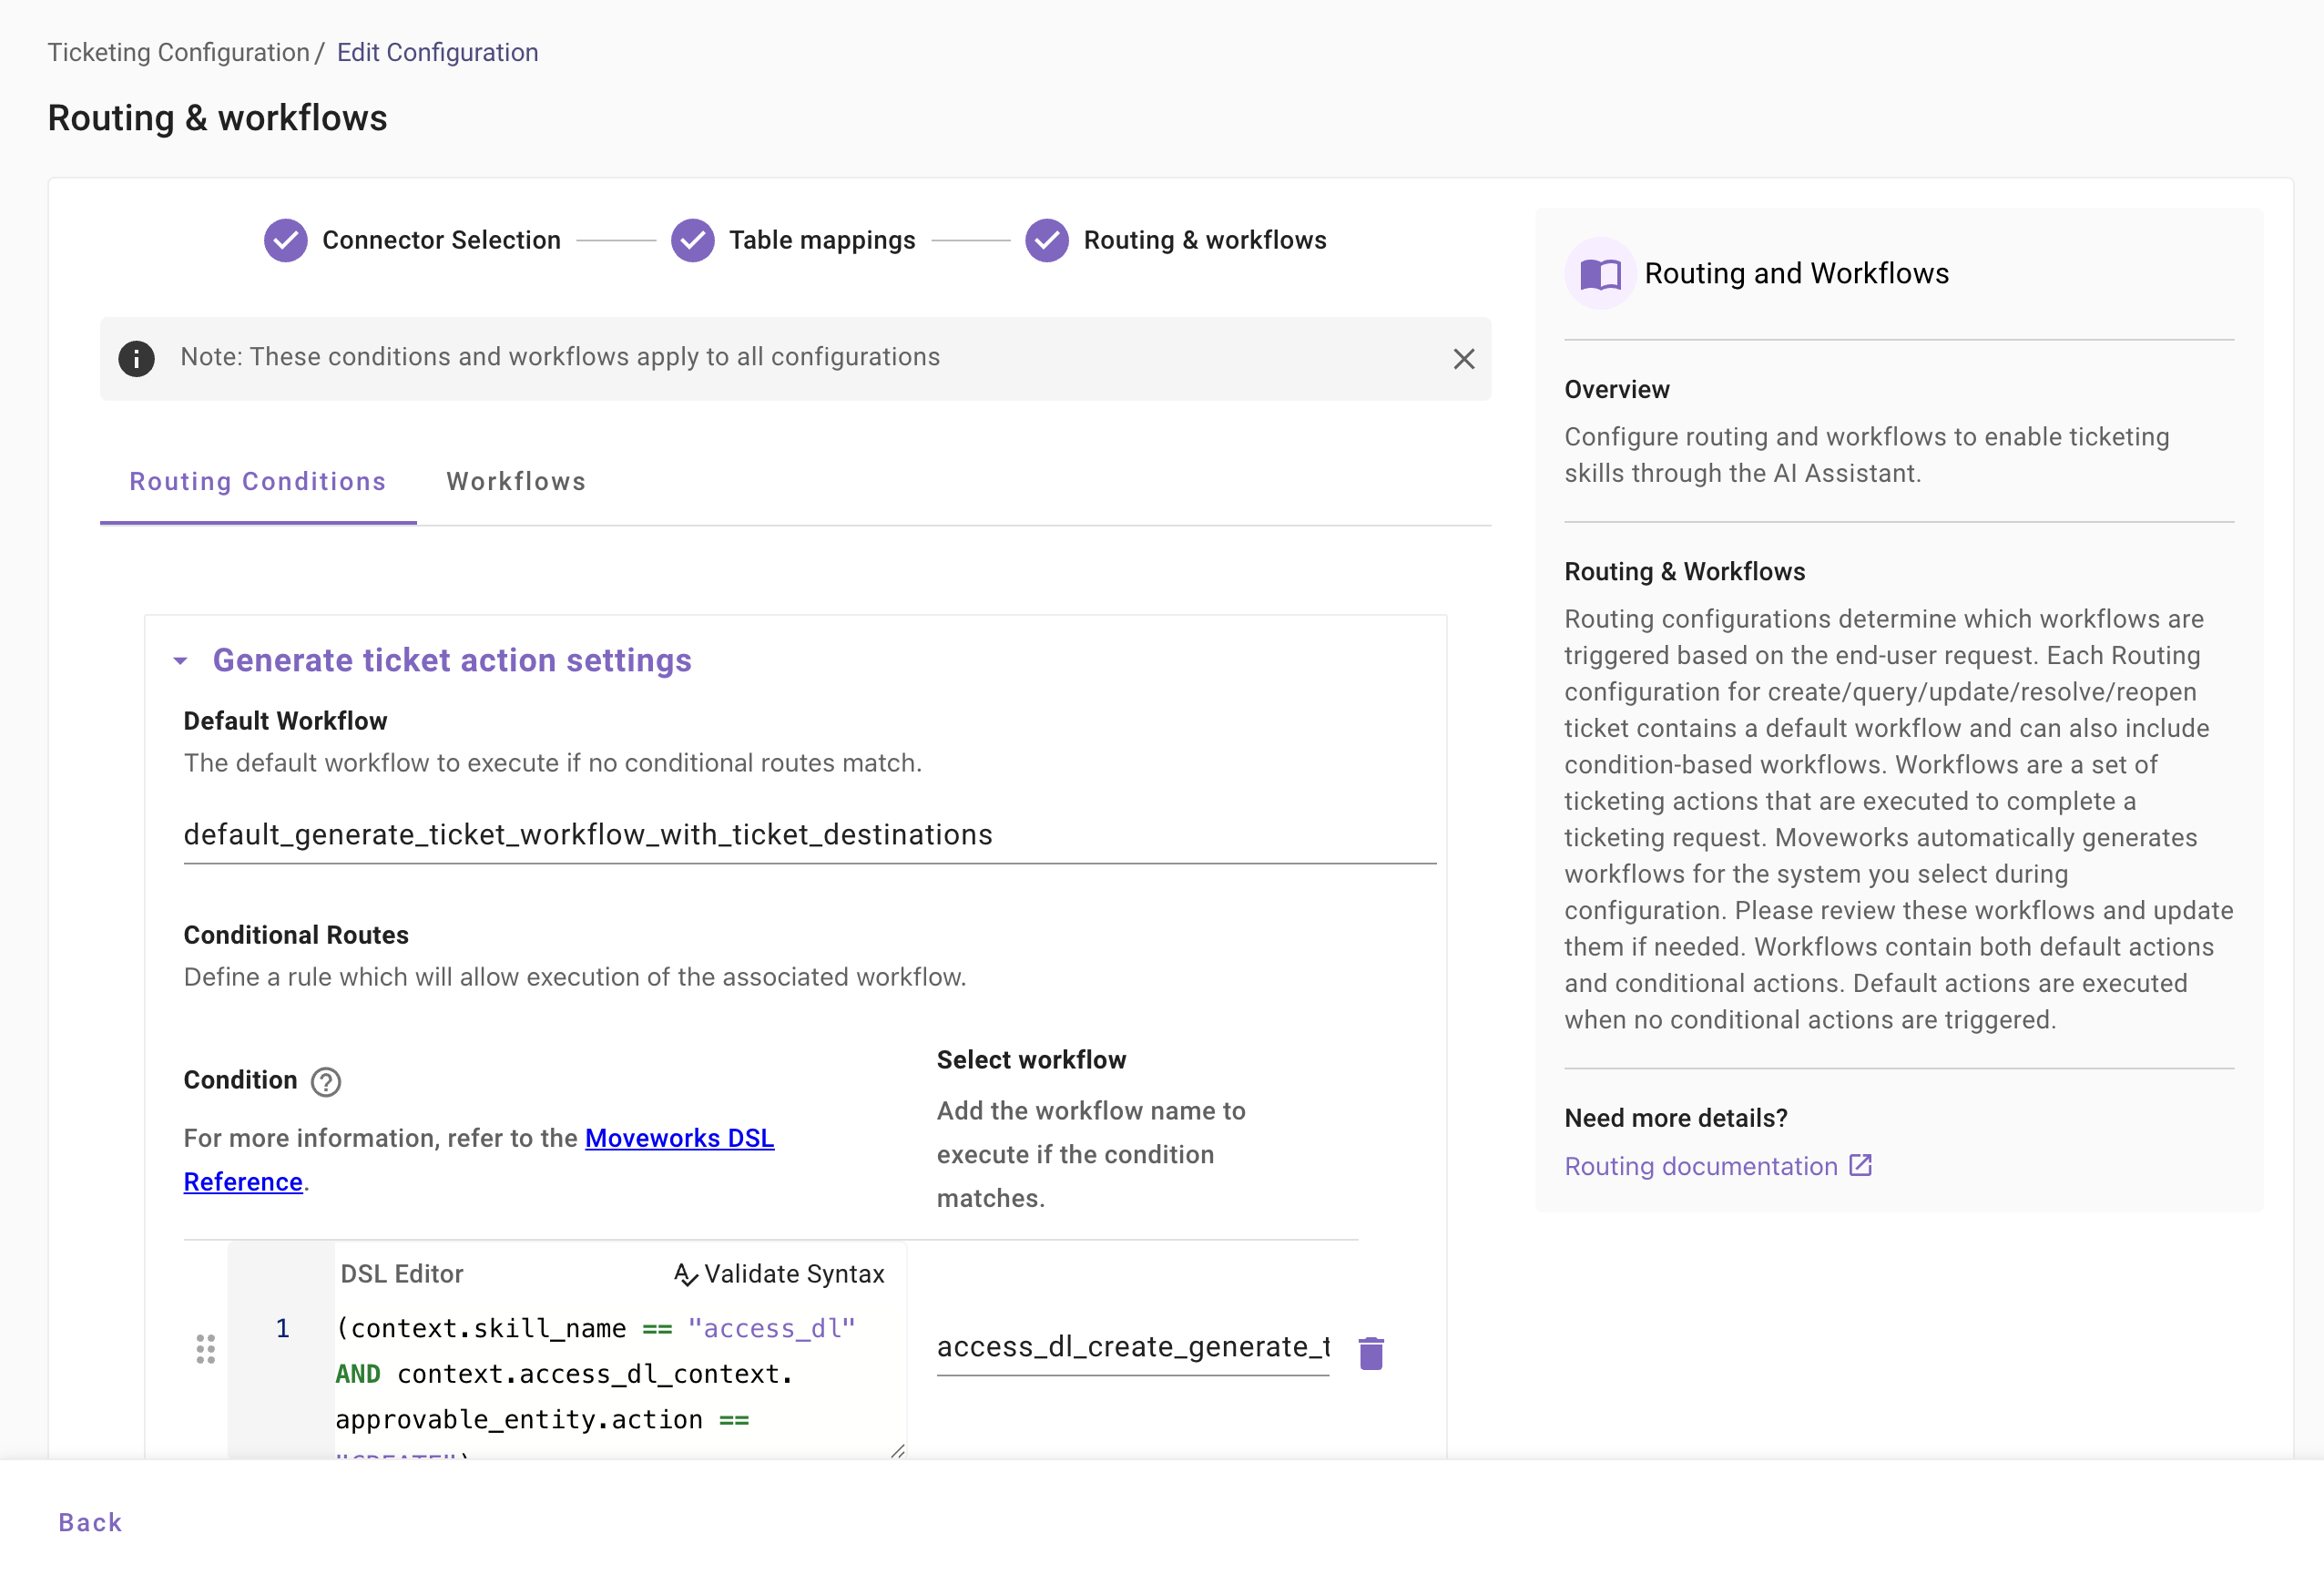
First, review the Default Workflow configured for the Generate ticket action. This workflow is used when no routing conditions are met. Navigate to the Workflows tab and open the workflow referenced here. Within the workflow, locate the Generate ticket action and select the Jira destination where tickets should be created. This ensures that tickets are filed into the correct Jira project and issue or request type.
If you want to control ticket creation based on specific conditions, you can add a Conditional Route. For example, if you want tickets to be created in a specific Jira destination only when the request is classified as a Request, click Add under Conditional Routes and define a condition in the DSL editor based on your routing logic, such as domain or ticket type. Then select the workflow that creates tickets in the appropriate Jira destination.
When a conditional route matches, Moveworks executes the associated workflow. If no conditions match, the default workflow is executed.
Once this configuration is complete, the new Jira destination is enabled for ticket creation through the Moveworks AI Assistant. You can further modify this behavior by adding additional routing conditions, creating separate workflows for different request types, or configuring new handoff entries to guide users to file tickets for specific use cases. The next section covers how to create intake forms and enable ticket filing through them.
For more information on routing and workflows, refer to the routing documentation:
/service-management/concierge-assistant/moveworks-setup-ticketing/workflows-and-workflows-triggering
8. How to create a new Intake form and enable ticketing filing through it ?
What a Intake form - Intake form provides you ability to take structured input from the users while filing a ticket in Jira. This is also know as RTF in Moveworks
Go through guide to understand how intake forms work in Moveworks : /service-management/concierge-assistant/moveworks-setup-ticketing/best-practices-rich-ticket-filing
Let’s go through the steps of creating a RTF form and enabling ticketing filing through it
Moveworks helps employees solve many routine issues instantly. But often, uncategorised issues require manual support and lack a dedicated form. In such cases, employees file generic tickets via Moveworks for help (synonymous with filing tickets in the backstop/via the bot).
Without a Rich Ticket Filing form, every ticket filed via the AI Assistant only includes:
- Short Description
- More Details
- Attachments
By using Rich Ticket Filing (RTF), you can configure a form-based ticket filing experience that collects structured information from users at the time of filing. This makes ticket routing and triage far more efficient.
1. Setup Ticket Destination Mapping
Before we start setting up the RTF, we need to setup the ITSM connection for the Destination where the RTF will create the ticket.
-
Navigate to Ticketing > Ticket Settings > Ticket Mapping Configuration under the Ticketing Automation Module.
- Edit the configuration and go to the Configure Ticket Type step where you can add the new Destination table. Follow this guide to setup Ticketing for a new Table.
-
In the Create Ticket Payload, you will need to define the attributes which are required to make a successful API call to create the Ticket.
-
The Attributes in Red are what the ITSM expects to see in the Payload, while the Attributes in Blue are Moveworks based and can also be hardcoded.
If you are always going to use an RTF for a specific Ticket Destination, Then it is recommended to define fallback values if a field is empty.
2. Create a Rich Ticket Filing Form
-
Navigate to ”Create intake form” section in the new ticketing journey configuration
-
Click on Create to setup a new form.
-
You will start by selecting the domain, and provide a unique ID for the form. (This ID will be used in multiple other configurations). Ensure that each form has a unique ID. Duplicate IDs will cause conflicts.
-
Add the following details:
-
Form Title – e.g., “Submit a Ticket” or “Ask HR a Question”
-
Description & Short Description – user-facing help text on how to fill the Form.
-
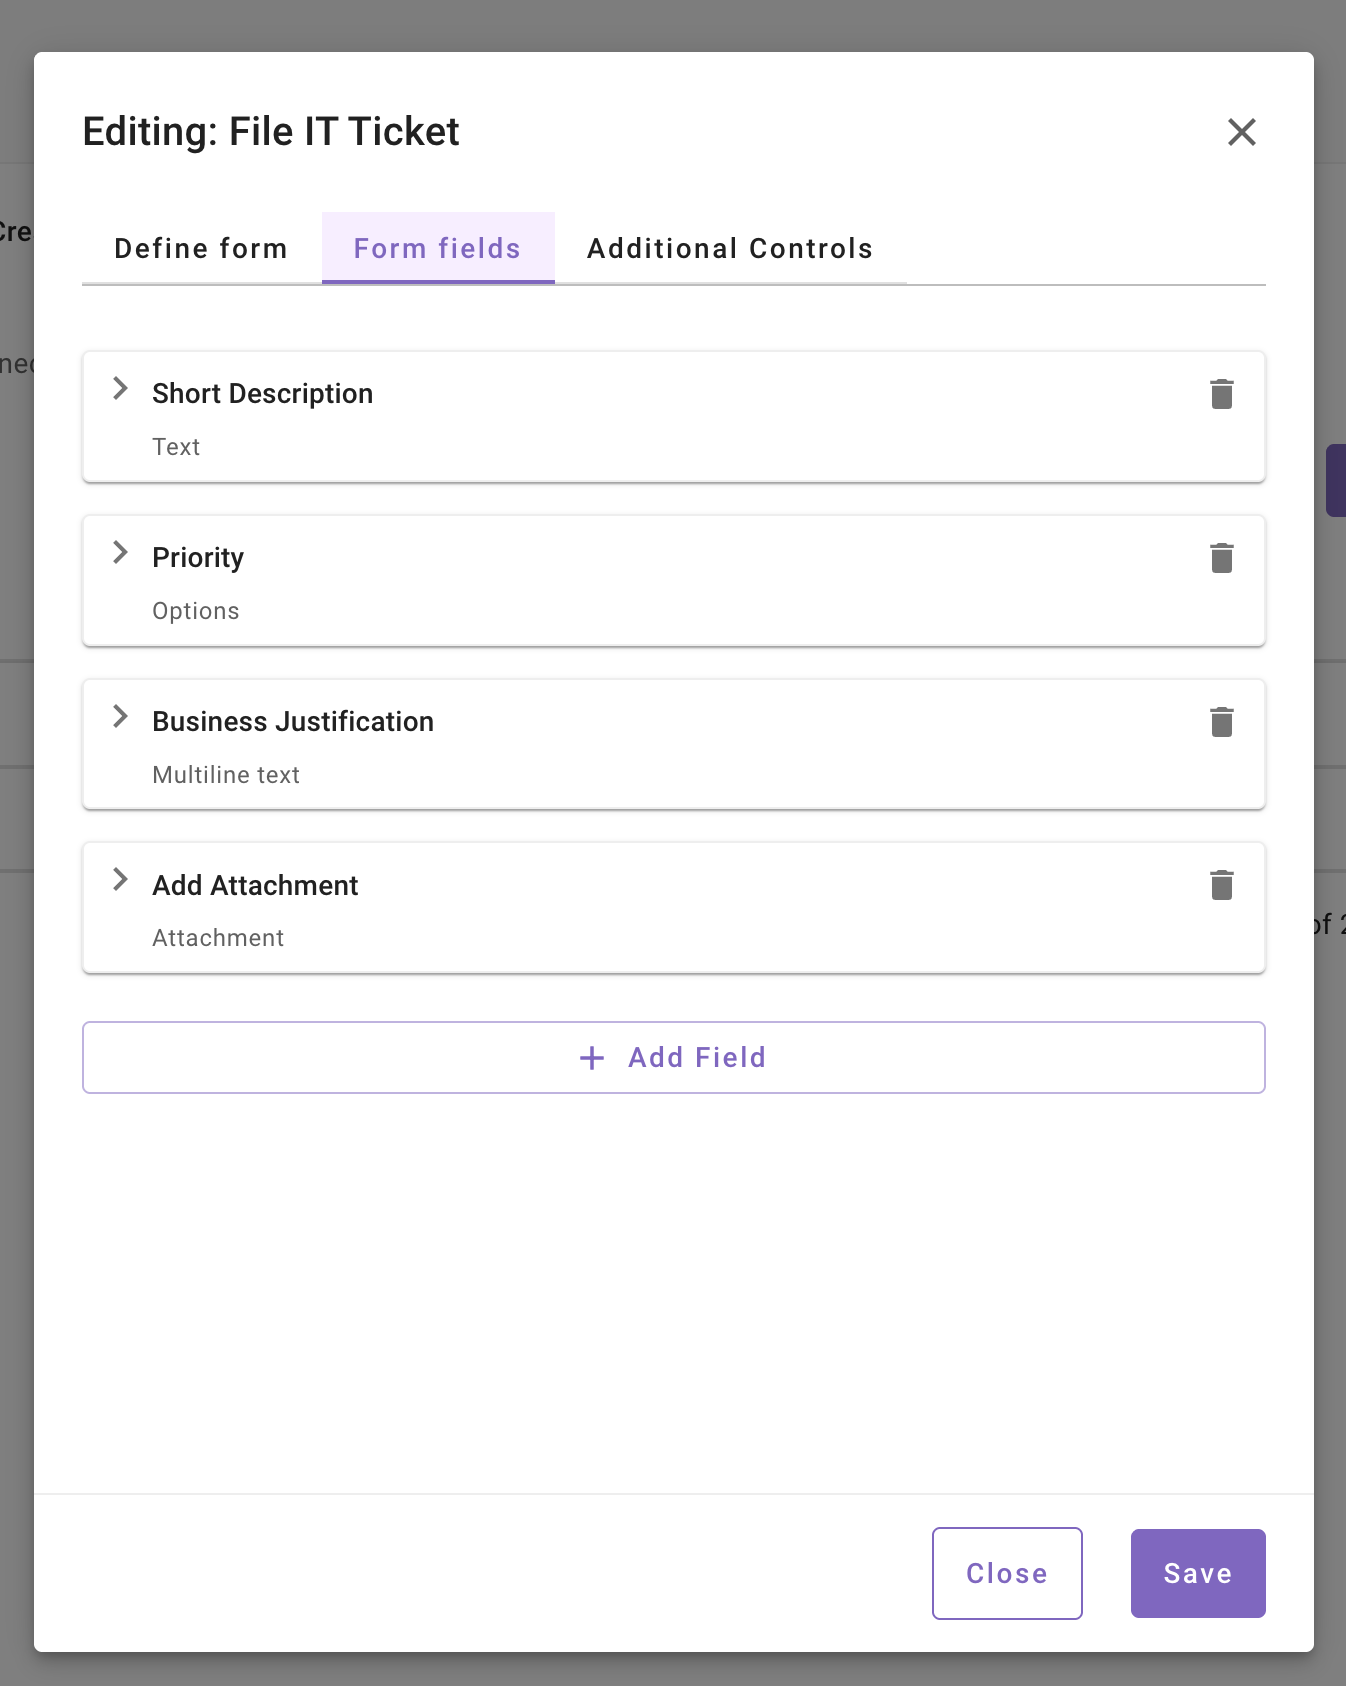
Fields – information you need from the user.
Required fields
Rich Ticket Filing forms must have at least one field with Field Name description or short_description. If neither of these fields are included in a Rich Ticket Filing form, ticket creation will fail.
If only 1 needs to be available, use short_description, as that is required for user’s chat context to be passed into the ticket creation form.
-
3. Add Fields to the Form
Rich Ticket Filing supports the following field types:
- Single-line text
- Multi-line text
- Single-options dropdown (max 100 options unless the field type is USER)
- Checkboxes
- Datetime fields (MS Teams only)
- Attachments (MS Teams only)
For each field, configure:
-
Field Label – user-facing name.
-
Field Name – internal identifier. This must be noted for mapping to ITSM fields later.
- Unmapped fields will be sent to the ticket description by default.
-
Field Type
-
Description– optional tooltip help text.
-
Required/Read Only
-
Auto-population (if any)
-
Dropdown Options (for option fields):
-
Label – shown to the user.
-
Value – backend value accepted by Jira
When configuring the OPTIONS field type, it is mandatory that each Label-Value pair is unique. Duplication within these pairs may lead to logic inconsistencies during system processing.
Example: For an Travel & Expense dropdown, add values for Travel and Expense. The selected value will determine which workflow runs based on the condition satisfied.
-
4. Linking RTF to Handoff Configuration
Now that the RTF has been configured, we need to create the display settings associated with it in order to Render it in the Assistant Chat Platform UI.
-
Navigate to Handoff > Handoff Settings under Ticketing Automation.
-
Create a new Category, or setup a new Item in an existing Category so we can link it to the RTF.
-
Deflection Action → UI Form Id
-
UI Form Id → unique ID of RTF we set earlier.
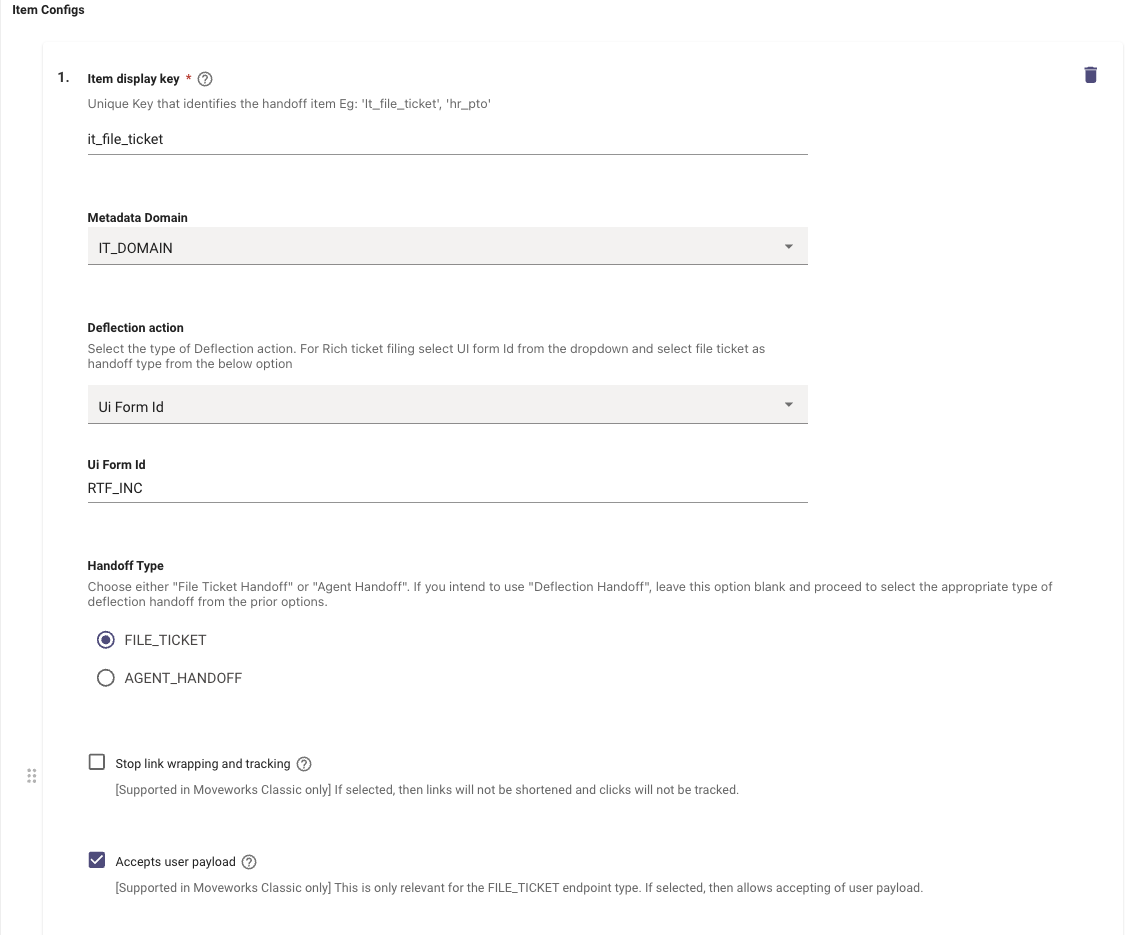
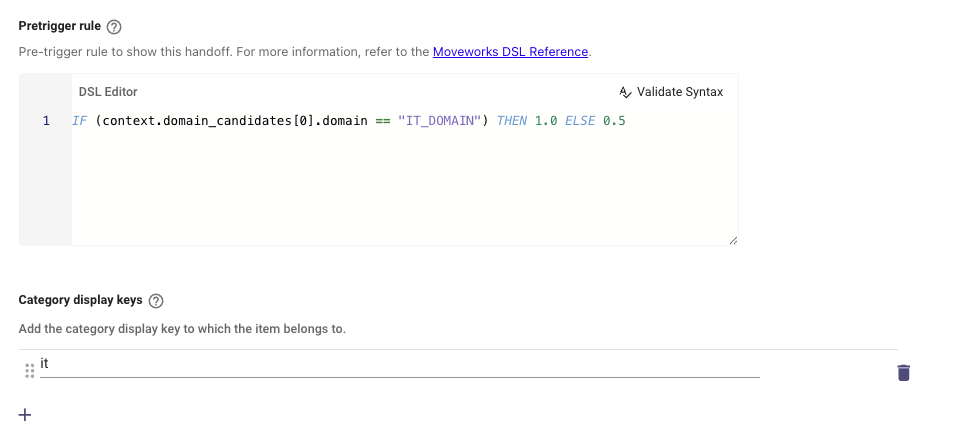
Always ensure the Pre-Trigger being provided here is based on the Domain the RTF was defined under.
5. Setting up Display Configuration
Once the Handoff is created, We need to provide some metadata to it, in order to define the details like name and description to the Item which was created for the Handoff.
You can follow this Guide on How To Configure the Display Fields for Handoff Items
6. Configure Ticket Action Workflows
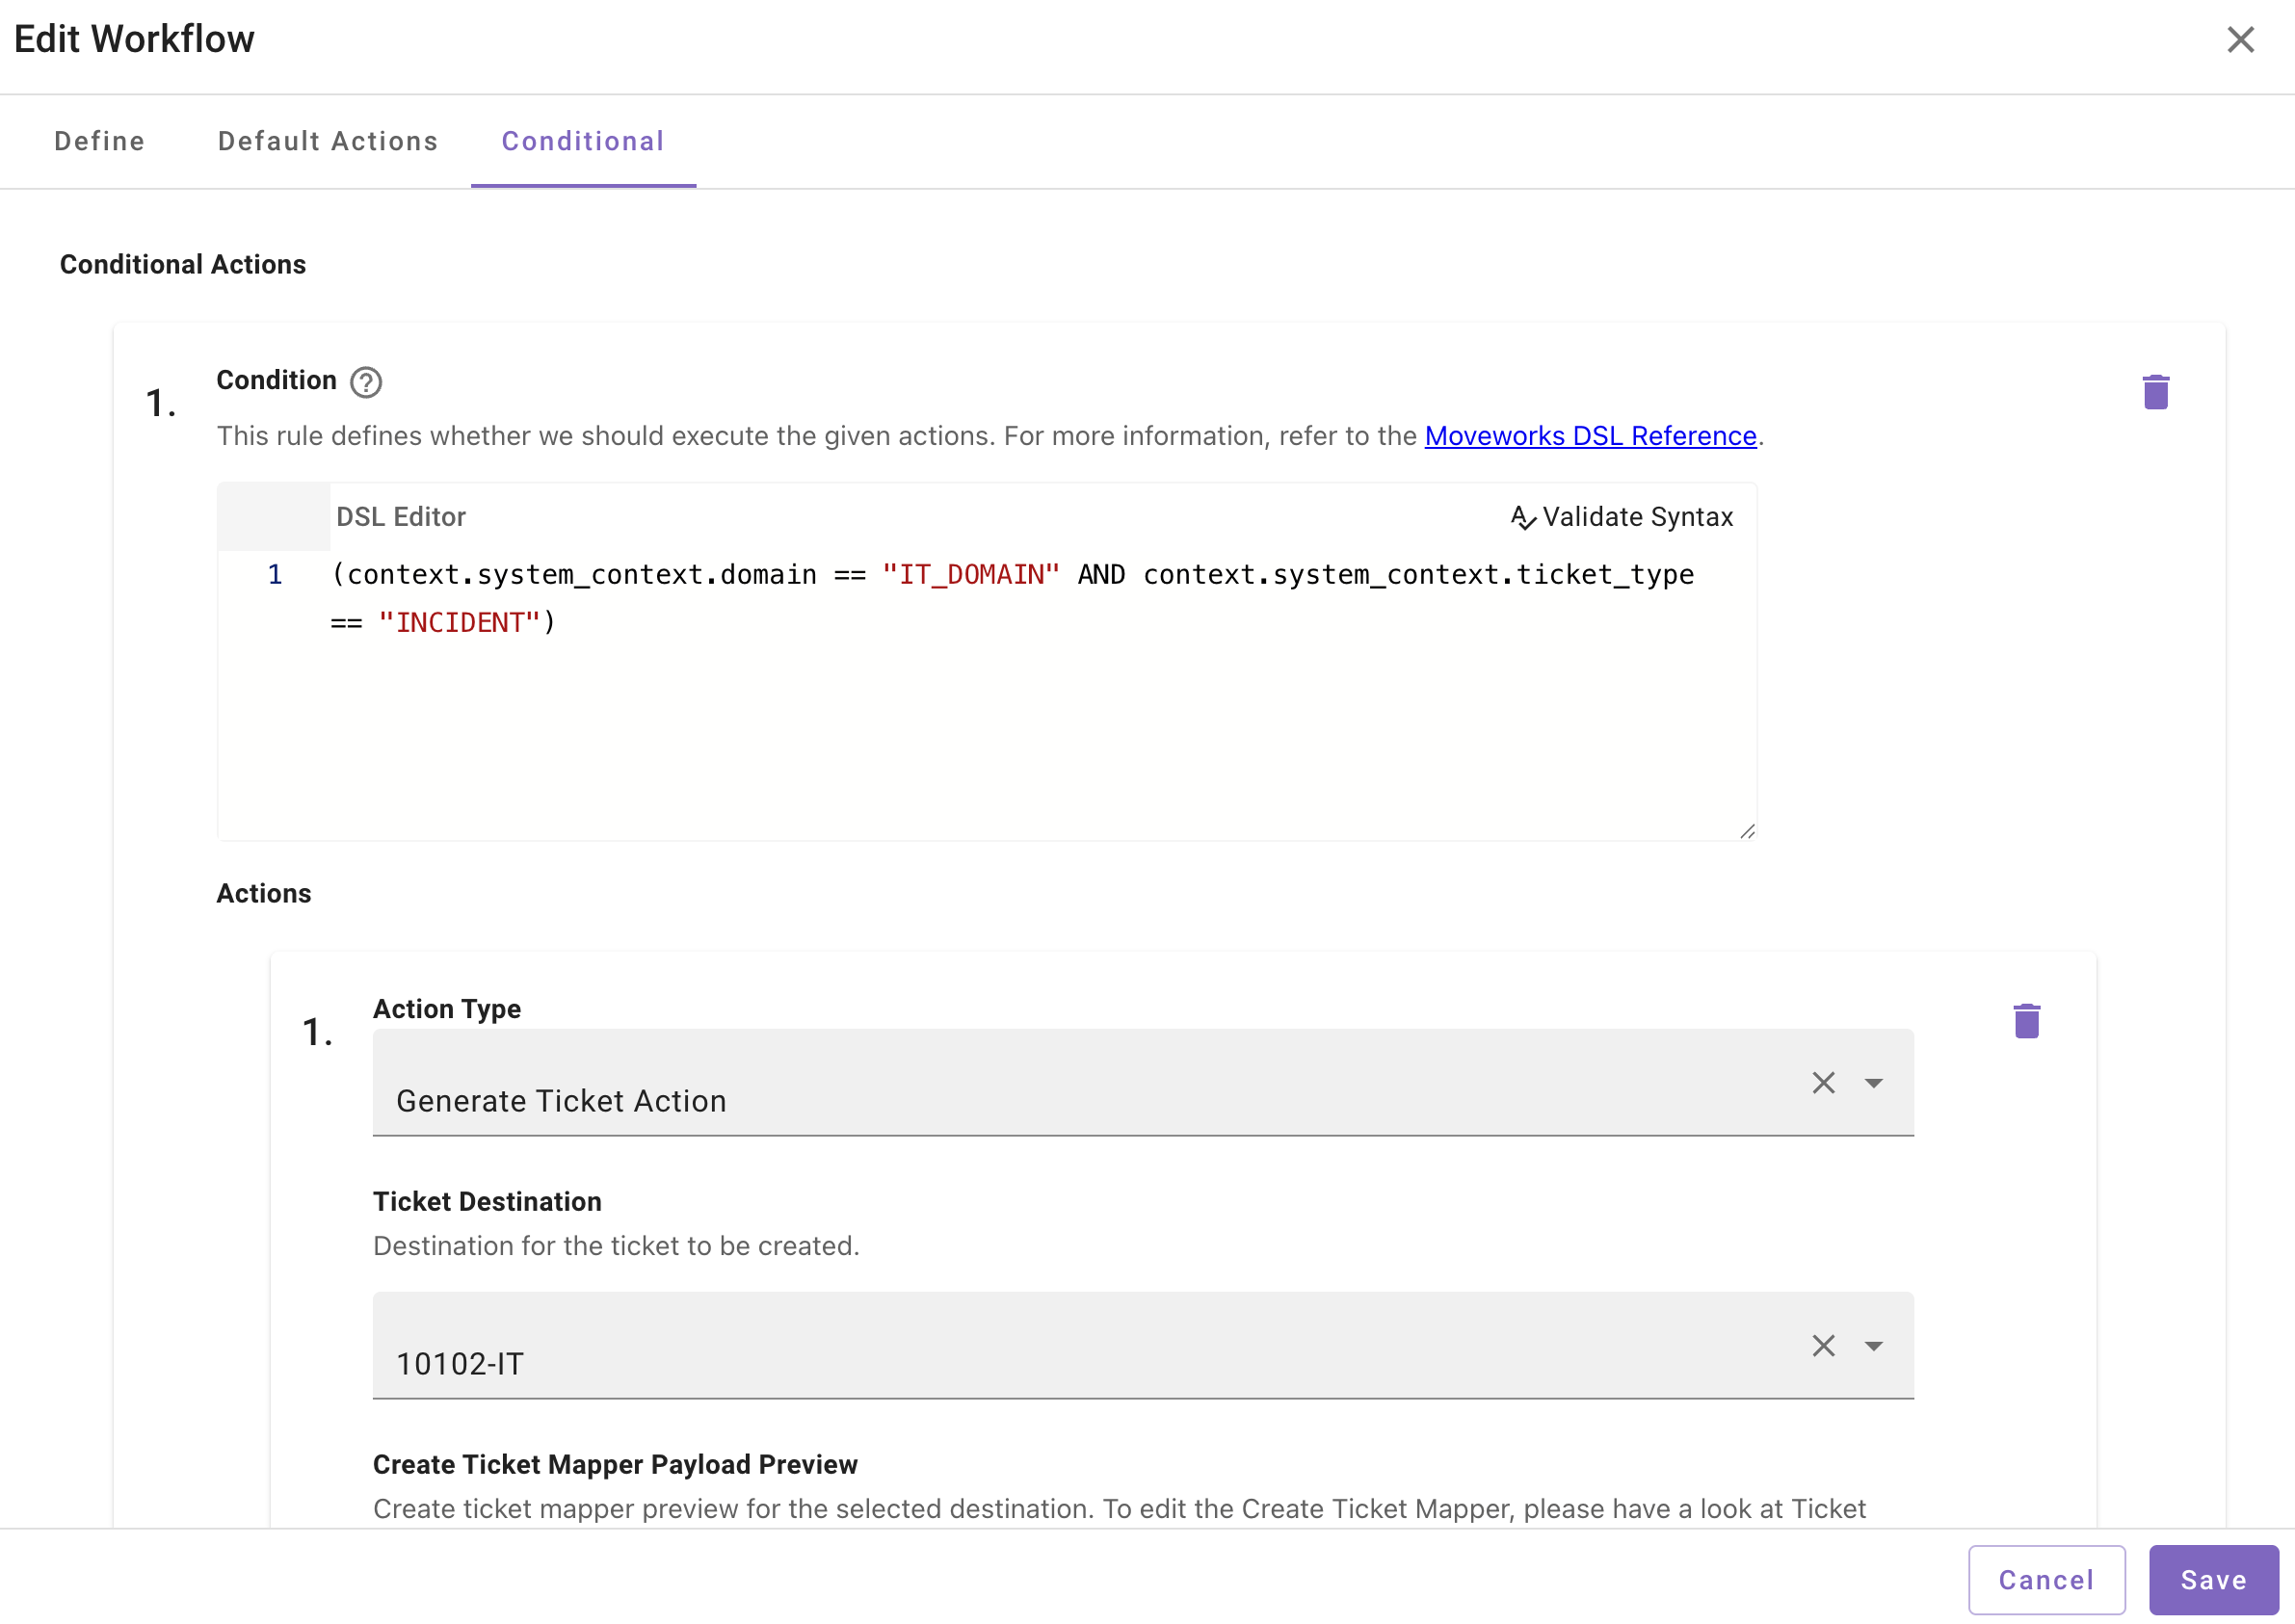
In order to define which payload is used to Generate the ticket for an RTF, we can use Ticket Workflows condition actions.
-
The Ticket Workflows have the ability to leverage the option a user has selected in an RTF by referencing the field name as part of a DSL Rule.
-
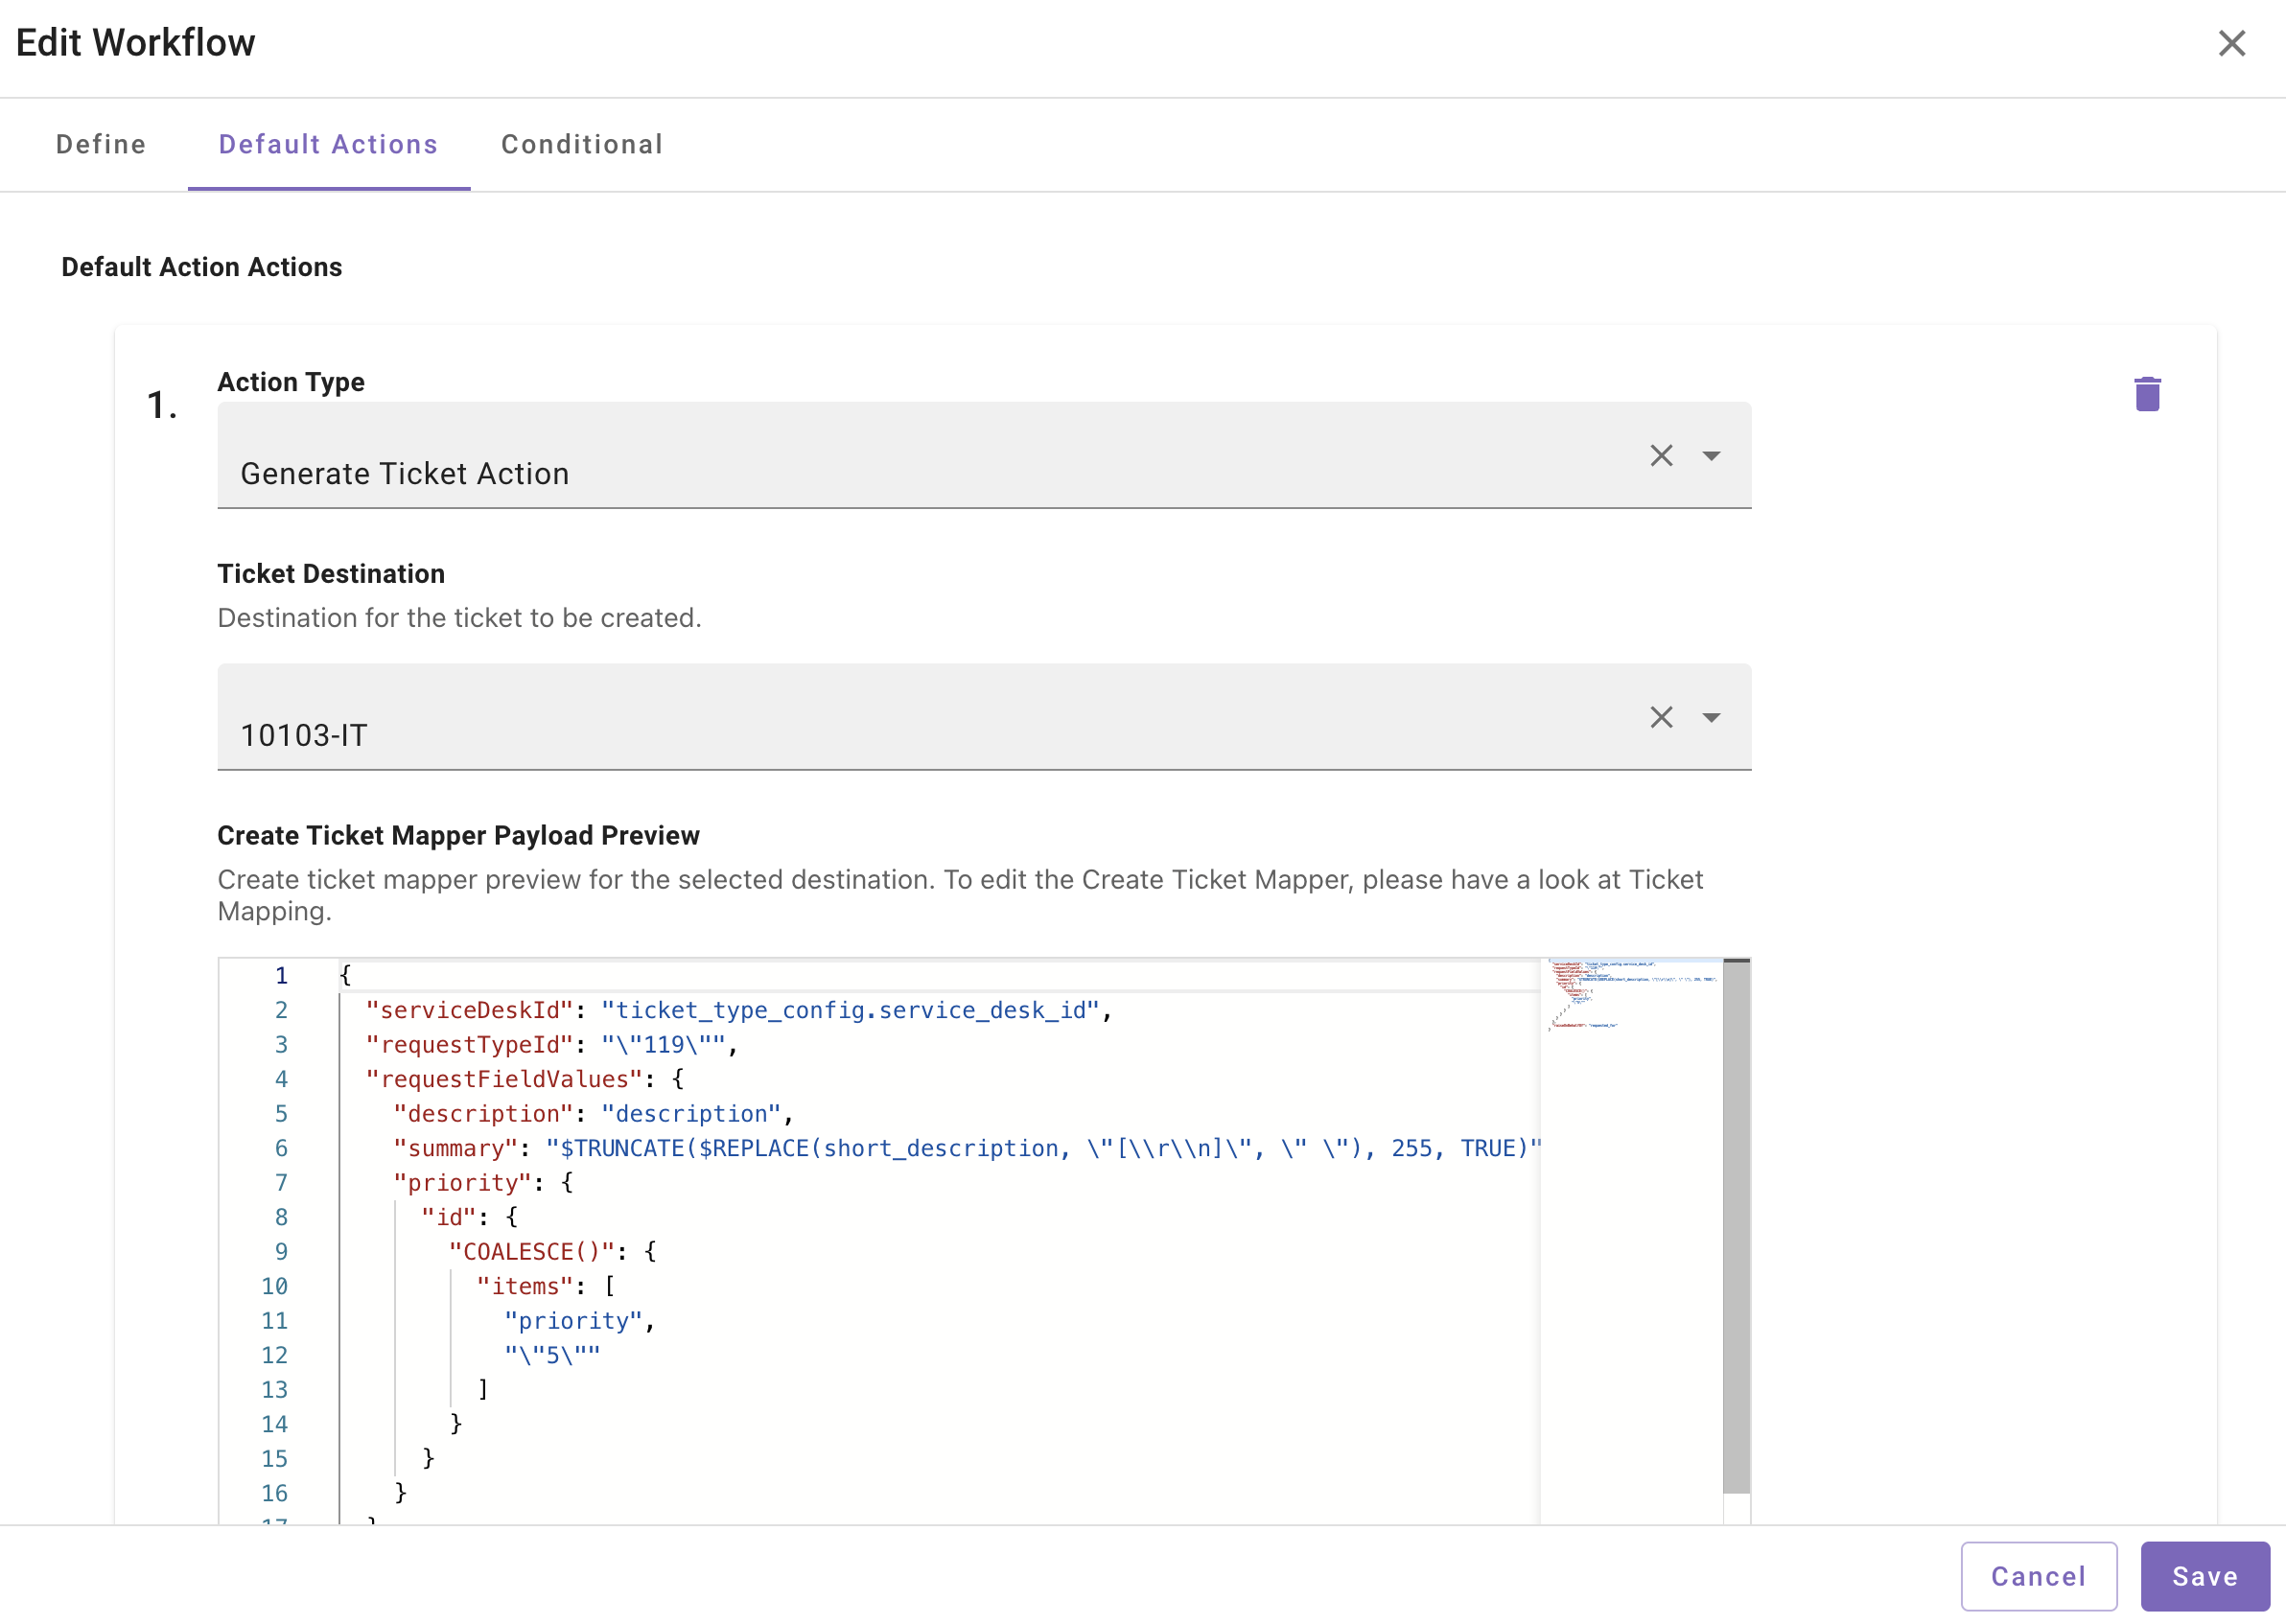
When you create a new Workflow, the Default Action will define the Generate Ticket Action with the default payload which has been set for a Destination.
-
Then comes the Conditional Action section, which allows you to define a DSL rule, based on which you can define Generate Ticket Action with multiple different Payloads. Here we can leverage the RTF Field value which has been configured earlier.
-
In the below example,
ticket_type_rtfis the RTF field which can be used for evaluating the condition.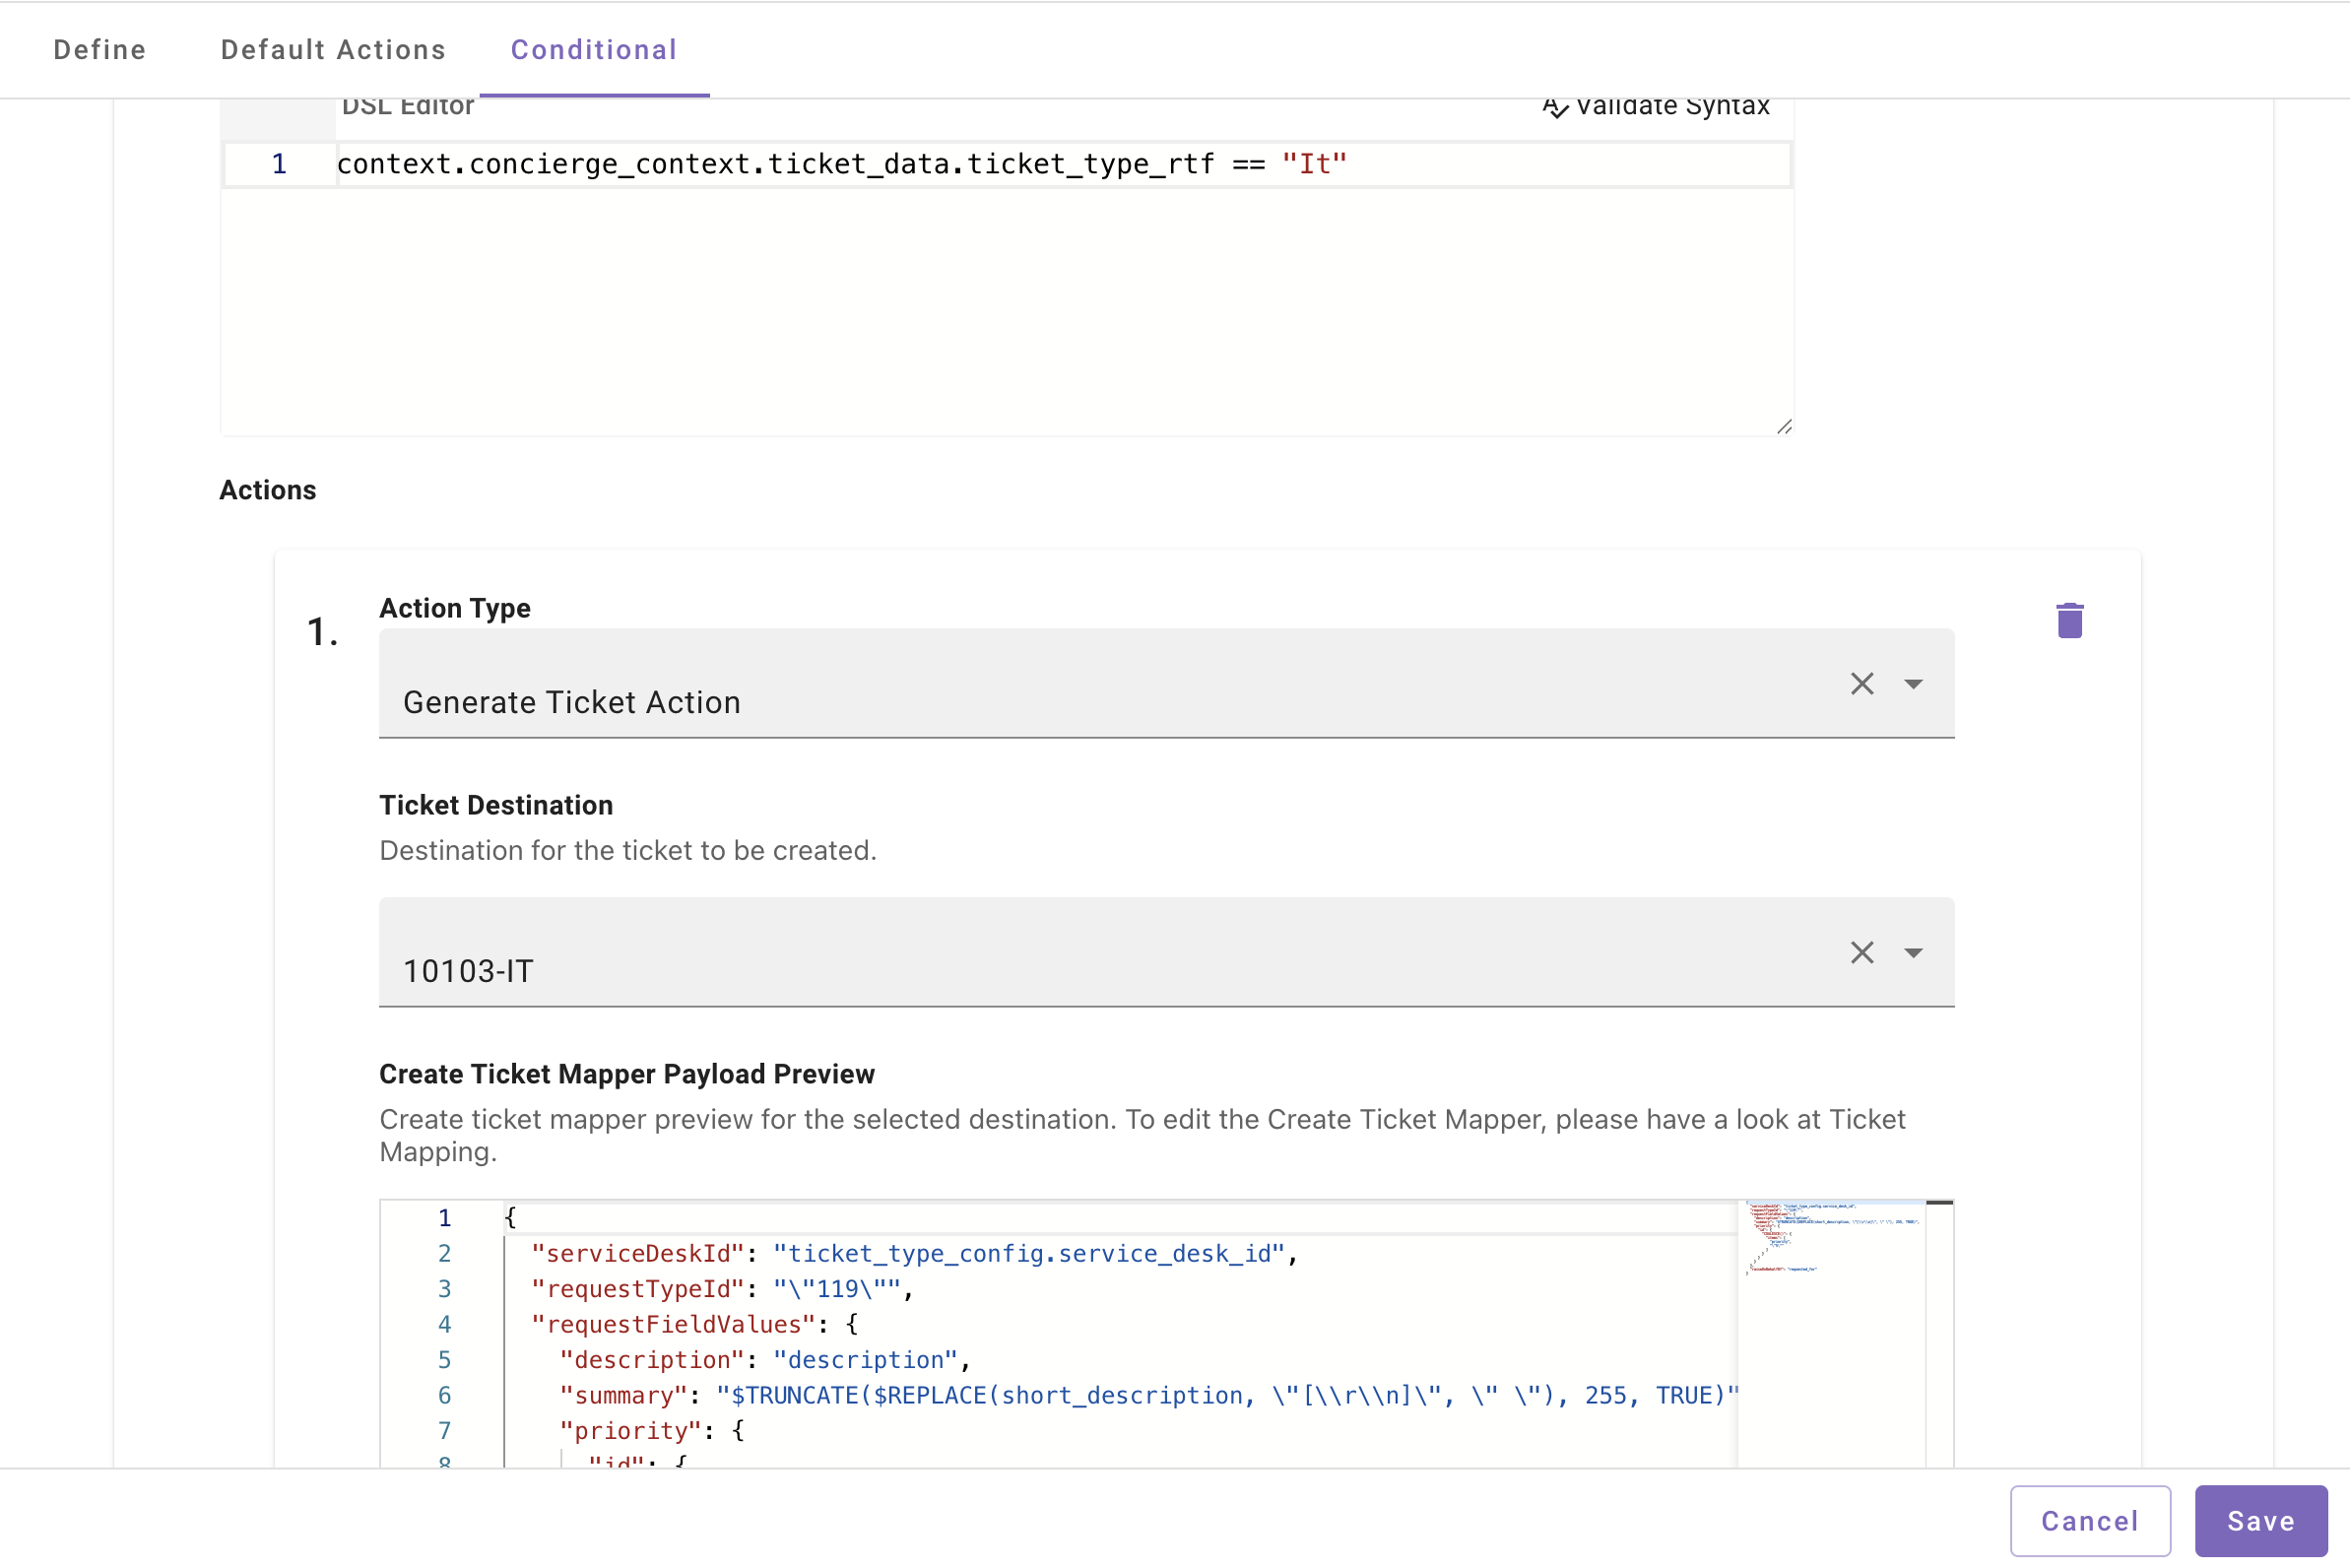
-
When writing the DSL Rule, we need to ensure both ticket_data & ticket.ticket_vars are included for the Condition to be Evaluated accurately
-
You can add more conditions here using different RTF fields in the DSL Rule in order to use the required payload.
Workflow Conditions is the only place where the RTF field context is available. These rule conventions should only be used here.
You should now be able to test this by clicking on the Get Help option, and then selecting the Handoff Category which the RTF belongs to.
Common questions
Q: For a User Type field, what if multiple users have the same name?
A: Moveworks will show Name: <Email> for USER type fields dropdown in the form, so even if they have multiple names, you can disambiguate using name + email pair.
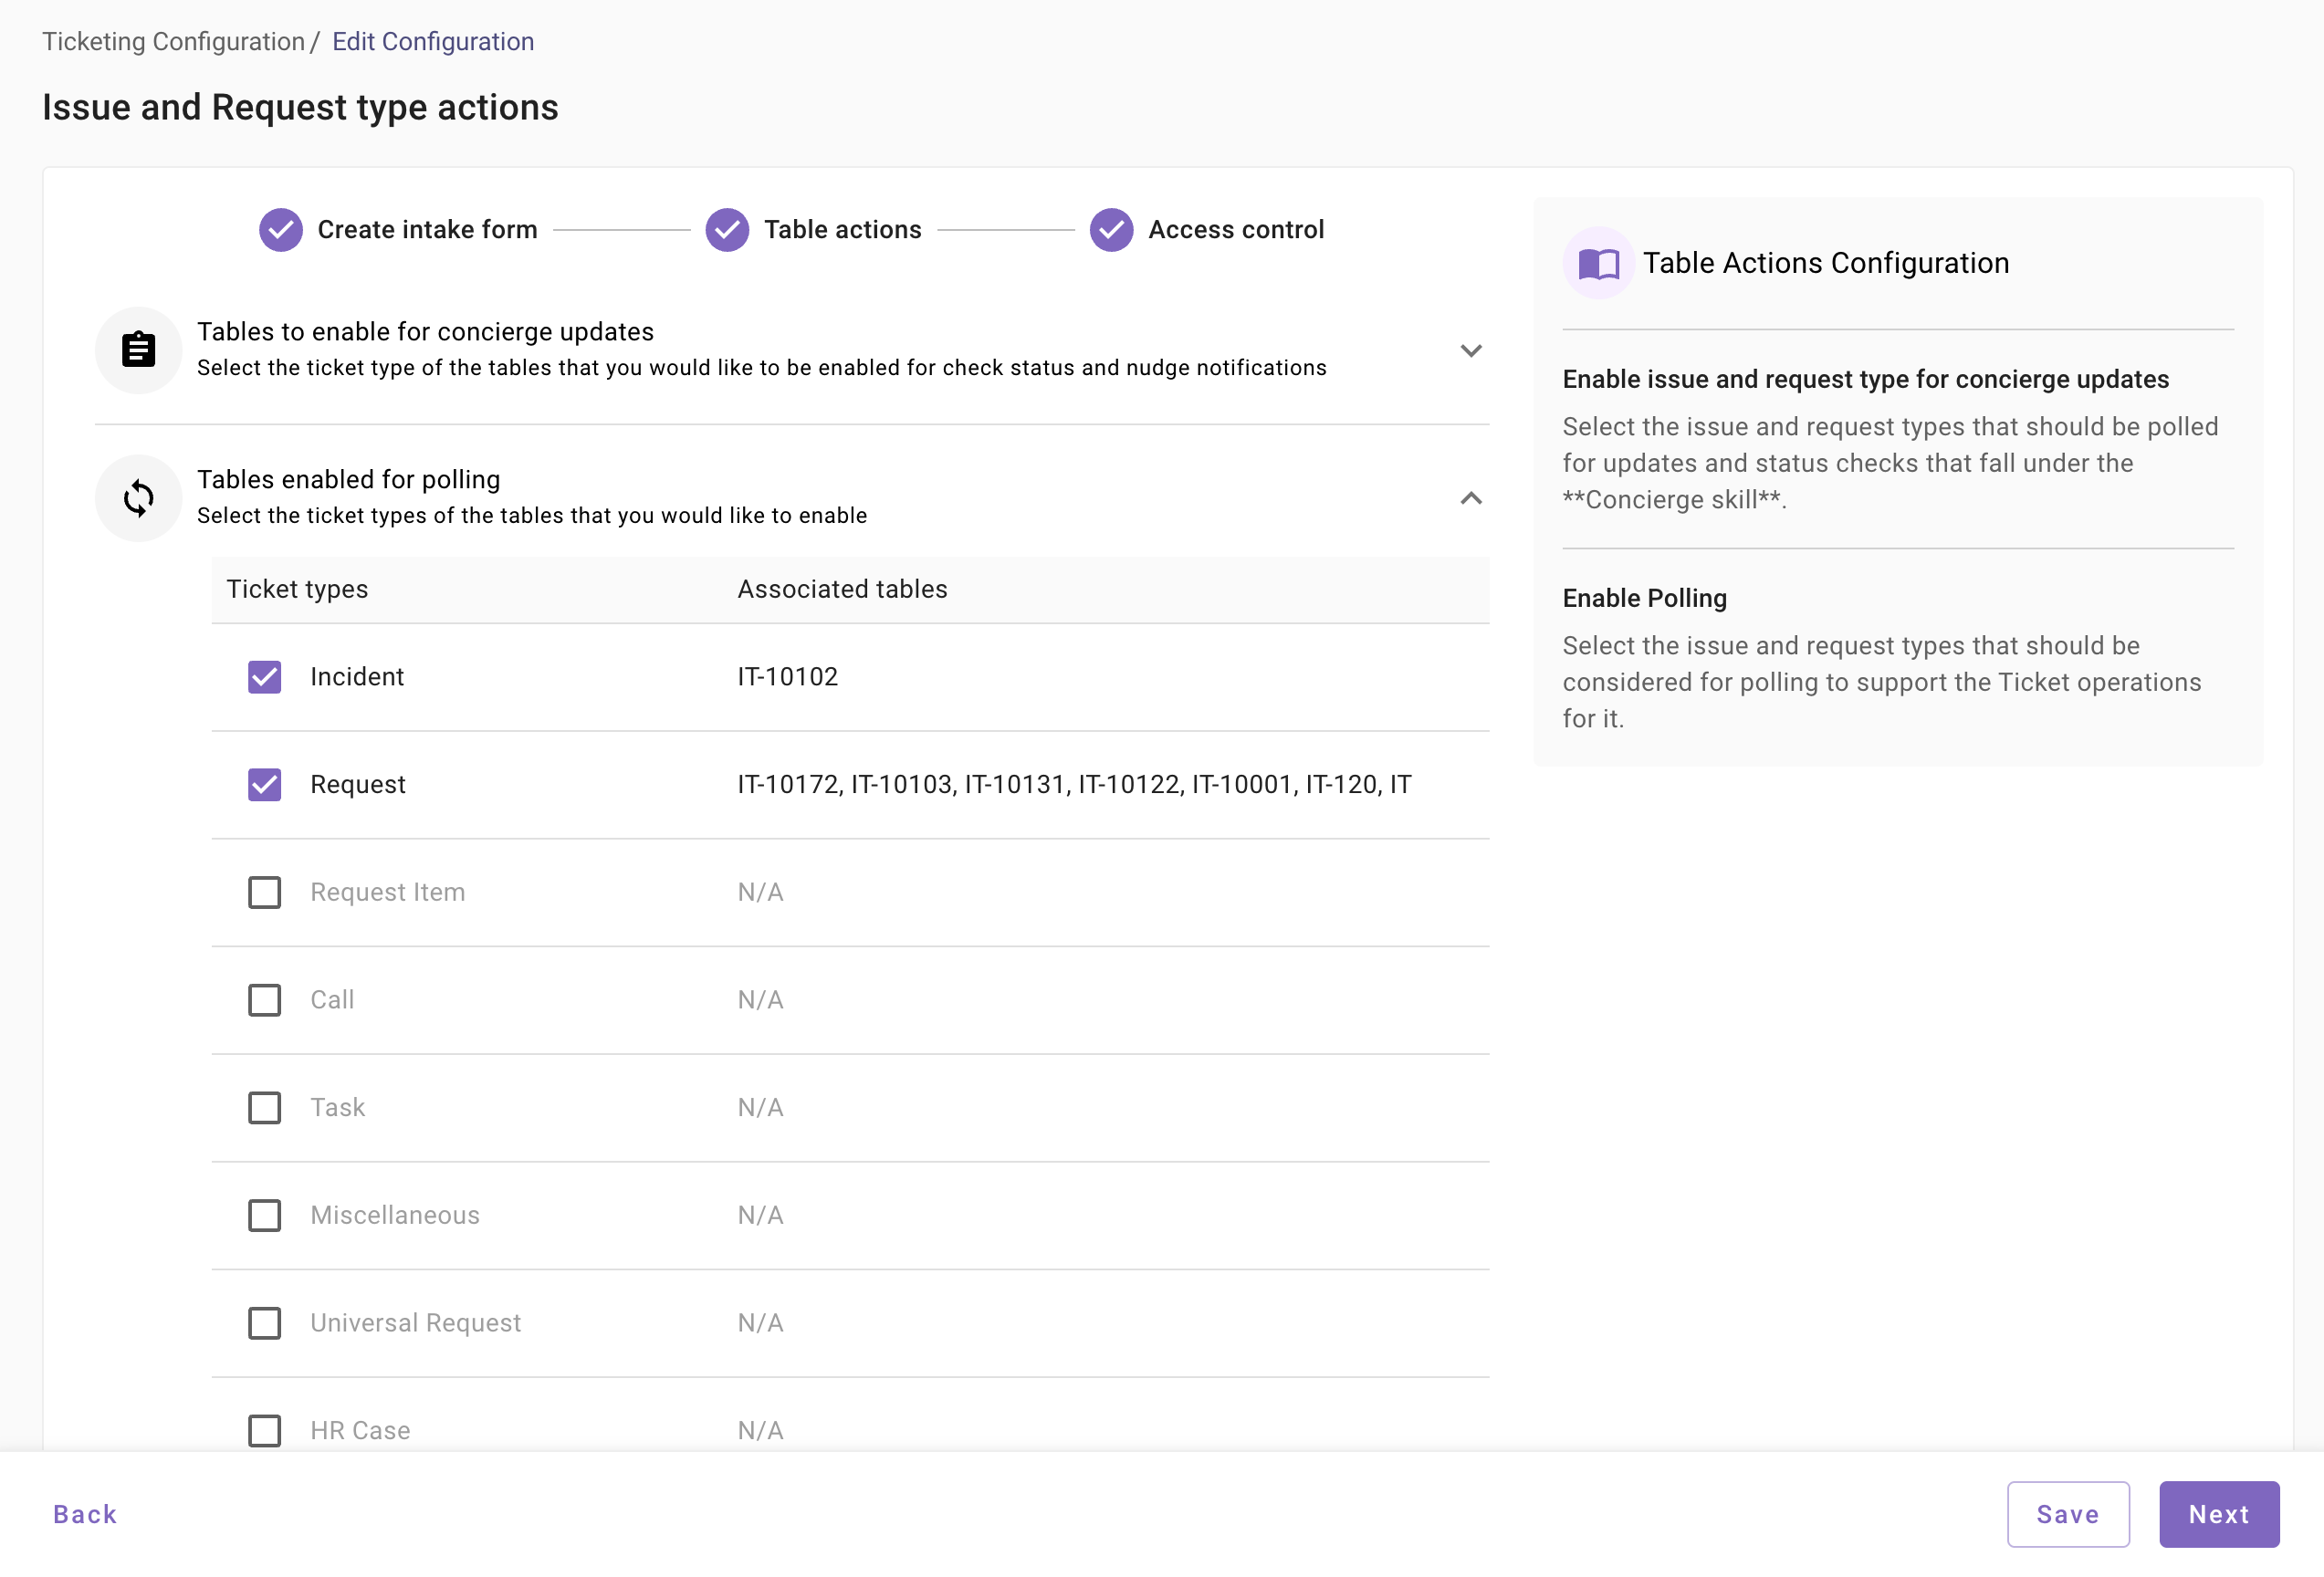
9. How to enable ticket polling and concierge updates
Moveworks automatically polls Jira Service Management to provide concierge updates such as ticket notifications, status changes, and automated nudges. Polling also enables ticket-related actions such as viewing, updating, and resolving tickets through the AI Assistant.
To enable these features, you must specify which Jira destinations are eligible.
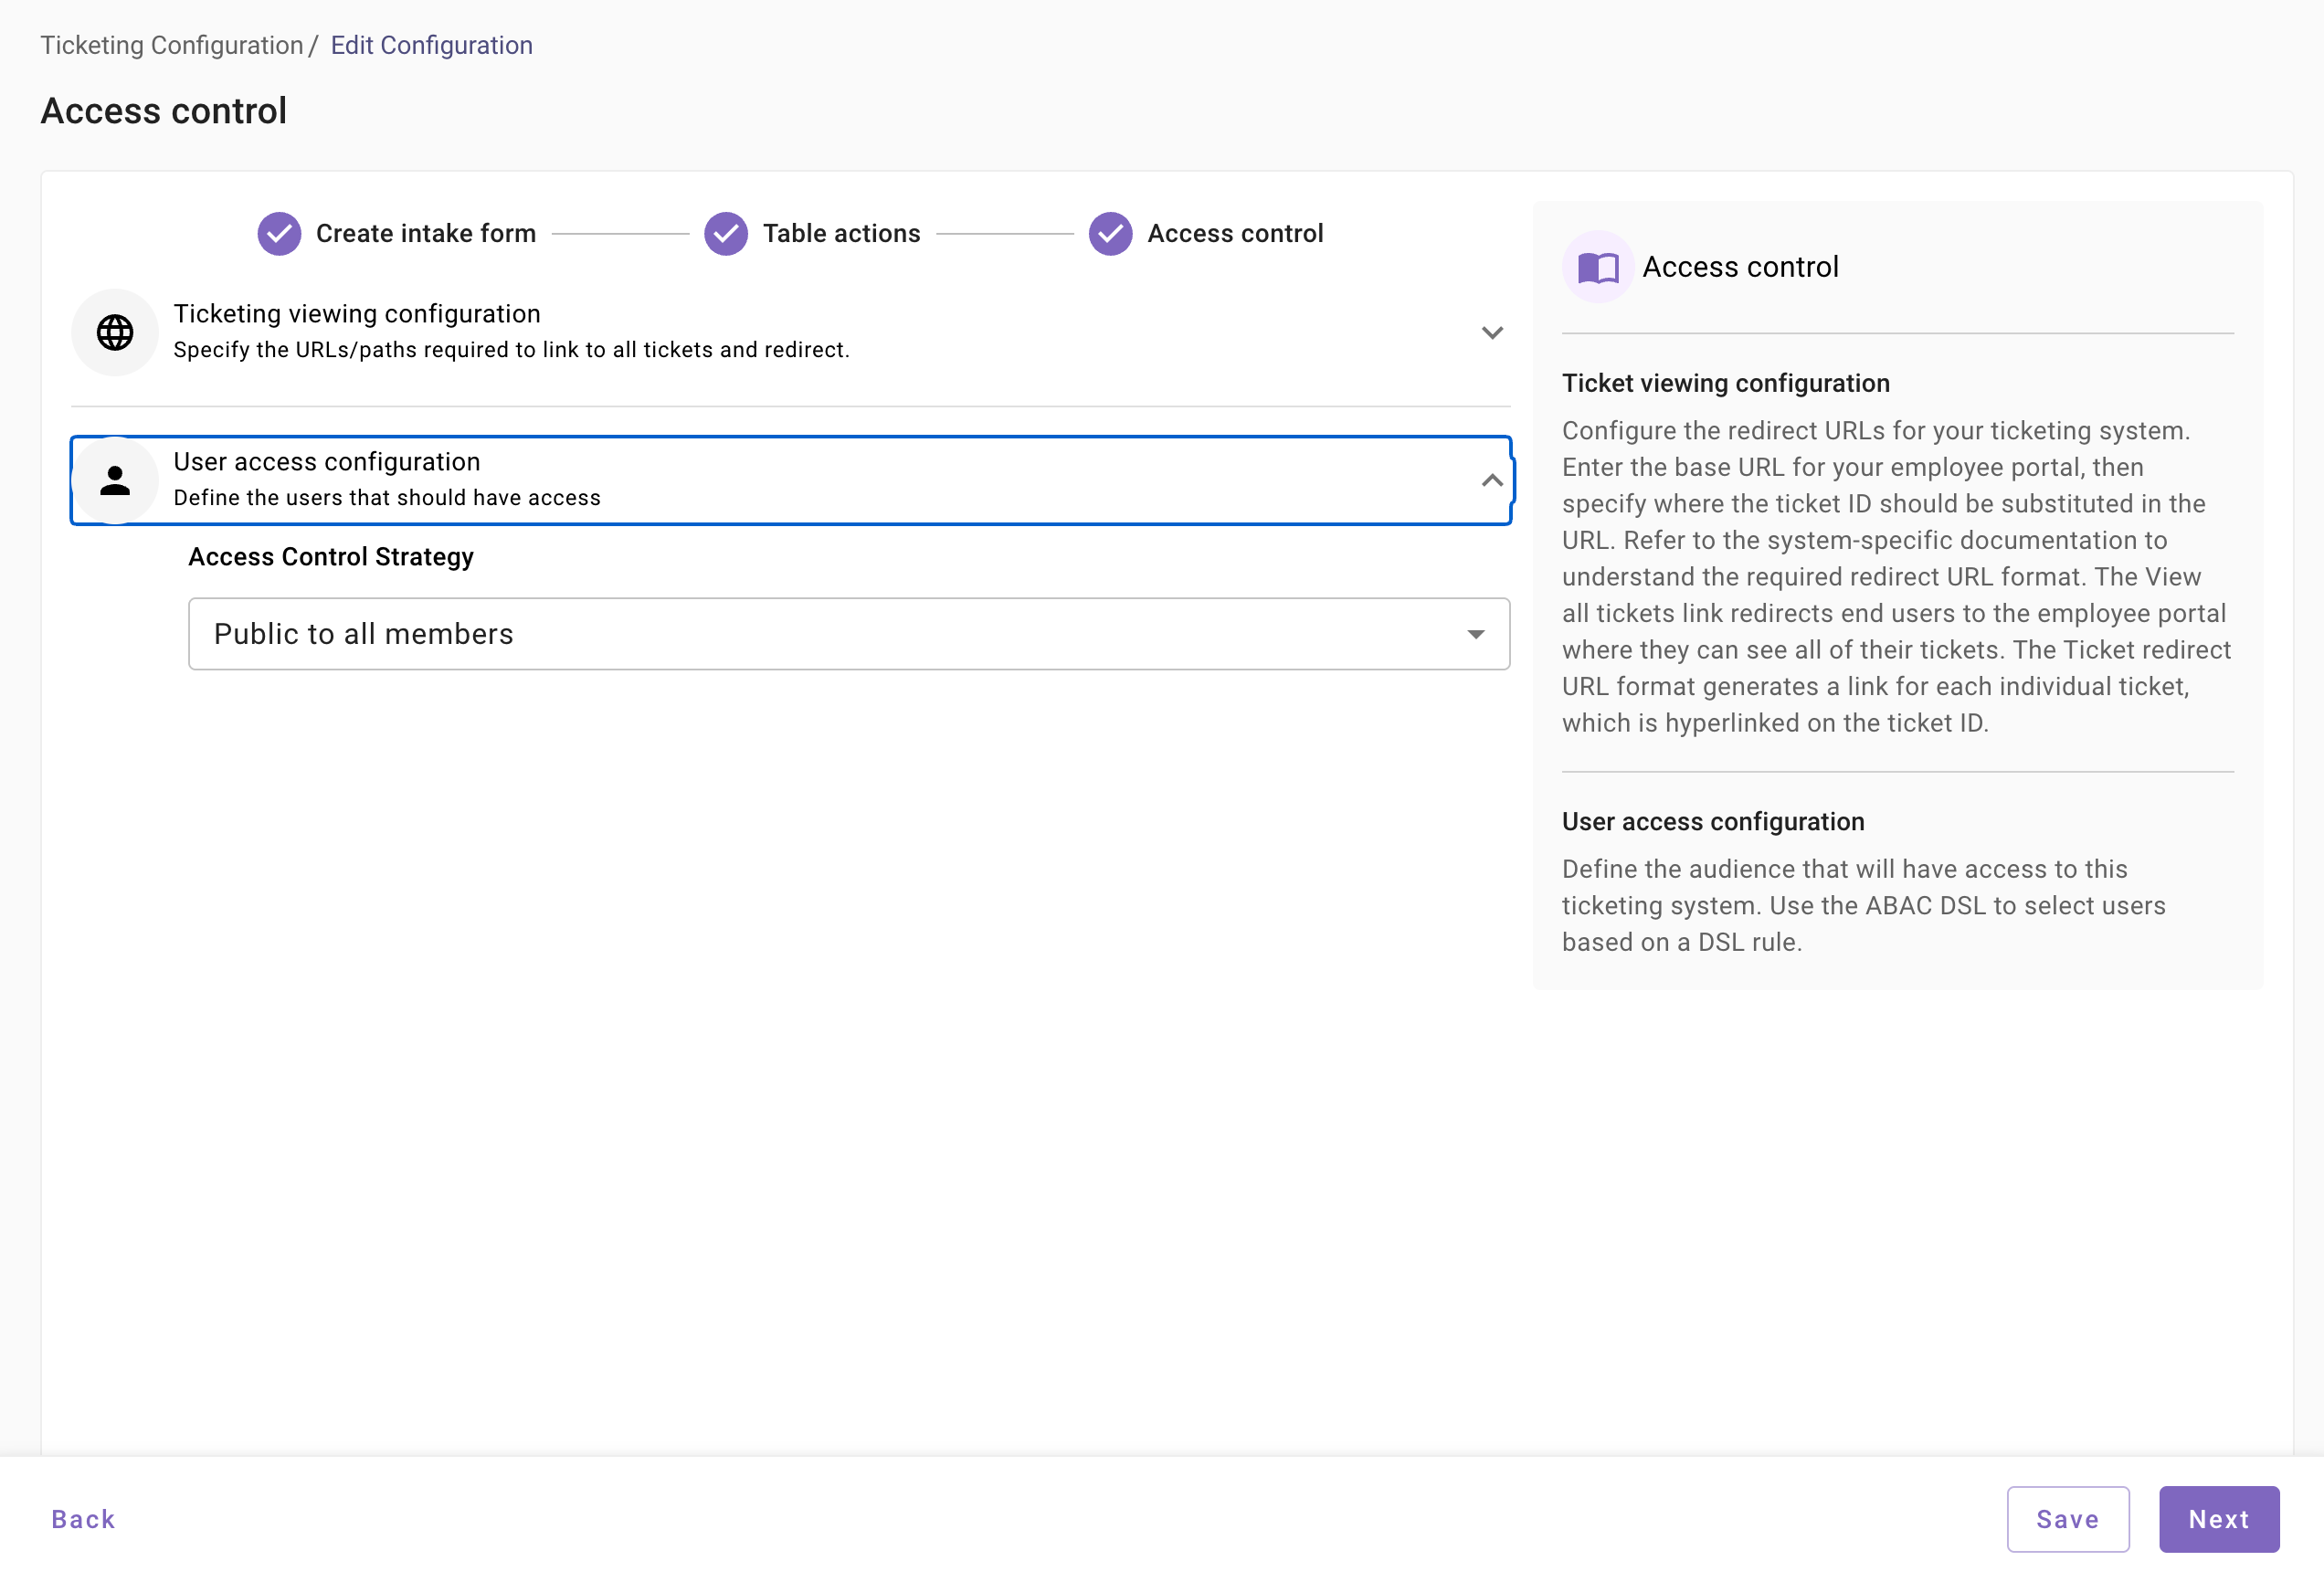
Access control
You must define which users can access the Jira ticketing integration in Moveworks. Two access control options are available:
- Public: Accessible to all members.
- ABAC (Attribute-Based Access Control): Define a custom DSL rule to control access based on user attributes.
Choose the option that best fits your organization’s access requirements.
10. Enabling platform level settings for ticketing
Manage ticket polling, notifications and filters. Control ticket display
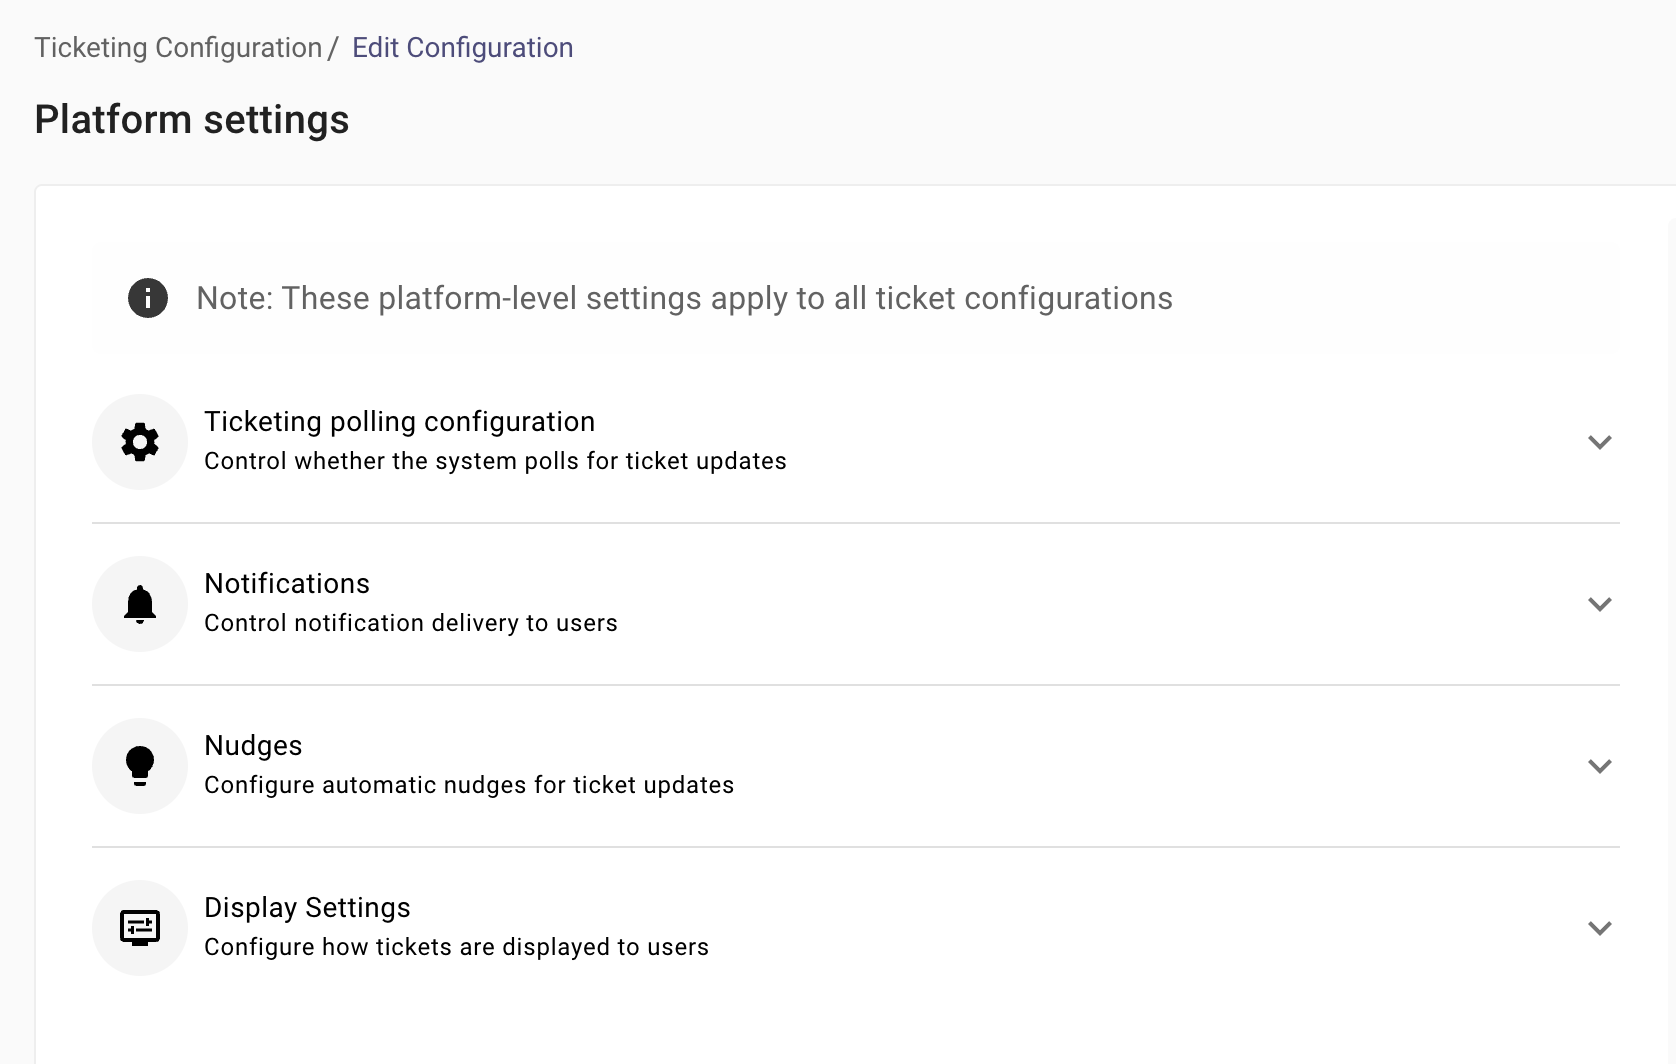
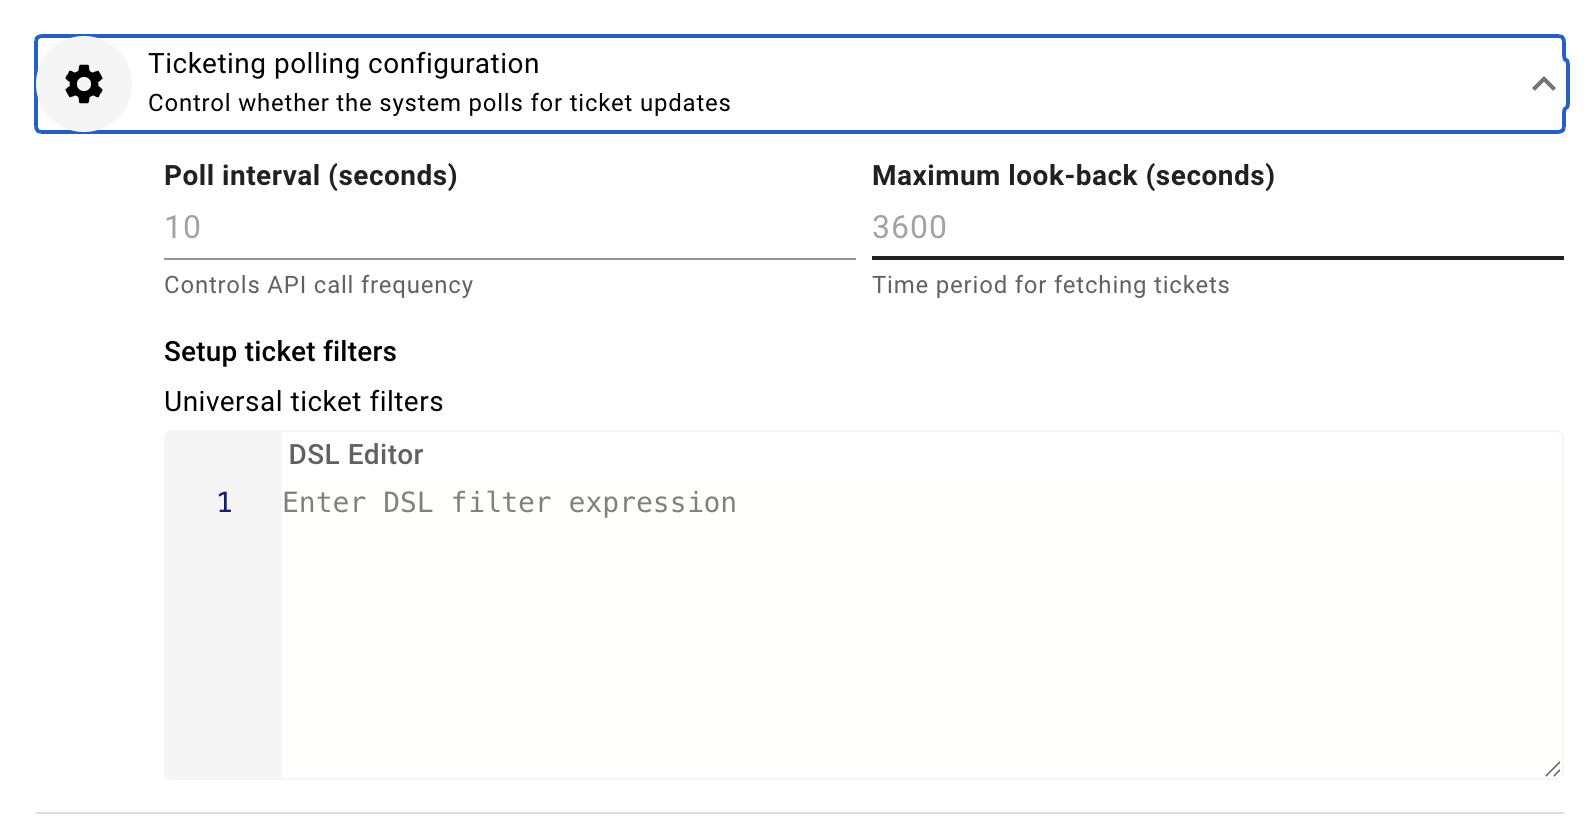
Ticketing Polling Configuration
-
Configure how frequently Moveworks polls Jira for ticket updates.
-
Define:
- Poll interval (in seconds)
- Maximum look-back window
-
Apply universal ticket filters using DSL to limit which tickets are considered.
Notifications
- Control how and when users receive ticket notifications.
- Configure notification filters using DSL.
- Restrict notifications to business hours if required.
- Optionally:
-
Respect user time zones
-
Enable weekend notifications
-
Notify watchers on ticket updates

-
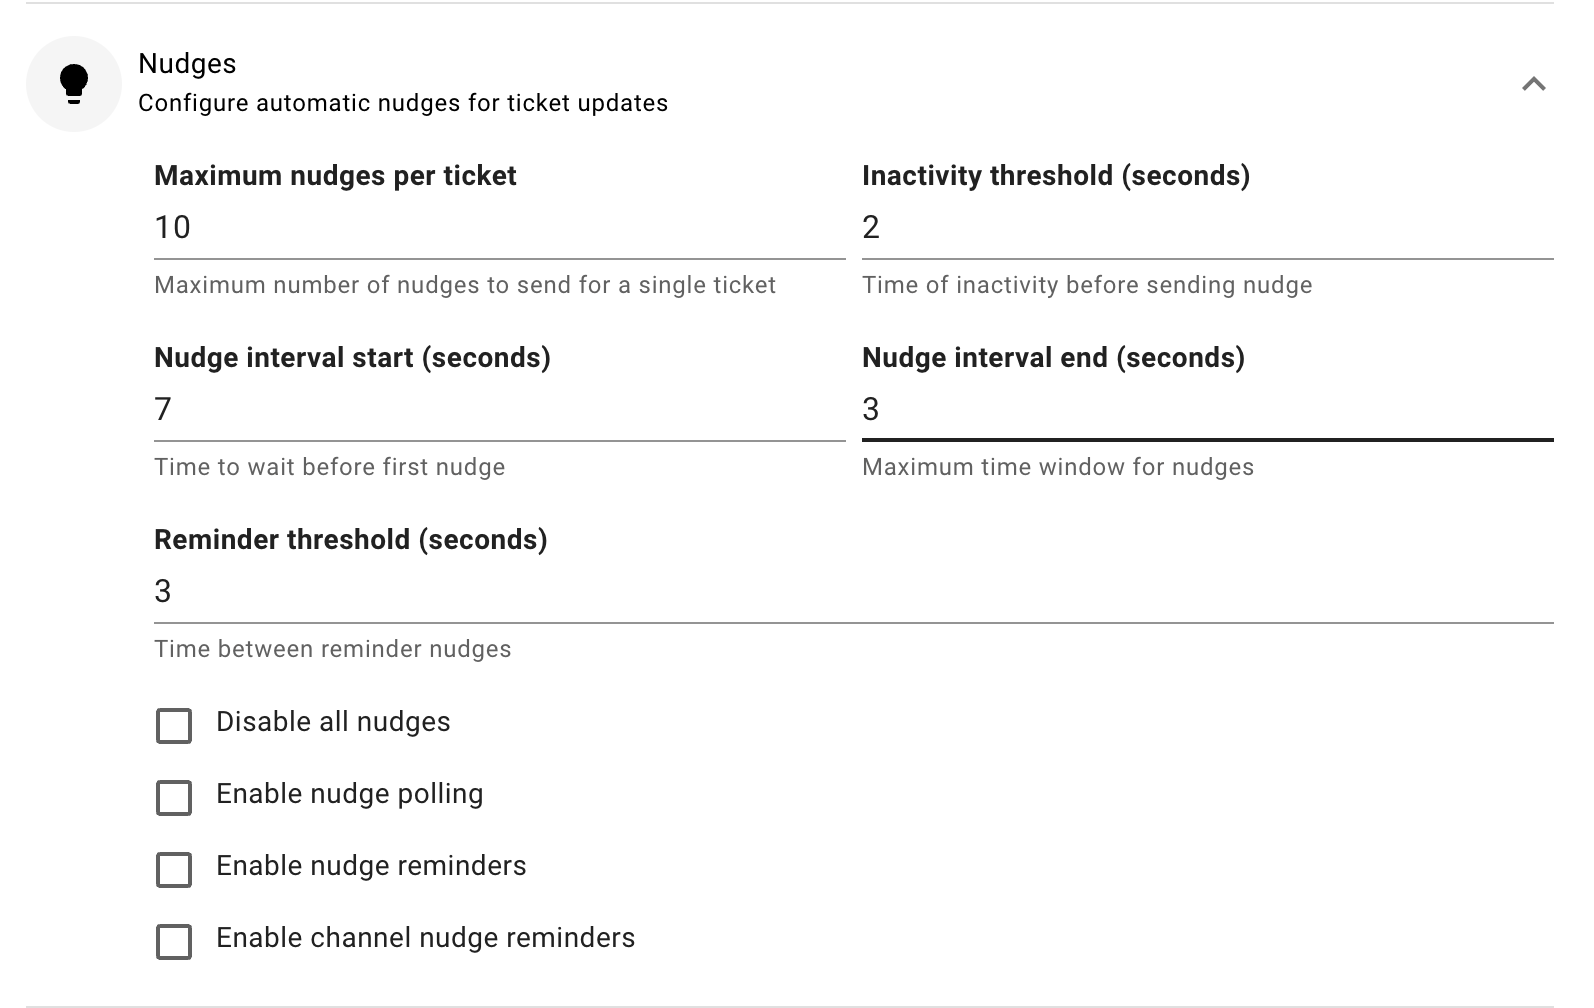
Nudges
-
Configure automated reminders for inactive tickets.
-
Define:
- Inactivity threshold
- Nudge interval
- Maximum nudges per ticket
-
Enable or disable polling-based and channel-based nudges as needed.
Display Settings
- Control how ticket information is displayed in Moveworks.
- Configure options such as:
- Displaying ticket state
- Showing assignee information
- Allowing attachment uploads
- Requiring comments before reopening tickets
- Hiding the reopen option for closed tickets