SharePoint Online & OneDrive Access Needs for MS Graph based live search
Use this guide to configure a per-user Microsoft Graph integration so Moveworks can perform Live Search across SharePoint Online and OneDrive.
Moveworks requires an Azure App registration (which creates an Enterprise application/service principal) to connect to Live Search for SharePoint & OneDrive. This connection will enable your users to connect to both SharePoint & OneDrive via a single connector.
Content Types
Indexing (SharePoint Online)
- Pages (modern site pages, classic wiki pages and classic publishing pages).
- Documents stored in SharePoint document libraries (including common attachments).
- Supported file formats: doc, docx, pdf, ppt, pptx, txt, html, aspx(pages)
Live Search (SharePoint Online & OneDrive)
- On-demand results from the signed-in user’s accessible SharePoint sites/libraries and their OneDrive files/folders. It includes Pages, Documents, Lists etc.
- Not indexed into the enterprise corpus; fetched at query time after user consent.
Access Requirements
Pre-requisites
Before you get started, make sure you have everything you need:
- Admin roles
- Global Admin to create the app registration and grant admin consent for Graph scopes.
- SharePoint Admin to confirm tenant domains and validate that SharePoint/OneDrive content is accessible as expected.
Detailed Instructions to set up a new Enterprise Application registration
You can find Microsoft’s documentation on setting up this Application here: https://learn.microsoft.com/en-us/graph/auth-register-app-v2
The streamlined steps are described below, starting with creating a new Registration in Azure (portal.azure.com).
1. Register a new App
-
Sign in to the Azure portal.
-
Select Microsoft Entra ID > Manage > App registrations > New registration.
-
On the Register an application page, register an app with the following details
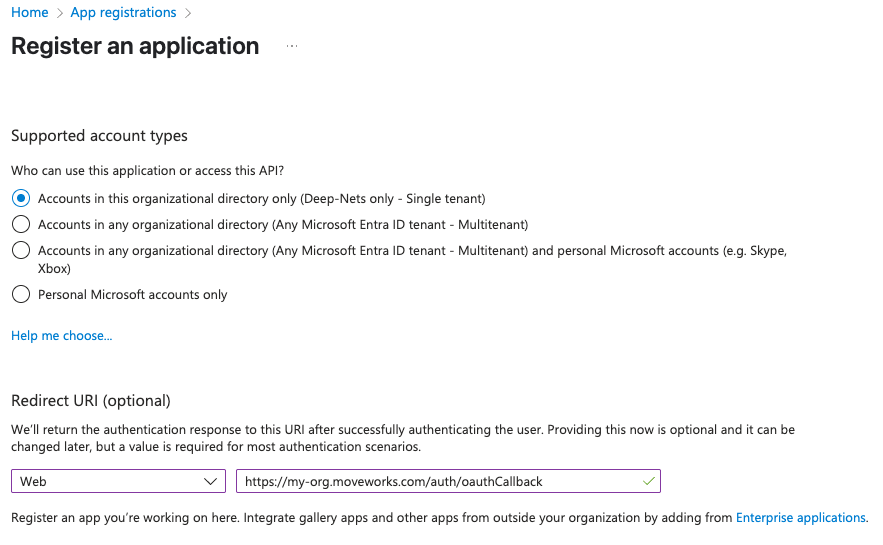
Note:
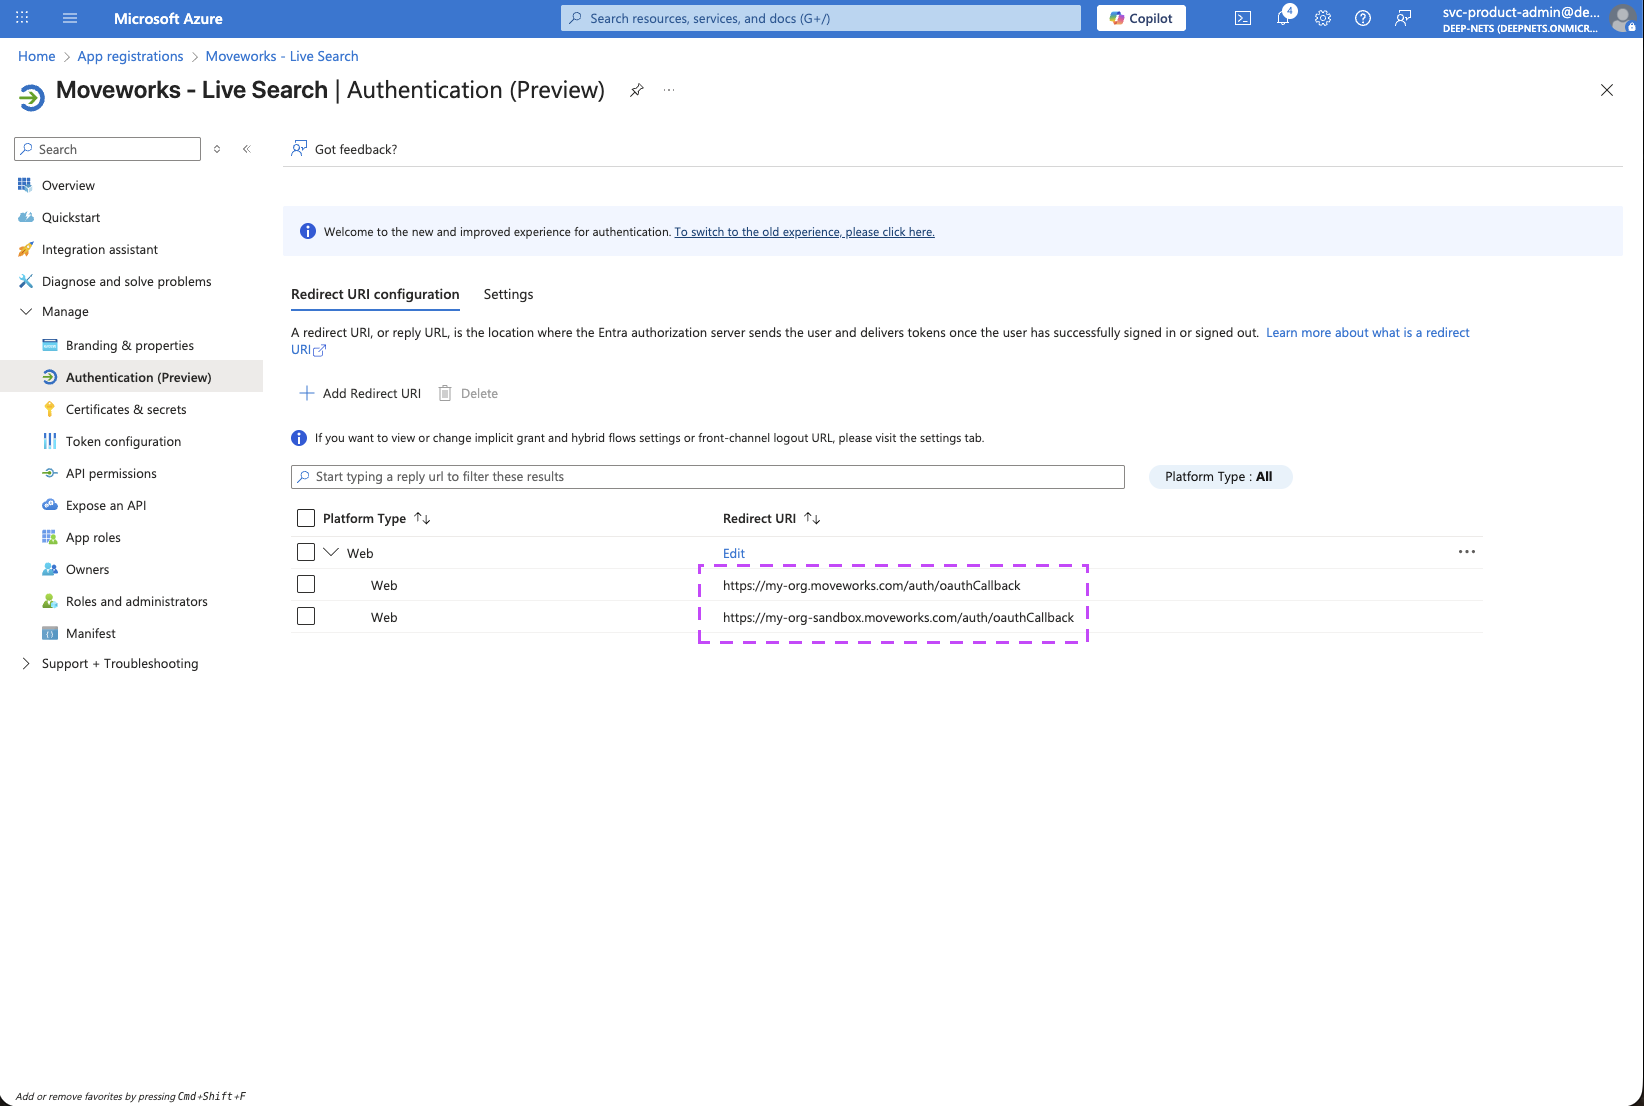
Ensure the Redirect URI is a Web application, and when specifying the Redirect URI, include your specific sub-domain for MyMoveworks.
https://{org}.moveworks.com/auth/oauthCallback— for US orgsMake sure to replace the
{org}with your specific sub-domain.
If you have a sandbox MyMoveworks environment, please configure an additional URL for that too:
-
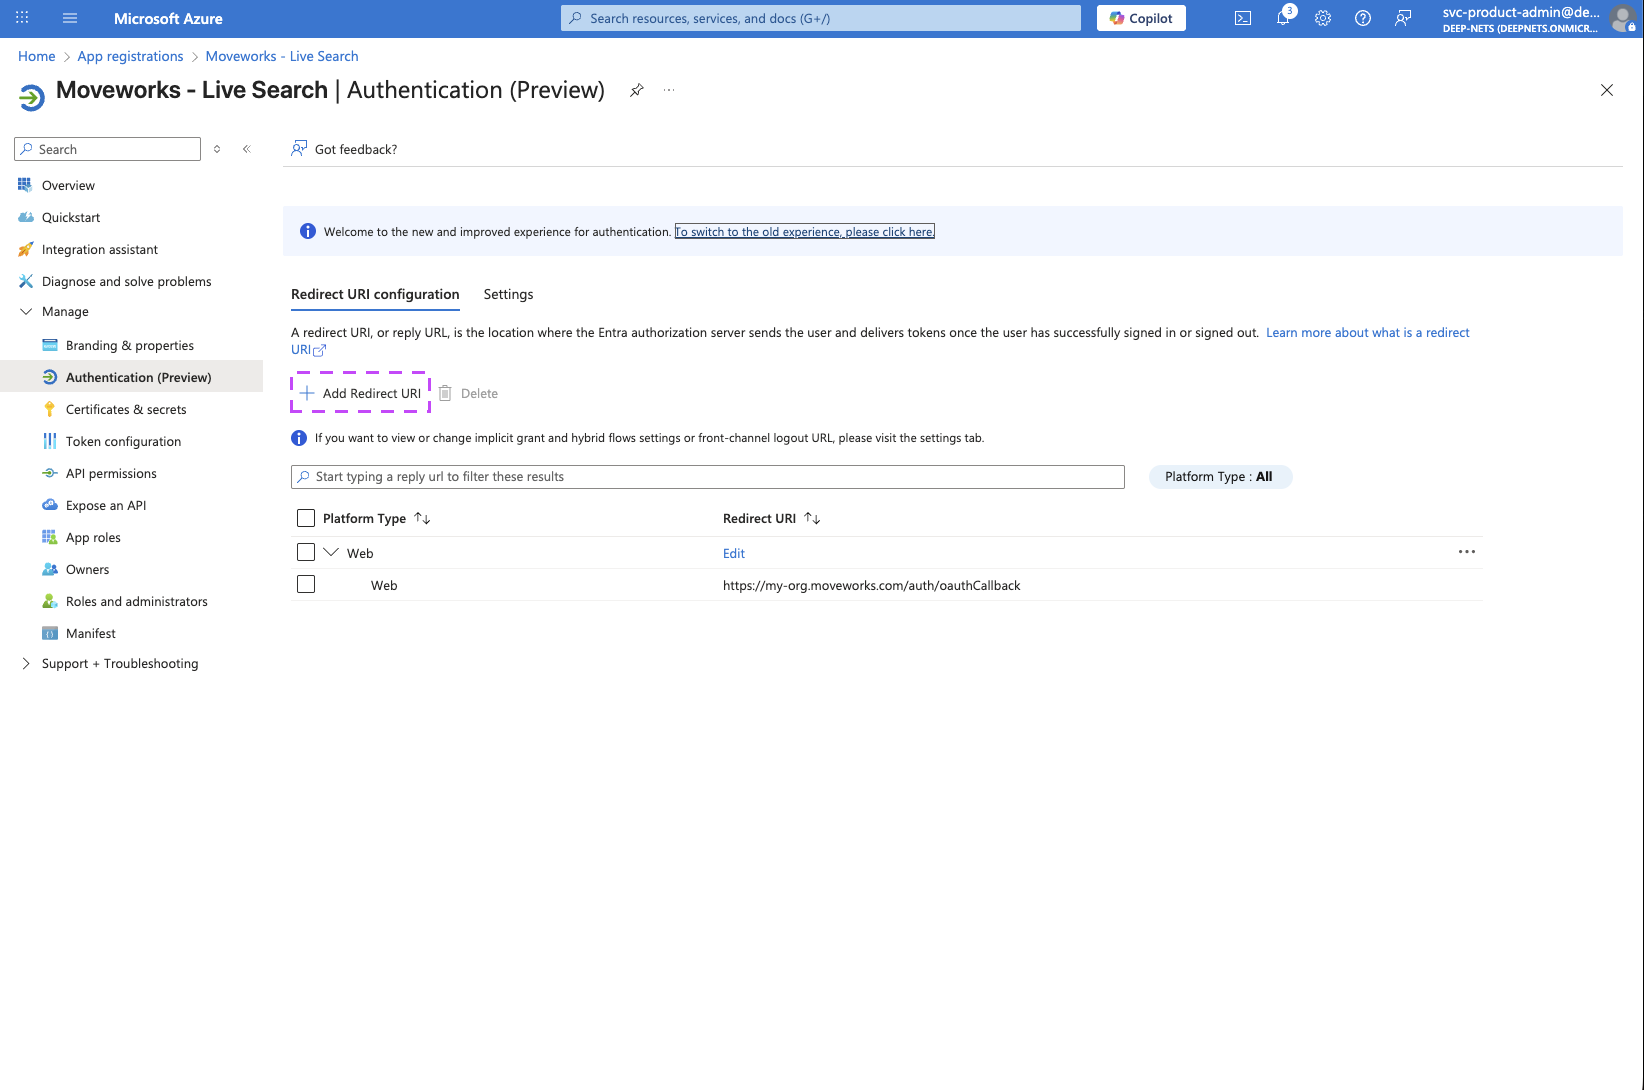
On the Home page of the Application you just created, click on the Redirect URIs link

-
On the page that opens, click on the Add Redirect URI button to add an additional URI
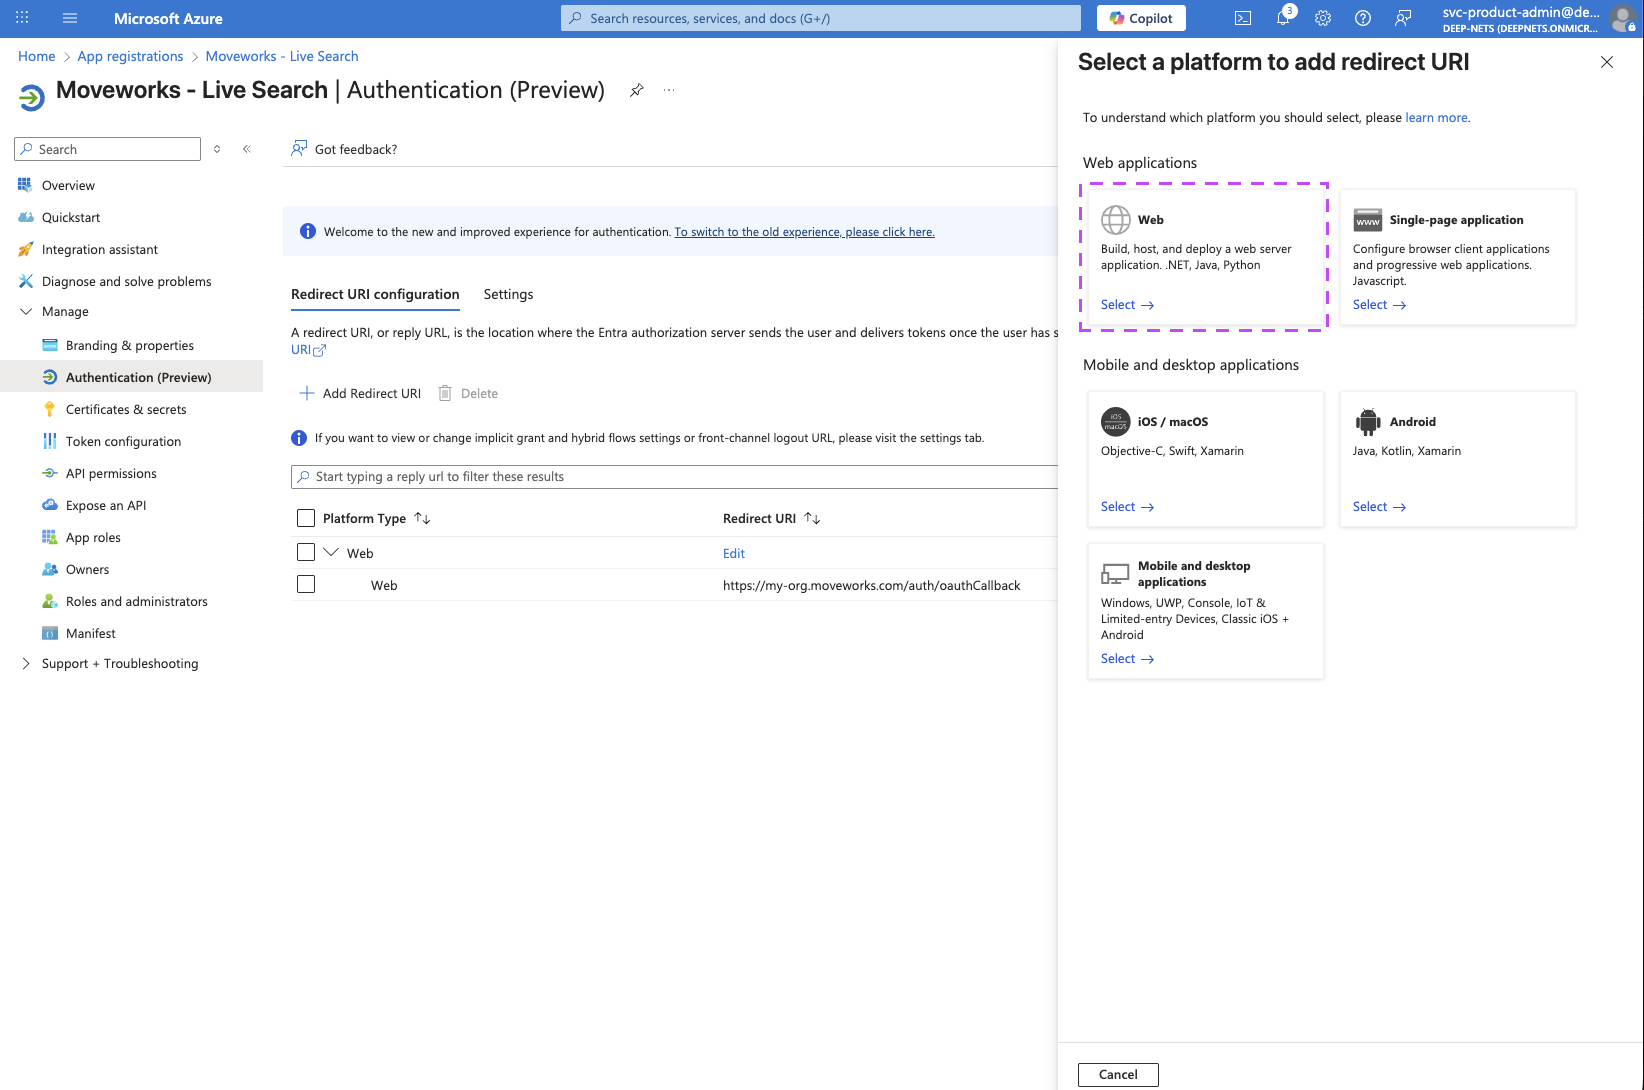
-
Select Web
-
Enter the URL for your sandbox MyMoveworks environment and click on Configure.
https://{org}-sandbox.moveworks.com/auth/oauthCallback— for US orgs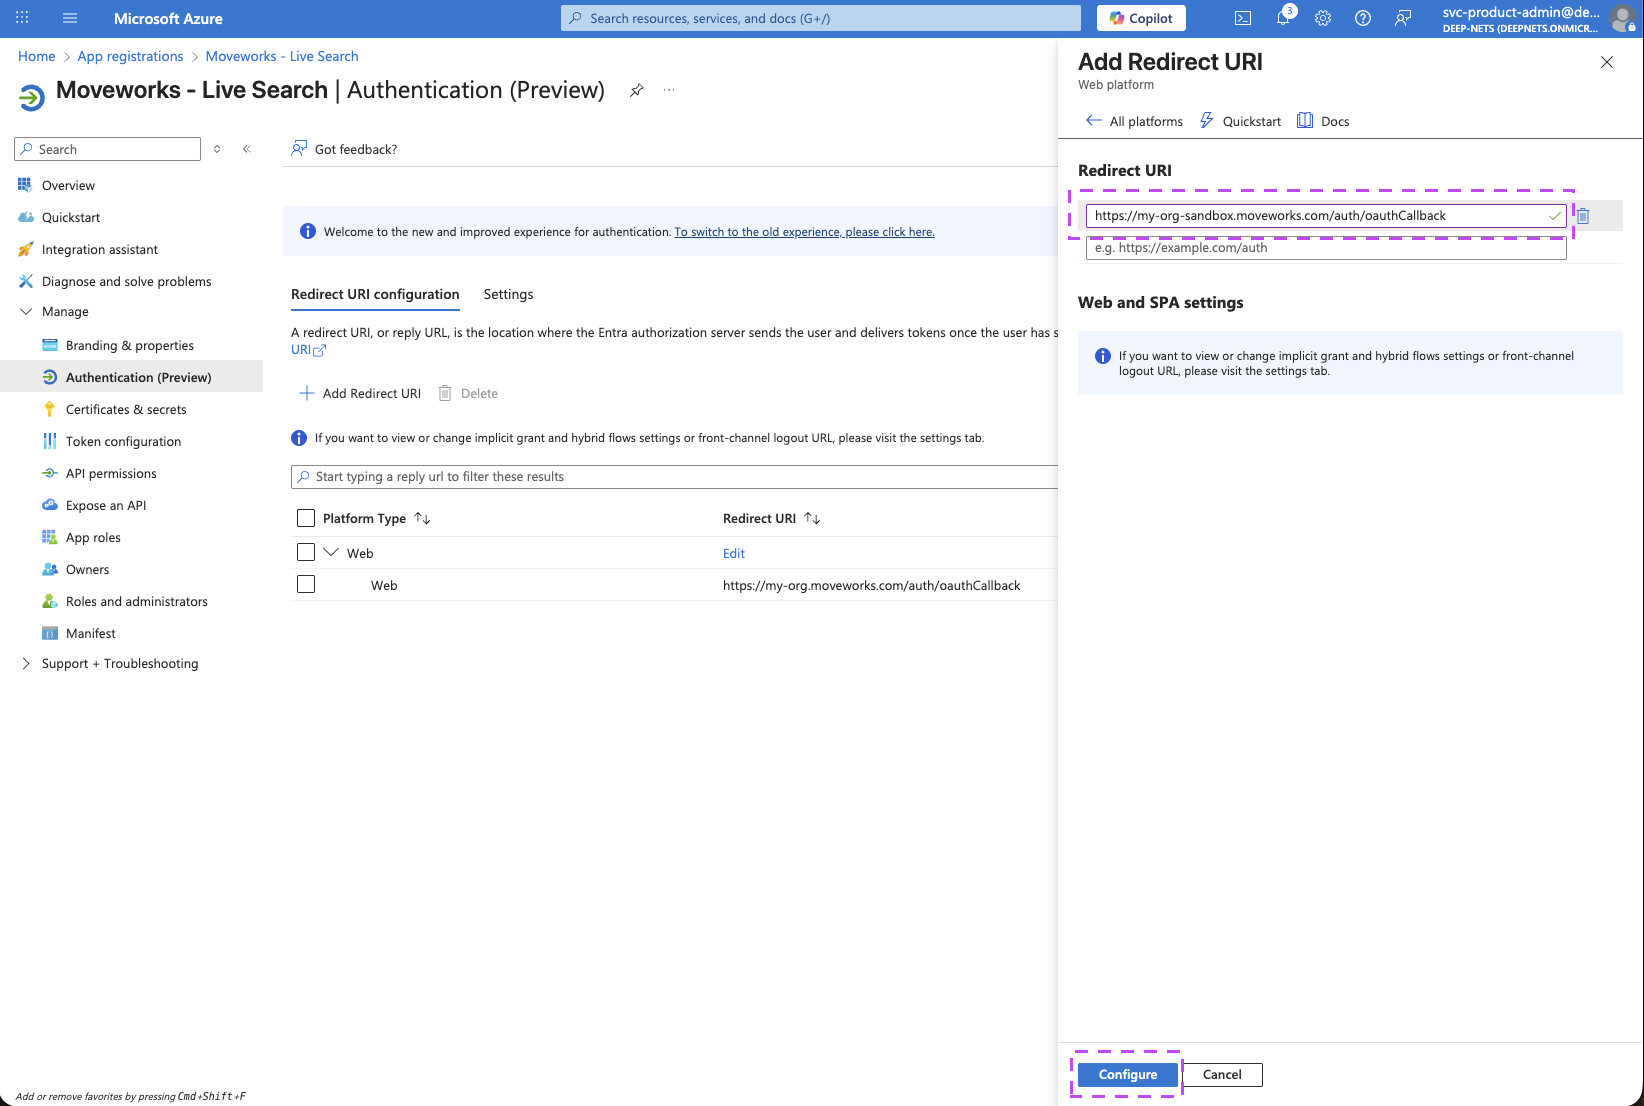
-
You should now notice both of your MyMoveworks URI configured on this page.
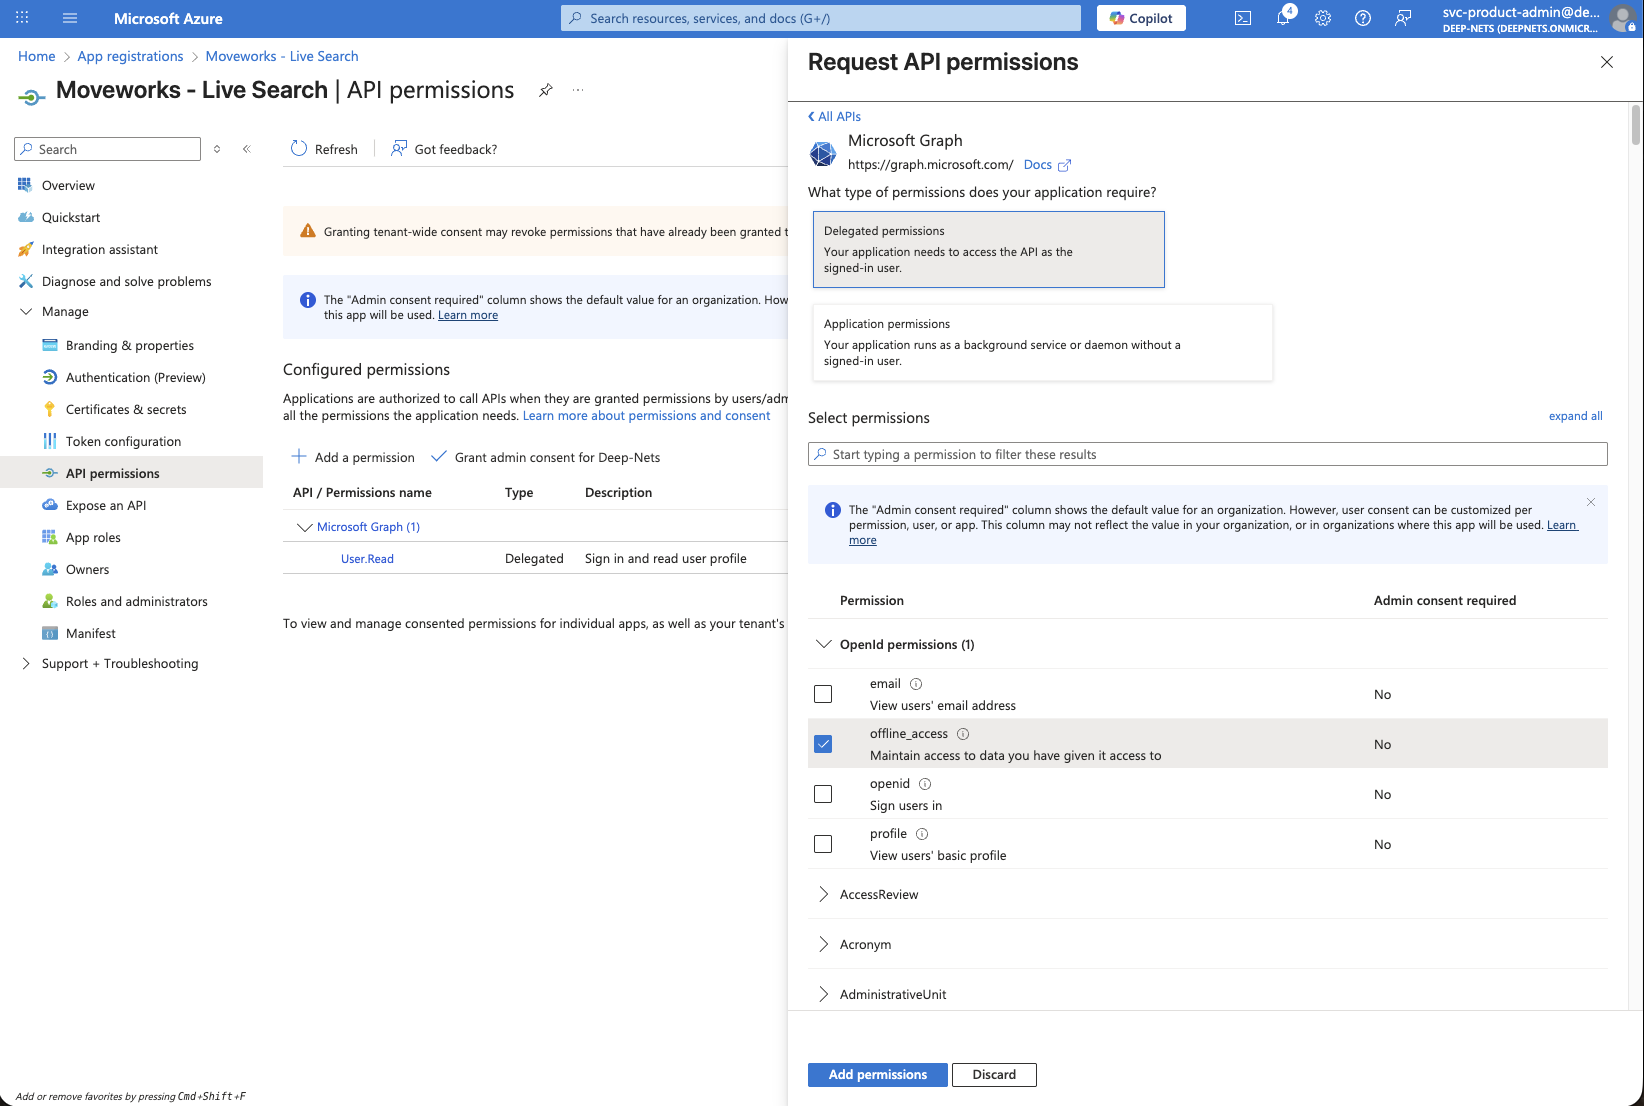
2. Setup API Permissions
-
Go to API Permissions to add the required MS Graph Permissions:
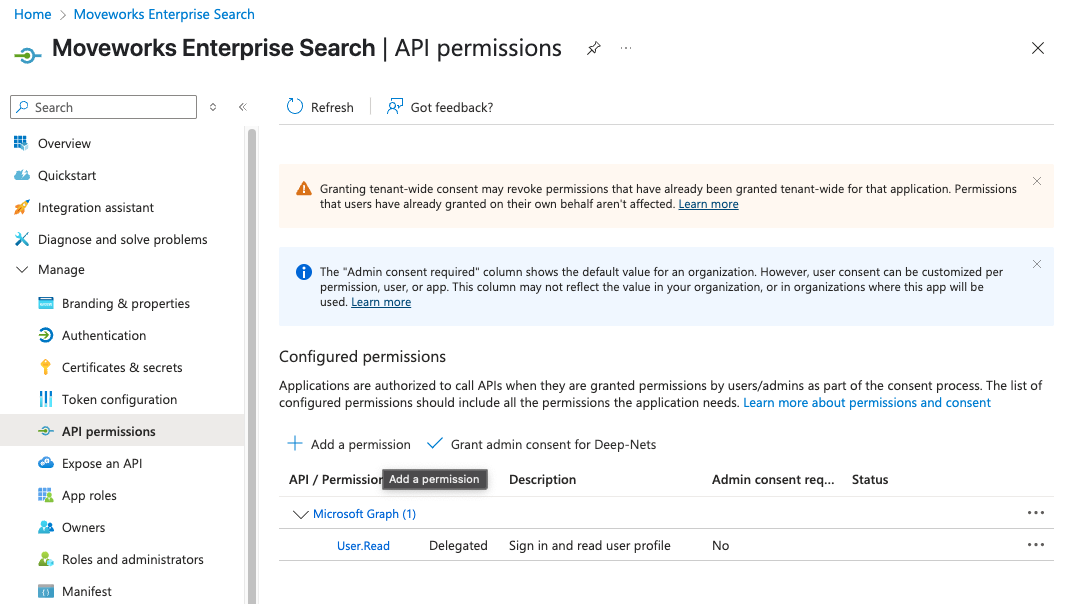
-
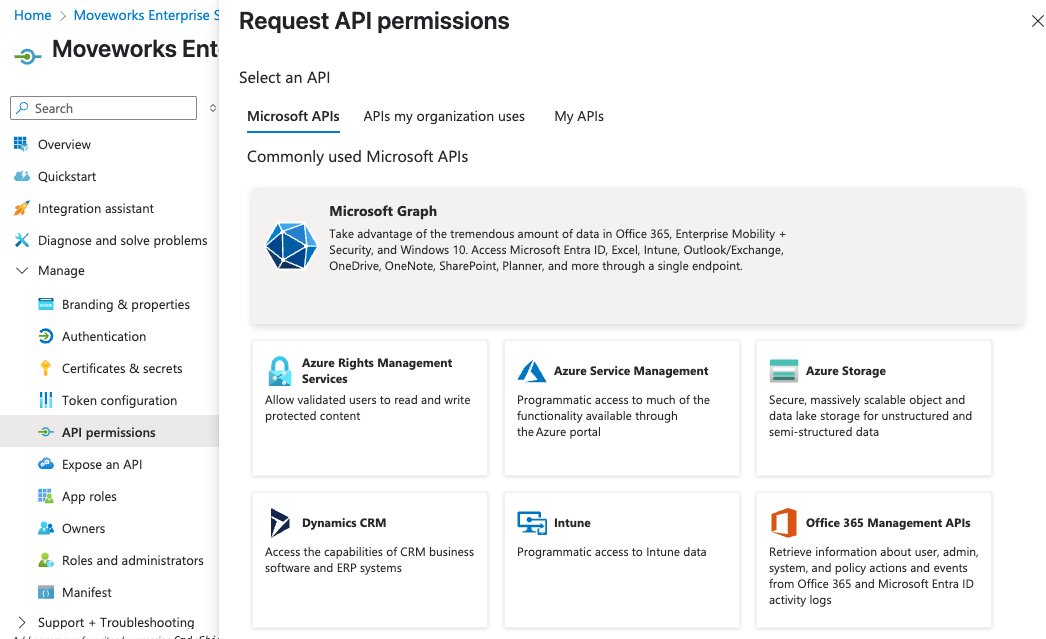
Click on Add a permission button. This will open a panel on the right side
-
Select Microsoft Graph.
-
Choose Delegated Permissions.
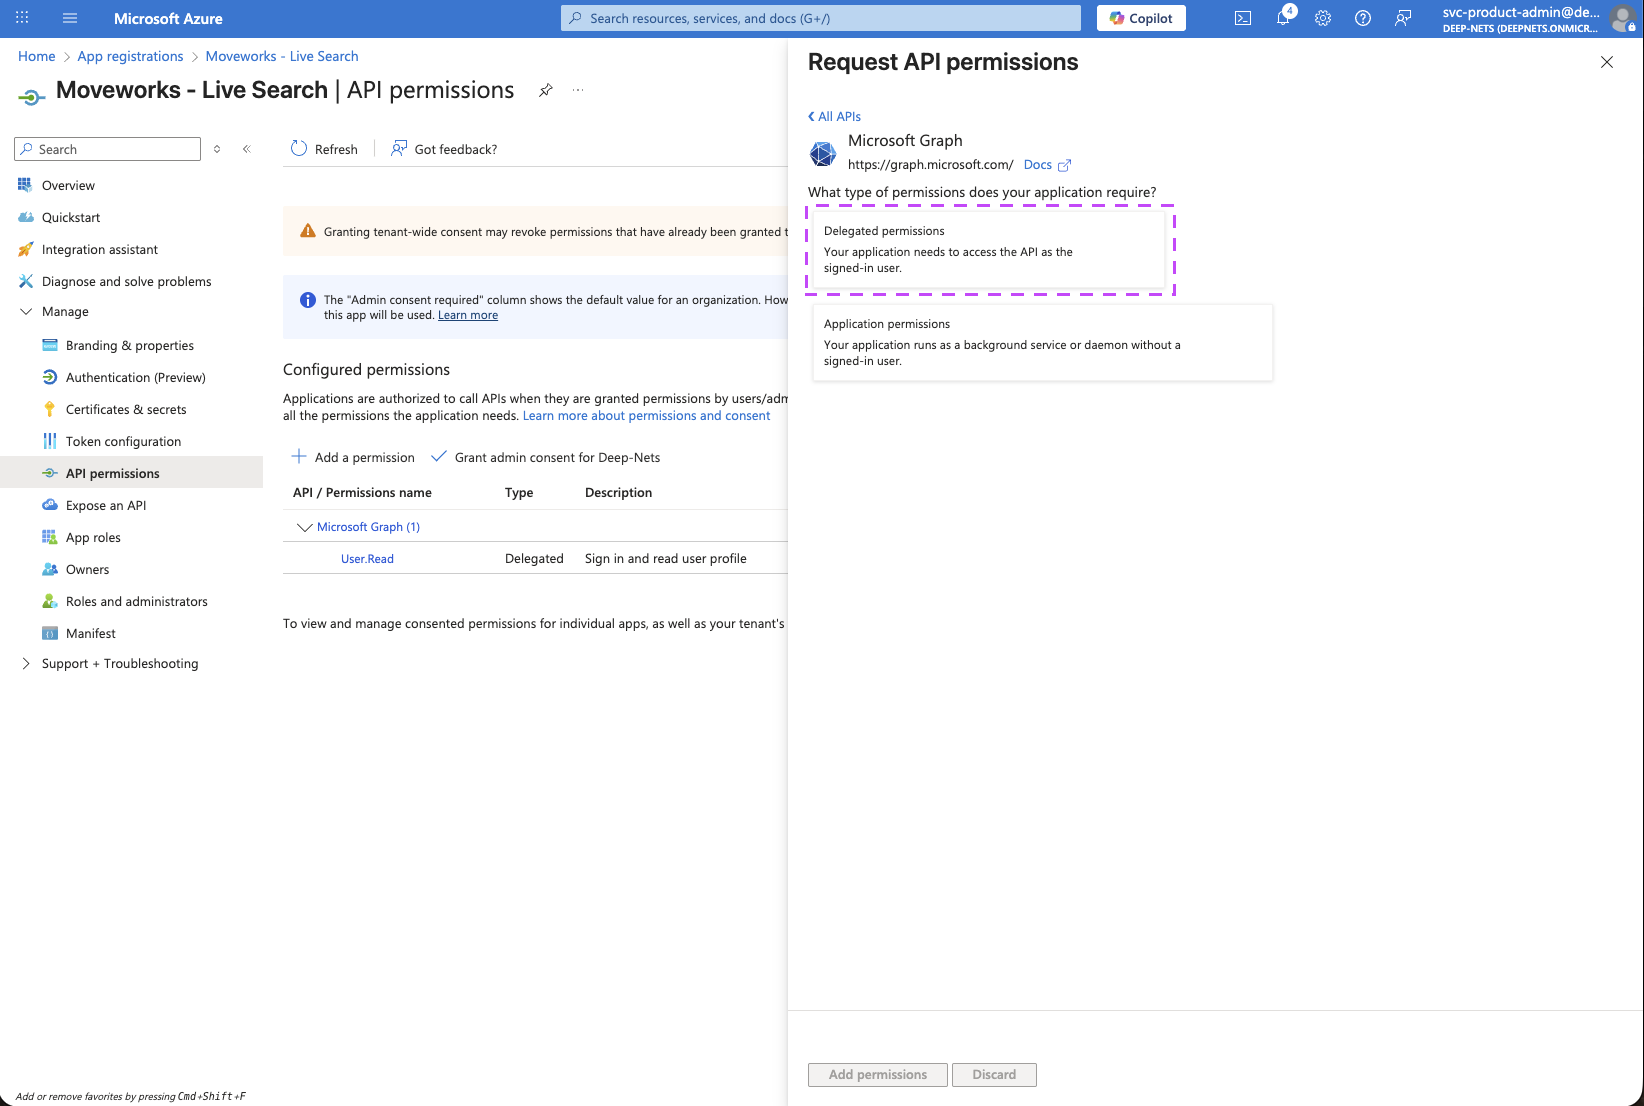
-
Ensure the following Delegated Permissions are added to the application.
Files.Read.All: lets Moveworks read files the user already has access to in OneDrive and SharePoint document libraries, so it can surface relevant results.Sites.Read.All: lets Moveworks read site pages and list items the user can access in SharePoint Online.User.Read: identifies the signed-in user.offline_access: allows Moveworks to store a refresh token so the user doesn’t have to re-consent every time they search.
-
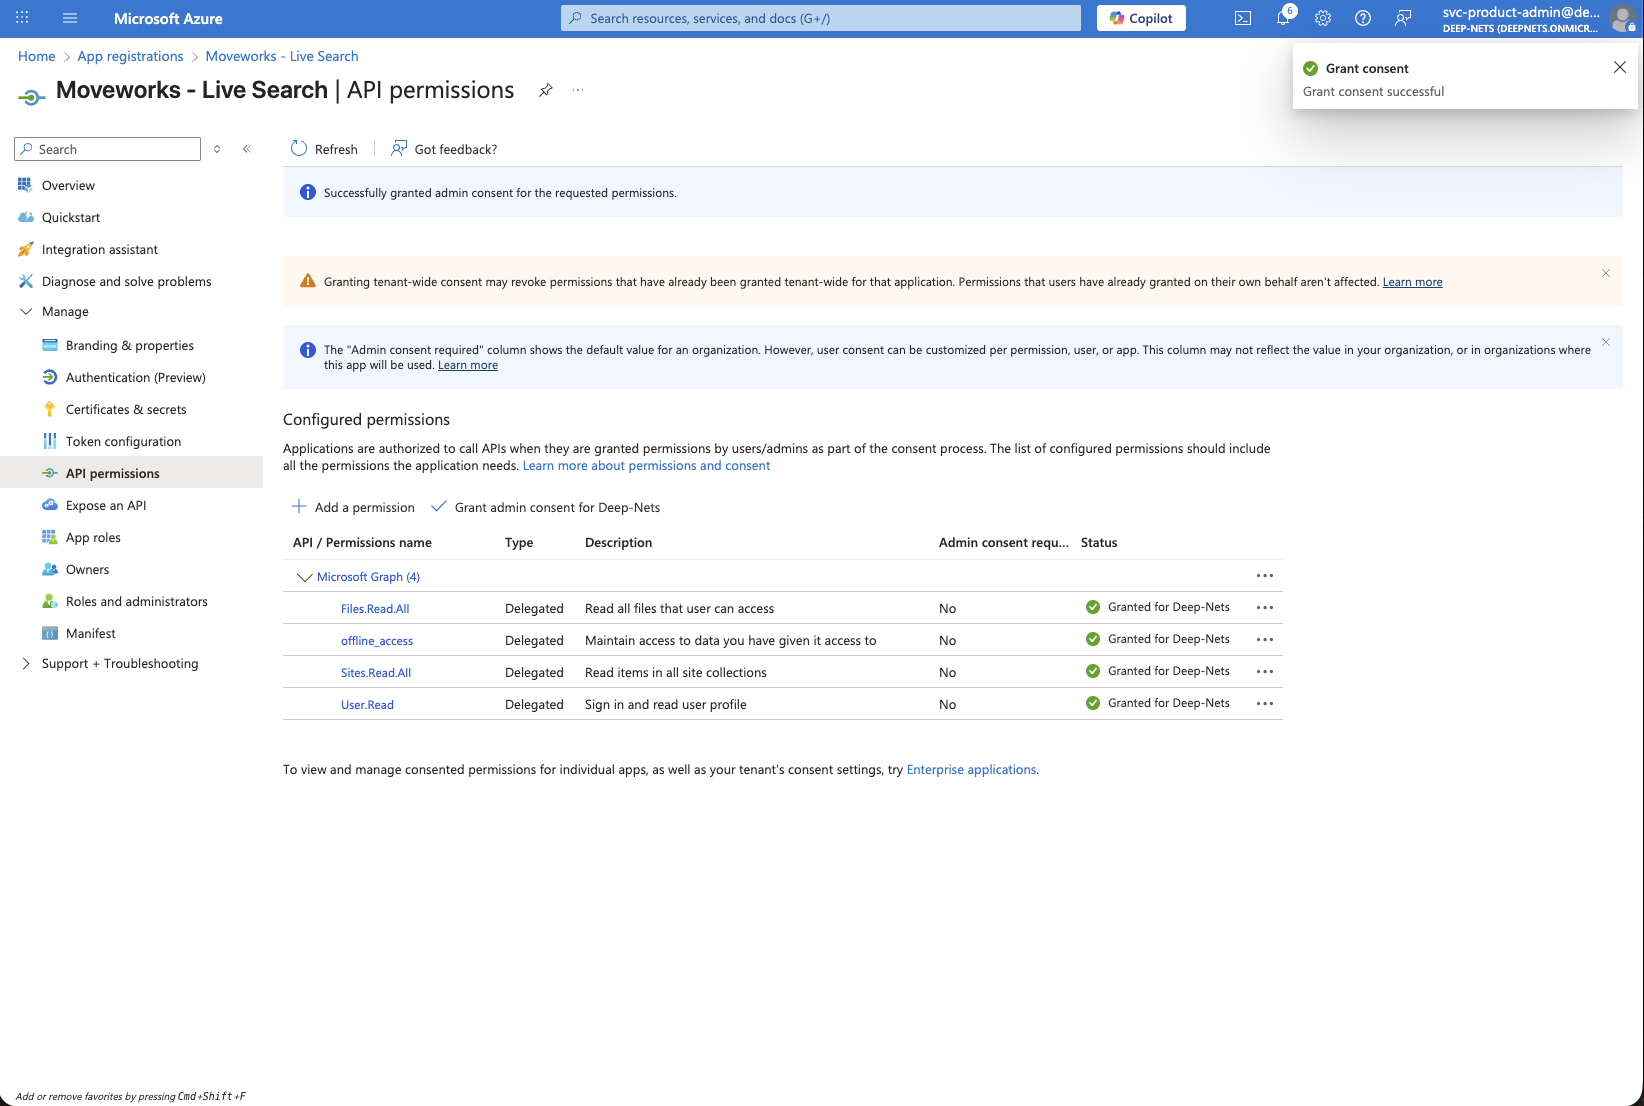
Click on Add permissions after selecting all of the above permission scopes.
-
Verify that all 4 permission scopes are present under Configured permissions.
-
Click on the Grant admin consent for your-org button to make sure all permissions are available for all users to grant access.
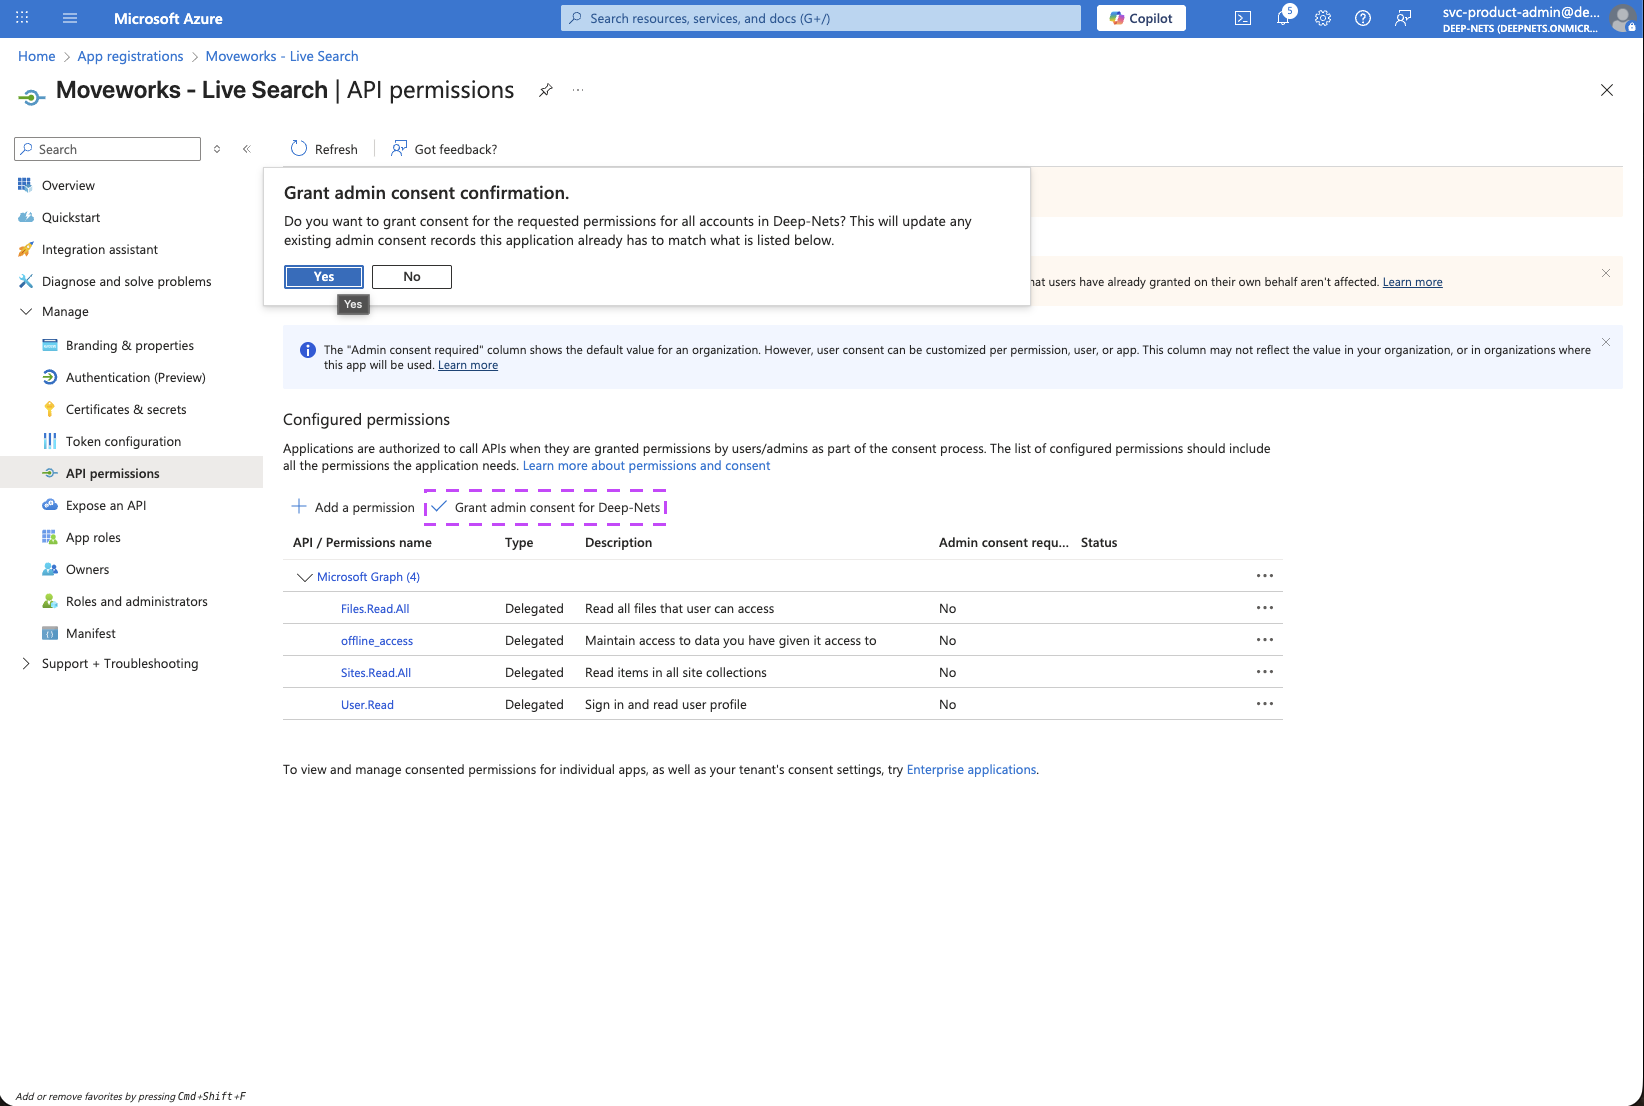
-
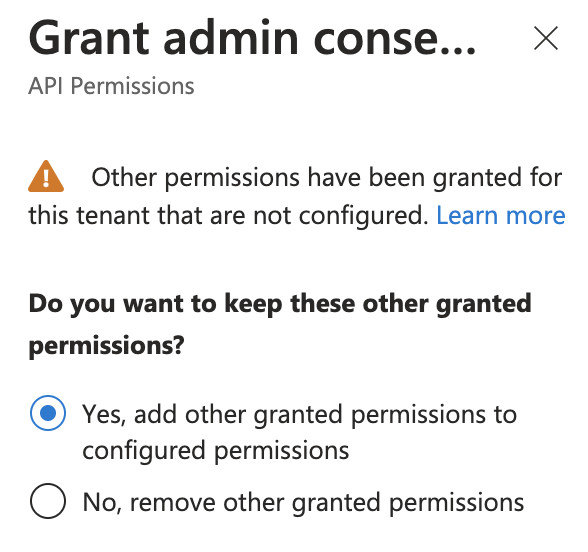
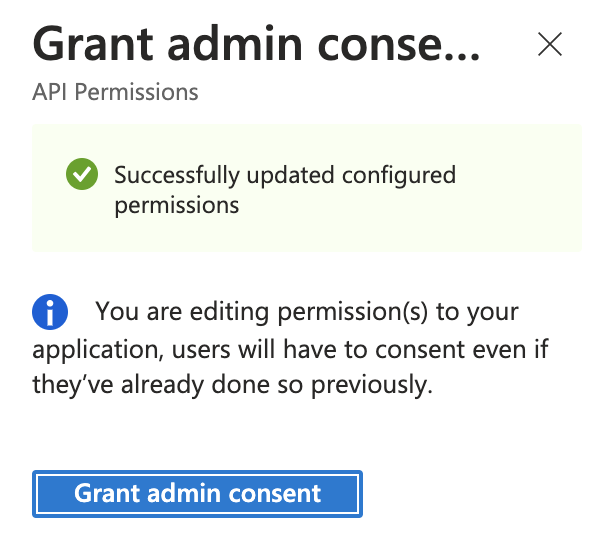
If this panel appears, click Yes, add other granted permissions to configured permissions then Save and continue, then Grant admin consent, and then Yes.
-
You will see green checkmarks on the newly added permissions if this was successful.
3. Generate Client Secret
Next, we will need to create a Client Secret for the Registration to connect it to Moveworks.
-
Navigate to the App you created above -> Certifications & secrets
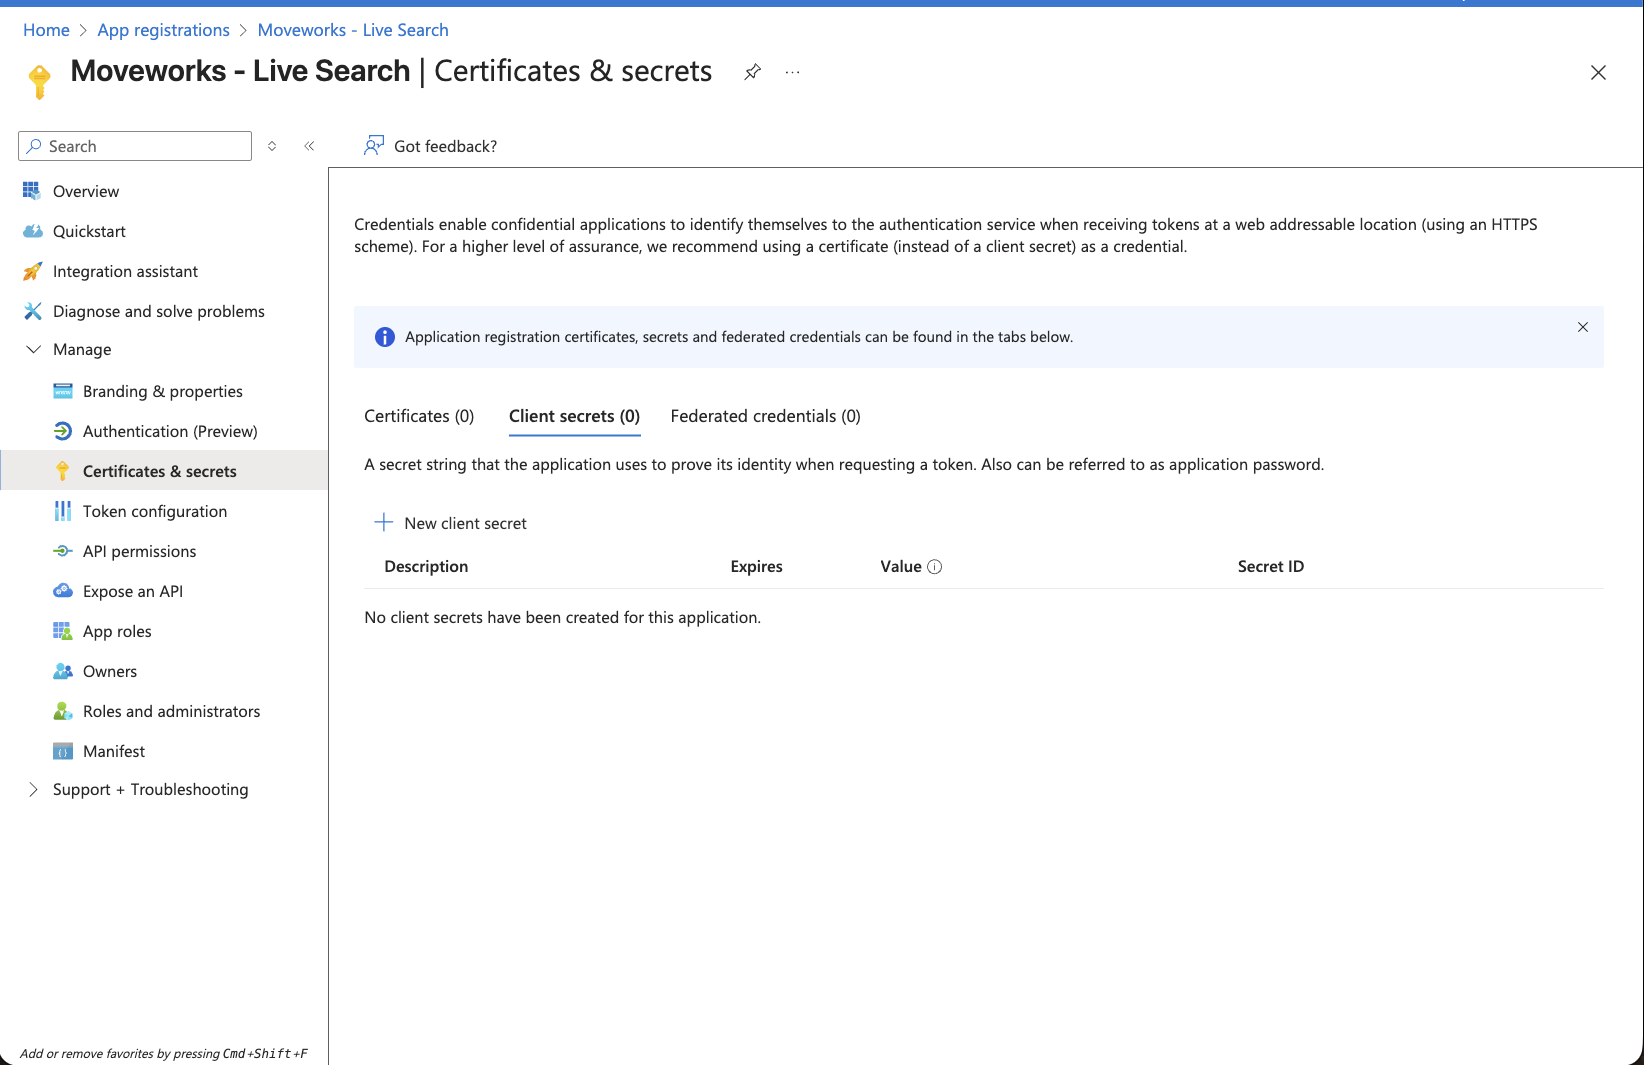
-
Click on New client secret button. This will open a panel on the right side.
-
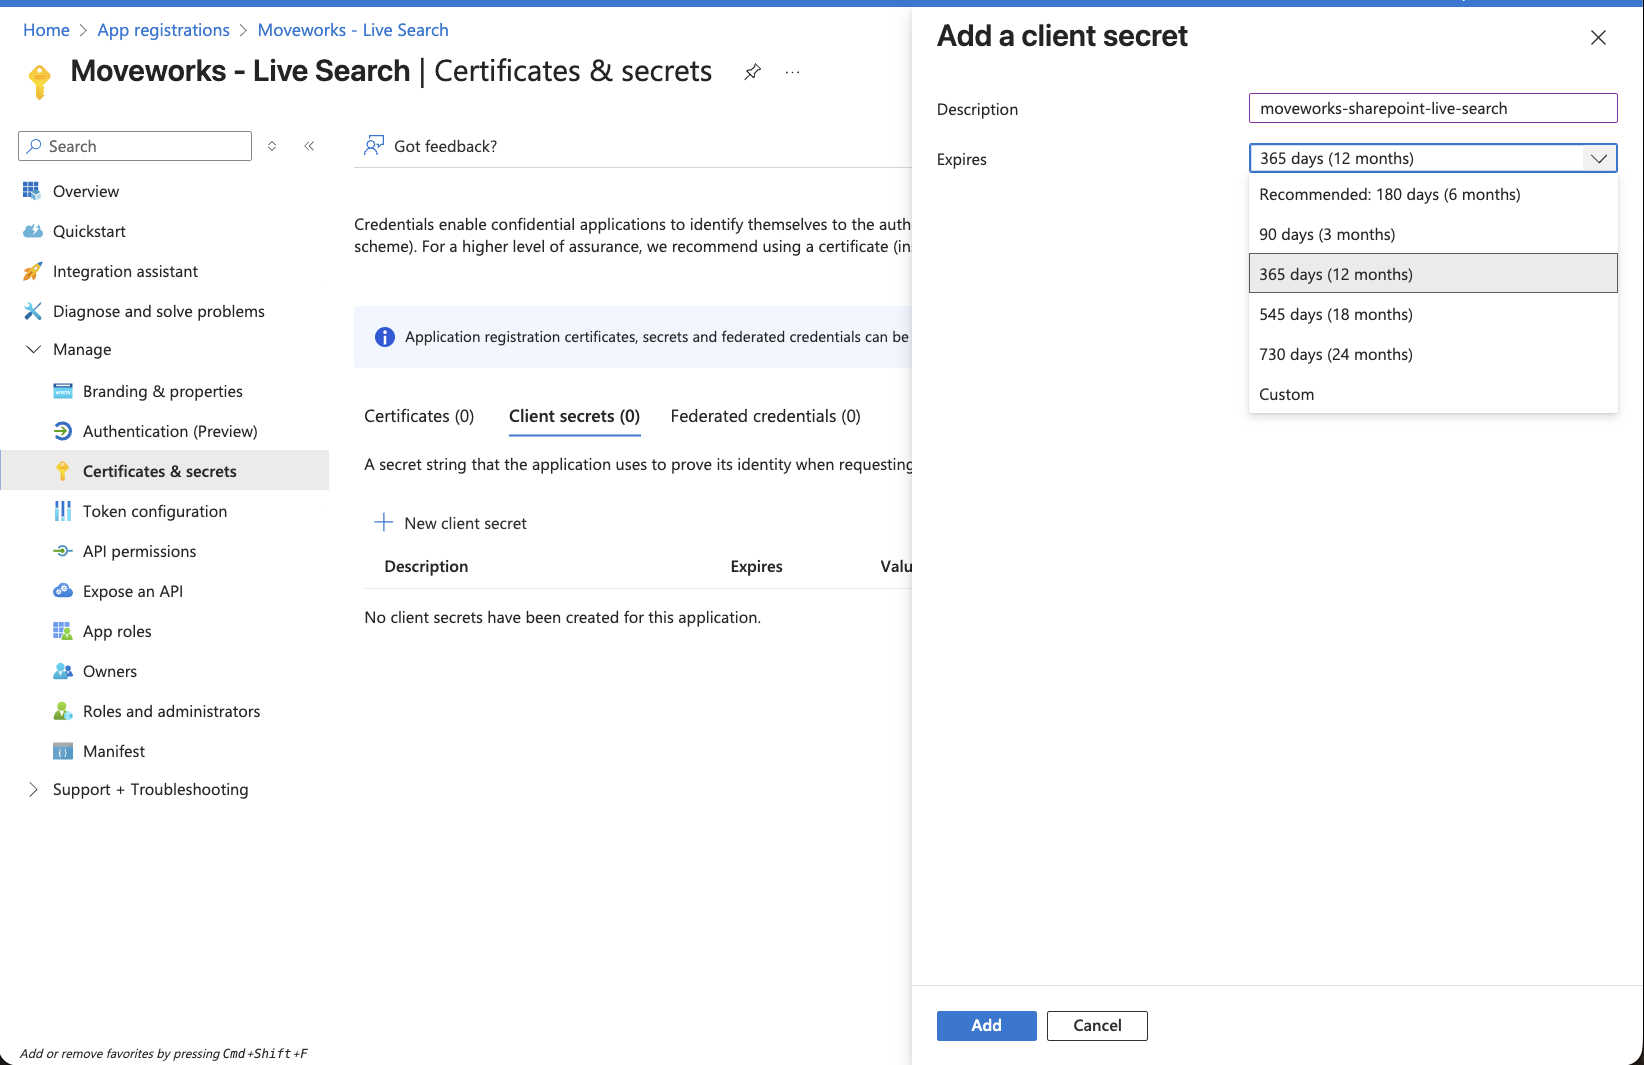
Set the description and expiry of this credential based on your org’s policy and click on Add.
-
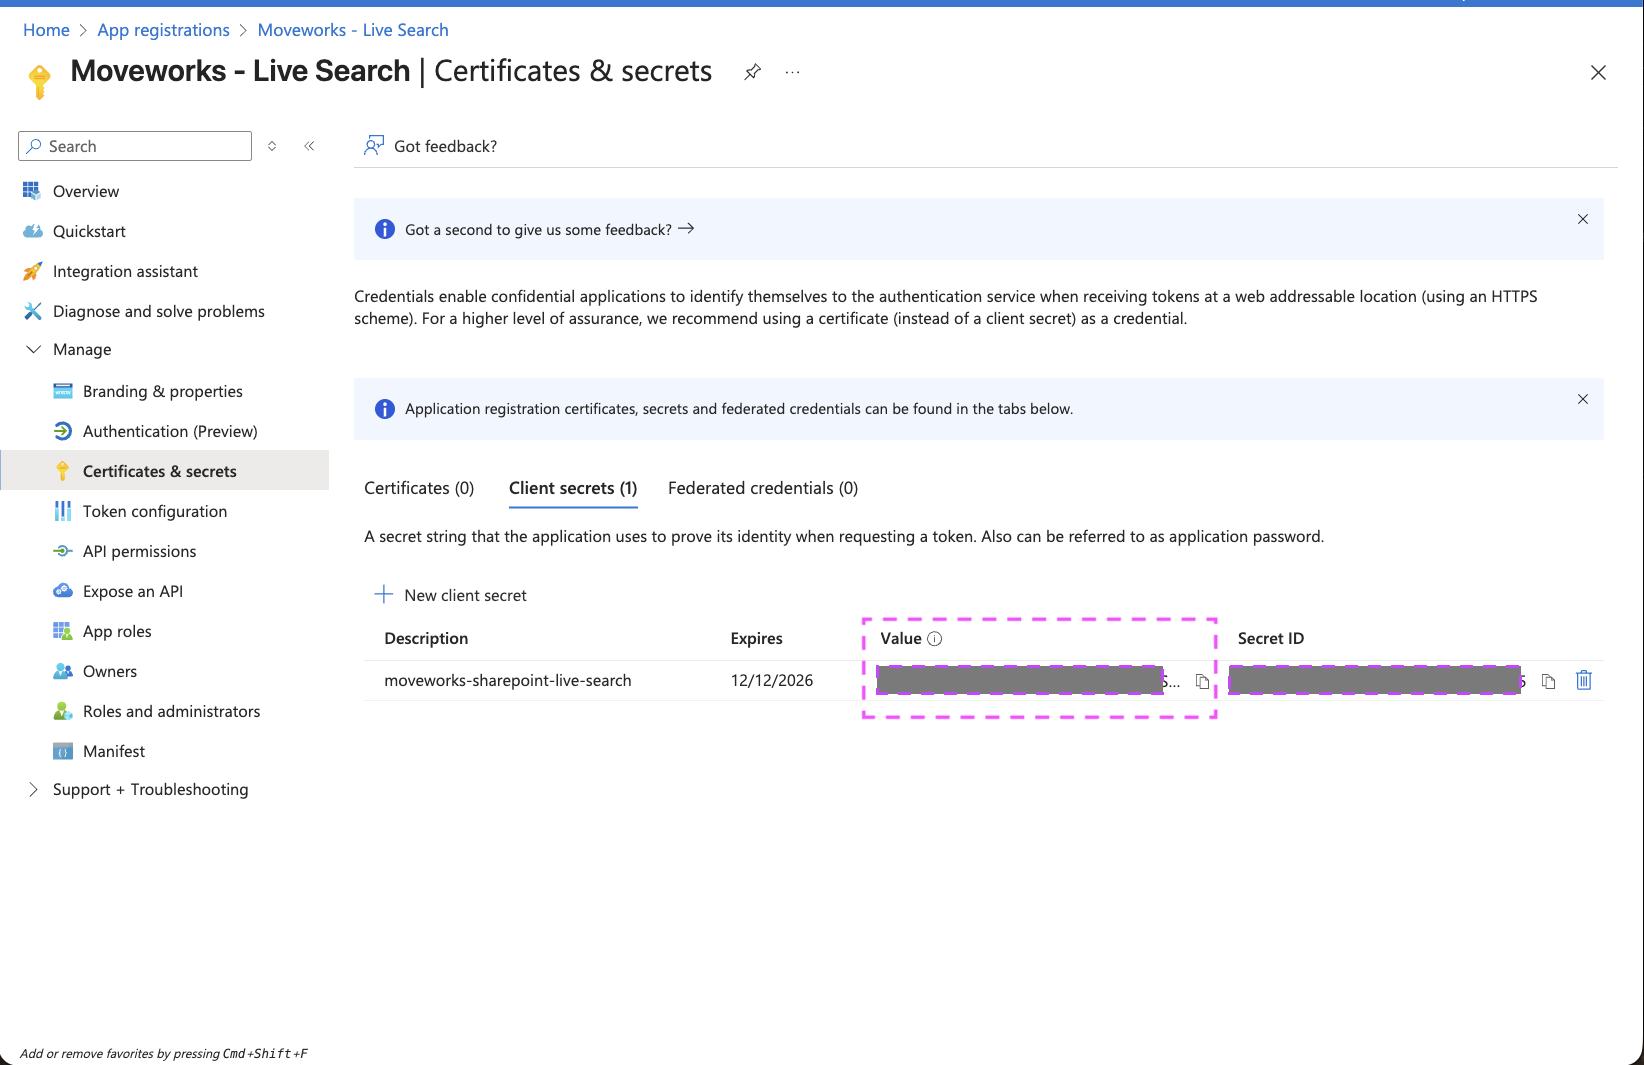
This will create a new entry on the Client secrets table
-
Make sure to copy the secret present in the Value column and store it in a secure location.
Note: Once you create the Secret, make sure to save it right now as it cannot be recovered later.
-
Go back to the Overview page, to capture the following details:
Directory (tenant) IDApplication (client) ID
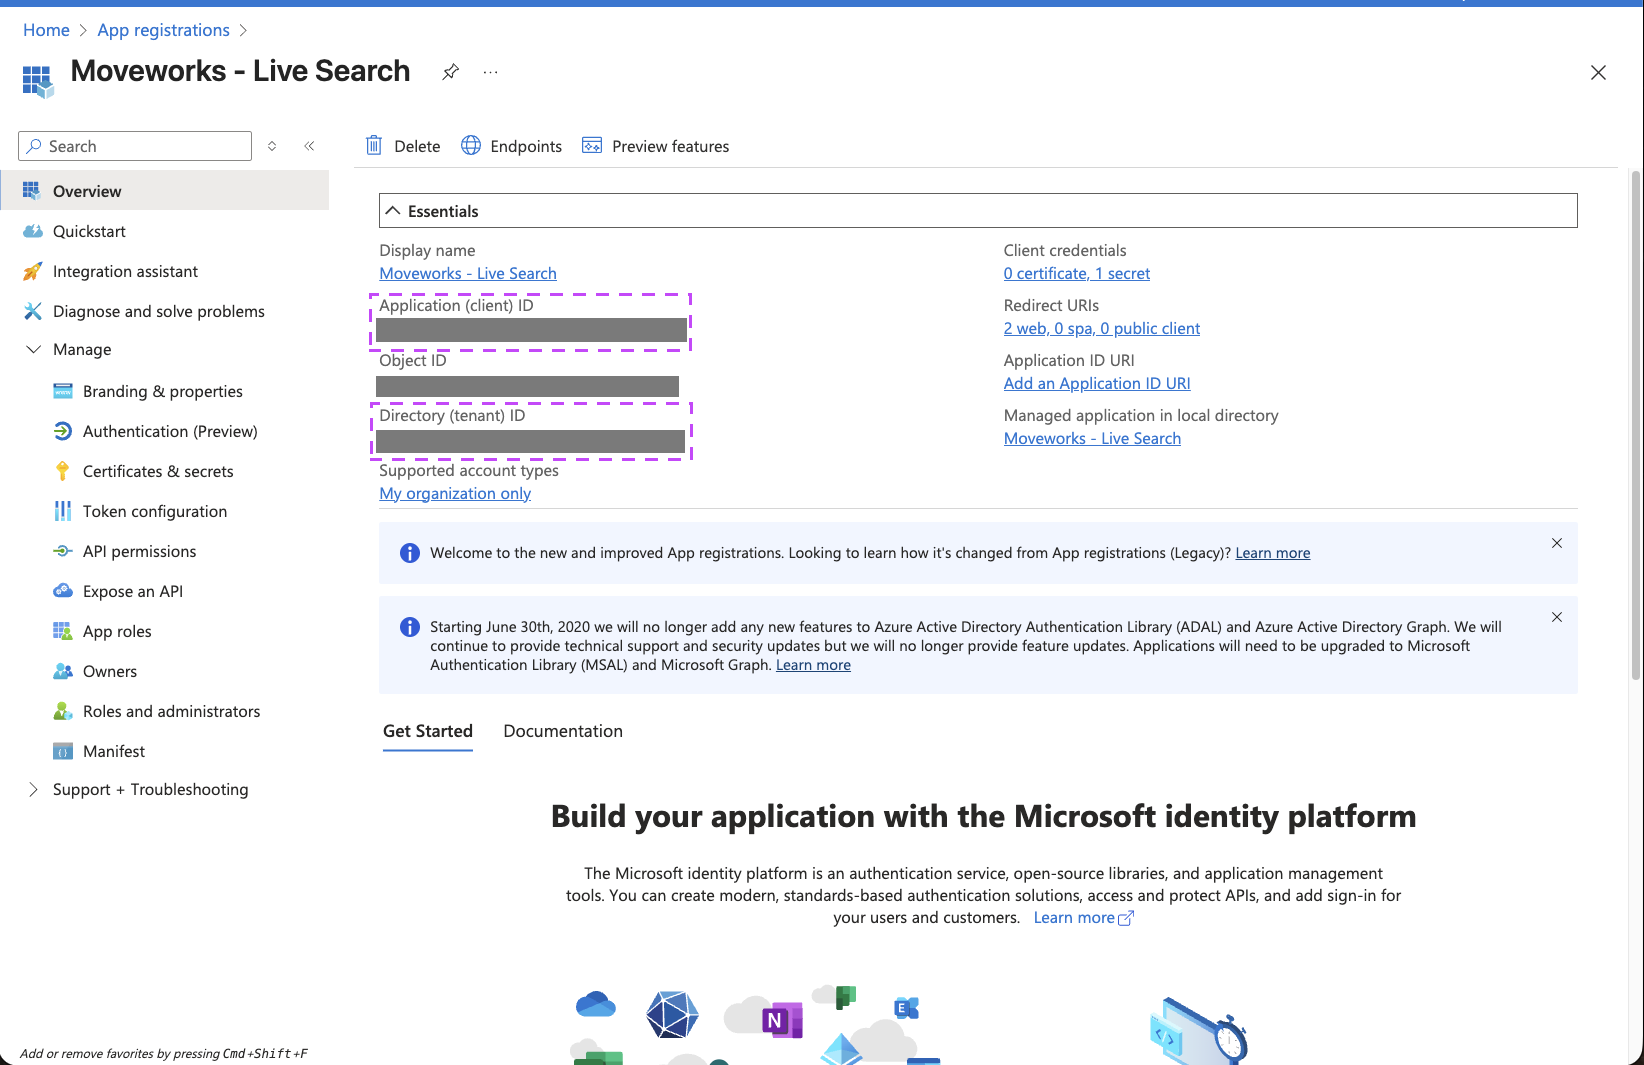
You have now completed all required steps to create a new Enterprise Application and generate the requisite credentials to setup a connector within Moveworks Setup for enabling Live Search. You should have the following details with you now:
Application (client) IDDirectory (tenant) IDClient Secret
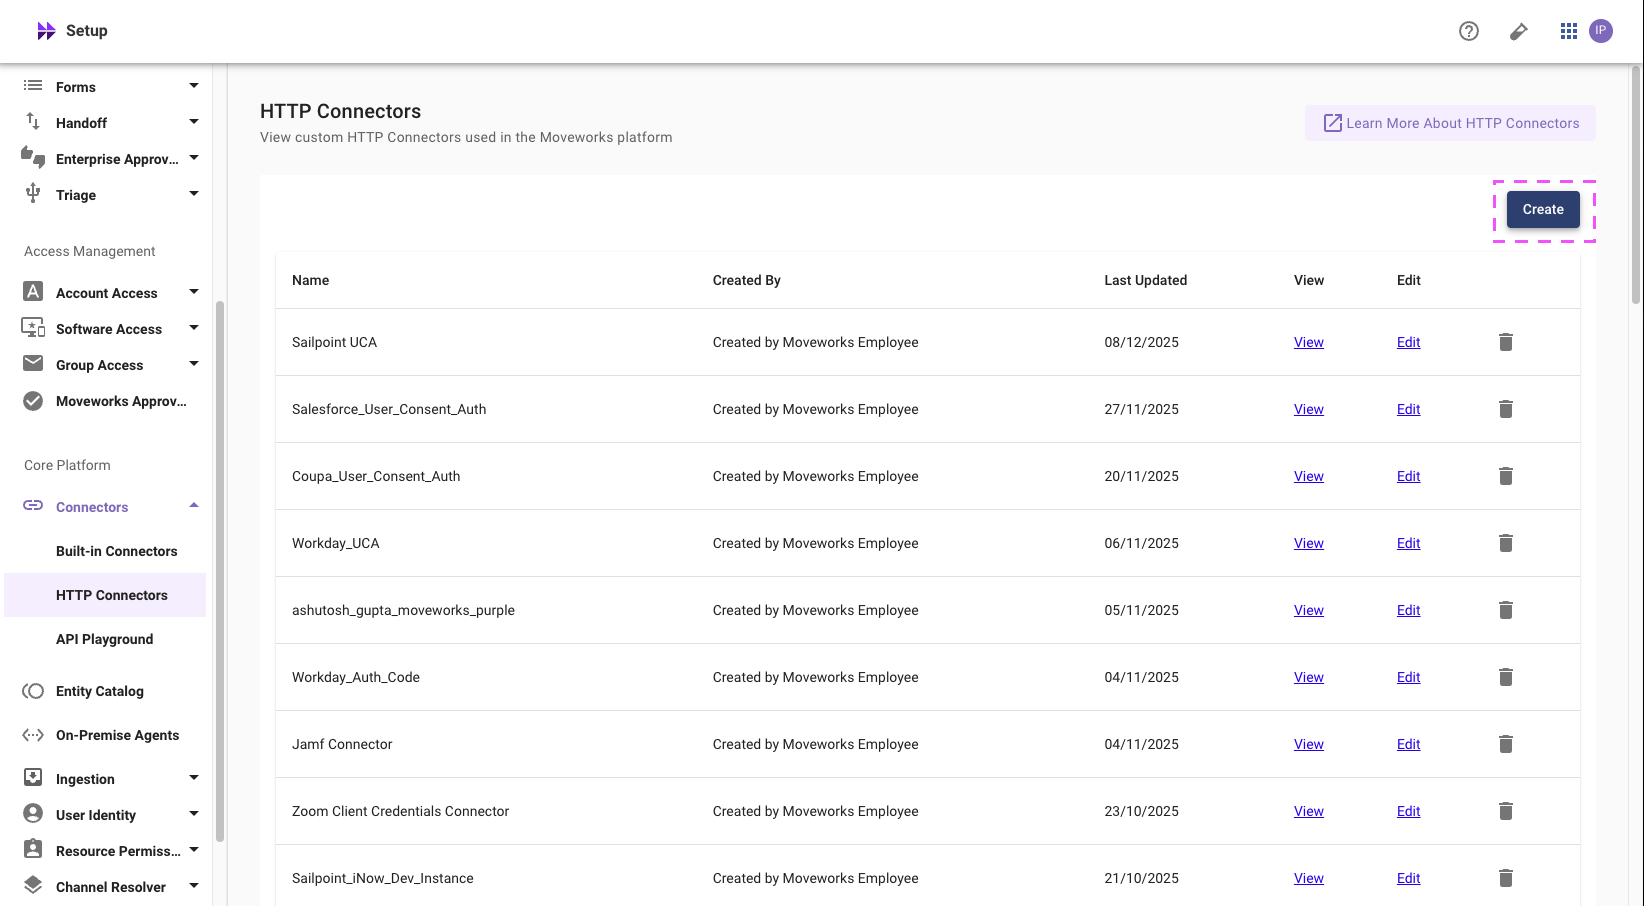
Creating a new HTTP Connector in Moveworks Setup
Within Moveworks Setup, we need to create a new HTTP Connector to enable the connection, with the details from the previous step.
-
Head over to Moveworks Setup > Core Platform > Connectors > HTTP Connectors
-
Click on the Create button to create a new HTTP Connector
-
On this page, setup your Live Search connector based on the following parameters:
-
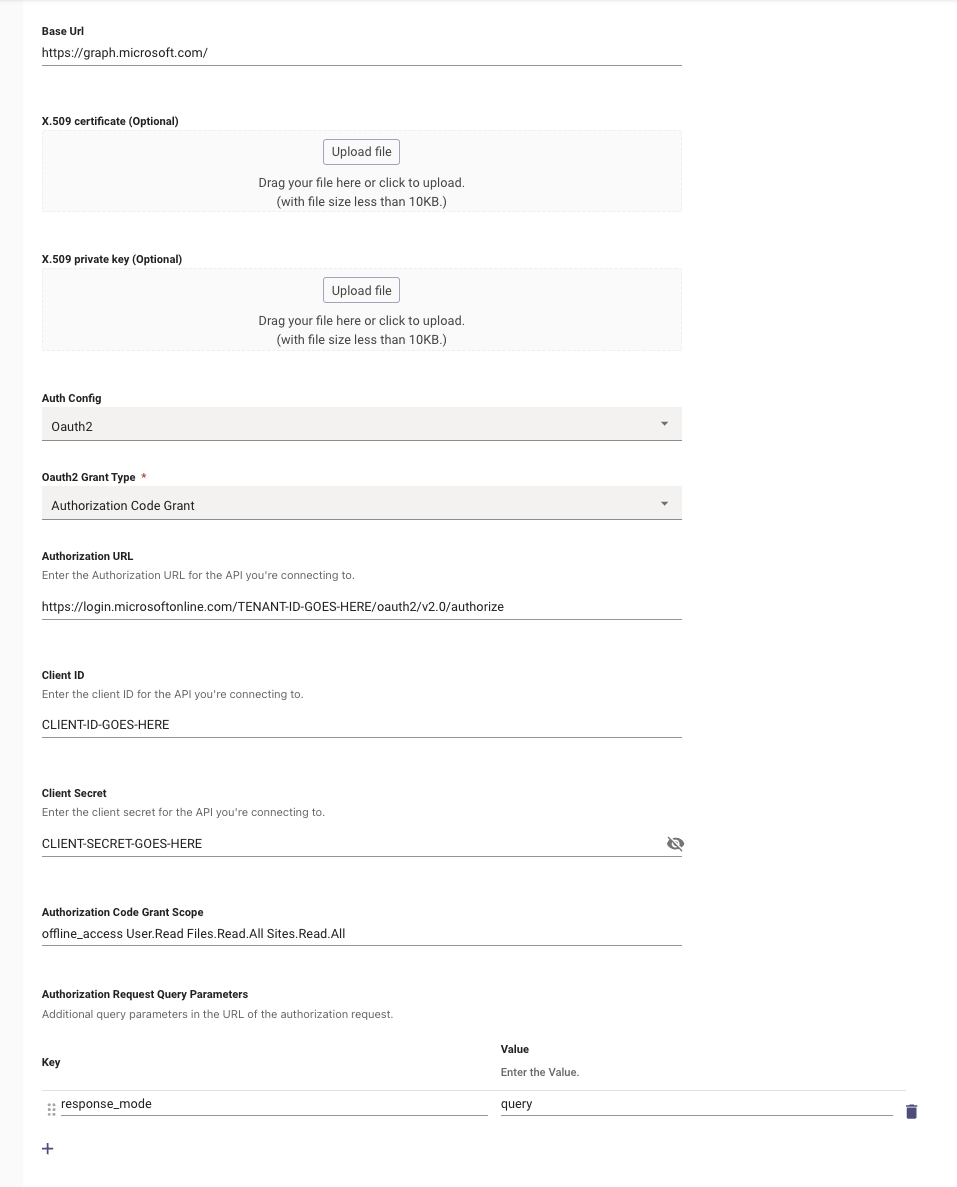
Connector Name:
enterprise_search_sharepoint_online -
Base URL —
https://graph.microsoft.com/ -
Auth Config —
Oauth2 -
Oauth2 Grant Type —
Authorization Code Grant -
Authorization URL —
https://login.microsoftonline.com/TENANT-ID-GOES-HERE/oauth2/v2.0/authorize. Replace the tenant ID with theDirectory (tenant) IDfrom the previous step -
Client ID — The
Application (client) IDfrom previous step -
Client Secret — The
Client Secretfrom previous step -
Authorization Code Grant Scope —
offline_access User.Read Files.Read.All Sites.Read.All -
Authorization Request Query Parameters
response_mode|query
-
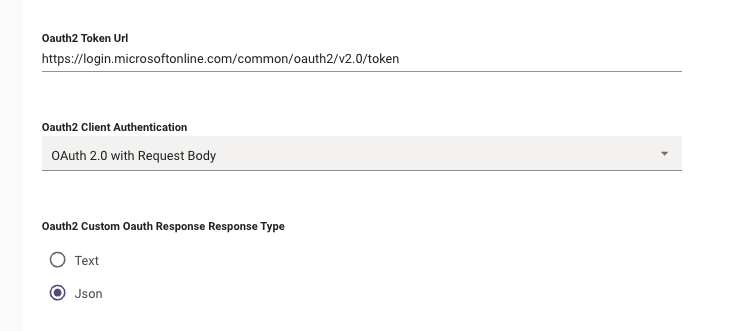
Lower on the connection configuration, add the token URL with the appropriate authentication type:
-
Oauth2 Token URL —
https://login.microsoftonline.com/TENANT-ID-GOES-HERE/oauth2/v2.0/token -
Oauth2 Client Authentication —
OAuth 2.0 with Request Body
-
Once this connector is saved, please notify the Moveworks team. We’ll complete the remaining Live Search configuration and validate SharePoint & OneDrive search end-to-end.