Moveworks for Web Installation Guides
Moveworks for Web can be installed on the following systems:
- ServiceNow
- SharePoint Online (Cloud)
- SharePoint Online (Cloud) - GovCloud
- Okta SAML SSO
- Okta OIDC
- Azure OIDC
Installing it on ServiceNow
Installation Participants
On the day of installation, we need these individuals from your team on the call:
- ServiceNow admin (able to elevate to the security_admin role)
- Testers
- Approver to move from test to prod instances
Installation Overview
The call will only take 1 hour to install and run through our test suite.
- We will install the prod Moveworks bot into your test ServiceNow environment via update sets.
- Once installed, we will run through a test suite designed to test all aspects of Moveworks for Web without overwhelming your team with needing to test core Moveworks features that would already have been tested during your initial Moveworks deployment.
- Once tested, we’ll ask the approver on the call for permission to move this to your production environment.
- This will be done by promoting the update sets to prod and exporting and importing a few additional records.
At the start of the meeting, Moveworks will send you an encrypted email containing the following:
- Java KeyStore certificate and password
- Latest base Moveworks update set XML file (if not already installed)
- Latest Moveworks for Web update set XML file
- Footer HTML snippet
- Install the certificate and create the JWT provider
First, we will create a JWT provider in your instance that will be responsible for generating authentication tokens for our services to verify a user is properly authenticated into ServiceNow whenever they visit a page with the Moveworks for Web widget on it. This is what enables Moveworks for Web to automatically log users in. The following steps will walk you through creating the records below:
- MW Java Key Store Certificate
- JWT Key
- JWT Provider
-
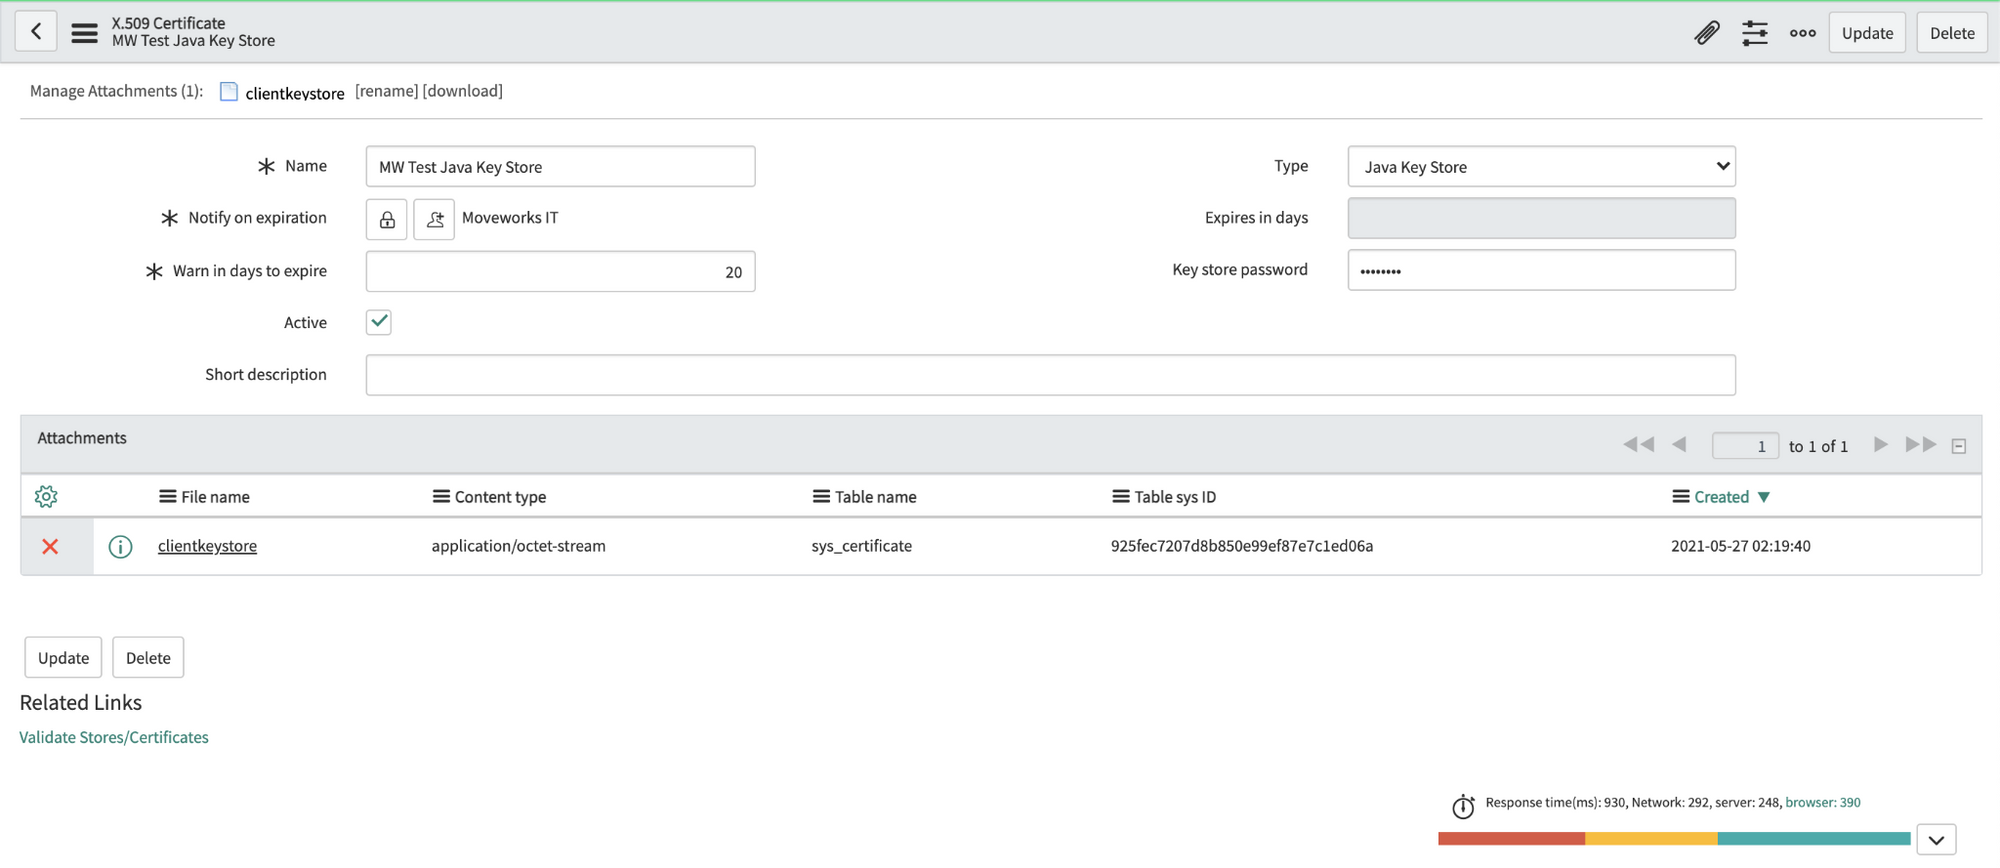
Navigate to the X.509 Certificate table in SNOW (search for “Certificates” to find it), create a new record as follows:
Name: MW Java Key Store
Type: Java Key Store
-
Click on the paperclip in the upper right to attach the JKS certificate.
-
Enter the password provided by Moveworks. Right click the top gray bar, click save.
Important: If you save before entering the password, it may seem to auto populate the Key-store password. This doesn’t always work correctly, so always enter the password manually. -
Click “Validate Stores/Certificates” under Related Links to ensure the record was configured properly.
-
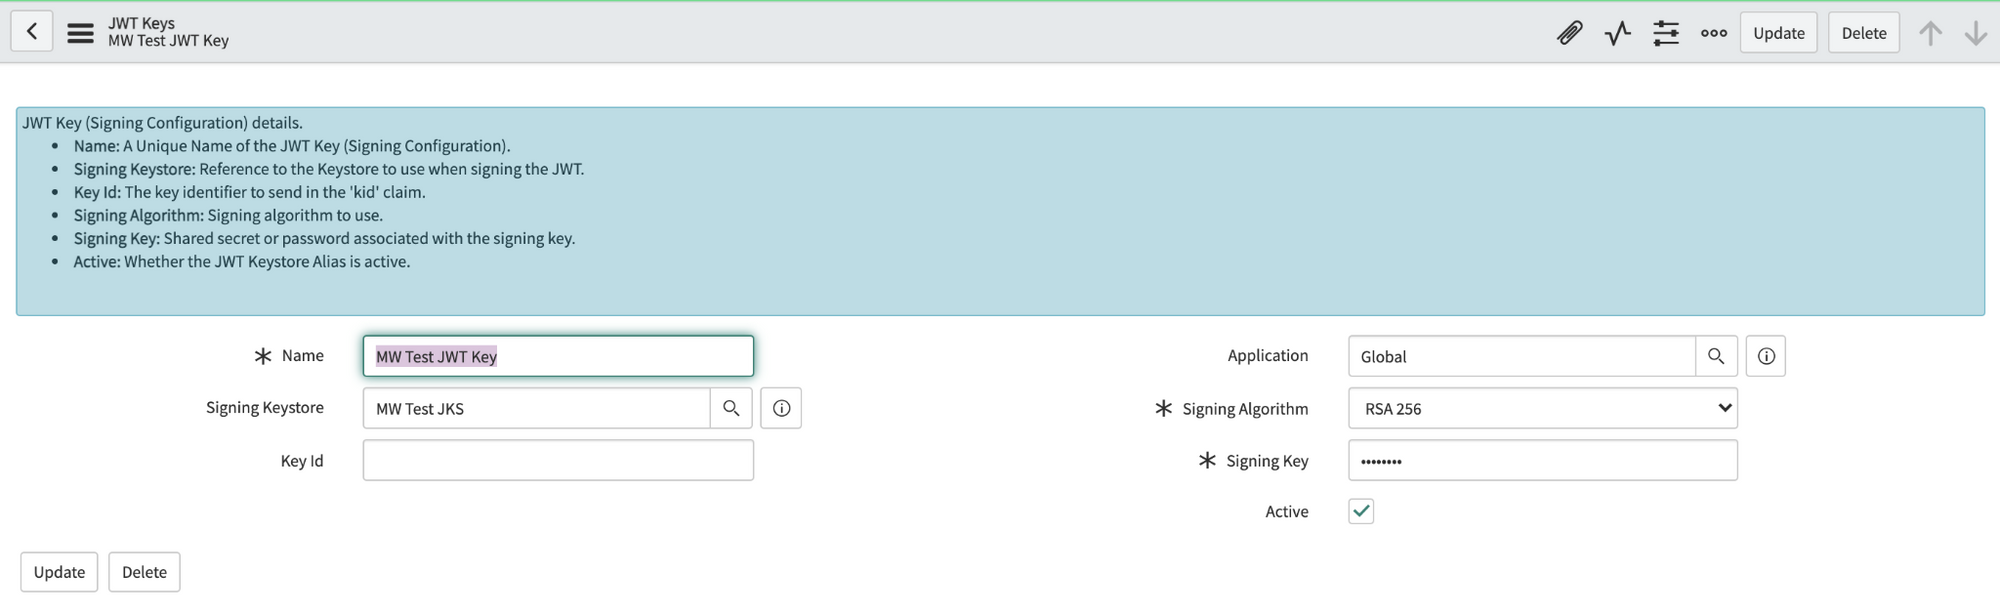
Navigate to the JWT Keys table (under System Oauth). Create a new record and set its Signing Key Store to the certificate record you made in the previous step. Enter the same password Moveworks provided in the Signing Key field. Save this record.
-
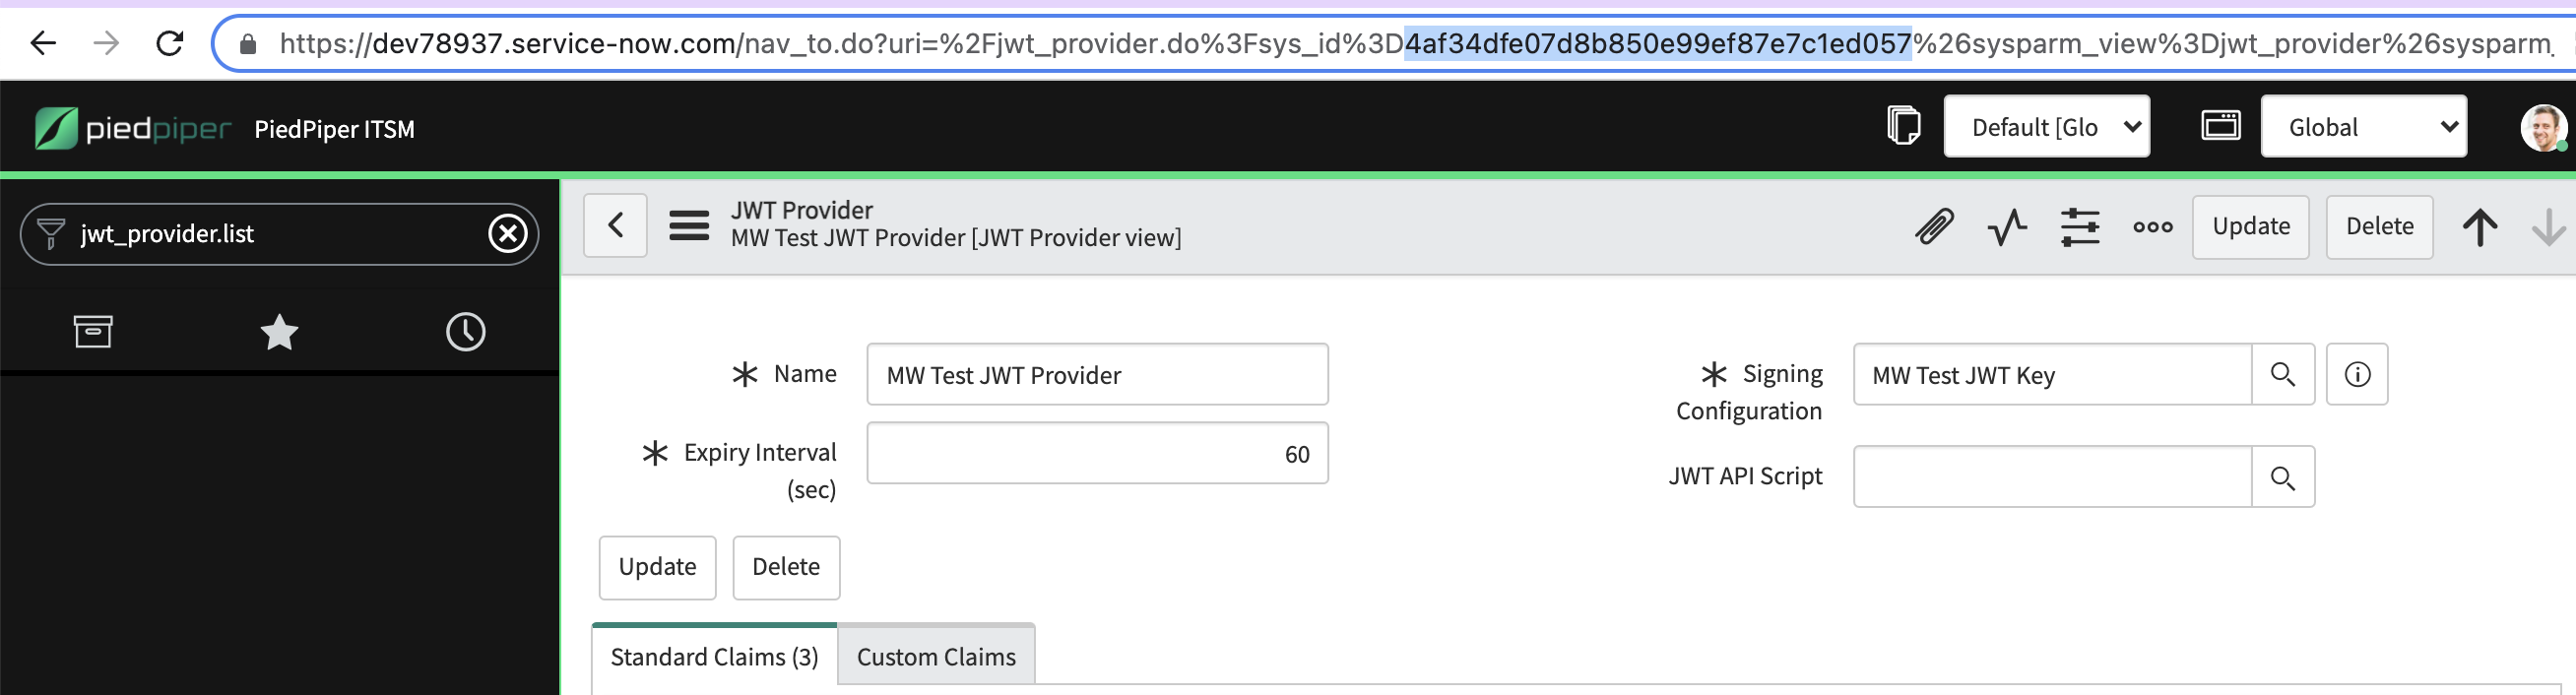
Navigate to the JWT Provider table. Create a new record and set its Signing Configuration to the key record you made in the previous step.

Important: Copy the sys_id of this JWT Provider record and provide it to your Moveworks Customer Success Team.
- Install the base update set
Moveworks offers a number of ServiceNow modules we install into your ServiceNow environment via update sets. If you’ve previously used other Moveworks modules, you may already have the “base” update set module in place. Verify with your Customer Success Engineer that you have the latest one.
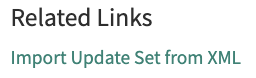
If you need to install the base module, navigate to the Retrieved Update Sets table and click Import Update Set from XML under Related Links.
Upload the base update set file you received in the encrypted email, preview the changes, and commit them.
Important: One of the changes the base update set makes in your environment is adding a moveworks_user role that will allow us to make an API call later to finalize setup. Please navigate to the sys_user table and apply the role to the Moveworks service account.
- Install the Moveworks for Web update set
Navigate again to the Retrieved Update Sets table and click Import Update Set from XML under Related Links.
Upload the Moveworks for Web update set, preview the changes, and commit them.
- These modules are very self-contained. If you encounter any errors while committing the files, this is usually self-referential and not something to be concerned about. You can usually ignore the warnings and commit the changes.
Note: If you ever need to update a Moveworks module, back out the old update set before importing the new one.
- Place the widget on your portal pages
The Moveworks for Web update set makes a widget available in your system that can either be drag and dropped onto individual pages via the Page Designer or placed across multiple portal pages at once by adding a snippet to your portals’ theme(s).
We recommend the latter as it is fast and maximizes availability for your users.
Navigate to the sp_portal table. Find the portal(s) on which you’d like to include the widget, and click into its Theme record.
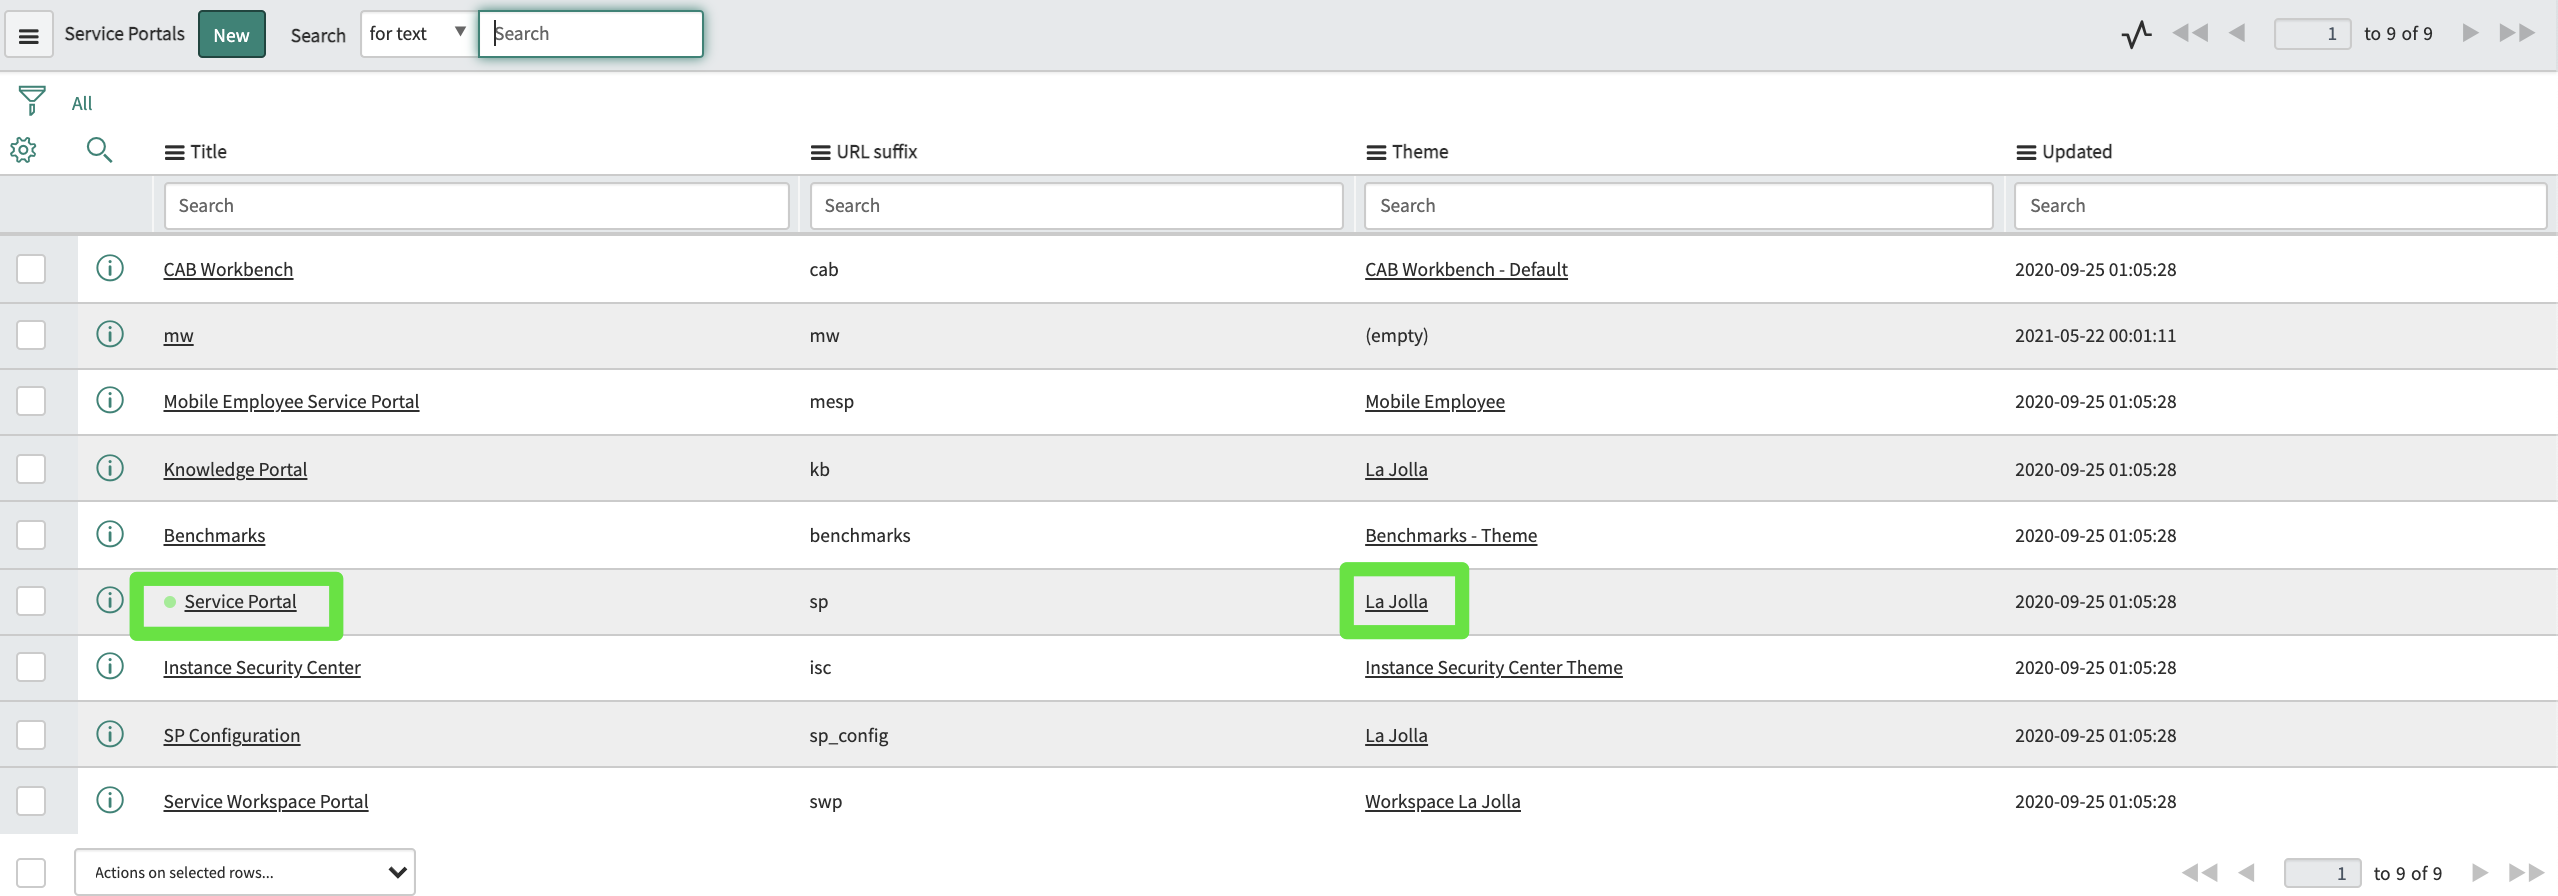
Find the footer field:

If there is nothing there, use the magnifying glass to create a new footer record and navigate to it. If there is already a footer there, navigate to that record.
In the footer record, add this snippet to the Body HTML template field:
Ensure the footer is applied to your theme:

Now the widget is set to appear on any page using that theme.
- Finalize setup
With this complete, Moveworks will now make an API call to your instance. This will finalize the installation, and anyone granted access from the Moveworks side will start seeing the AI Assistant appear on the portal pages.
This API also allows us to make tweaks to the positioning of the AI Assistant on the page if necessary (in case it is blocking something else on your page for instance).
- Test
Moveworks will walk everyone through about 15 quick test cases to verify the AI Assistant behaves as expected.
📘
Note: Our test cases will not produce any tickets. If your team chooses to do additional ad hoc tests, it’s worth noting that because we are using a production bot, any tickets your team chooses to file will appear in your production instance, not the test instance in which the widget currently appears.
- Promote to production ServiceNow instance
With the tests complete, we like to wrap up the call by promoting the Moveworks for Web to your production instance, so your users can begin enjoying its benefits.
- Apply the Moveworks role to the Moveworks service account in prod.
- Export the x.509 certificate record, JWT key, and JWT provider record as XML, and import them into their respective tables in prod.
- Follow your standard process for promoting update sets from test to prod, doing so for both the base and Moveworks for Web update sets.
- Add the footer and footer snippet to the same themes in prod.
Finally, Moveworks will make one final API call and the installation process to your prod environment is complete.
Installing it on SharePoint Online (Cloud)
Who can install this?
A SharePoint admin with the global administrator role.
Upload the Moveworks for Web Package to your SharePoint Tenant
Moveworks will email you the web part package containing the Moveworks for Web app.
- Navigate to this page:
https://{{tenant}}-admin.sharepoint.com/_layouts/15/online/AdminHome.aspx#/webApiPermissionManagement - Click upload, and upload the package provided by Moveworks.
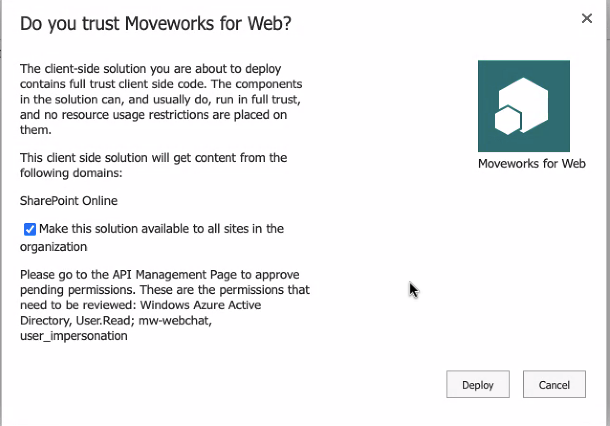
- Check the box to deploy it to all sites in the organization.
- Click Deploy.
Approve Permissions
-
Navigate to this page: https://login.microsoftonline.com/common/adminconsent?client_id=cf538890-2c10-4680-84ee-9081502a25b5&redirect_uri=https://www.moveworks.com/sharepoint-installed
- Click Accept.
- You will be redirected to a Moveworks page with a confirmation. You can close that now.
-
Navigate to the SharePoint admin center API Access page here:
https://{{tenant}}-admin.sharepoint.com/_layouts/15/online/AdminHome.aspx#/webApiPermissionManagement- Under pending requests, Approve both requested permissions (one from Windows Azure Active Directory for User.Read and one from mw-webchat for user_impersonation).
Now the webpart will be available in your webpart toolbox.
Add the Web Part to a Page
If your user account is allow listed on the Moveworks side, then you will see it right away, if not, work with Moveworks to do so.
Sharepoint Modern Site
It will look like this (a thin rectangle) if you successfully added it and are not allow listed (you can use the trash can to remove it, if desired):

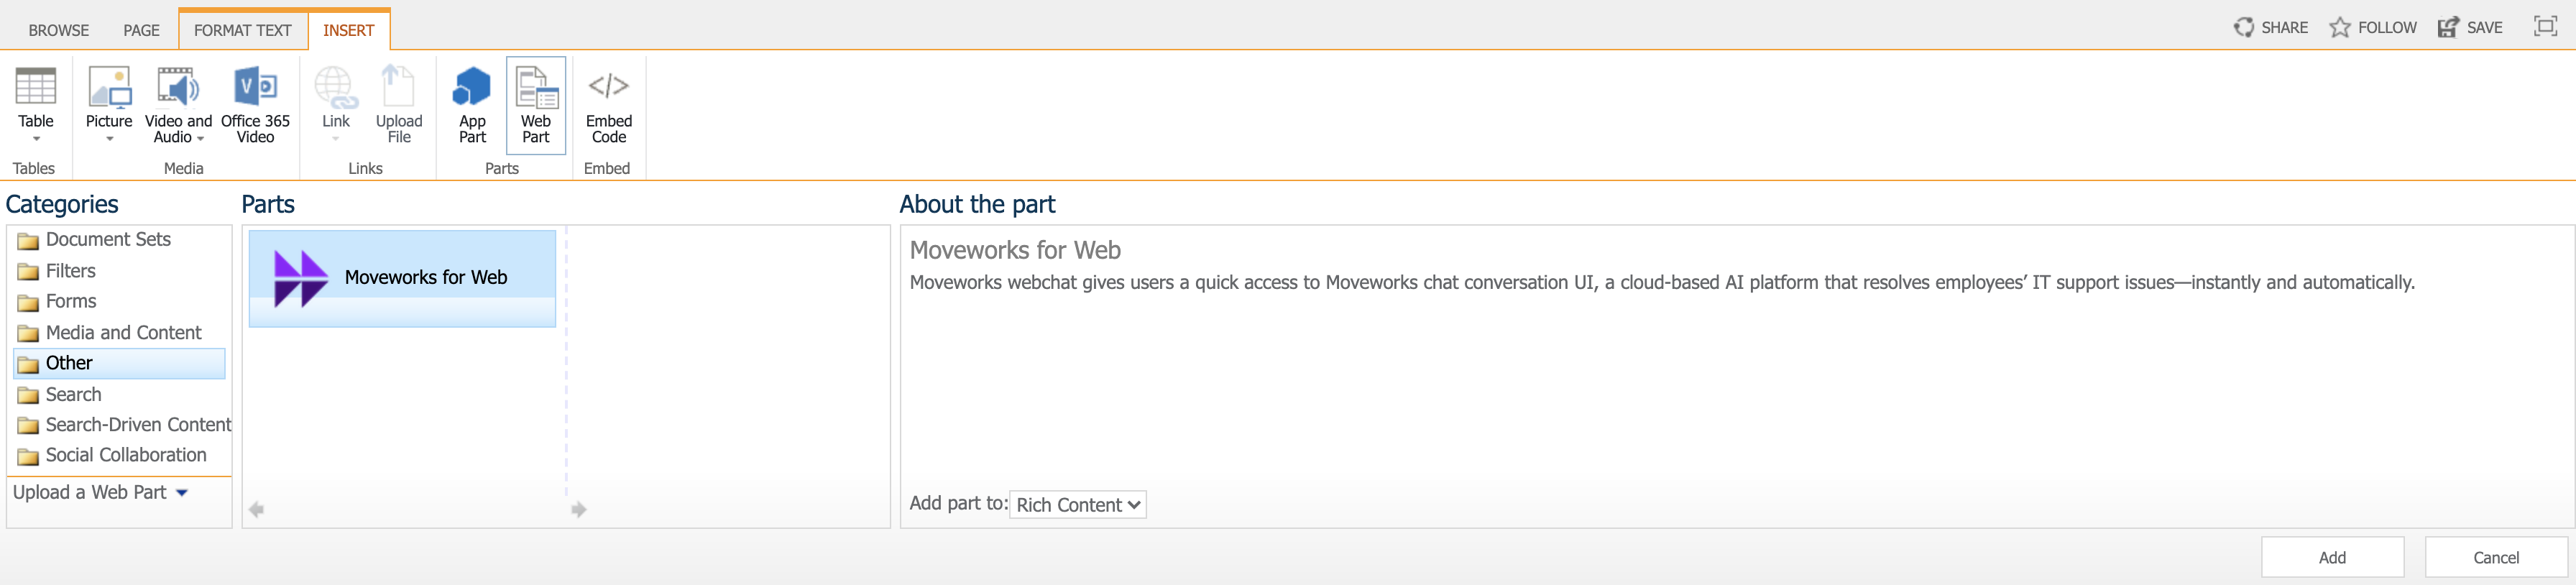
Sharepoint Classic Site
Find the Moveworks for Web web part located in the Other category, and insert it on the page.
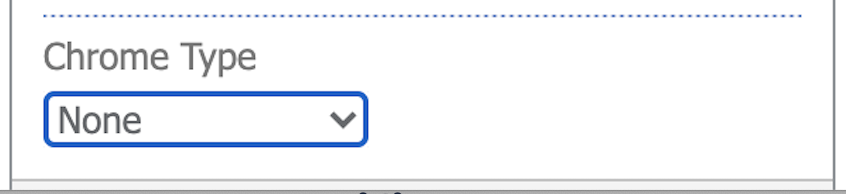
After the web part is added to the page. Edit the web part configuration. Change Chrome Type to None.
Installing it on SharePoint Online (Cloud) - GovCloud
Who can install this?
A SharePoint admin with the global administrator role.
Upload the Moveworks for Web Package to your SharePoint Tenant
Moveworks will email you the web part package containing the Moveworks for Web app.
- Navigate to this page:
https://{{tenant}}.sharepoint.com/sites/appcatalog/AppCatalog/Forms/AllItems.aspx - Click upload, and upload the package provided by Moveworks.
- Check the box to deploy it to all sites in the organization.
- Click Deploy.
- After deploying, now the web-part will be available in your web-part toolbox.
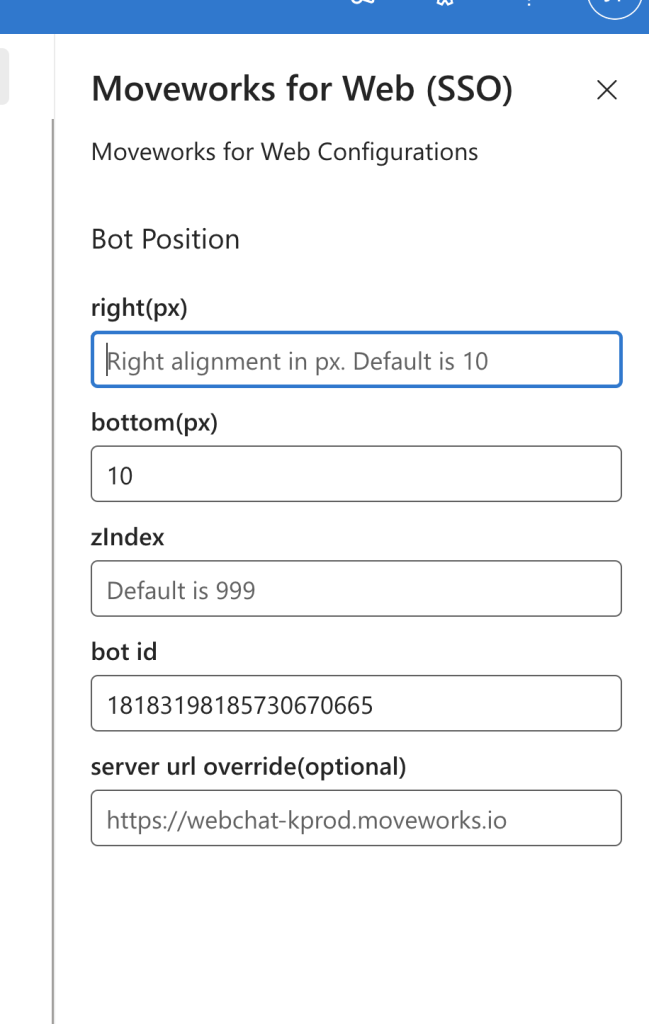
Configure SSO Configuration
right(px), bottom (px), and zIndex - These determine where on the Site UI the AI Assistant shows up.
bot id — This will be provided by your Moveworks CSE
server url — For commercial customers this is https://webchat-kprod.moveworks.io however for GovCloud, this URL should be: https://webchat.prod.am-usge1.moveworks.io
Add the Web Part to a Page
If your user account is allow listed on the Moveworks side, then you will see it right away, if not, work with Moveworks to do so.
Sharepoint Modern Site
It will look like this (a thin rectangle) if you successfully added it and are not allow listed (you can use the trash can to remove it, if desired):
Sharepoint Classic Site
Find the Moveworks for Web web part located in the Other category, and insert it on the page.
After the web part is added to the page. Edit the web part configuration. Change Chrome Type to None.
Installing it with a Code Snippet and Okta SAML SSO
This method of installation allows you to embed Moveworks for Web on any webpage governed by Okta Single Sign-On (SSO), as long as the page supports HTML/JavaScript editing. It simply requires setting up an Okta application and then pasting a code snippet onto your target pages.
Installation Participants
On the day of installation, we need these individuals from your team on the call:
- Okta super admin
- Must be able to add a new application and make tenant-level configuration changes.
- Target host admin(s)
- Must be able to paste an HTML/JavaScript code snippet onto the target page or site.
Installation Overview
Moveworks can walk you through the Okta application installation on a call in about 15 minutes.
Setting up the Okta application is a one-time activity and from then on you are free to paste the code snippet onto any other site governed by your Okta SSO at your convenience.
Moveworks will provide the following:
- Unique Customer Identifier String
- Unique Customer Code Snippet
Review Security Overview document and Verify Okta tenant is configured to support iFrames
Please review the following document with your security team (or equivalent) before proceeding with installation:
Moveworks for Web: Okta SAML Security Overview
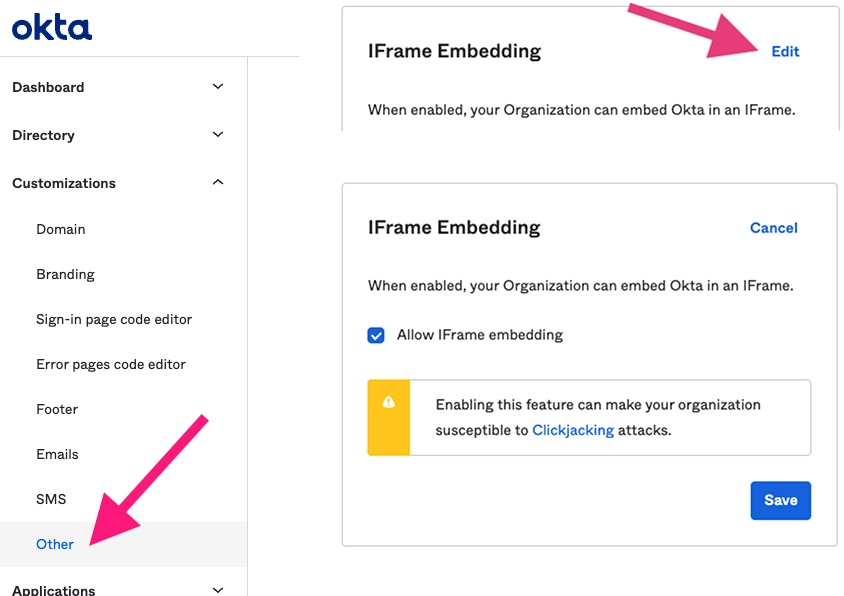
Moveworks for Web is an iframe-based application since the entire chat is hosted on Moveworks’ domain. Okta allows these kinds of applications to be installed by enabling a tenant-wide configuration (see screenshot below).
Enabling this feature is necessary for Moveworks for Web to function, however, it does allow other Okta applications to utilize iFrames as well. By enabling this feature within the Okta tenant, customer’s security posture may be weakened since this may enable attackers to perform a clickjacking attack against end users. Customers may sign up for Okta’s beta program feature for trusted origins which only allows explicitly specified domains to be displayed in iFrames, such as Moveworks. We highly recommend customers review this with their security team (or an equivalent) before enabling this feature.
For further information about this feature please see:
- Okta iFrame solution: https://support.okta.com/help/s/article/Okta-in-IFrame-is-not-working?language=en_US
- Trusted Origins for iFrame embedding (beta feature): https://help.okta.com/en-us/Content/Topics/API/trusted-origins-iframe.htm
Okta App Setup Instructions
Go to the screen that lets you create Applications.
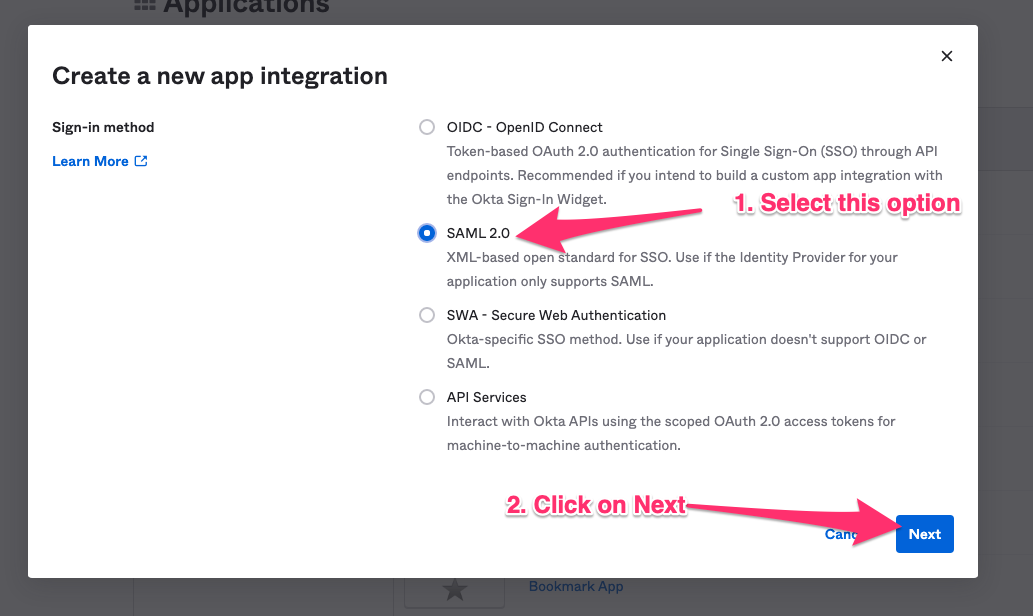
Click on Create App Integration.

Select SAML 2.0 in the next screen.
Specify a name for the application. Moveworks recommends using your bot’s name.
Check the box to not display the AI Assistant as an application among your users’ Okta chiclets.
Click next to configure the application.

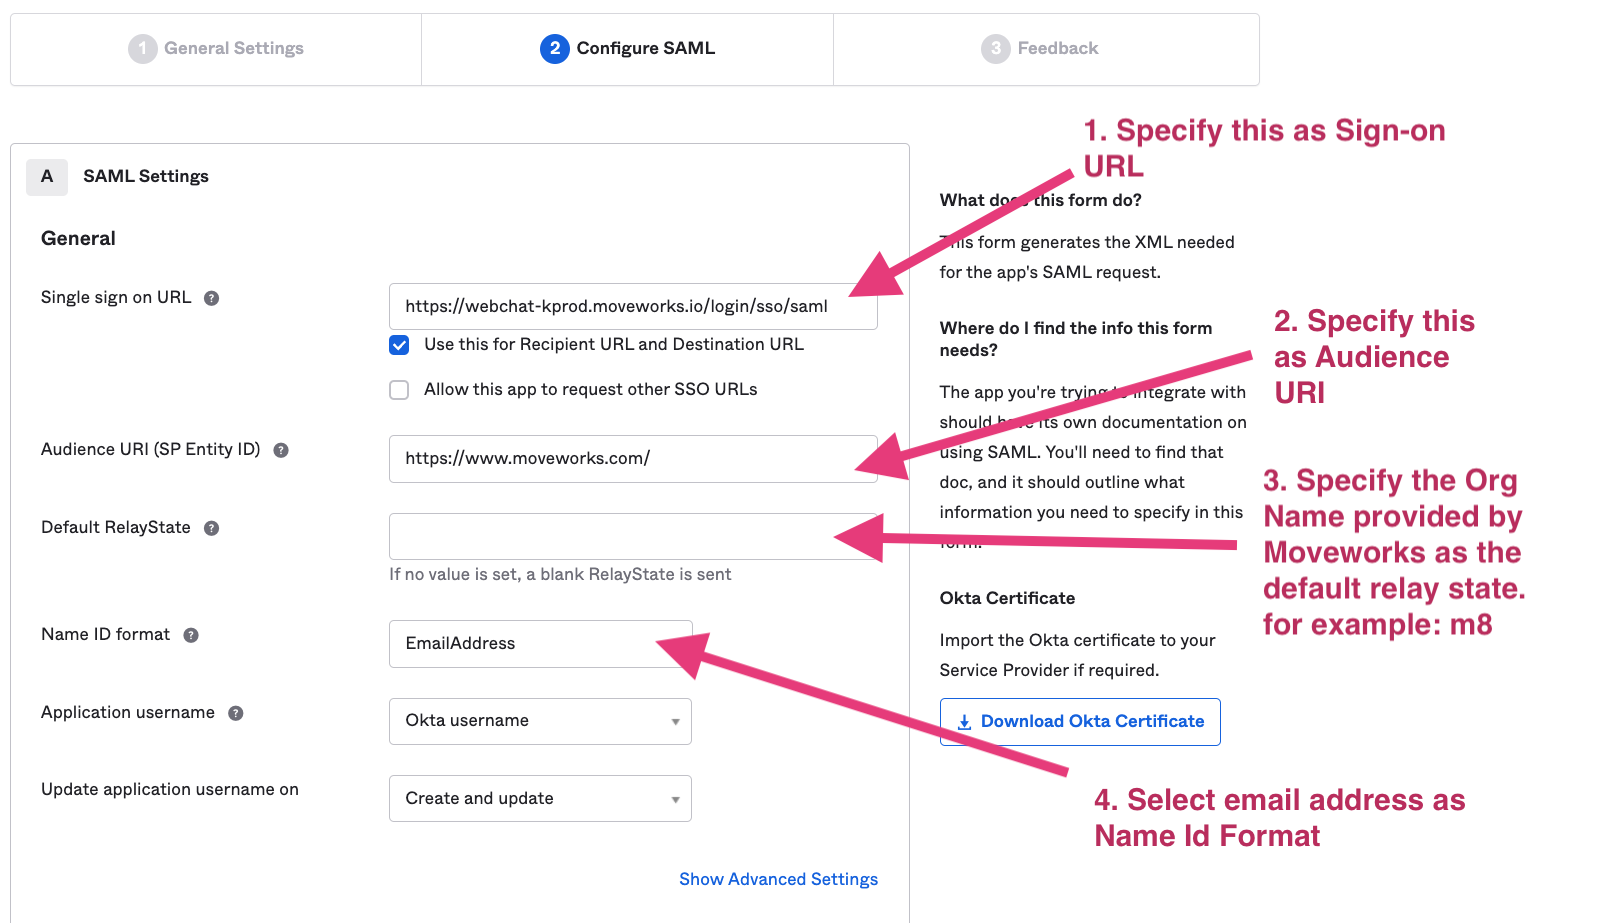
Based on your AI Assistant environment, set the Single sign on URL as one of the following:
Commercial Environment: https://webchat-kprod.moveworks.io/login/sso/saml
GovCloud Environment: https://webchat.prod.am-usge1.moveworks.io/login/sso/saml
EU Environment: https://webchat.prod.am-euc1.moveworks.io/login/sso/saml
Canada Environment: https://webchat.prod.am-cac1.moveworks.io/login/sso/saml
Specify https://www.moveworks.com/ as the Audience URI.
In Default Relay State: Add the unique customer identifier string provided by Moveworks.
Select email address as the Name ID format.
On the Feedback panel, select the following options.
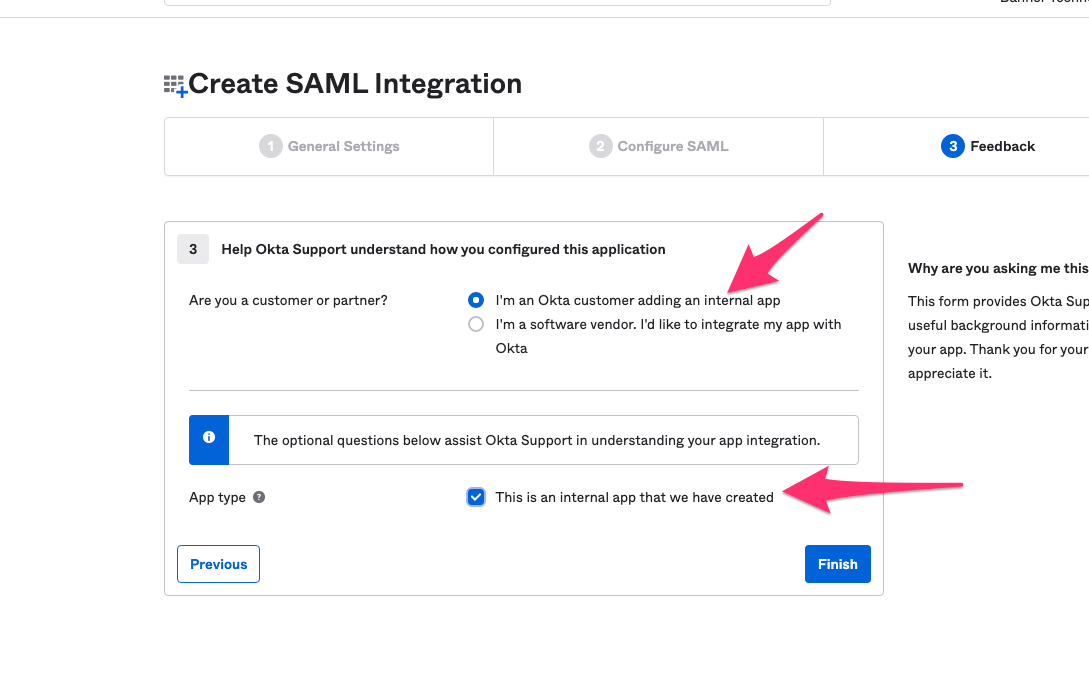
Provide Moveworks configuration info about your app
- Go the Sign On tab and click on View Setup Instructions.
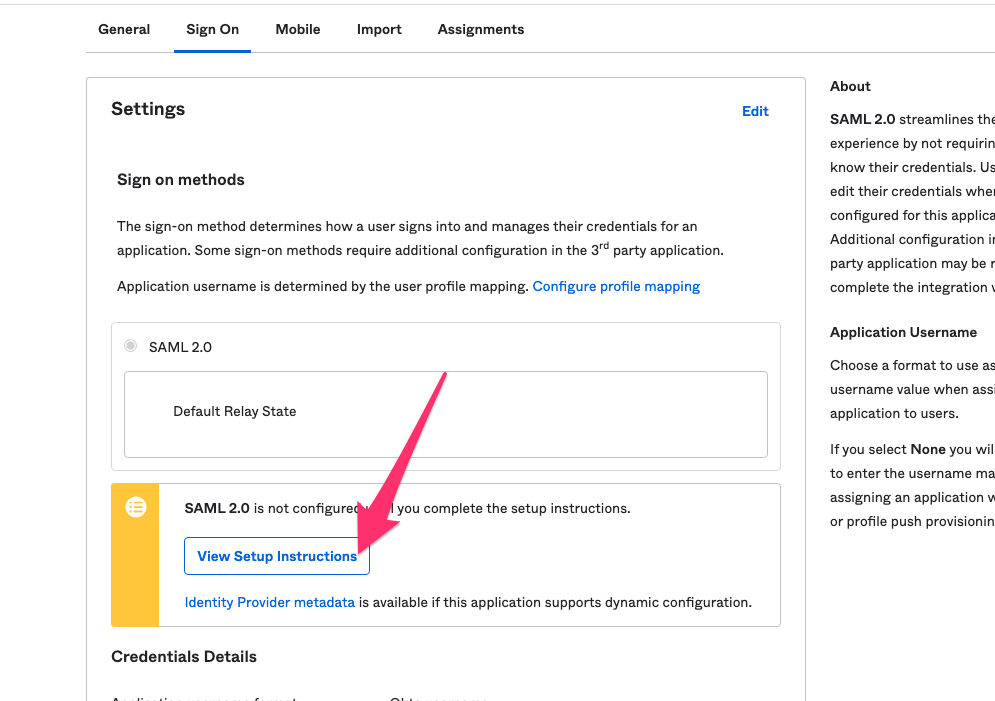
- Please provide Moveworks the following:
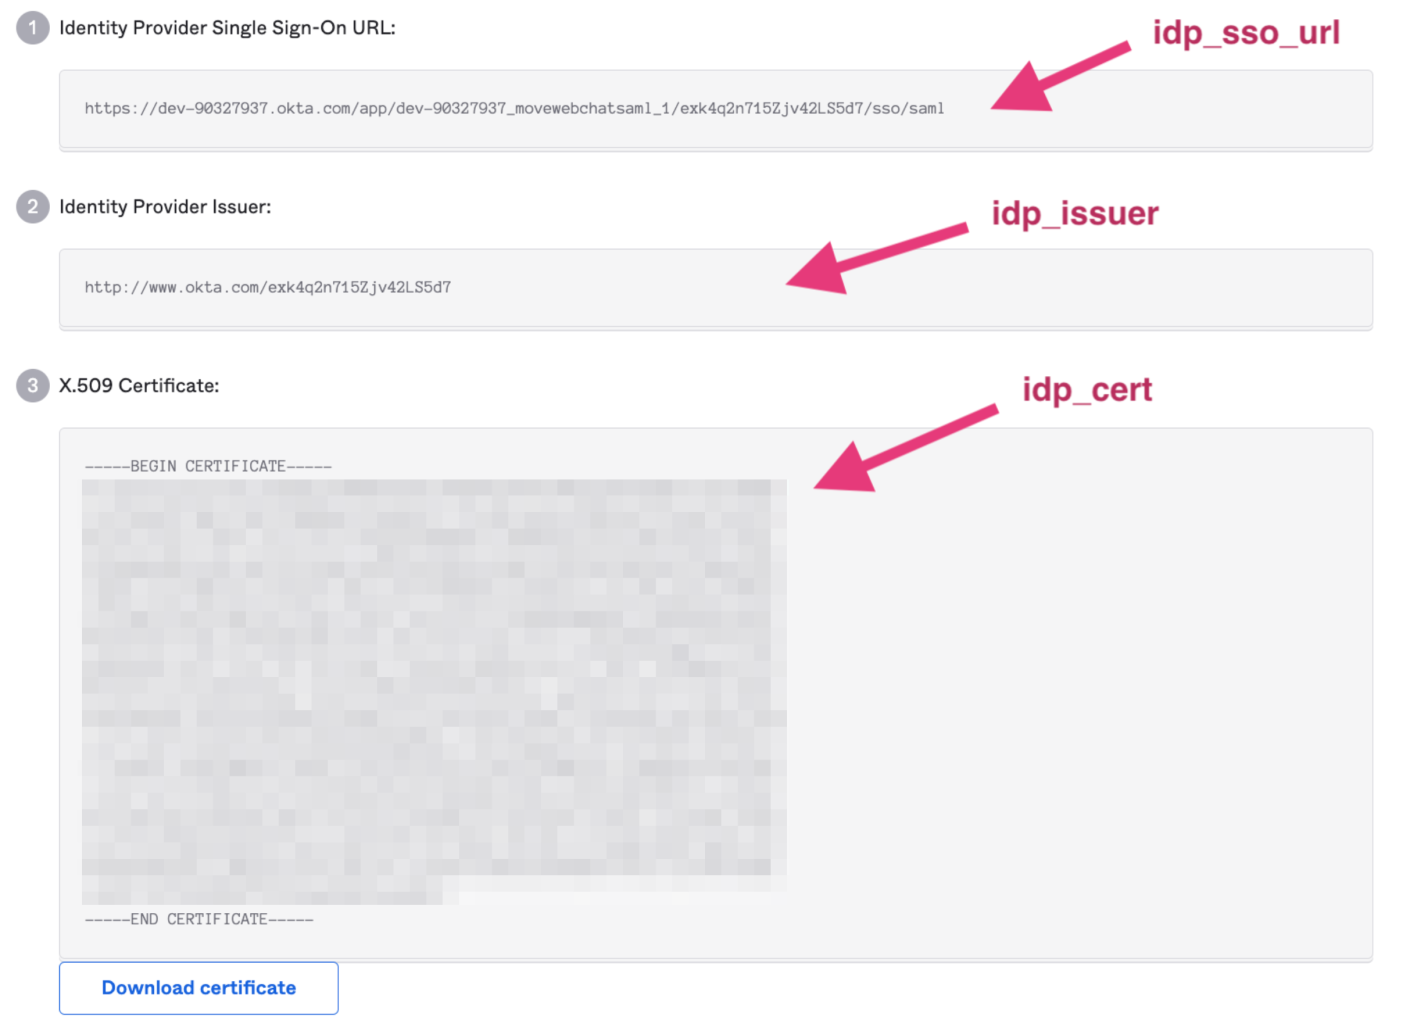
- Identity Provider Single Sign-On URL
- Identity Provider Issuer
- X.509 Certificate
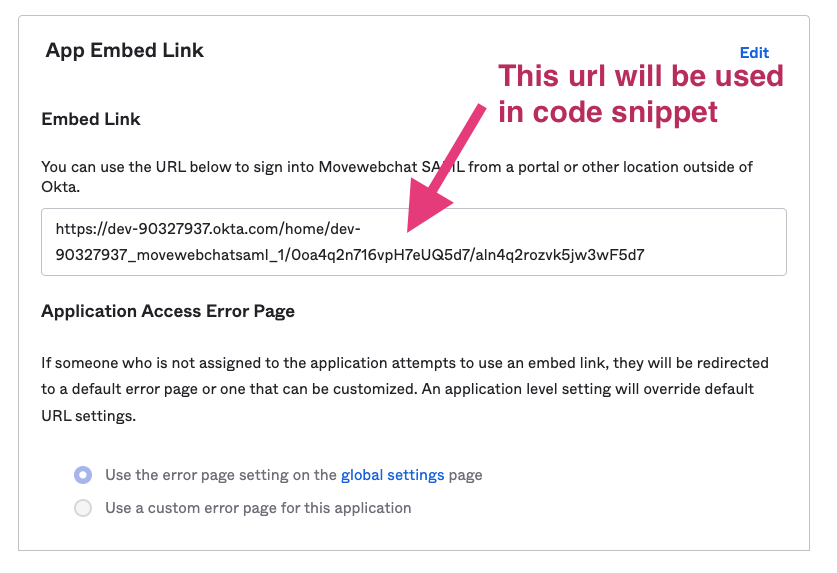
- Go to the General tab. Please provide Moveworks the Embed Link.
Await Moveworks to complete its configuration
Moveworks will use the details you provided to complete the configuration on the Moveworks backend. This typically takes about 2 business days.
Paste the AI Assistant onto your site
Go to your web host’s HTML/JavaScript editor, paste the following code snippet onto the page (which Moveworks will uniquely configure for you), and publish the changes.
If you would like to move the AI Assistant around the page, you can use this snippet format instead, which includes some style parameters:
That’s it!
Step 5 is the only step necessary going forward if you want to put the AI Assistant onto other hosts. You can reuse the code snippet on as many websites as you like as long as they use the same Okta SSO.
By pasting this onto a given page, or a template for a page, the AI Assistant will appear if the user successfully authenticates when they visit it. Authentication is seamless, and no login prompt will ever be seen by the user. If the user is not authenticated, the AI Assistant will simply not appear.
If the AI Assistant does not automatically appear, let your Moveworks Customer Success Engineer know the domains to which you added the bot, and we’ll make sure they are allow listed on the Moveworks side.
Installing it with a Code Snippet and Okta OIDC
This method of installation allows you to embed Moveworks for Web on any webpage governed by Okta Single Sign-On (SSO), as long as the page supports HTML/JavaScript editing. This will create an Okta application that will allow you to copy a code snippet of the AI Assistant and paste it onto any page governed by Okta , and Moveworks for Web will just work, automatic authentication and all.
Prerequisite Questions
- Does the site/page you want to include Moveworks for Web on allow for HTML/JavaScript editing?
- If you want it to be everywhere on the site, does it support site templates, master pages, headers, footers, or other similar global page elements that support HTML/JavaScript editing?
- Is the site/page governed by Okta SSO?
- Ensure there is a tool owner with Super Admin access in your Okta instance
Installation Participants
On the day of installation, we need these individuals from your team on the call:
- Okta super admin
- Must be able to add a new application and make tenant-level configuration changes.
- Target host admin(s)
- Must be able to paste an HTML/JavaScript code snippet onto the target page or site.
Installation Overview
Moveworks can walk you through the Okta application installation on a call in about 15 minutes.
Setting up the Okta application is a one-time activity and from then on you are free to paste the code snippet onto any other site governed by your Okta OIDC at your convenience.
Moveworks will Provide the Following:
- Unique Customer Bot ID
Okta App Setup Instructions
Go to the screen that lets you create Applications.
Click on Create App Integration
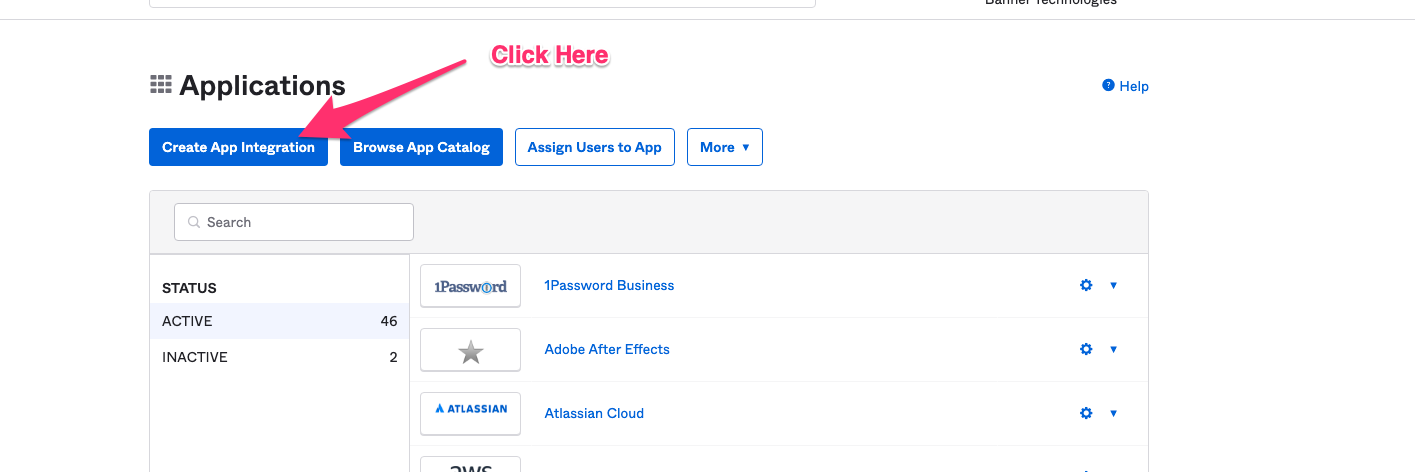
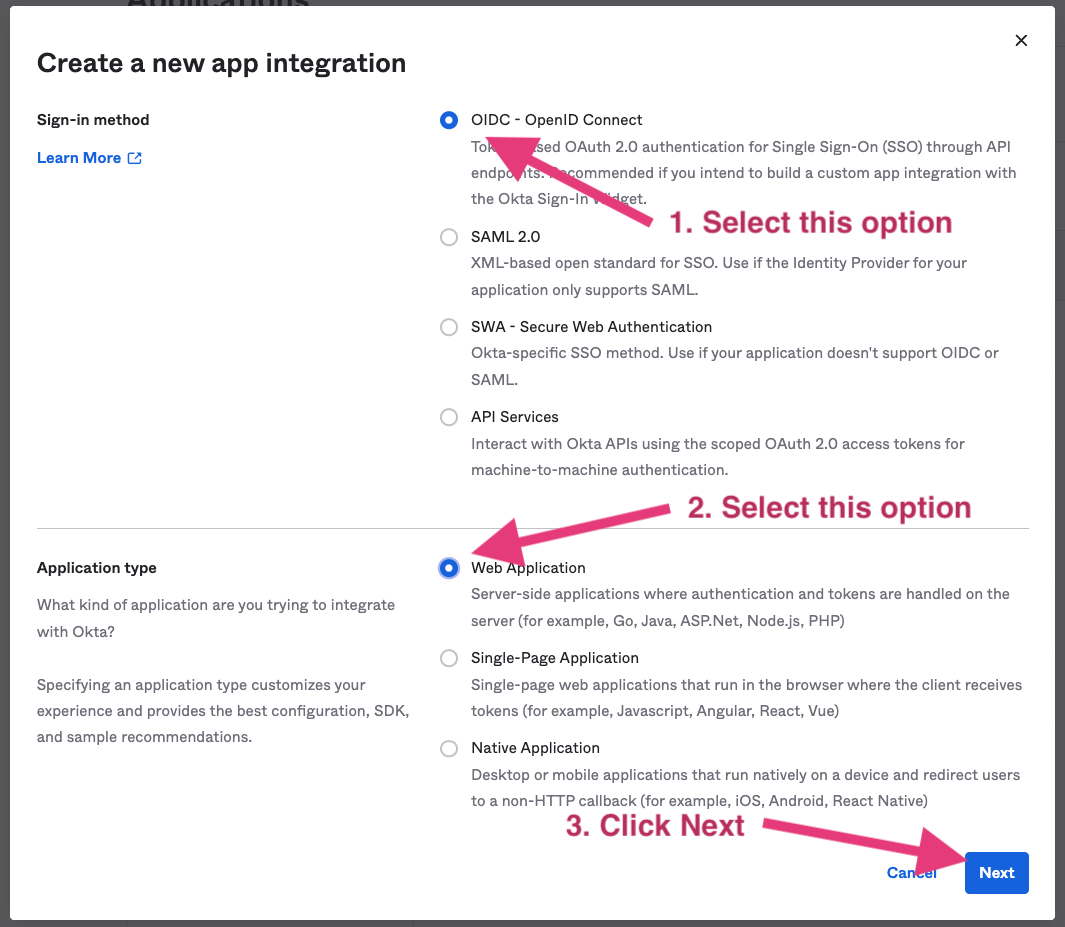
Select OIDC - OpenID Connect in the next screen.
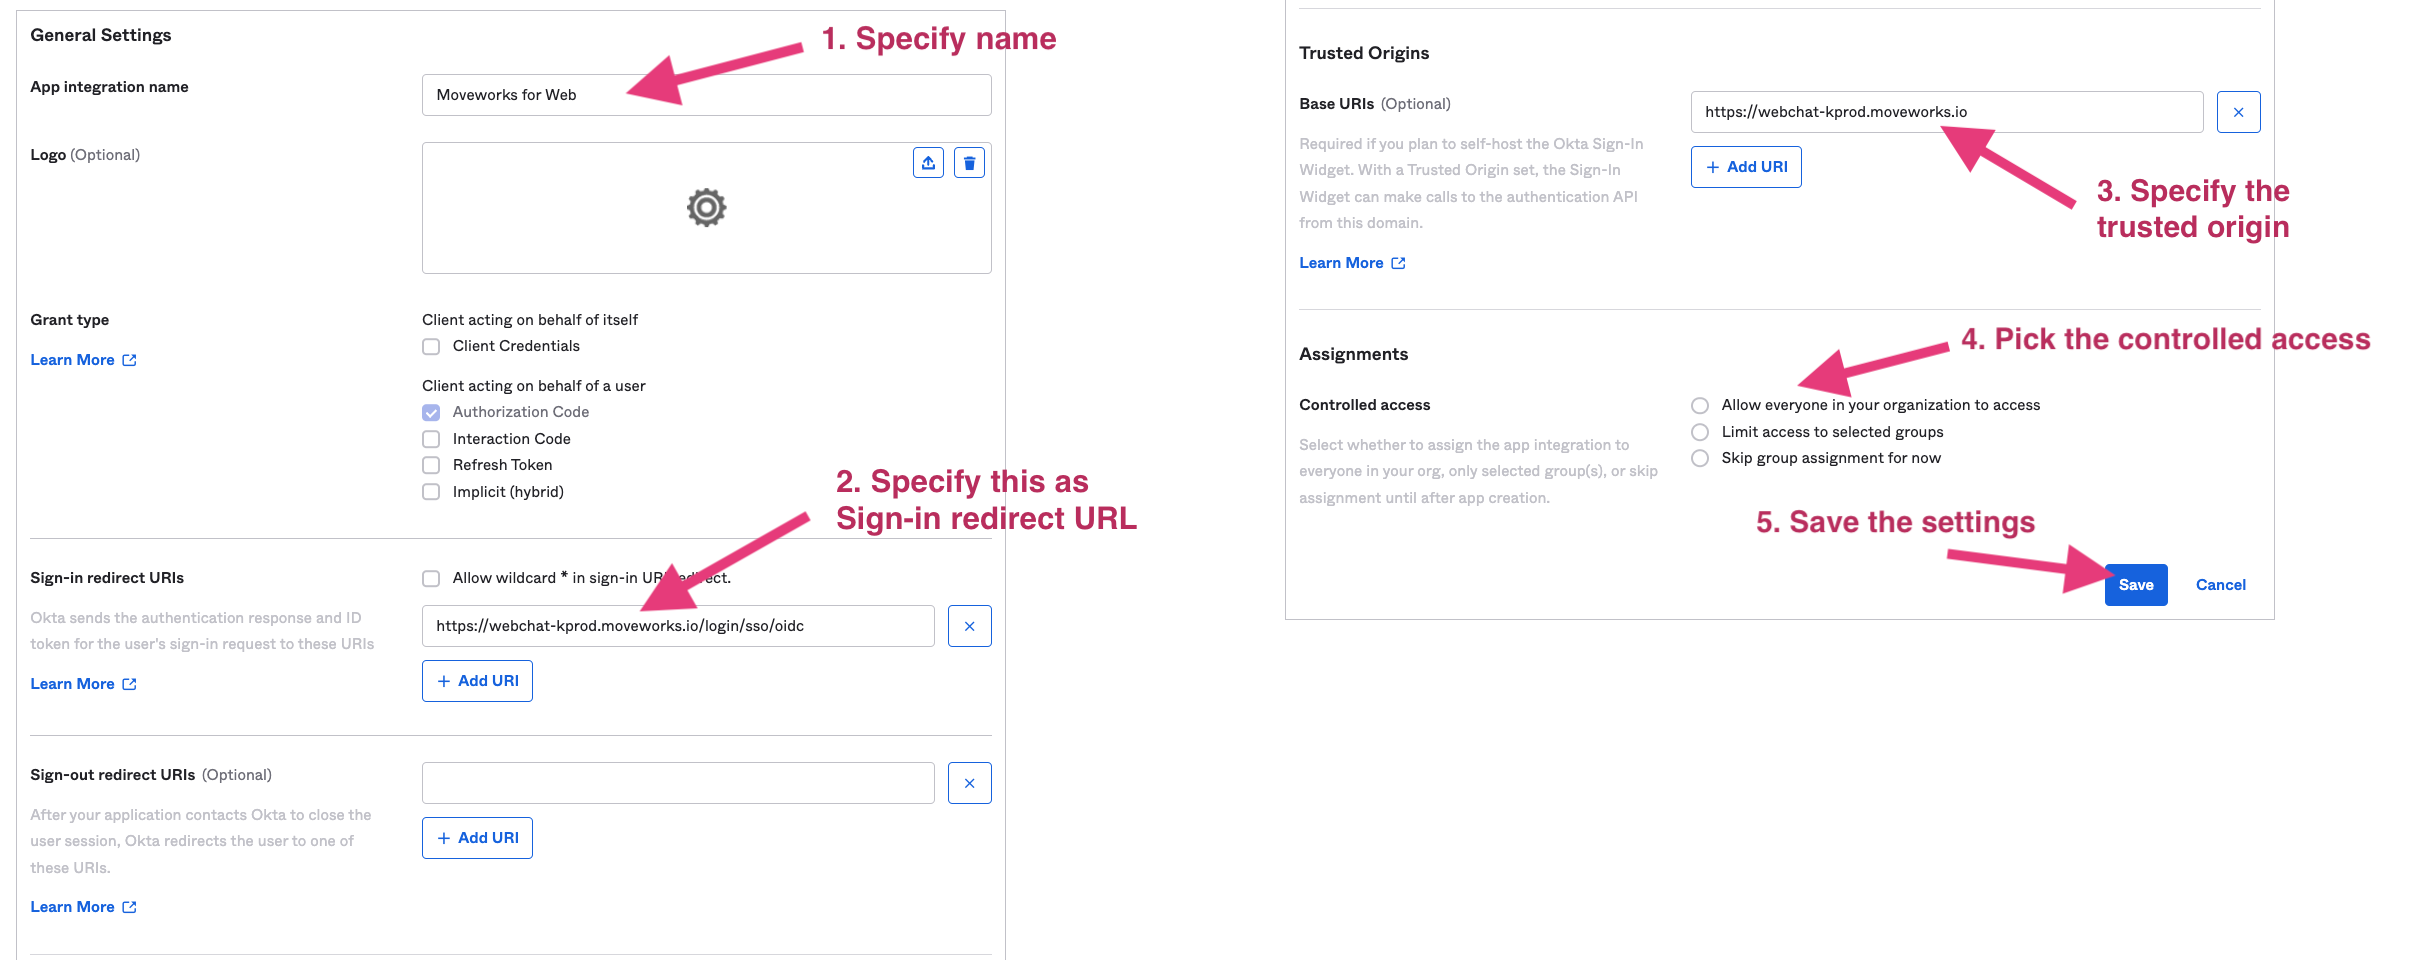
- Fill out the Settings page
- Specify a name for the application. We recommend using your bot’s name.
- Use
https://webchat-kprod.moveworks.io/login/sso/oidcas the Sign-in redirect URL. - Specify
https://webchat-kprod.moveworks.ioas the Trusted Origin. - Configure to be one of the following options:
Allow everyone in you organization to accessLimit access to selected groups
Select options as shown below.
Go back to General Settings and uncheck Require consent. Since the AI Assistant is doing silent authentication, the Require consent will block the AI Assistant auth flow and leave the AI Assistant invisible.

Finish the Moveworks side of the integration
After setup is complete, provide the following information to your CS team.
- The domains and URLs that will host the web AI Assistant (e.g.
www.moveworks.ai/*) - Client ID (idp_client_id)
- Client Secret (idp_secret)
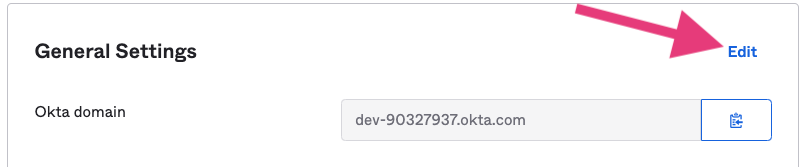
- Okta Domain (idp_issuer)
- To get these information, Go to the General tab
Prepare code snippet
You will need to paste the following code snippet in your web page html body.
The highlighted red areas are provided based on your settings. bot_id is the unique AI Assistant ID provided by your CS team.
If your installation does not require any style overrides then use the following:
Otherwise use the following:
- You can also added these optional parameters along with the serverURL. See below.
stylescontrols the position of the avatar
Congrats! You did it! By pasting this onto a given page, or template for a page, the AI Assistant will appear if the user successfully authenticates. Authentication is seamless, and no login prompt will ever be seen by the user. If the user is not authenticated, the AI Assistant will simply not appear. This is true for all websites governed by Azure OIDC SSO, thus you are now free to paste this snippet anywhere that supports it.
By default, this behavior is NOT enabled for all users. Work with your CS team to first create an allowlist of users who can test the web AI Assistant before having them enable it to all users.
Installing it with a Code Snippet and Azure OIDC
This guide walks you through the Azure SSO OIDC setup for Moveworks for Web (M4W). This will create an Azure application that will then allow customers to copy a code snippet of the AI Assistant and paste it onto any page governed by Azure SSO, and Moveworks for Web will just work, automatic authentication and all.
Prerequisite Questions
- Does the site/page you want to include Moveworks for Web on allow for HTML/JavaScript editing?
- If you want it to be everywhere on the site, does it support site templates, master pages, headers, footers, or other similar global page elements that support HTML/JavaScript editing?
- Is the site/page governed by Azure SSO?
Installation Prerequisites
- On the day of installation, we need an individual who has Global Administrator access in your Azure tenant
🚧
The Azure OIDC silent authentication only works if users are logged into only one MS tenant. Make sure users logged out from other testing tenants when testing webchat bot. This should be rare if the end users are logged into multiple tenants at once.
Azure App Setup Instructions
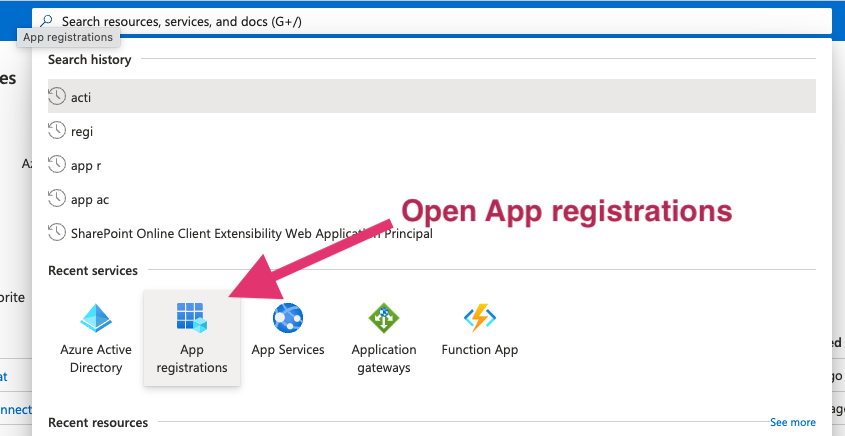
Go to the https://portal.azure.com/ that lets you create Applications.
Click on App registrations
Select New Registration in the next screen.

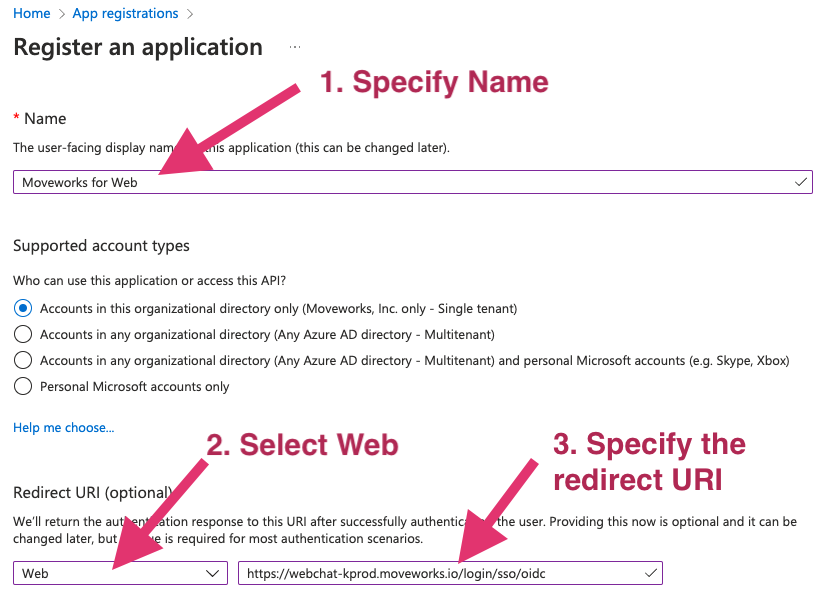
Configure the application
- Specify a name for the application. We recommend using your bot’s name.
- Configure the application.
- Based on your AI Assistant environment, set the Redirect URI as one of the following:
Commercial Environment:https://webchat-kprod.moveworks.io/login/sso/oidc
GovCloud Environment:https://webchat.prod.am-usge1.moveworks.io/login/sso/oidc
EU Environment:https://webchat.prod.am-euc1.moveworks.io/login/sso/oidc
Canada Environment:https://webchat.prod.am-cac1.moveworks.io/login/sso/oidc
- Based on your AI Assistant environment, set the Redirect URI as one of the following:
Select options as shown below.
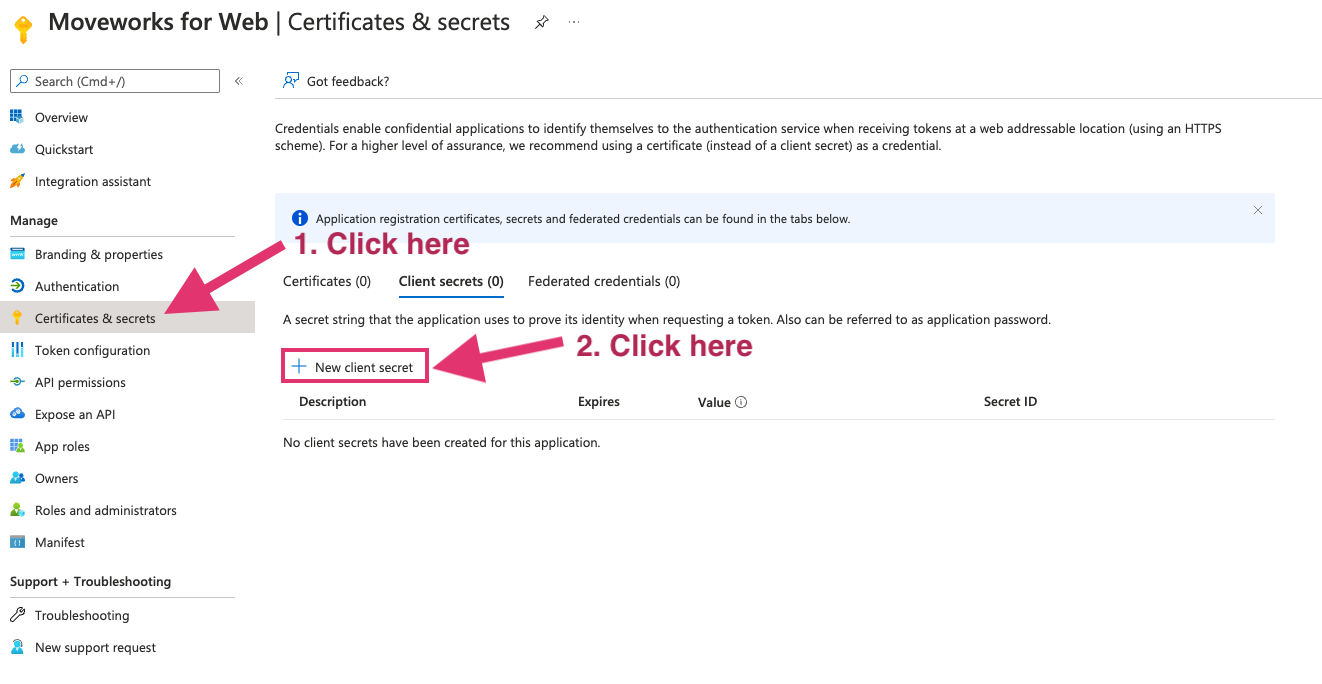
Generate idp_secret
- Go to Certificates & secrets on the left
- Click New client secret
- Add Description and Expires. 24 months is our recommended option to go with as it is the longest time possible. You can have multiple secrets at once, so before one expires you can create another for a seamless cutover.
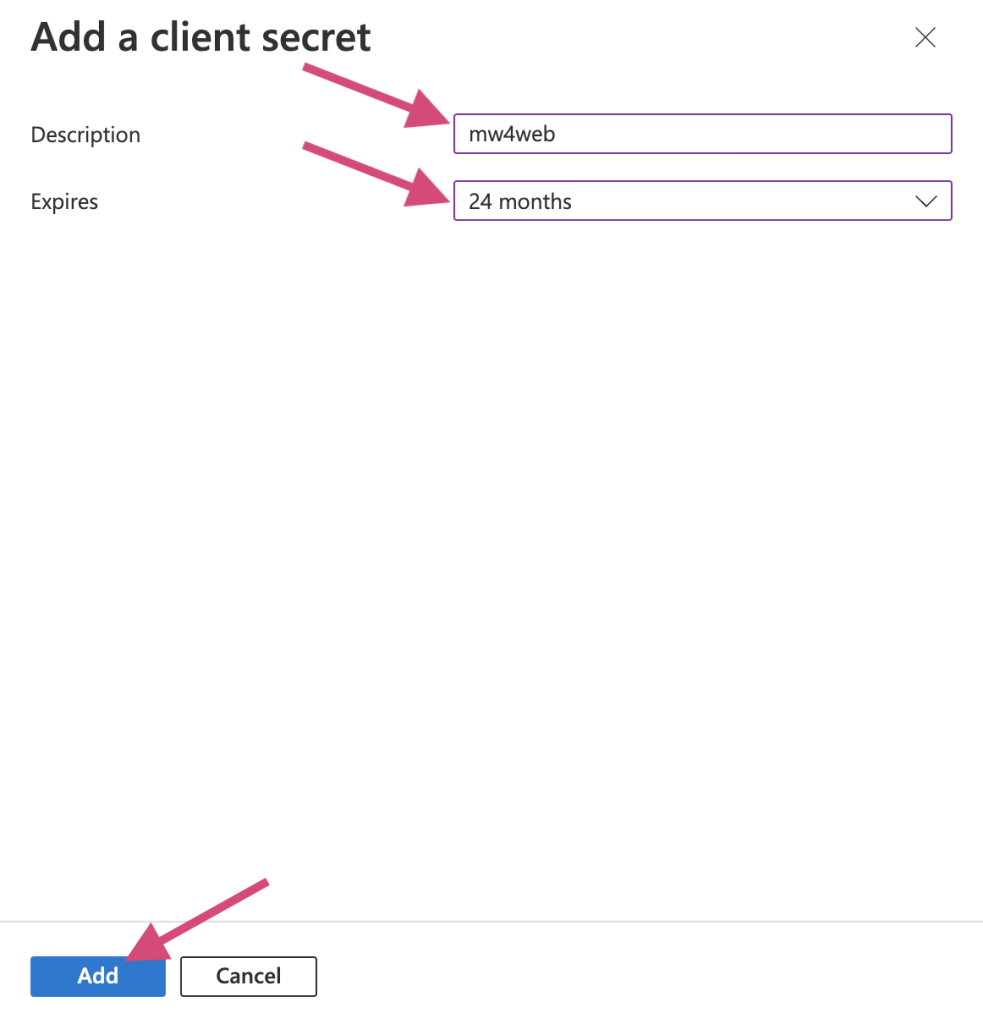
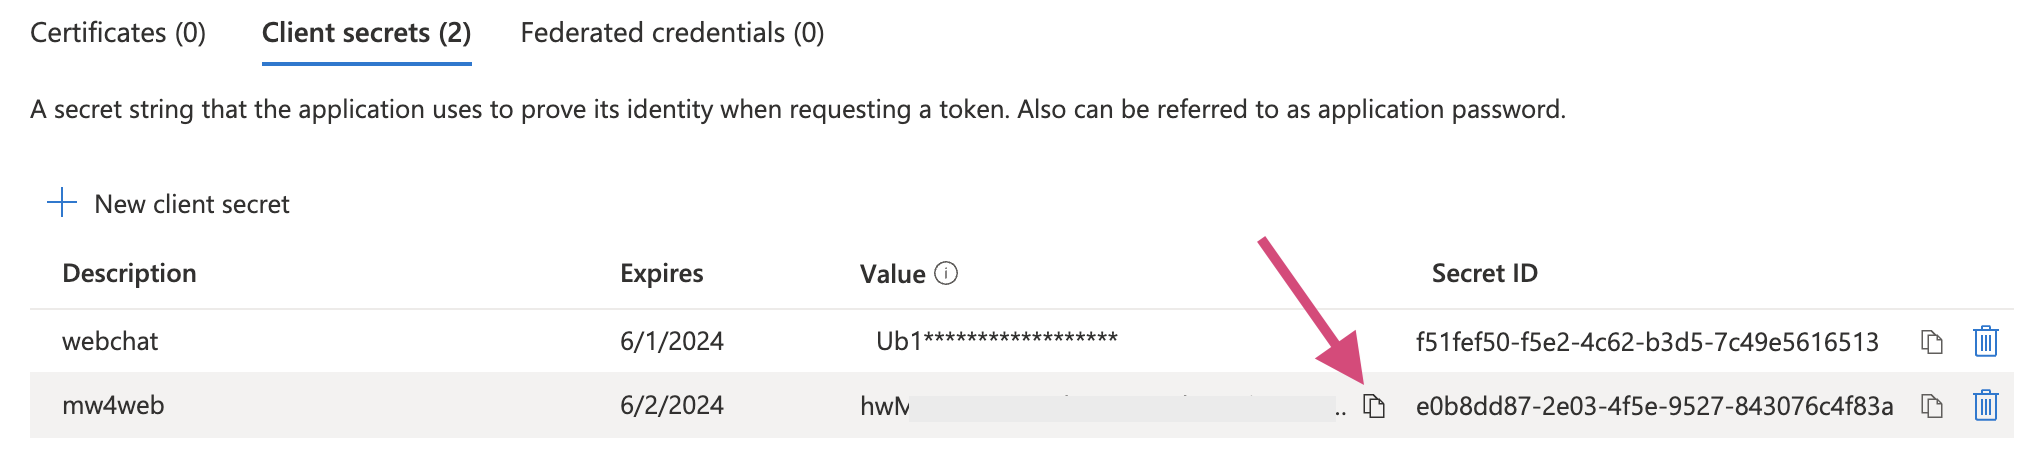
Once the secret is created, copy the value and send to Moveworks engineer. Note that this value is only accessible at the time of creation. You will need to create a new one if the previous one isn’t saved before leaving the page.
Grant tenant level user consent to the app
- Go to Azure Active Directory
- Go to Enterprise Application under Manage
- Find the application just created and open
- Go to Permissions and click Grant admin consent for<org>

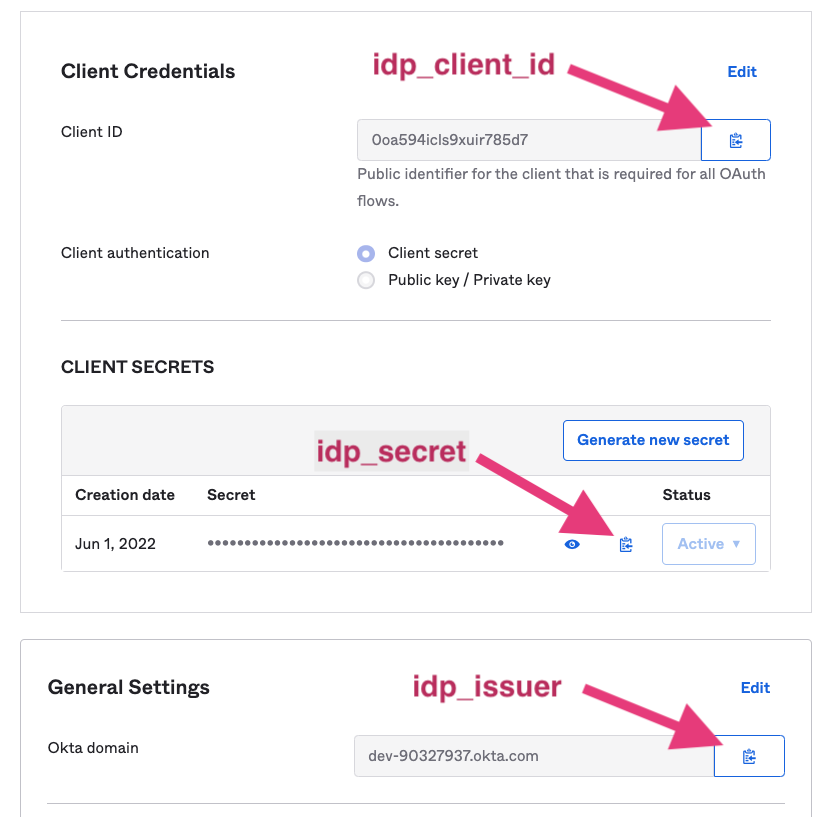
Finish Moveworks’ side of the integration
After setup is complete, the following information must be shared with Moveworks Customer Success, with the saved secret above.
- Go the Overview in App registrations → your app just created.
- idp_client_id
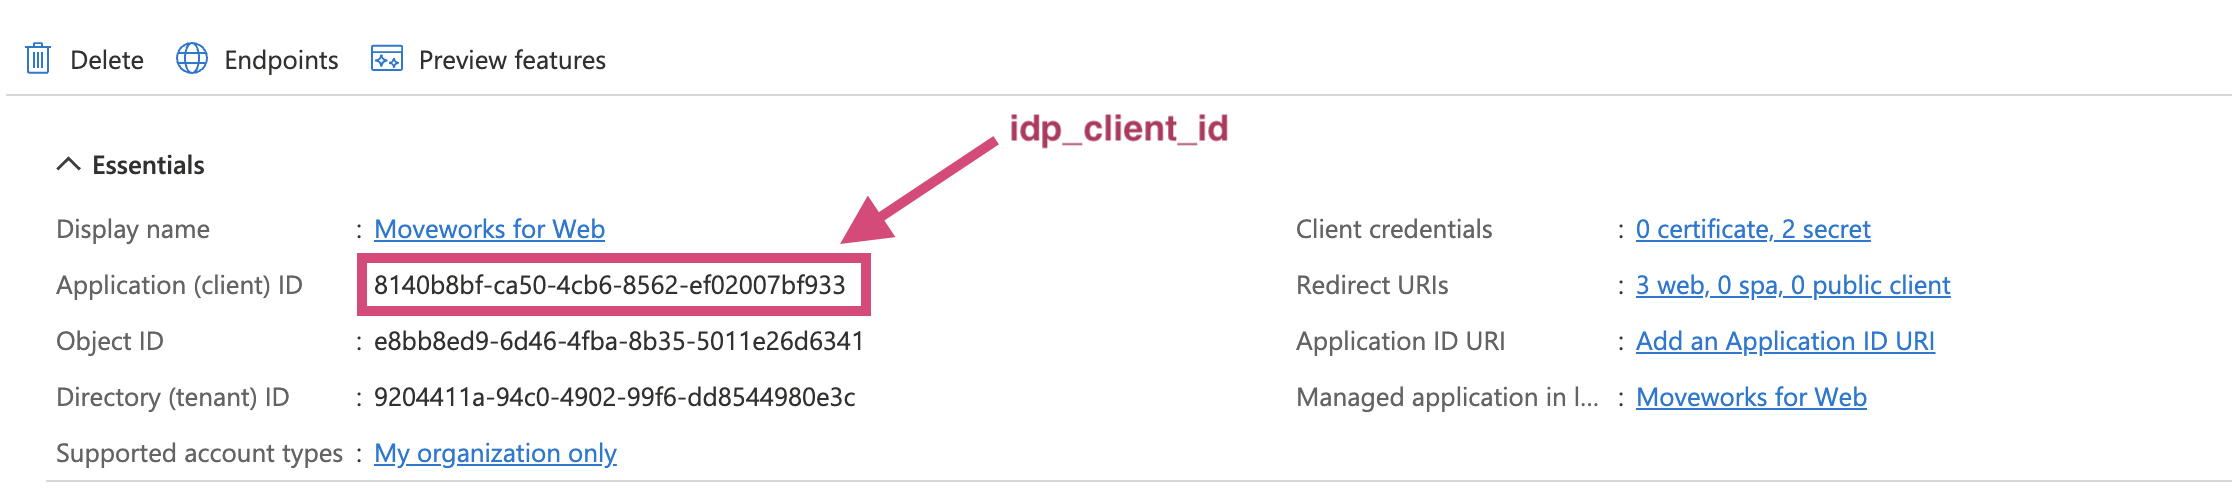
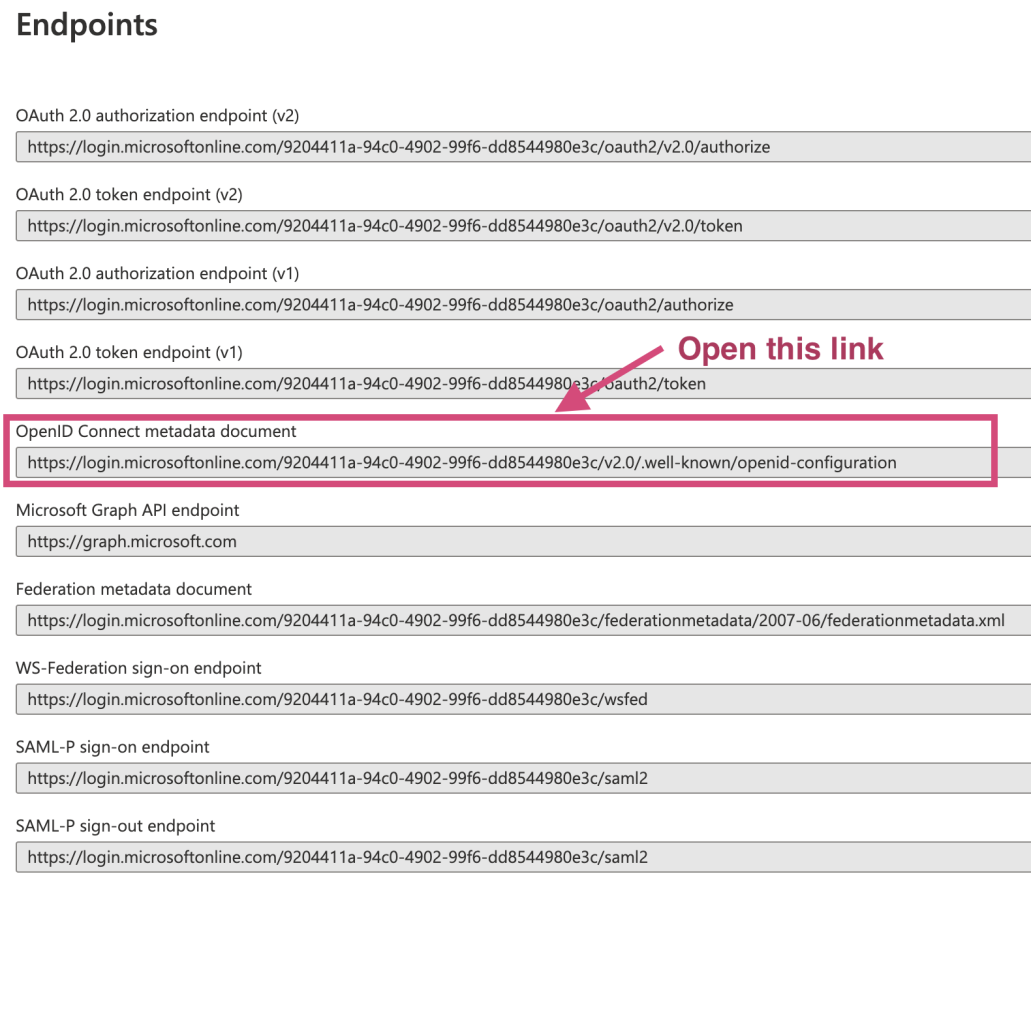
- idp_issuer


- idp_secret (saved locally in the previous step)
- idp_client_id
Prepare code snippet
You will need to paste the following code snippet in your web page html body.
The highlighted red areas are provided based on your settings. bot_id is the unique bot ID provided by your CS team.
If your installation does not require any style overrides then use the following:
Otherwise use the following:
- You can also added these optional parameters along with the serverUrl. See below.
stylescontrols the position of the avatar
Congrats! You did it! By pasting this onto a given page, or template for a page, the AI Assistant will appear if the user successfully authenticates. Authentication is seamless, and no login prompt will ever be seen by the user. If the user is not authenticated, the AI Assistant will simply not appear. This is true for all websites governed by Azure OIDC SSO, thus you are now free to paste this snippet anywhere that supports it.
By default, this behavior is NOT enabled for all users. Work with your CS team to first create an allowlist of users who can test the web AI Assistant before having them enable it to all users.