Configure Ticket Routing & Ticket Workflow
Configure Ticket Routing & Ticket Workflow
This guide describes how to configure Ticket Routing (the controller) and ticket workflows (the execution) within Moveworks Setup
What are Workflows and how are they used?
The ticketing workflow is a tool that helps to replicate your external system’s ticketing process. It offers flexibility and customization to your operations, including creating, updating, re-opening, and resolving tickets.
What are Routing Conditions and how are they used?
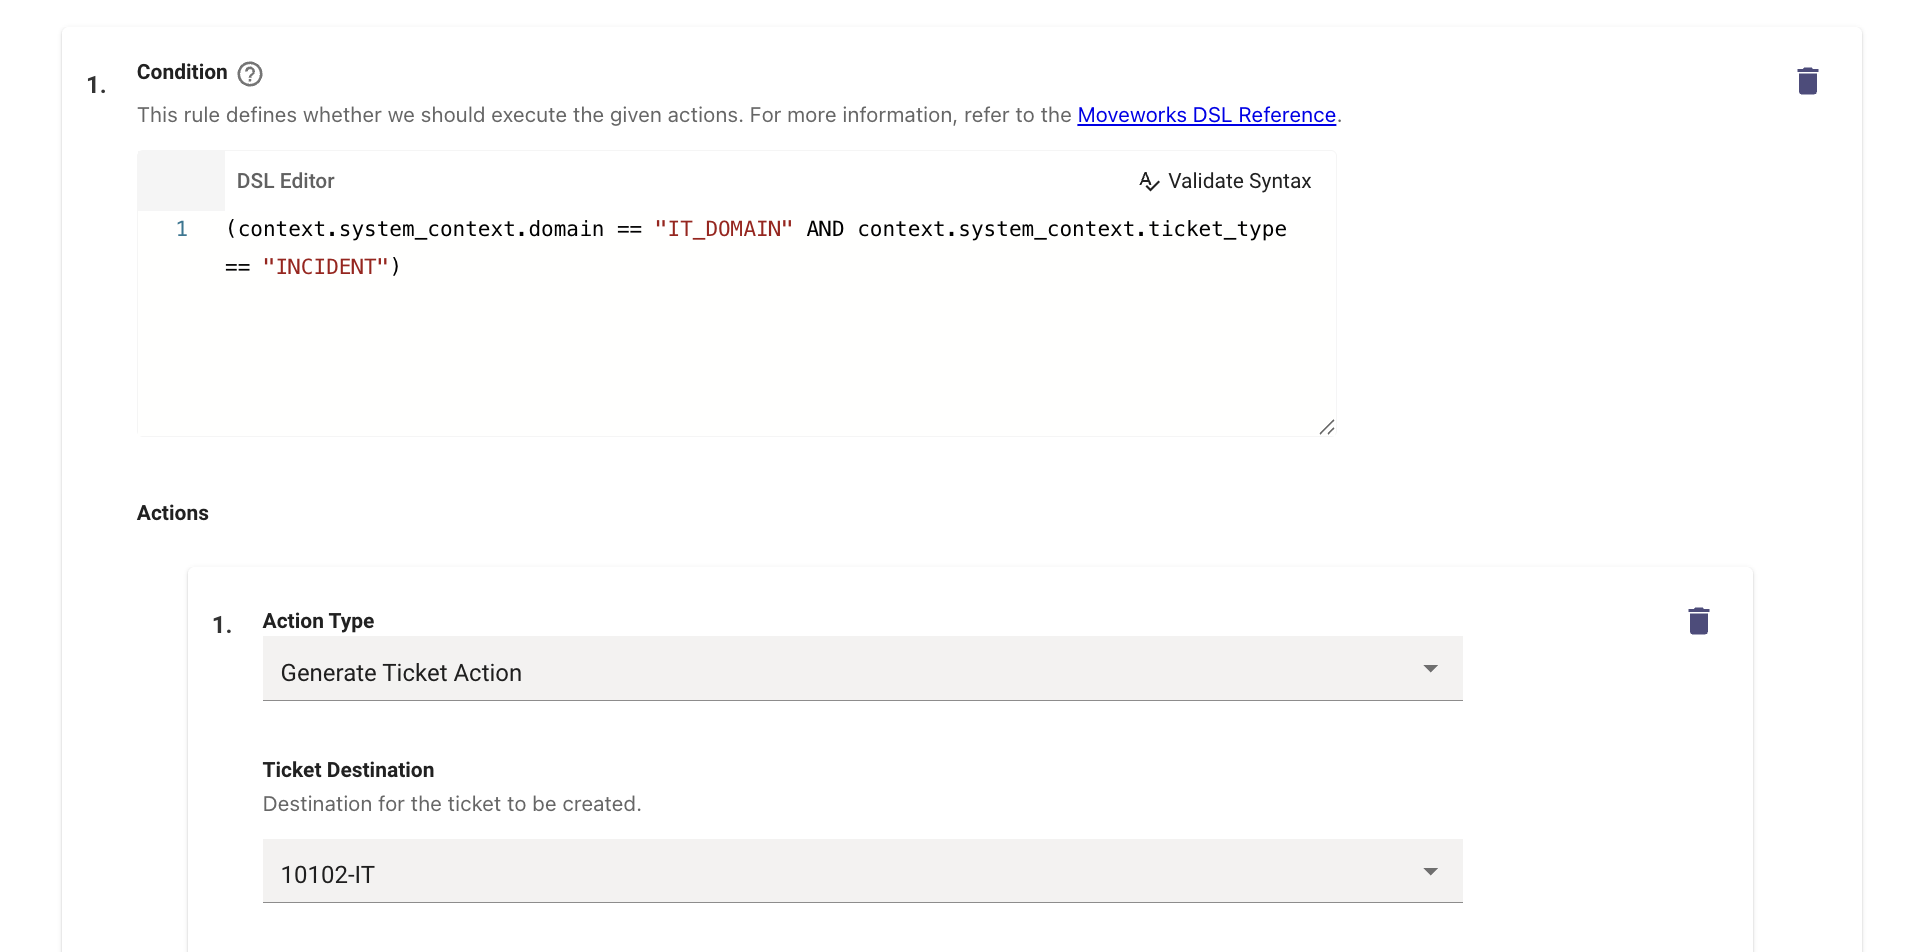
Routing Conditions allow you to specify which workflow to execute when each high-level ticketing action is taken. You can configure routing conditions for the following high-level ticketing actions:
- Generate Ticket
- Query Ticket
- Update Ticket
- Resolve Ticket
- Reopen Ticket
These Routing Conditions will be auto-generated and pre-configured. The default behavior will be sufficient in most cases, but you may configure/modify them further if needed.
How should these be configured?
When configuring to support specific behavior, we suggest using a top-down approach by thinking about Routing Conditions first to determine what high-level skills or conditions should trigger this behavior. Then think about Workflows in terms of what actions you would like to execute, in what order, and under what conditions.
In practice however, you must configure a Workflow before you can reference it in a Routing Condition.
Ticketing Workflows
Default Workflows
Some workflows are auto-generated to provide default behavior for Concierge & Ticketing. These are prefixed with “GENERIC_MW_DEFAULT_CONCIERGE_” and provide pre-defined actions, but they can be used as a starting point and modified according to your specific needs.
Create Custom Workflows
You can also create new, custom workflows from scratch. To create a new workflow:
→ Navigate to ‘Ticket Workflows - Workflow Conditions’
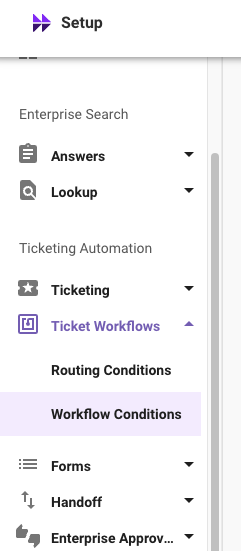
→ Click on ‘Create’ in the top right to create and configure a new workflow.
→ Define:
- Display name - Name the workflow for future references
- Select connector - Select the connector of the end system where the workflow will be triggered
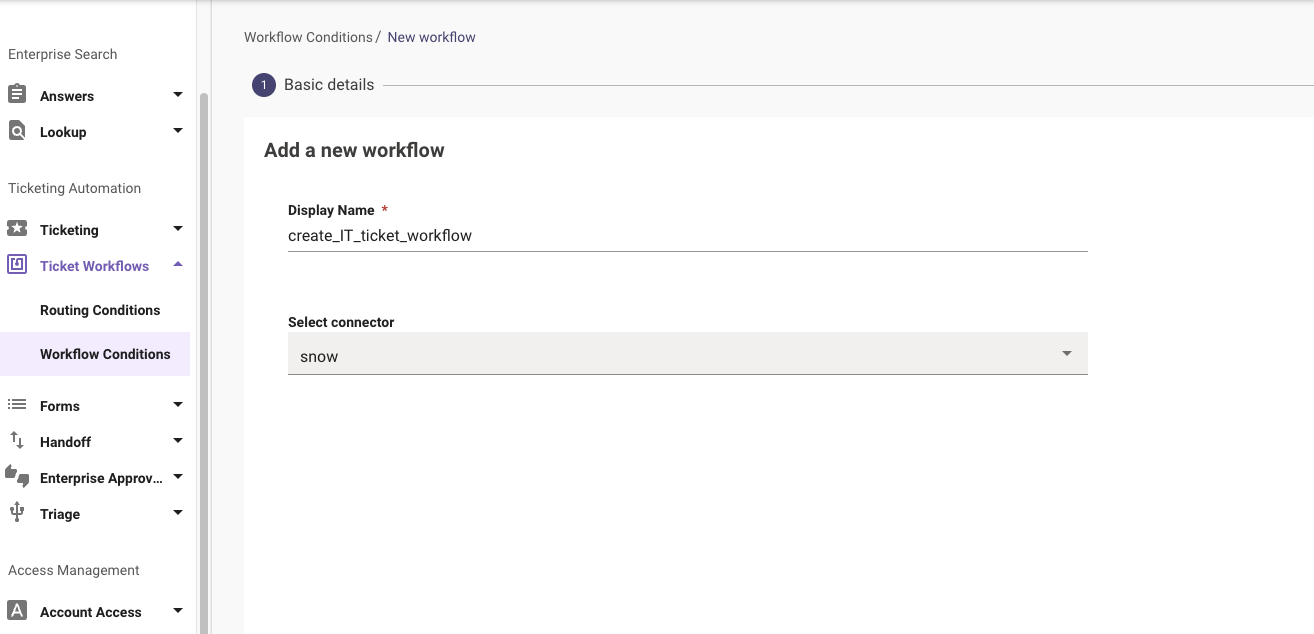
→ Click ‘NEXT: ADD WORKFLOW’ in the bottom right.
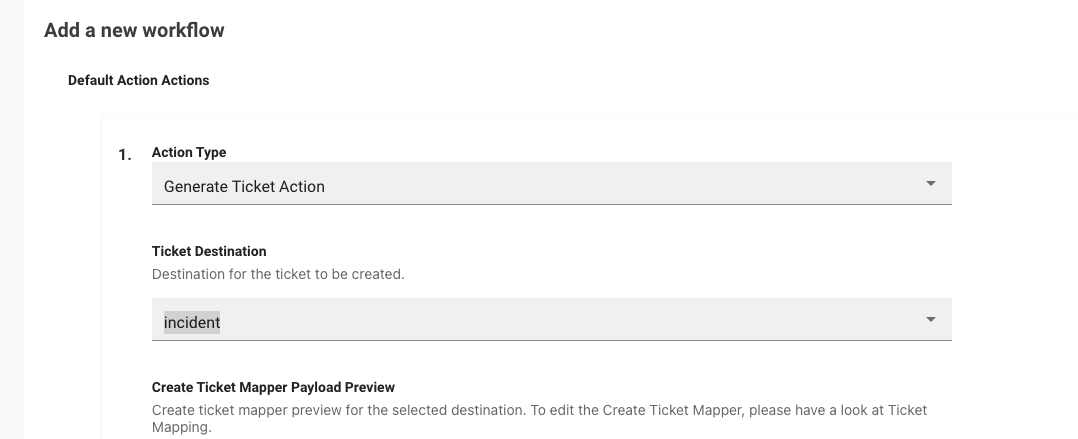
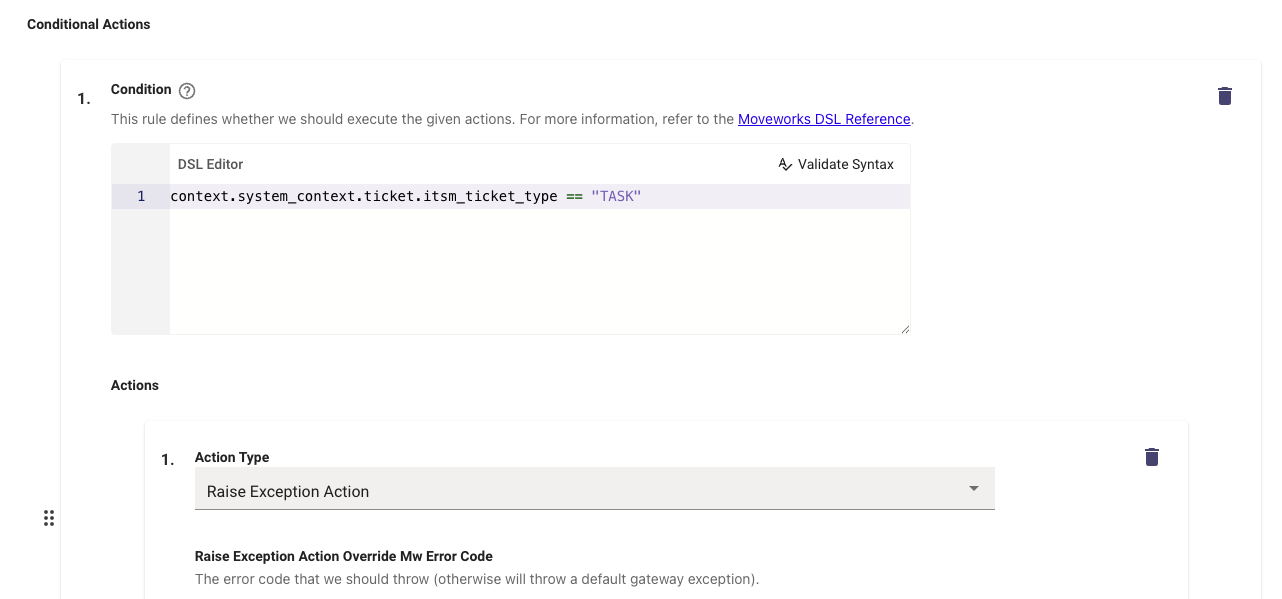
→ On this screen, you can configure the various actions that should be taken when the workflow is triggered. Below is the list of primitive actions that can be used. For each workflow, you must define one or more default actions, and optionally one or more conditional actions that will be taken upon execution of the workflow. If no Conditional Action rule is satisfied, the Default Action(s) will be taken. For more detail on configuration of each action, see Workflow Actions.
-
Click ‘Add +’ under Default Action Actions to Add a default action to take for this workflow.
-
Click ‘Add +’ under Conditional Actions to add any conditional actions to take for this workflow.
-
For each conditional action, you must define a DSL rule that will determine when the action should be taken.
-
→ Click ‘Confirm Workflow’ in the bottom right to finalize the workflow configuration.
Workflow Actions
There are built-in primitive actions available to use when creating a Workflow. Most of the actions are self-describing and require no additional configuration, but these are the exceptions:
-
Generate Ticket Action
- Generate a ticket via direct table insertion
- Additional configurations:
- Ticket Destination
-
By default, Moveworks will predict whether the ticket should be an Incident or Request and assign that value to a variable within Moveworks called ticket_type. You can utilize ticket_type in the Conditional DSL rule to specify which ticket destination should be filed in either scenario.
-
For example, if you have two different Incident ticket types mapped within Moveworks ticket mapping, you can choose the one you’d like to be filed when Moveworks predicts the type to be Incident.
Example of choosing which ticket destination to file when Moveworks predicts the ticket should be an Incident:
-
-
You can also use other criteria in the conditional such as context.system_context.domain to specify which ticket type should be filed per domain. The DSL editor contains a dropdown of all available criteria that can be used when writing the conditional rules.
-
The ticket destination options will consist of the Ticket Types that have been mapped in Ticket Mapping
-
A read-only preview of the Create Ticket Payload will appear for the selected Ticket Destination so that you can review the configured payload that will be used to create the ticket.
-
- Generate Ticket Action Additional Ticket Fields Mapper
- Additional data you want to send when filing the ticket. This output mapper only support constants (no DSL).
-
Note: The Additional Ticket Fields Mapper is used to define variables and set them to a hard coded value. For example, you can define a variable called category and set it to value “Software” to be populated when software request tickets are filed. This mapper is only responsible for defining the variable. To include it in the generate ticket outbound payload, the field must be included in the Create Ticket Payload mapping in the Ticket Mapping configuration for the desired ticket type.
- For example, in the image below, you can see from the “Create Ticket Mapper Payload Preview” that the “category” field in red has been included in the create ticket payload. The category field will be populated with a variable called “category” within Moveworks. In order to populate the Moveworks “category” variable, we can define it in the ticket workflow Additional Ticket Fields Mapper. This allows you to set different dynamic category variables in your configured conditional ticket actions in the ticket workflow.
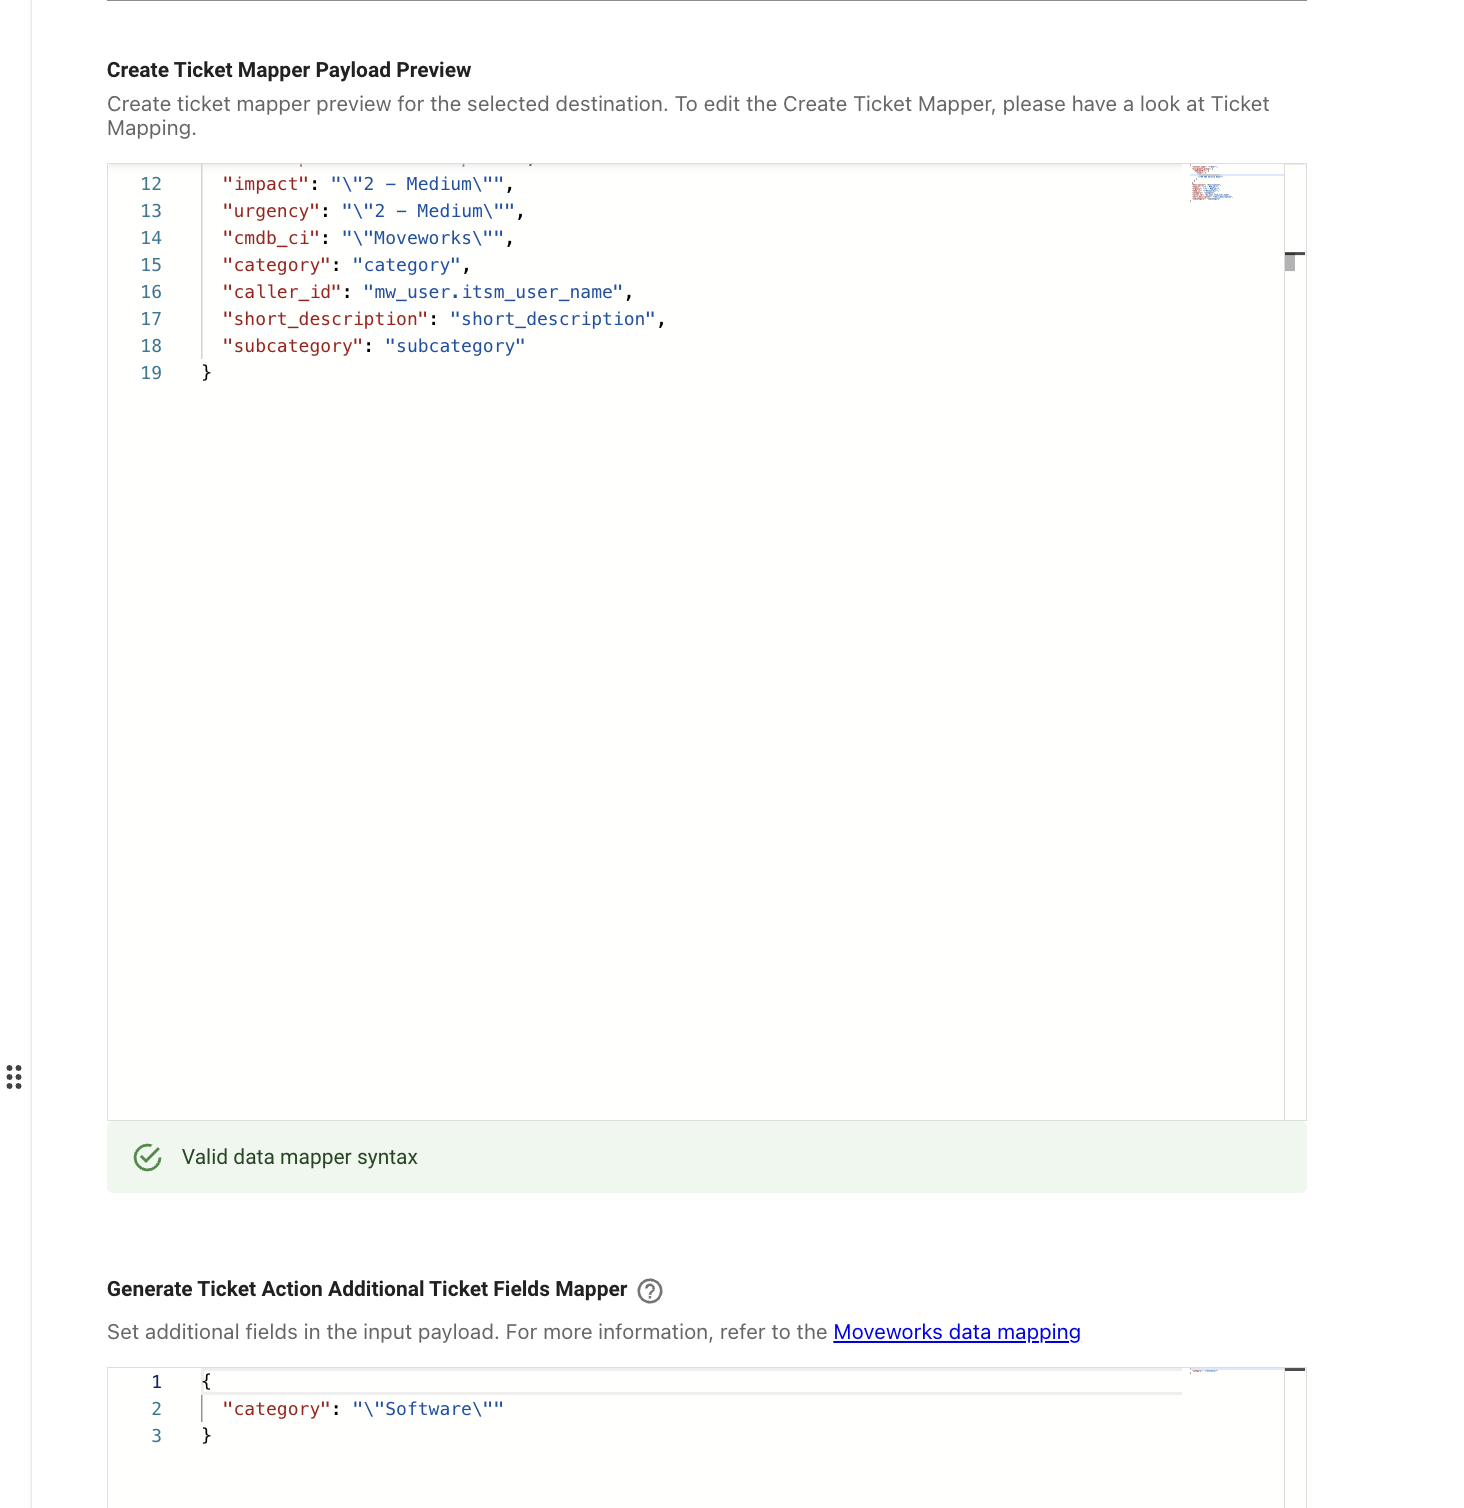
Reminder: Simply setting category to a value in the Generate Ticket Action Additional Ticket Fields Mapperwill not result in the field getting set upon ticket creation. The variable name from the Generate Ticket Action Additional Ticket Fields Mapper must be set in the ticket mapping generate ticket payload mapping.
-
- Additional data you want to send when filing the ticket. This output mapper only support constants (no DSL).
- Ticket Destination
-
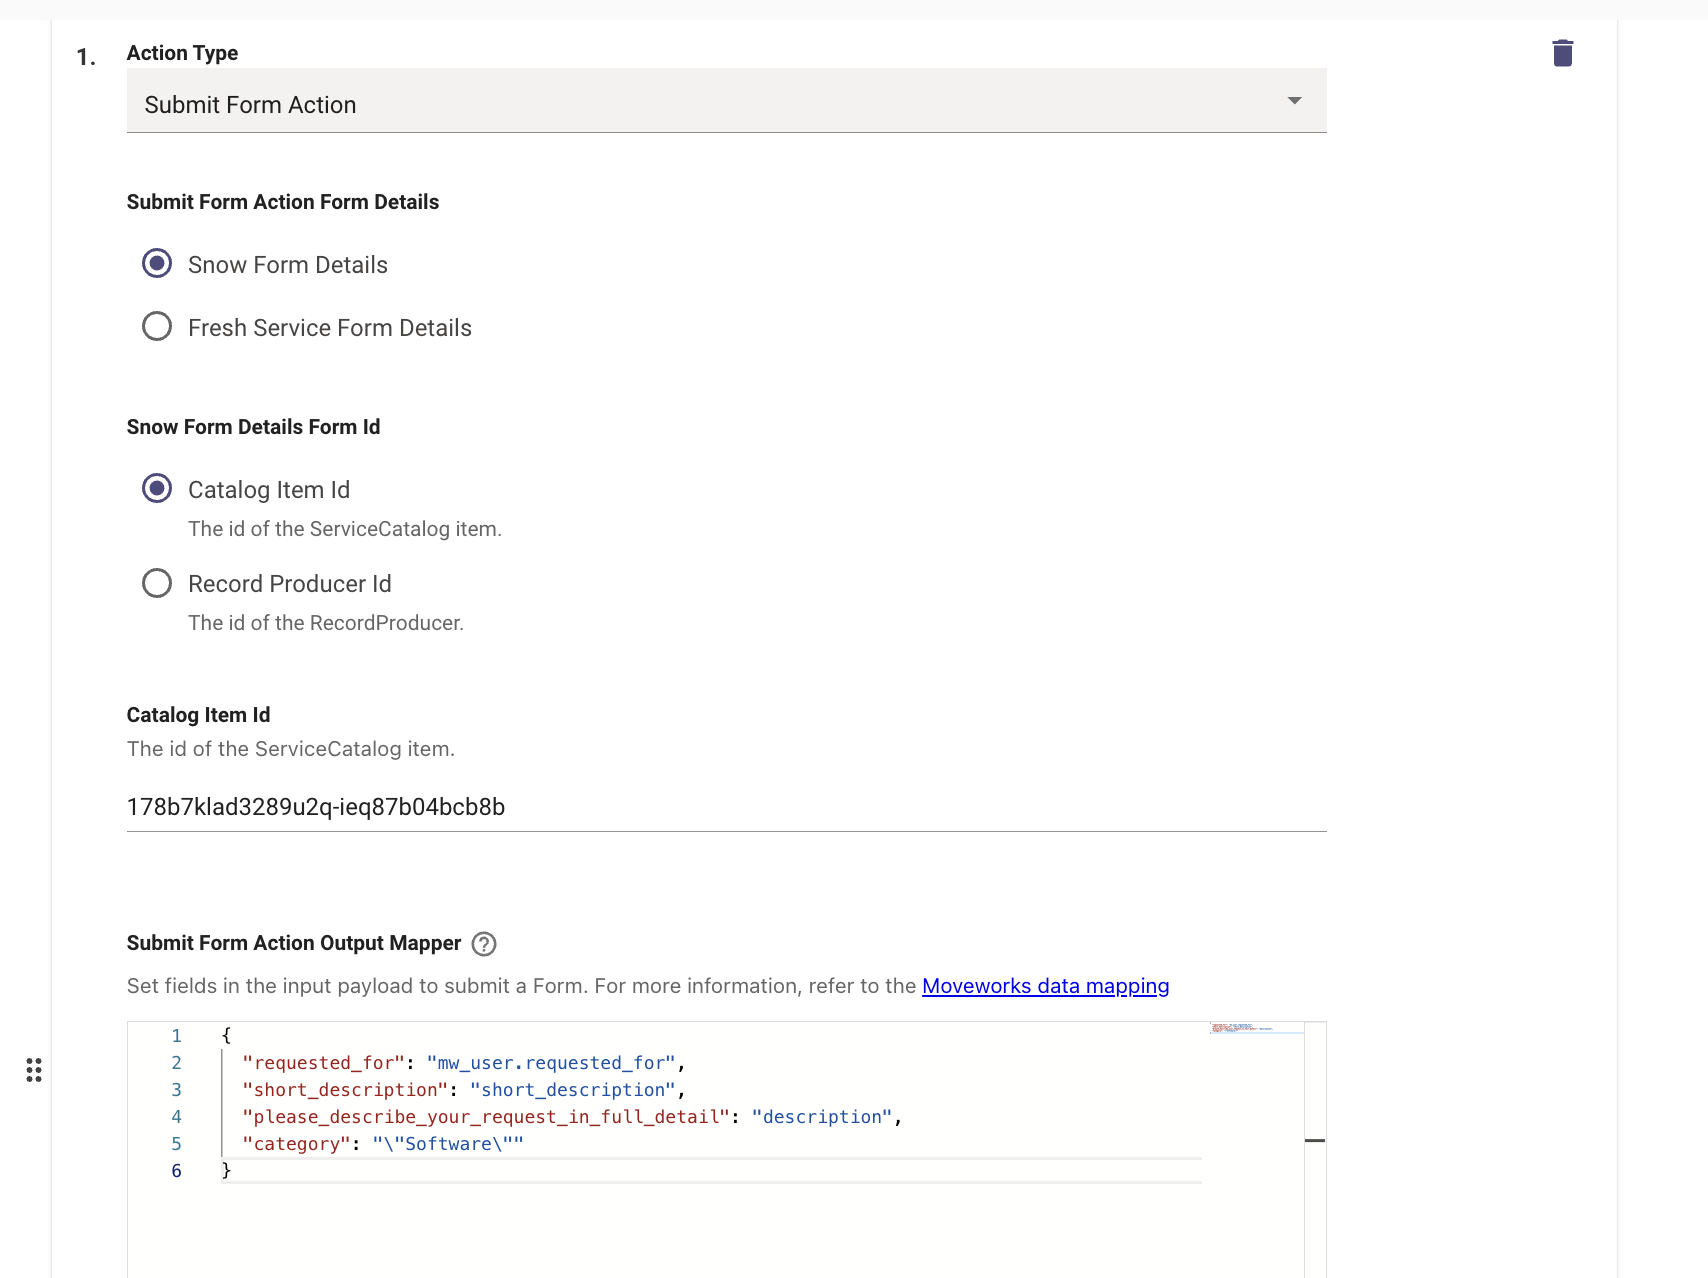
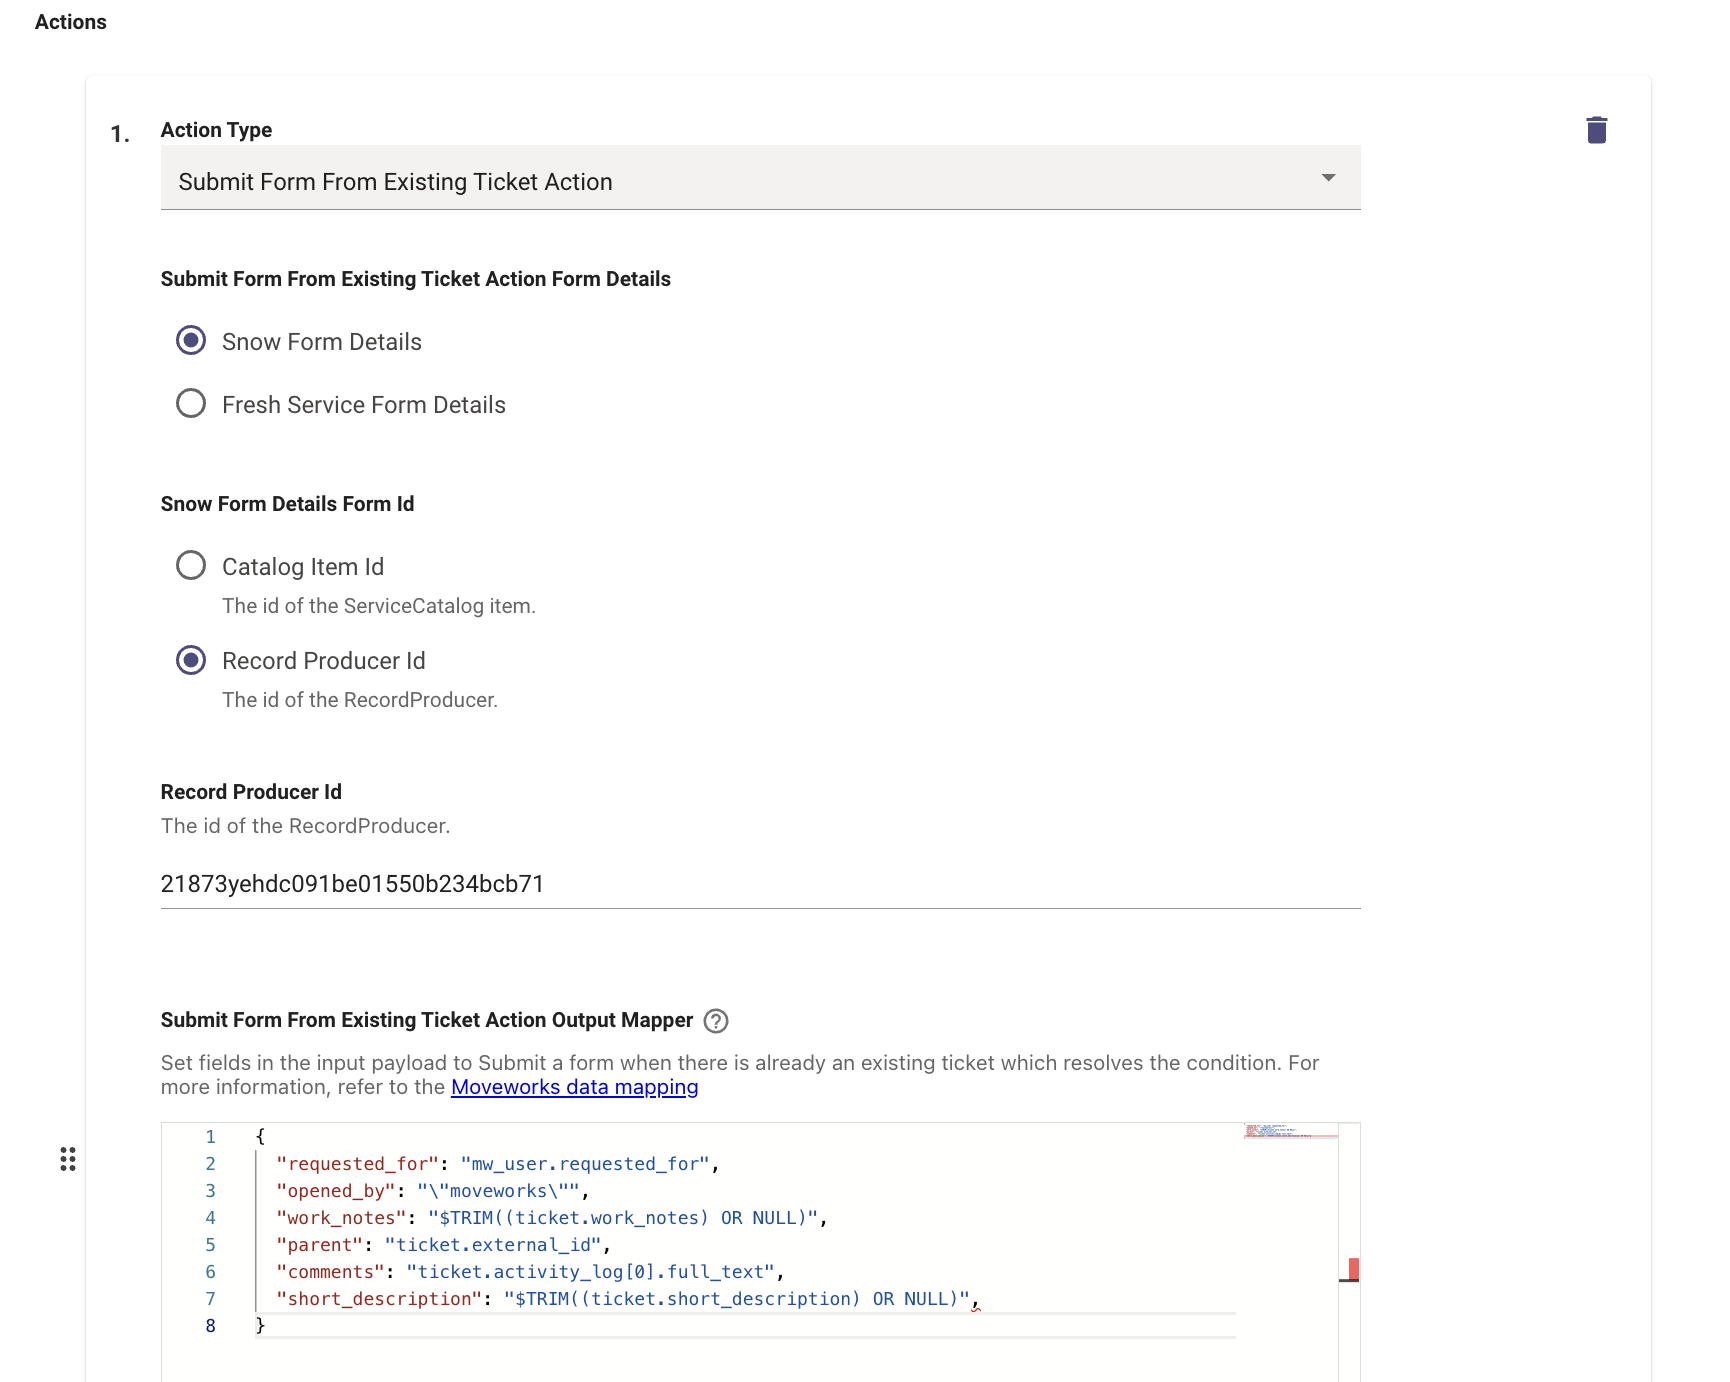
Submit Form Action
- Create a ticket via form submission.
- Additional configurations:
- Submit Form Action Form Details
- The type of form id.
- For ServiceNow, select whether it’s a record producer or catalog item.
- For FreshService, specify the Service Item Catalog Id.
- The type of form id.
- Output mapper
-
Payload that will be sent to the ITSM system to submit the form.
-
First, specify the field name from your ITSM ticket to be populated, the specify the value of the field that should be set.
- Note: Moveworks has several system variables that will be populated with data automatically that can be used in create ticket payload in ticket mapping and in the Submit Form Action in Ticket Workflows:
- description
- short_description
- mw_user.requested_for
- Note: Moveworks has several system variables that will be populated with data automatically that can be used in create ticket payload in ticket mapping and in the Submit Form Action in Ticket Workflows:
-
Example:
The fields in red are the backend field names from the ITSM that will be used in the create ticket API call. The blue variables are Moveworks system variables that are populated automatically.
-
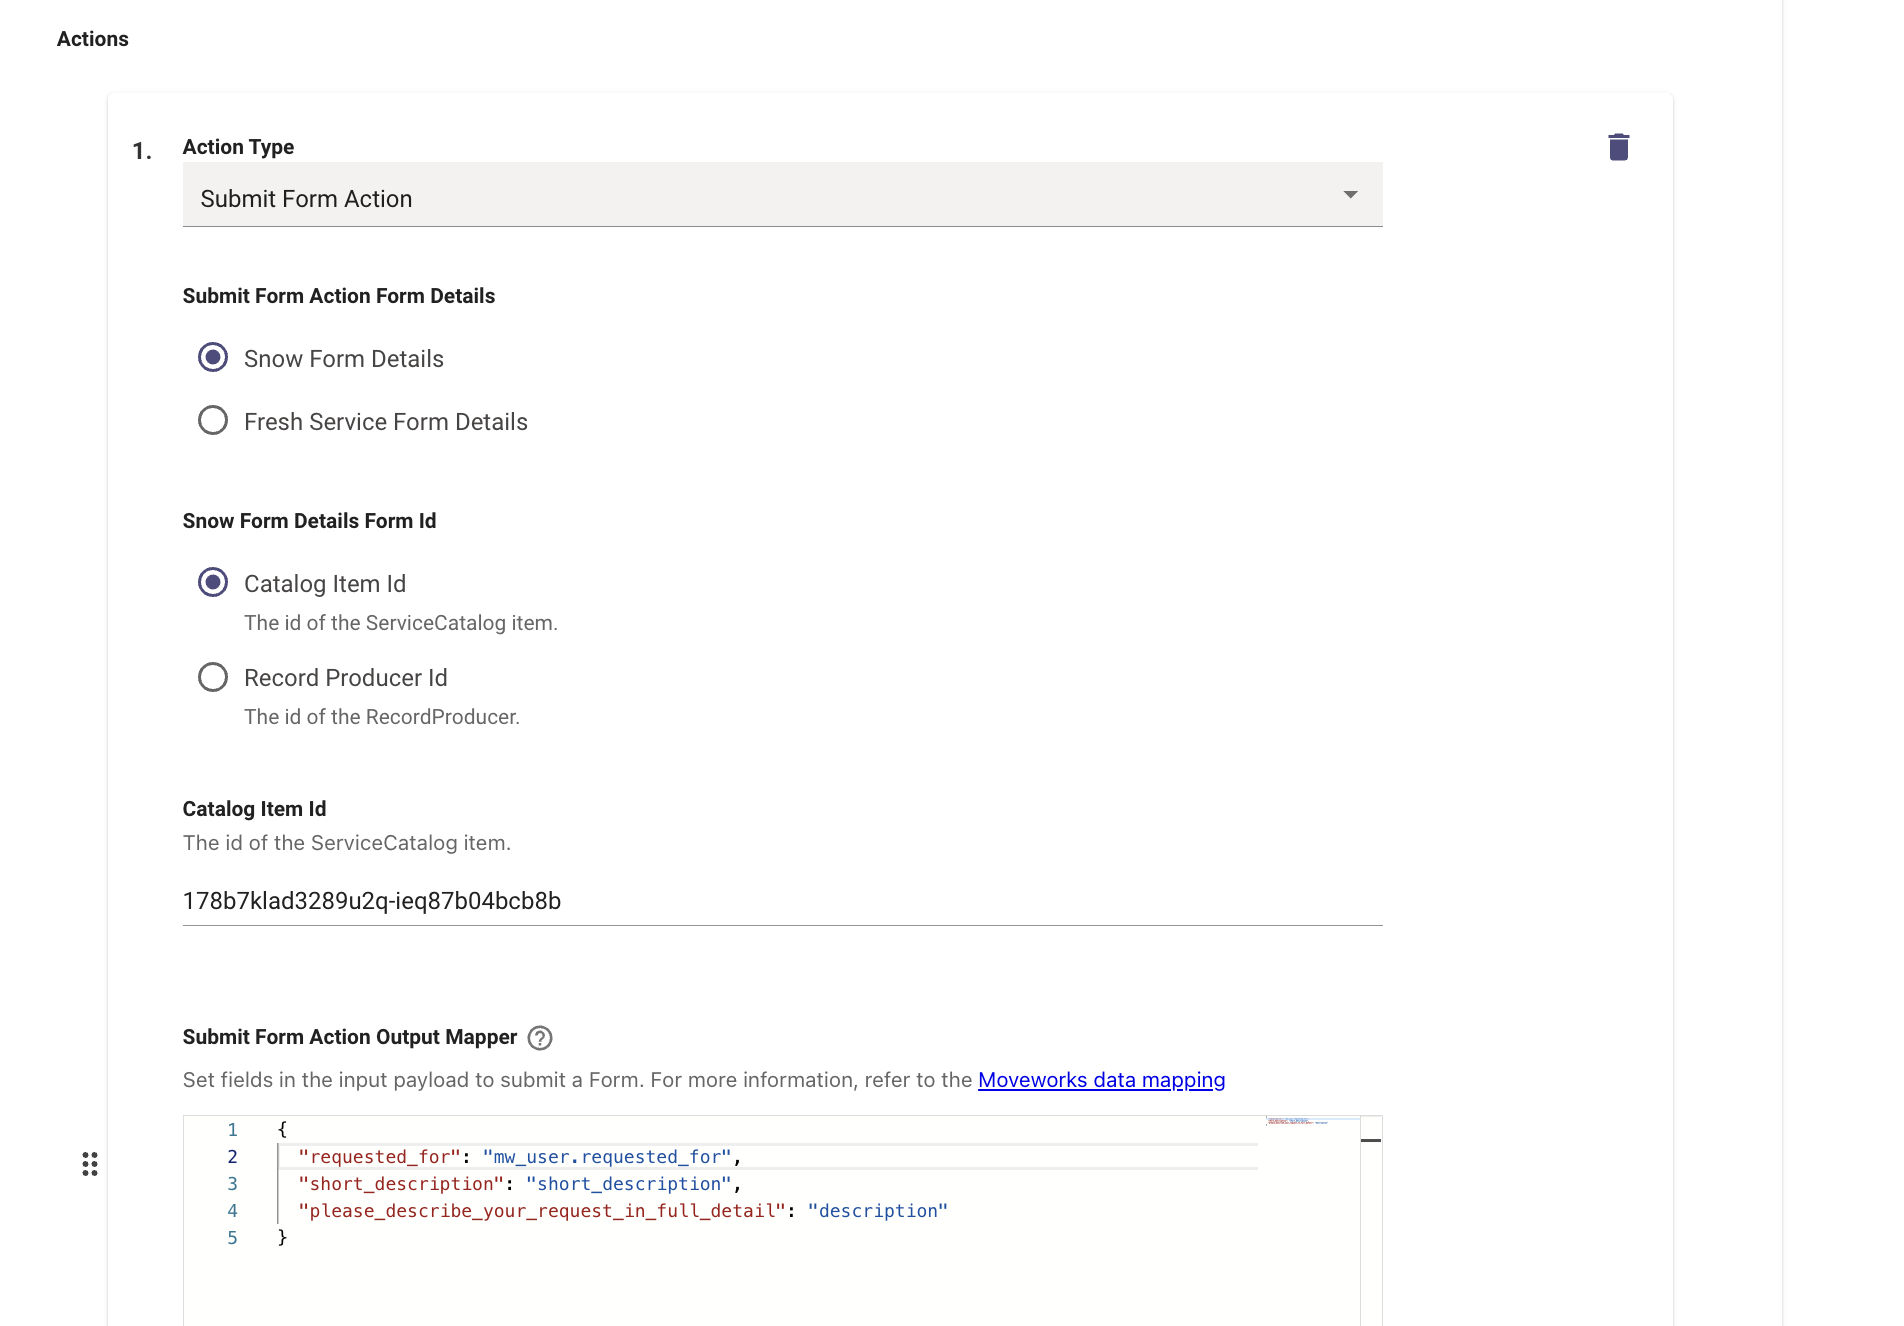
You can also hard code a value in the Submit Form Action such as ‘category’ in the example below. Be sure the escape the string values by adding ” in front of the quotes surrounding the string.
-
-
- Submit Form Action Form Details
-
Generate Ticket From Existing Ticket Action
- Instead of reopening the original ticket, generate a new ticket via direct table insertion.
- Additional configurations:
- Ticket Destination
- Choose the type of ticket that should be generated when a user requests to reopen a ticket of a certain type
- Output mapper
- Used to carry over fields from the original ticket to the new ticket.
- Fields that are available to reference when bending are:
-
The original ticket in the form of
ticket.- Example:
ticket.requested_for,ticket.short_description, etc - In the example below, the
comments,work_notes, andshort_descriptionare configured to be copied over from the previous ticket and the parent field is configured to be set to the ID of the original ticket
- Example:
-
- Ticket Destination
-
Submit Form From Existing Ticket Action
- Instead of reopening the original ticket, create a new ticket via form submission
- Additional configurations:
- Submit Form Action Form Details
- The type of form id.
- For ServiceNow, select whether it’s a record producer or catalog item.
- For FreshService, specify the Service Item Catalog Id.
- The type of form id.
- Output mapper
- Payload that will be sent to the ITSM system to submit the form.
- Fields that are available to reference when bending are:
- The original ticket
- Requestor in the form of
mw_user
- Submit Form Action Form Details
Routing Conditions
To configure routing conditions, navigate ‘Routing Conditions’ in Moveworks Setup.

→ Expand the settings for the high-level action you would like to configure.
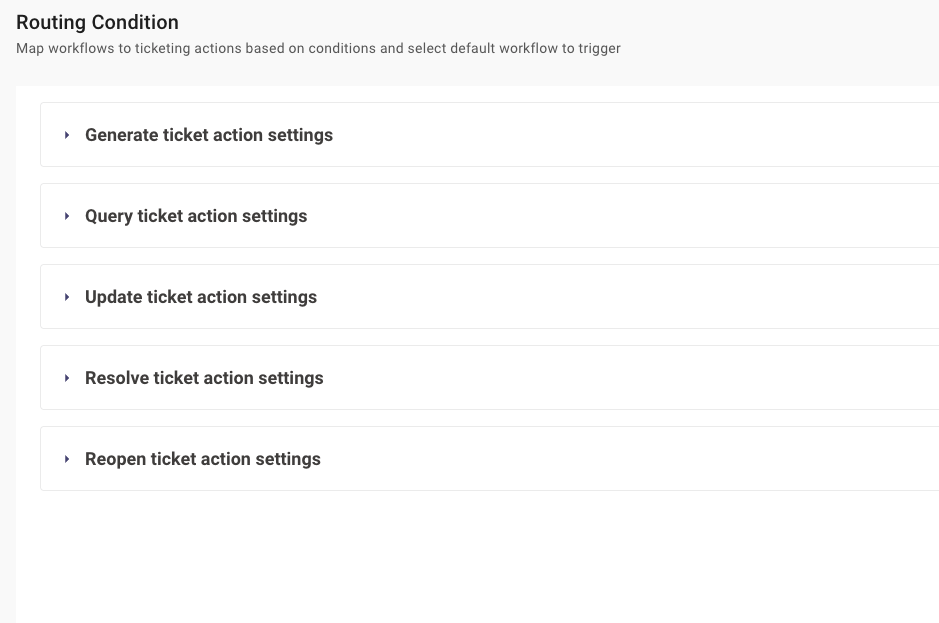
→ For each action:
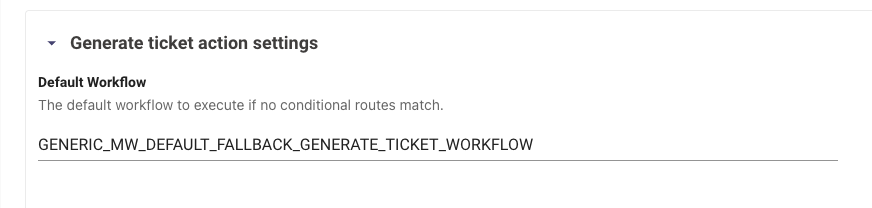
-
You must specify a Default Workflow using the Workflow Name value from Workflow Conditions.
-
You may optionally add Conditional Routes to execute a workflow under specific conditions. These are evaluated in ascending order, and the route corresponding to the first satisfied condition is taken. Use the DSL editor to define your condition(s). See the DSL Reference for more information on writing your rule(s).
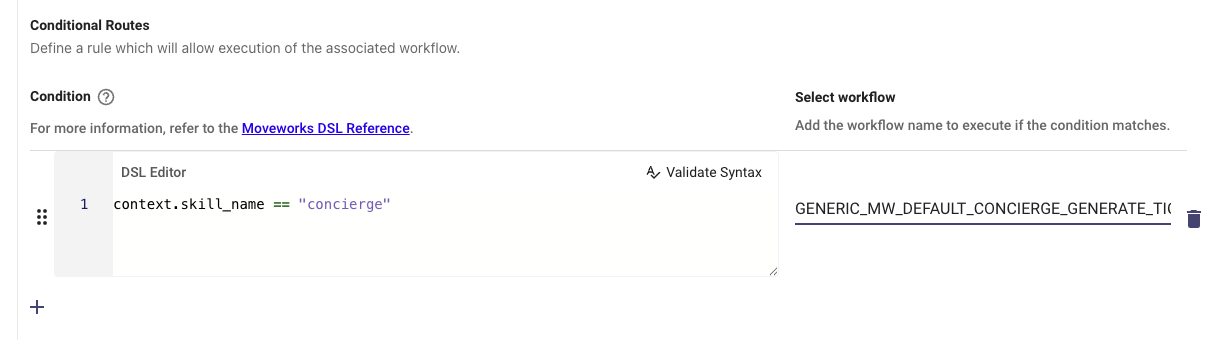
- You have access to the following fields when building your conditions:
context.system_context.domain_destination— the resolved ticket destination for the request (e.g.IT,HR). Use this field to branch on the destination configured in Moveworks Setup. Compare case-insensitively with.$LOWERCASE().context.system_context.ticket_id(not available for Generate Ticket Action)context.system_context.requestorcontext.skill_name- E.g. Account Access, Group Access, Channel Resolver, etc.
- List of available values:
- Account Access
access_account - Group Access
access_dl - Channel Resolver -
channel - Concierge -
concierge - Form -
form - Native Approvals -
native_approvals - Software Access -
access_sw - Ticket Interception -
ticket_interception - Triage -
triage - Unspecified Skill (fallback for all other skills) -
unspecified_skill
- Account Access
context.concierge_context.ticket_datacontext.triage_context.field_updatescontext.access_dl_context.approvable_entity
- You have access to the following fields when building your conditions:
-
ADDITIONAL NOTES
- Query Ticket
- This should not be modified as the built-in behavior for querying tickets will work in most cases.
- Query Ticket
Common Workflow Configurations
Configure the AI Assistant to prevent users from closing tickets.
With this configuration, when users ask the AI Assistant to resolve their ticket, the Assistant will instead leave a worknote on the ticket indicating the user said it was ok to close their ticket. The ticket state will remain unchanged and an agent will need to close out the ticket after populating any additional information and required fields.
-
In Moveworks Setup, navigate to Ticket Workflows > Routing Conditions

-
Under Resolve Ticket Action Settings, identify all of your resolve ticket workflows and note them down for the next step.
-
Navigate to Ticket Workflows > Workflow Conditions to edit the workflows notes down in the previous step.
-
For each resolve ticket workflow, edit the workflow and adjust the ticket actions under each desired condition and in the default section if desired. The ticket actions should be listed in the following order:
- Add Comment Action
- Add Work Note Action
- Raise Exception Action
- Raise Exception Action Override Mw Error Code: 5303
- Raise Exception Action Override Mw Error Message: Input an error message here
- Fetch Single Ticket Action
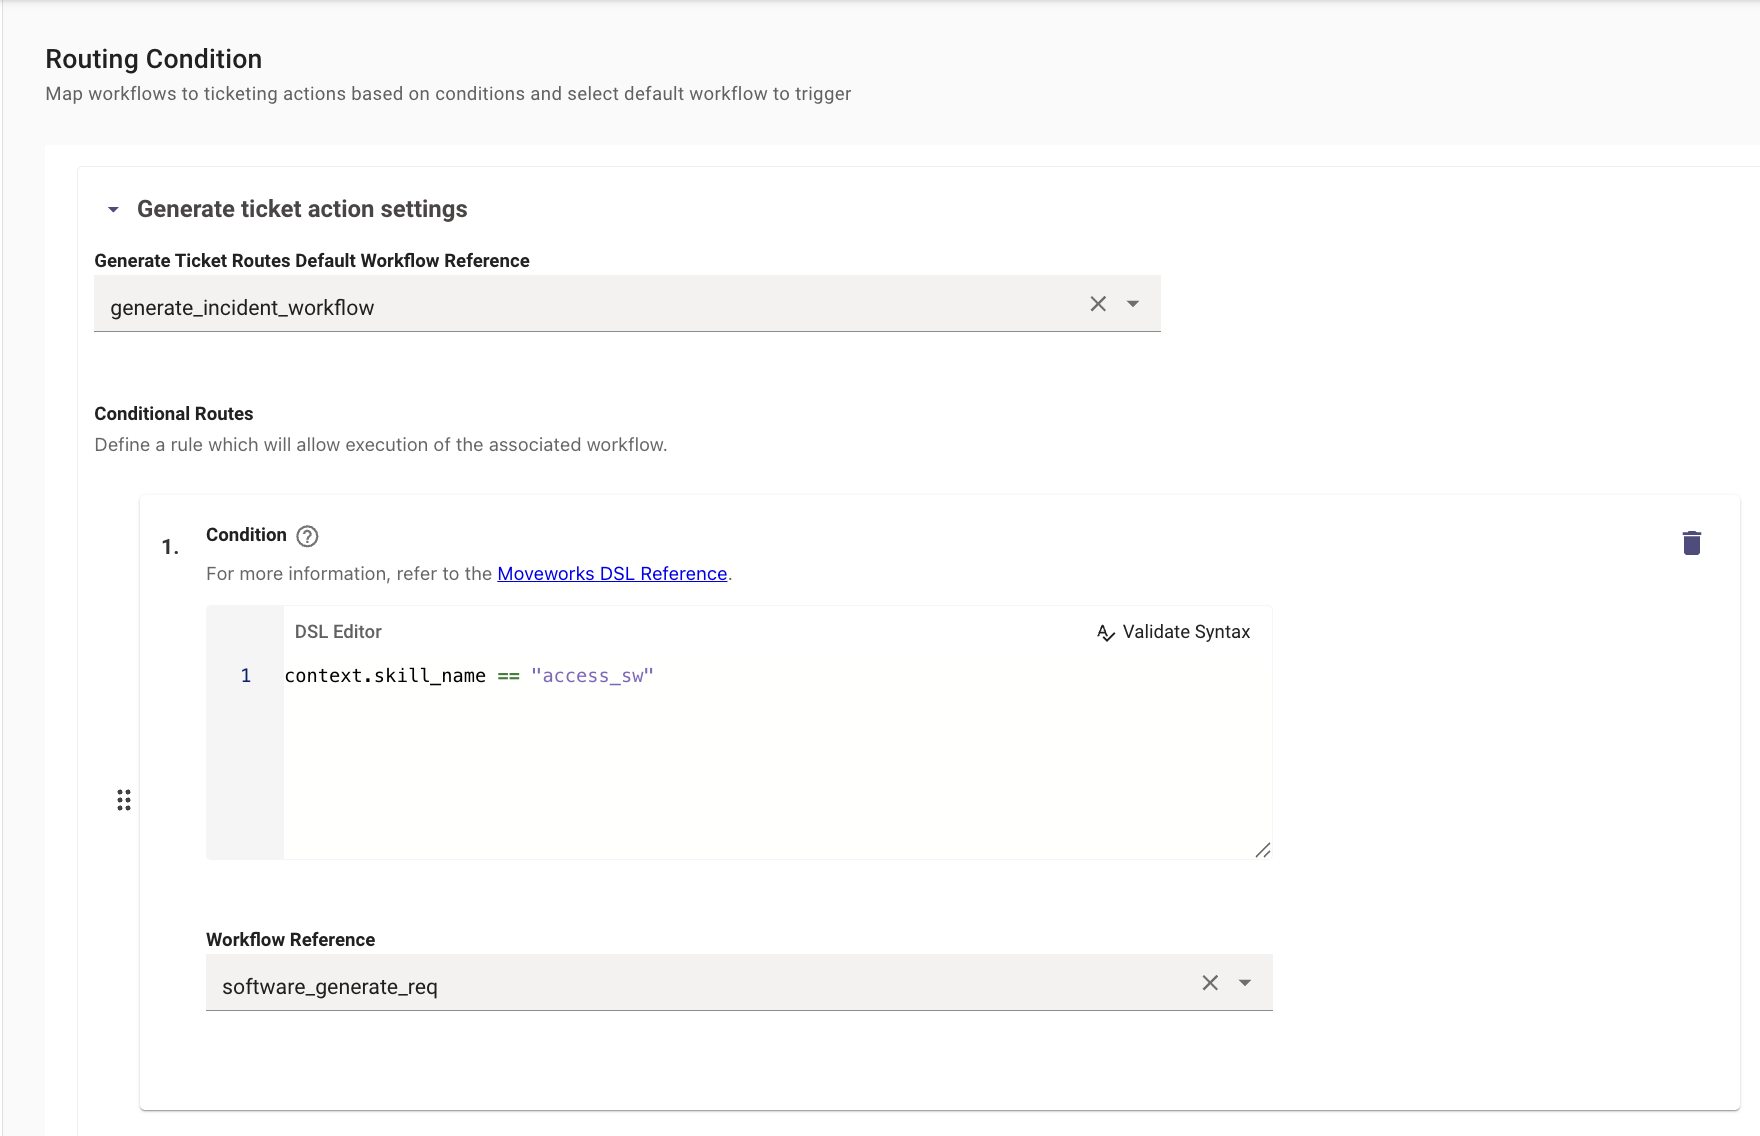
Route access software tickets to a specific assignment group.
Send tickets generated by the Software Access plugin (access_sw) to a dedicated assignment group, while all other ticketing traffic continues to use the default workflow. This is done in two steps: create a workflow whose Create Ticket Payload targets the assignment group, then add a conditional route that sends Software Access traffic to that workflow.
-
Create a workflow with the access software assignment group. In Ticketing Configuration, go to Integration → Routing and workflows and add a new workflow (for example,
software_generate_req) in the Workflows section. Set the workflow’s Create Ticket Payload to include the target assignment group. The field name depends on your ticketing system — for ServiceNow, useassignment_group:Use the external ID of the assignment group as it appears in your ticketing system (for example, the
sys_idin ServiceNow), not the display name. -
Add a conditional route for Software Access. In the same Ticketing Configuration, navigate to Generate ticket action settings → Create ticket action and add a new conditional route under Conditional Routes:
-
In the DSL Editor, enter:
This evaluates
skill_nameon the TicketGatewayContext object. When the condition istrue, Moveworks routes the ticket through the workflow you select below instead of the default. -
Set Workflow Reference to the workflow created in Step 1 (for example,
software_generate_req). -
Save the configuration.
-
-
Validate. Submit a test access software request through the Moveworks Assistant. In the workflow execution logs, confirm that
software_generate_req(rather than the default workflow) was selected, and confirm the ticket lands in the expected assignment group. If routing isn’t working, verify thatskill_namematchesaccess_swexactly (case-sensitive) and that the assignment group external ID is valid.