For AI agents: a documentation index is available at the root level at /llms.txt and /llms-full.txt. Append /llms.txt to any URL for a page-level index, or .md for the markdown version of any page.
Logo
DeveloperAcademyCommunityStatus
  • Service Management
    • Overview
    • Concierge & Ticketing Capabilities Overview
    • Forms
    • Forms - Integration Specific Guides
    • Live Agent Chat / Handoff
    • Triage
    • Approval Mirroring
    • Ticket Interception
    • Generic Ticketing Integration: Ticket Gateway
  • Administration
    • MyMoveworks
    • Organization Information
    • Roles and Permissions
    • MyMoveworks SSO
  • Moveworks Setup
    • Accessing Moveworks Setup
    • First-Time Login via Magic Link
    • Moveworks Setup Modules
    • Moveworks Setup: Module How To Guides
    • Plugin Management
    • Monitor Alerts
    • Audit Logs
    • DSL Fields Defaults
    • Data Crawling View
    • API Playground
    • Setup Homepage
    • Troubleshooting Hub
    • Security and Privacy Settings
    • Configuration Delete
    • Advanced Config Editor
    • Identity configuration
    • Onboarding Stage
  • Security
    • Security
    • Hyperlink & Button Expiry
    • Attachment Handling
    • Moveworks Subprocessors
  • Provision Management
    • Overview
    • Access Software
    • Access Groups
    • Access Account
  • Access Requirements
    • Overview
    • Update Set Modules
    • Ticketing Systems & ITSMs Access
    • Identity and Access Management Systems Access
    • Multi-Factor Authentication (MFA) Systems Access
    • Knowledge Access Requirements
    • Email Distribution List Systems Access
    • Facilities Management Access
    • Live Agent Chat Access
    • HR Information System Access
    • Expense Management Access
      • Coupa Approvals Access Requirements
    • Calendar Management Access
  • Core Platform
    • User Identity
    • Moveworks On-Prem Agent
    • Approvals Engine
    • Entity Catalog
    • Configuration Languages
    • Moveworks Data Objects
    • SIEM
  • Employee Experience Insights
    • Overview
    • Breaking Down the Dashboard
    • Understanding Industry Benchmarks
    • Apps & Services
    • Impact Module
    • EXI Common Use Cases
    • Configure EXI
    • Ticket Backpolling
  • Knowledge Studio
    • Overview
    • Knowledge Studio Configuration
    • AI Powered Recommendations
    • Inspecting & Verifying Sources
    • Publishing Articles
    • Creating Knowledge Articles
    • Resolving IT Tickets Guidance
DeveloperAcademyCommunityStatus
On this page
  • Access Setup Overview
  • Access Setup Walkthrough
  • How to create a new service account
  • How to create a new Oauth2 client
Access RequirementsExpense Management Access

Coupa Approvals Access Requirements

||View as Markdown|
Was this page helpful?
Edit this page
Previous

Calendar Management Access

Next
Built with

Moveworks fetches all the approvals request created in your Coupa instance by reading the request and sending notifications to the appropriate approvers. This enables us to help approvers approve or deny purchase request through the bot. In order to do so we require access to your Coupa instance.

Access Setup Overview

Once you have completed the access setup, share these details with your Moveworks Customer Success team in an encrypted email:

  • Service account email
  • Service account password
  • Oauth2 client_id
  • Oauth2 client_secret
  • Scopes
  • Instance url

Access Setup Walkthrough

A service account for Moveworks in your instance is required as well as Oauth2 client setup so our system is able to authenticate with your Coupa instance.

How to create a new service account

  1. You can create a new user by navigating to Setup → Users → Create.

  2. Click on the check mark next to User under Roles. The User role is required to fetch all purchase requisitions and approve/deny it.

How to create a new Oauth2 client

  1. Oauth2 client are use to get access tokens, which we use to authorize with the APIs. To create a new Oauth2 client navigate to Setup → Integration → Oauth2/Open ID clients → Create a new client.

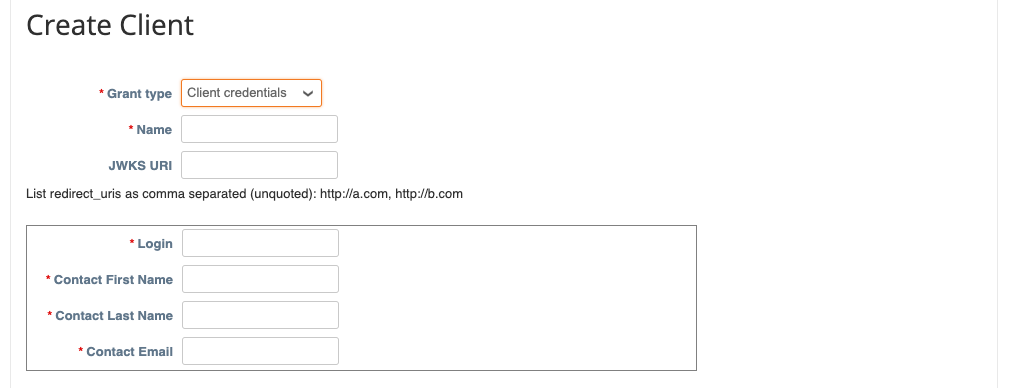
  2. Under Create Client, change the Grant type to be Client credentials.

  3. Fill in the the Login, Contact First Name, Contact Last Name, Contact Email details using the details of the service account which was created in the first step.

  4. Once we have these details we also need to provide the scopes to this client. These are the below scopes required:

    • core.approval.read
    • core.approval.write
    • core.requisition.read
    • core.user.read
    • core.user_group.read