Lab #2: User Identity & Service Account Setup
Lab #2: User Identity & Service Account Setup
Overview
- Learning Objectives: Learn how to leverage connected systems to build a Moveworks User Roster. Understand how to configure the account representing the Moveworks AI Assistant, and give end-users access to Moveworks.
- Estimated Time: 45 minutes active | Up to 4 hours total (user ingestion runs after configuration)
- Prerequisites:
- Lab 1 complete (snow connector configured and tested)
- The
sys_idof the ServiceNow admin account (copied during Lab 0, Step 1.3)
Key Concepts
The User Roster is the “brain” of Moveworks identity, determining who can interact with the Moveworks AI Assistant and what data belongs to them. Key components include:
- Source Connectors: The primary systems (usually an ITSM or IDAM) from which Moveworks pulls raw employee data to build the user roster.
- Filters: API query strings that narrow the records pulled from a source (e.g., only active users).
- Processors: Automated functions that clean or “resolve” data during ingestion, such as transforming a manager’s
sys_idinto a clickable name or calculating local time zones. - Source Mapping (DSL Editor): A per-attribute editor where you define exactly which source field maps to each Moveworks profile attribute, with the ability to test the mapping against a real user before saving.
- Joining Keys: The unique identifier used to match a user across sources (e.g., email address).
- Bot Access Rule: A global logic gate (often set to
TRUEor controlled via DSL) that determines if a user is permitted to interact with the AI Assistant.
Relevant Documentation:
- Moveworks Help: User Identity Overview
- Moveworks Help: Configuring User Ingestion
- Moveworks Help: Configuring the Service Account
- Moveworks Help: User Data Object
🛠️ 1: Walkthrough
1.1: Configure User Identity
The Identity Configuration is a 5-step wizard: Select sources → Configure source mapping → Override field mapping → Set Joining Keys → Test with user.
Step 1: Select Sources
-
In Moveworks Setup, enter
identityinto the search bar and navigate toUser Identity > Identity Configuration. Selectsnowas your primary source connector.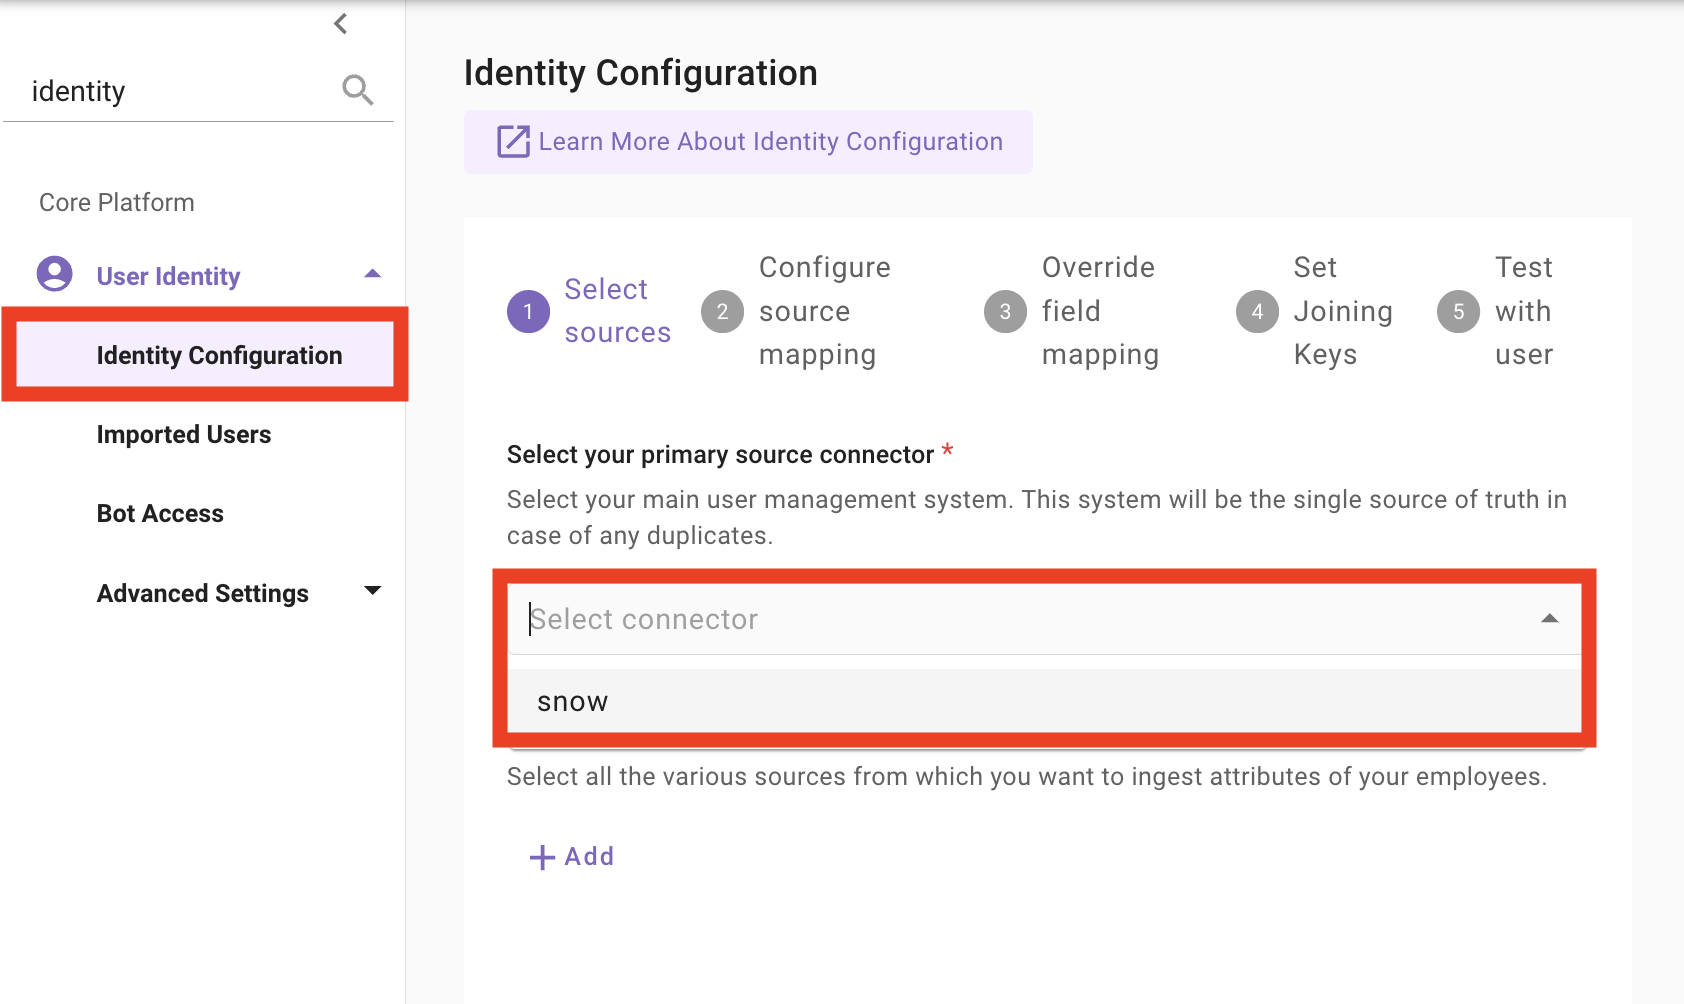
-
Click
Testto confirm the connector is reachable.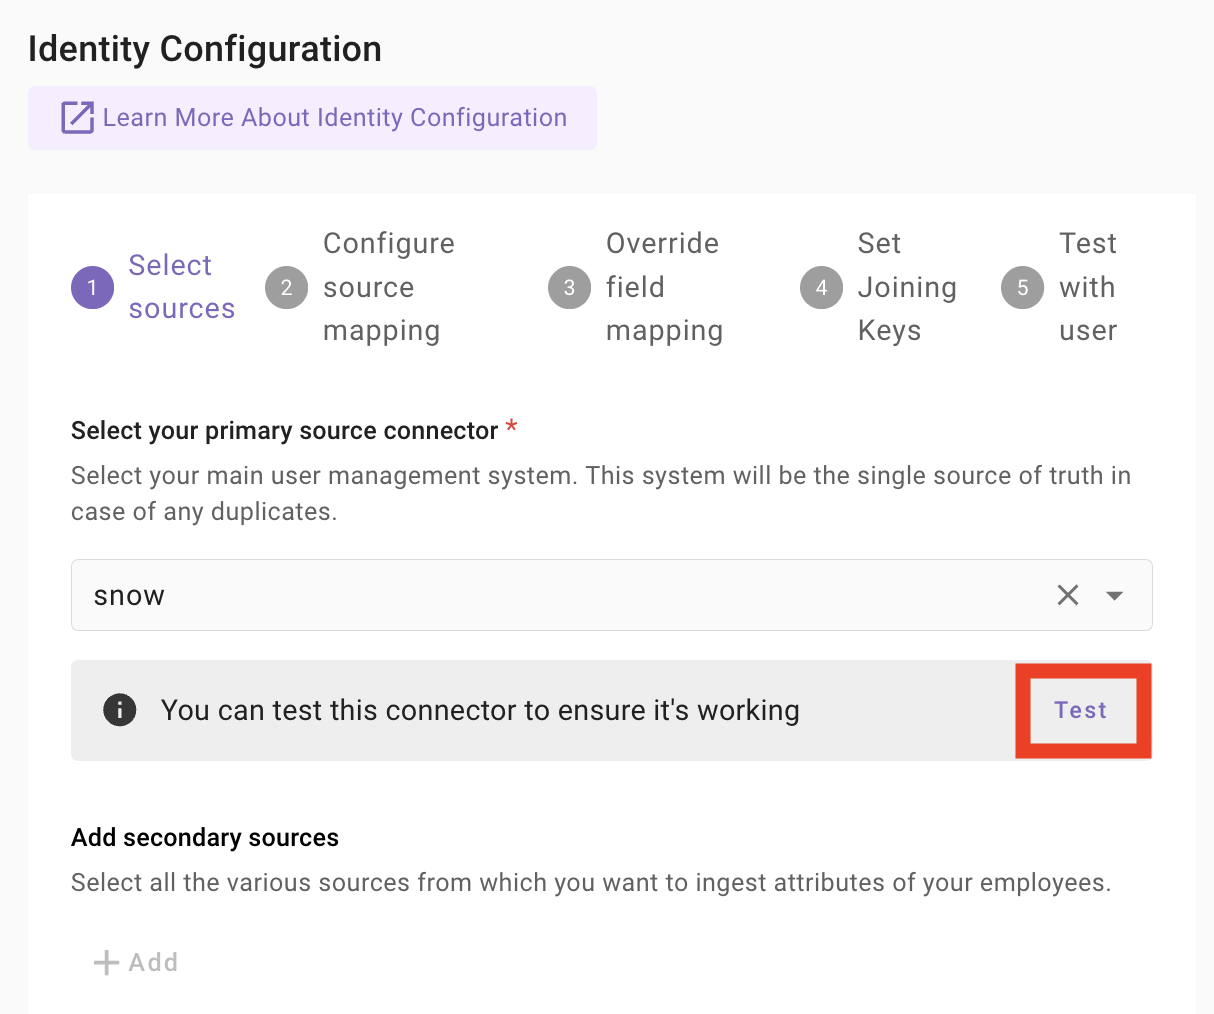
-
After you see
Connector tested successfully, clickNext: Configure Source Mappingat the bottom right.Secondary sources (for example, an HRIS or IDP) can be added under Add secondary sources. For this lab we are using
snowas the single source of truth, so leave this empty.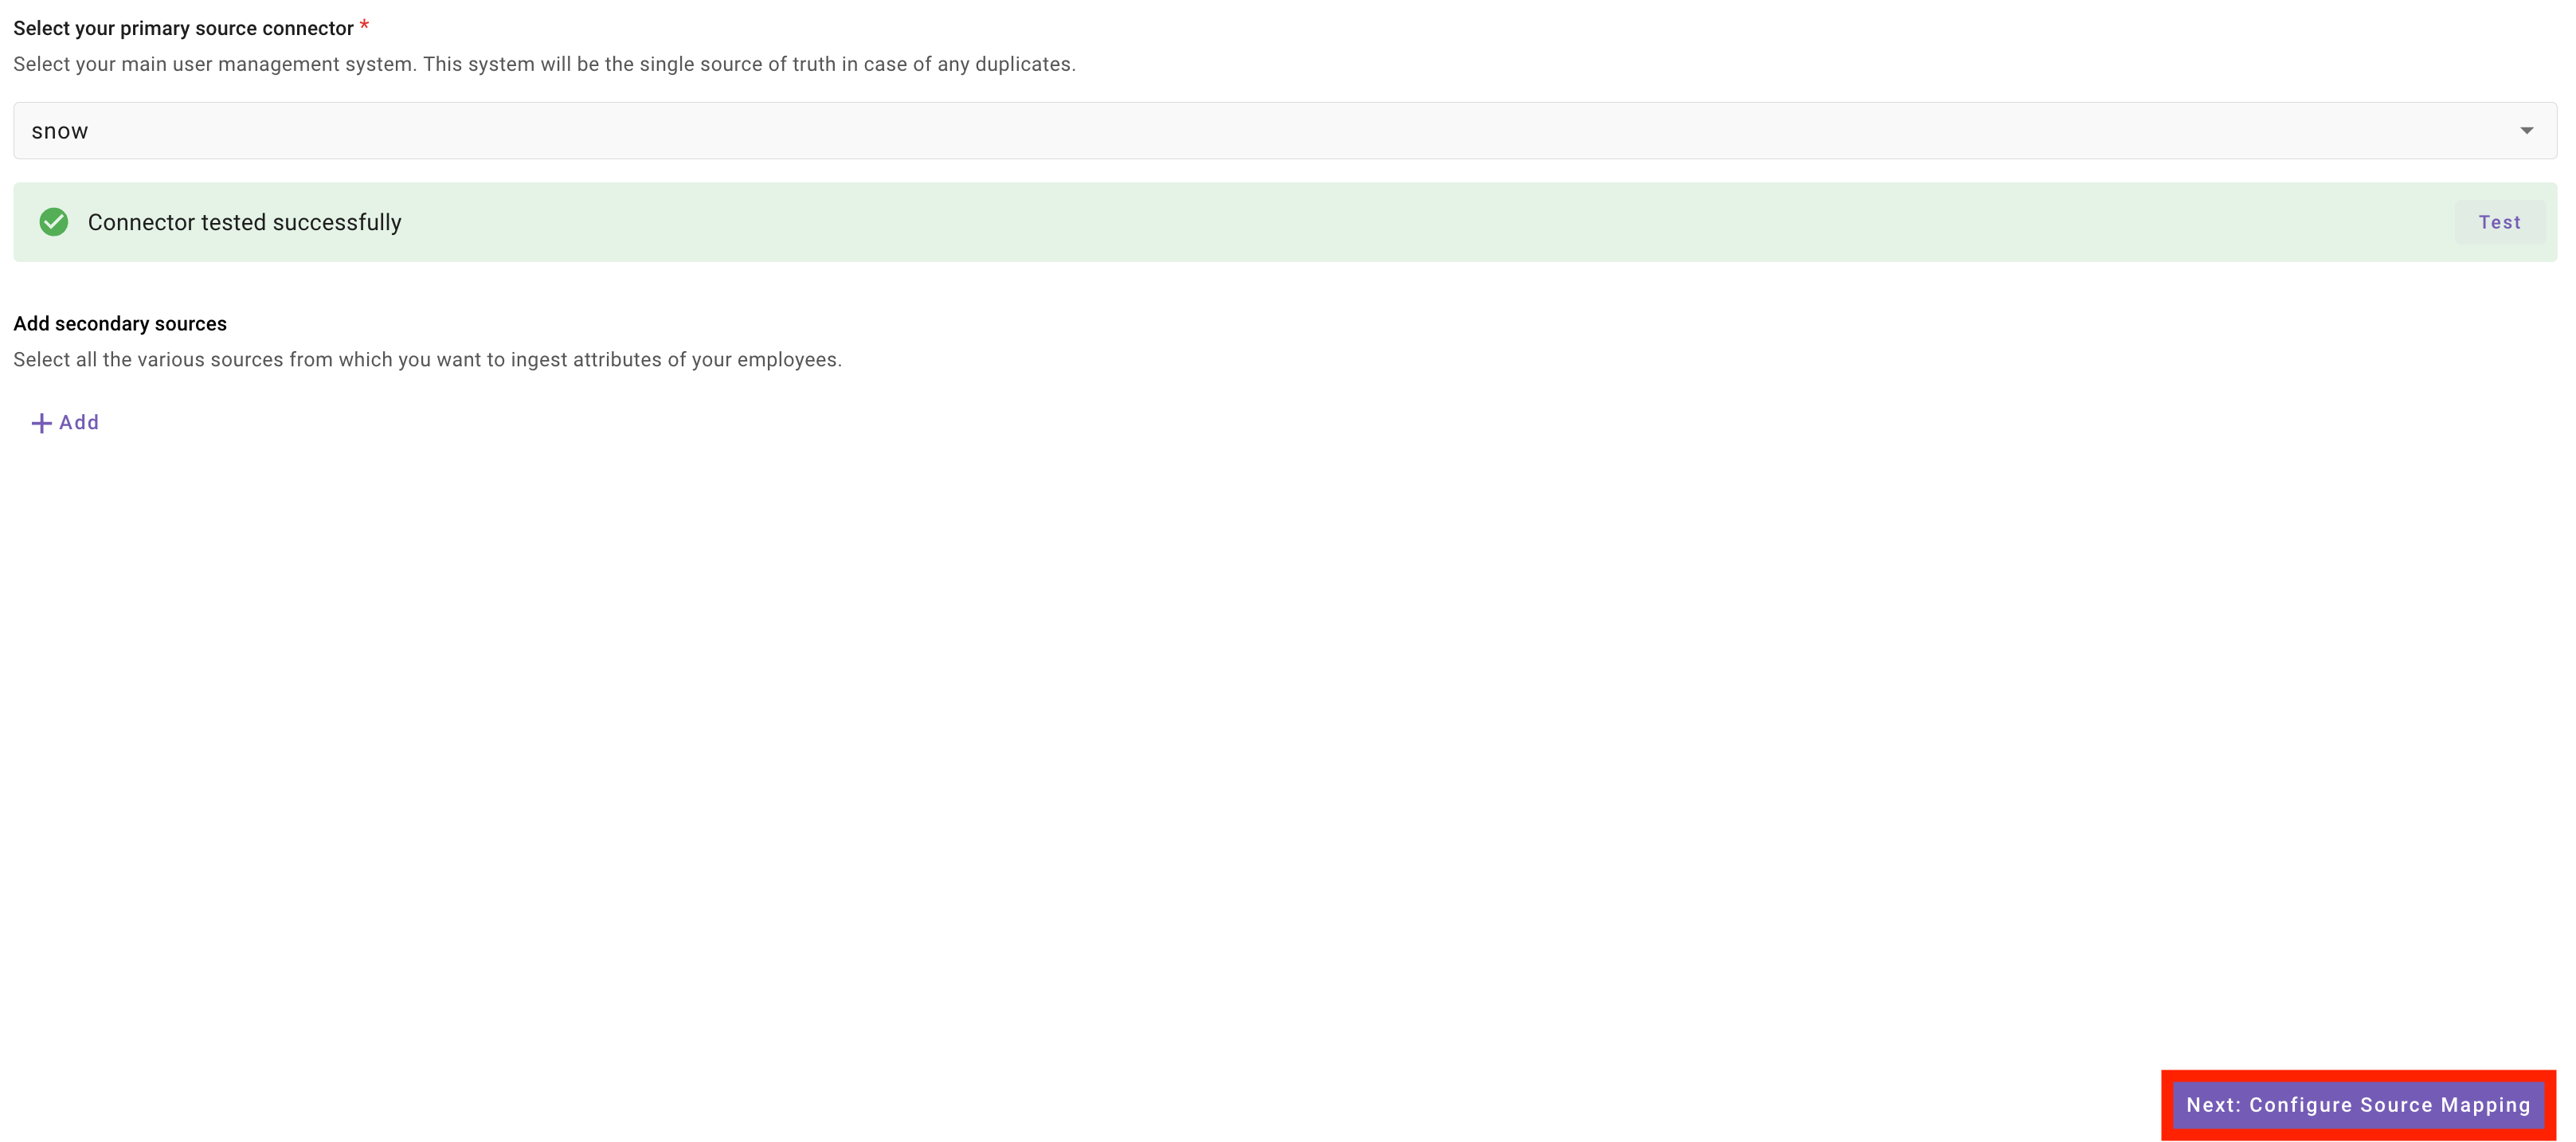
Step 2: Configure Source Mapping
-
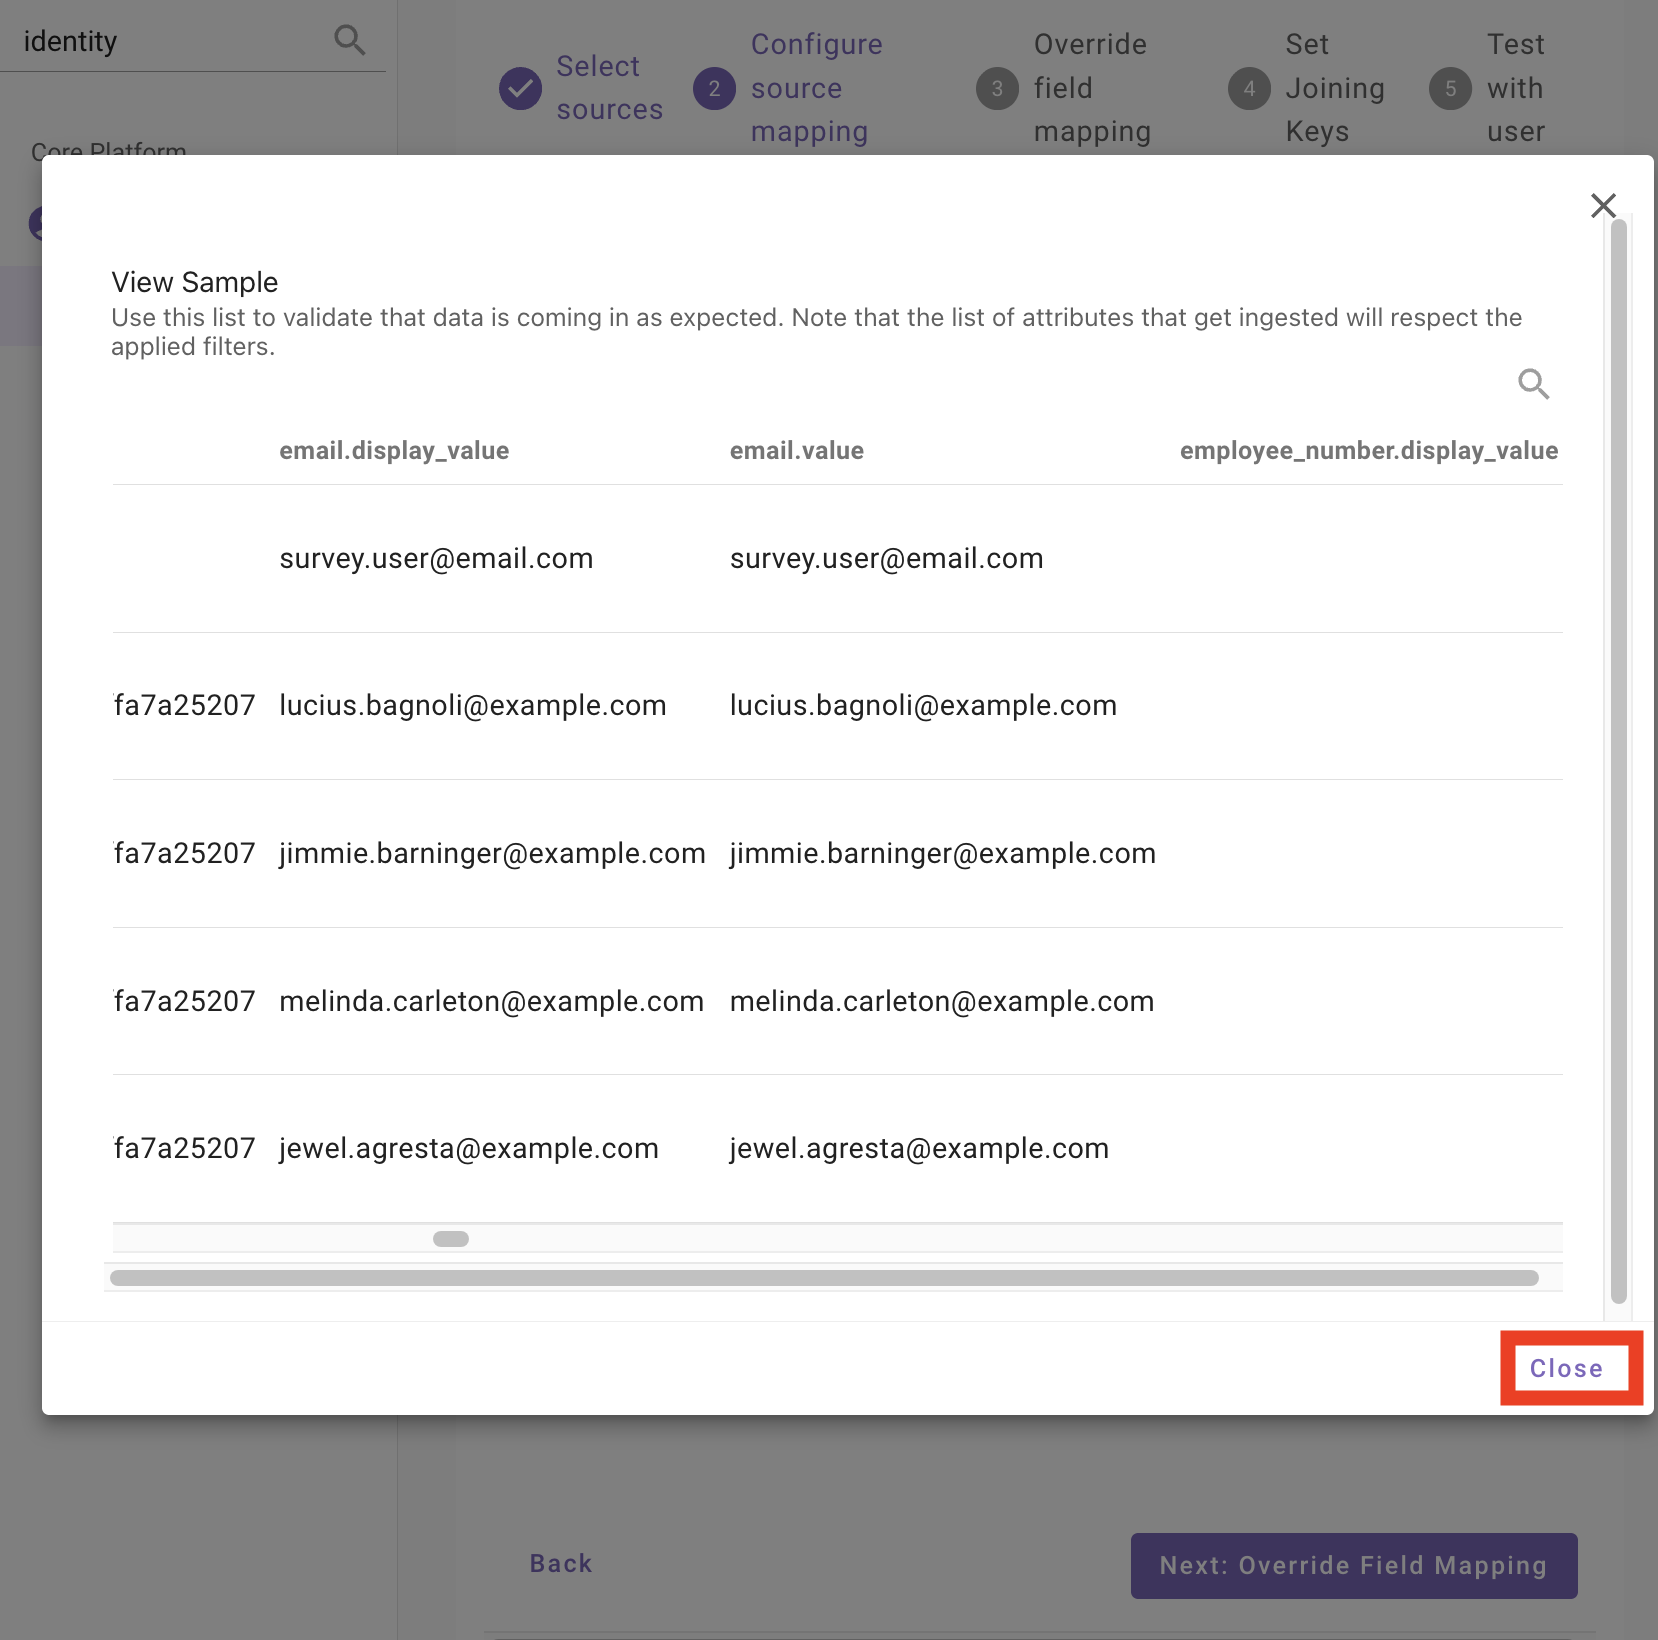
On the Configure source mapping step, locate your
snowsource row and click the person icon to the right.
The person icon opens a View Sample dialog that shows real users returned by the source system. Use it to confirm your connector is reaching ServiceNow and pulling records before you continue configuring the mapping.
If users are not returned, go back to your connector and verify that your credentials were entered properly.
-
Close the sample dialog, then click the filter icon next to your
snowsource to open the Edit: snow dialog.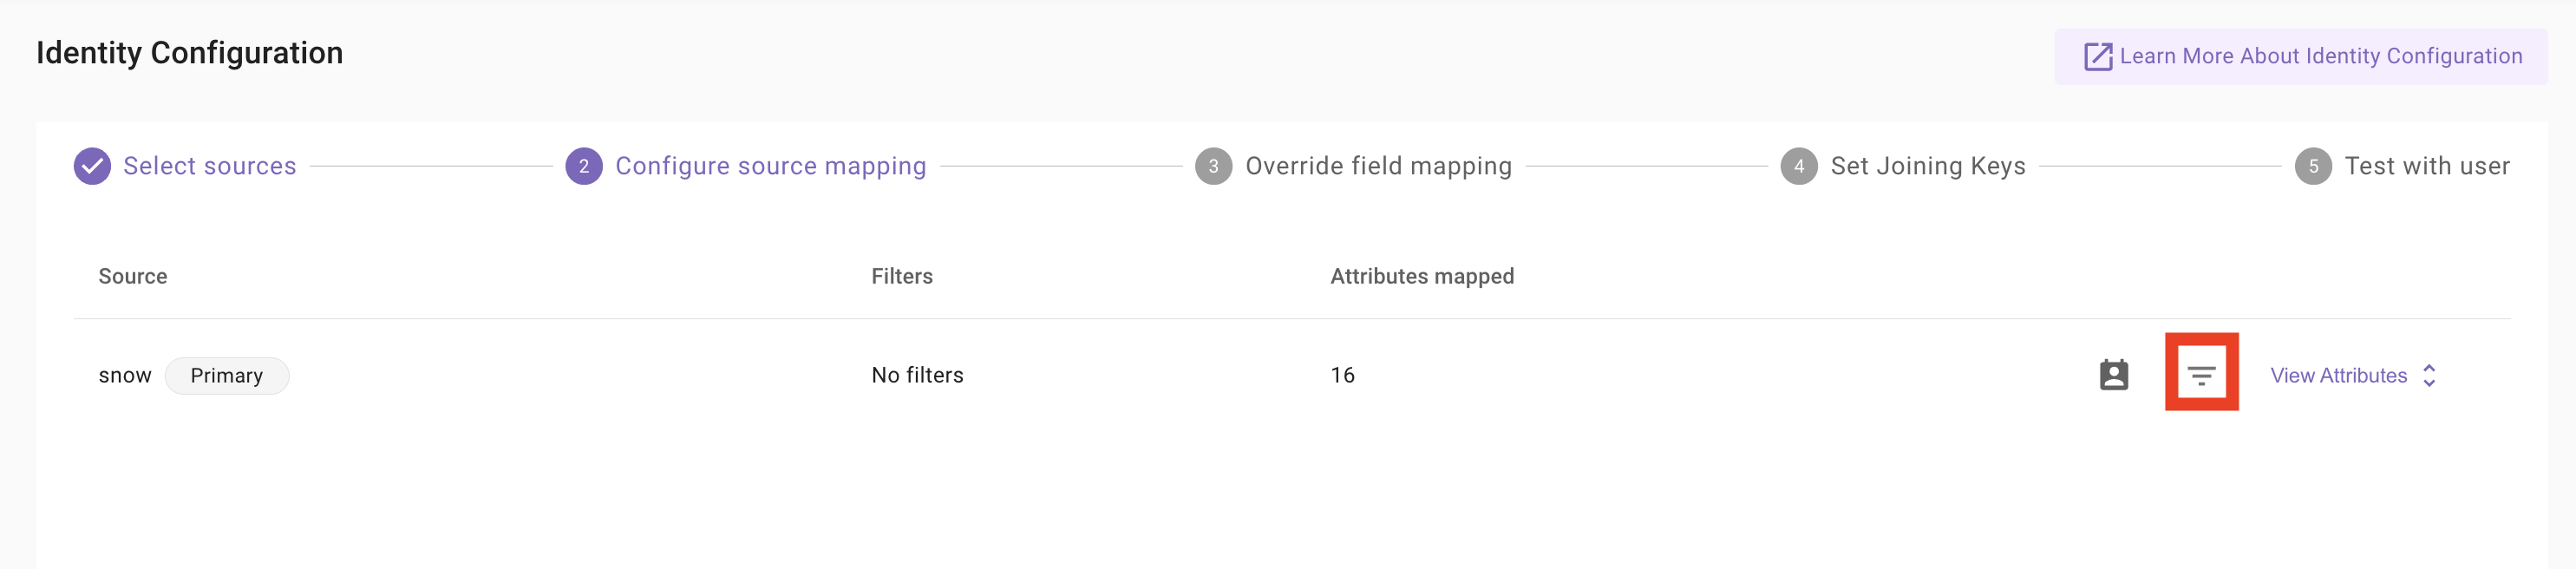
-
On the Filters tab, click
Add+and set the API Query String toactive=true. This ensures Moveworks only ingests active ServiceNow users.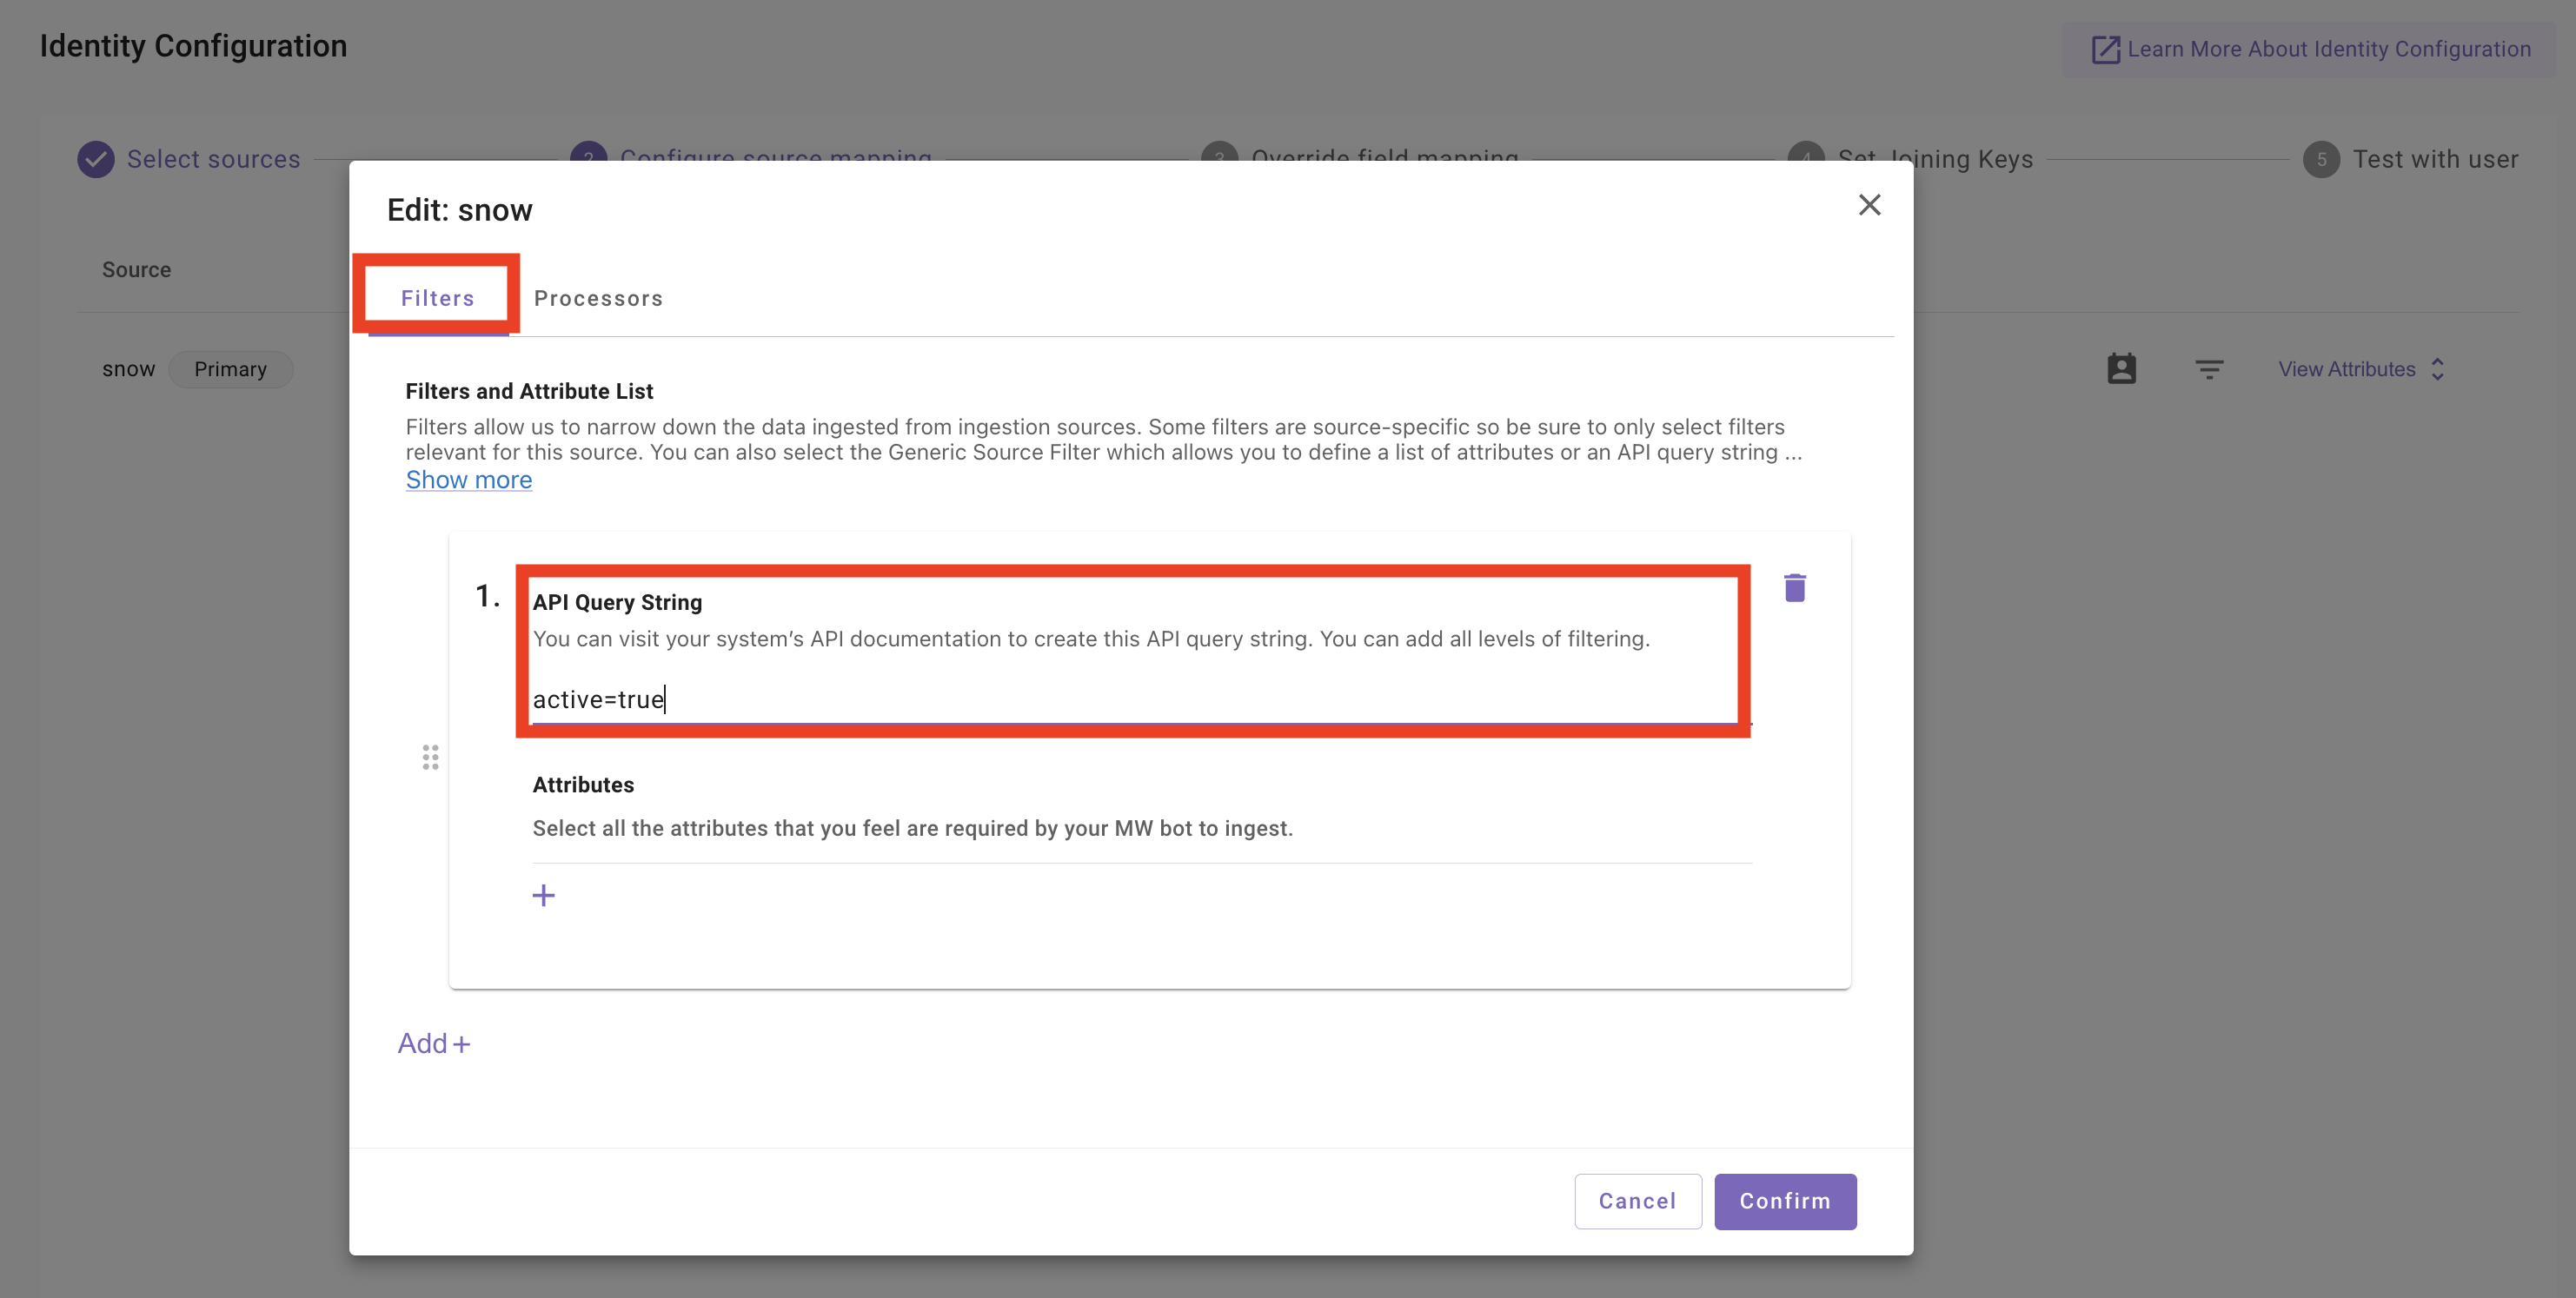
-
Switch to the Processors tab, click
Add+, selectUser Timezone Processor, and tickEnable processor.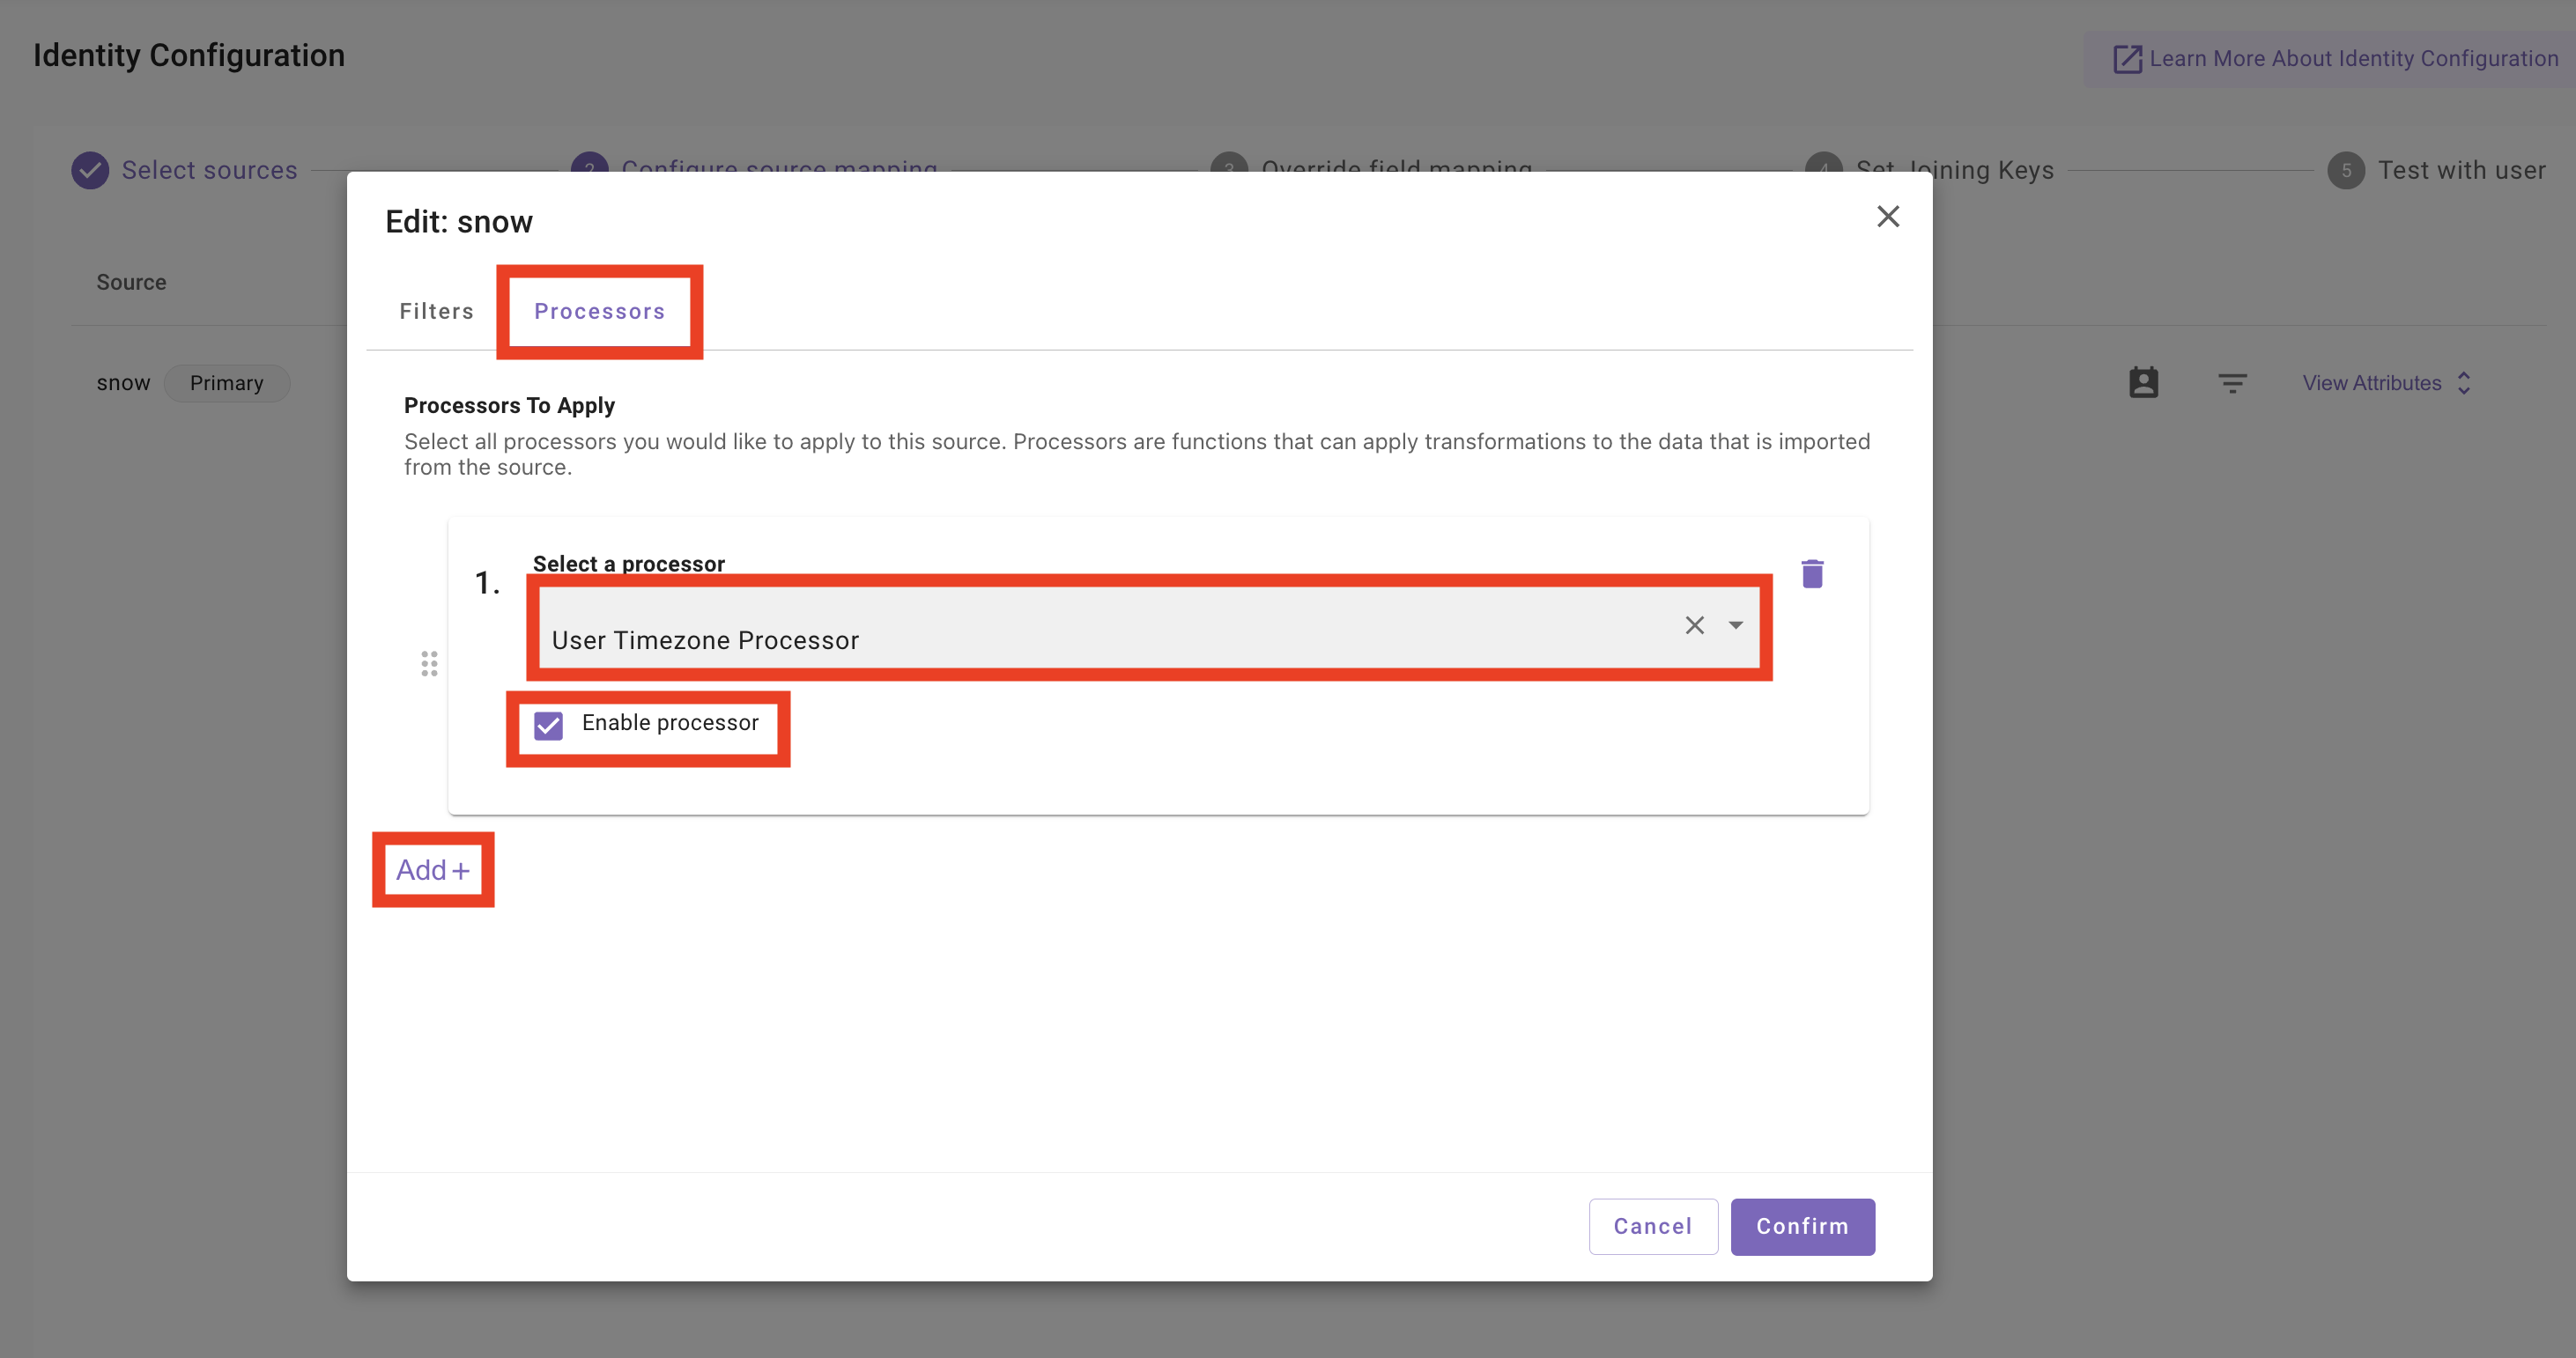
-
Click
Add+again to add a second processor. SelectUnified Resolve Manager Processorand tickEnable processor. This processor resolves each user’s manager reference into a usable Moveworks profile attribute.You can add more processors here (for example, Password Expiry) using Add+ if your environment requires them. For this lab, the User Timezone and Unified Resolve Manager processors are enough to demonstrate the pattern.
-
With both processors configured, click
Confirmto save your changes and close the Edit: snow dialog.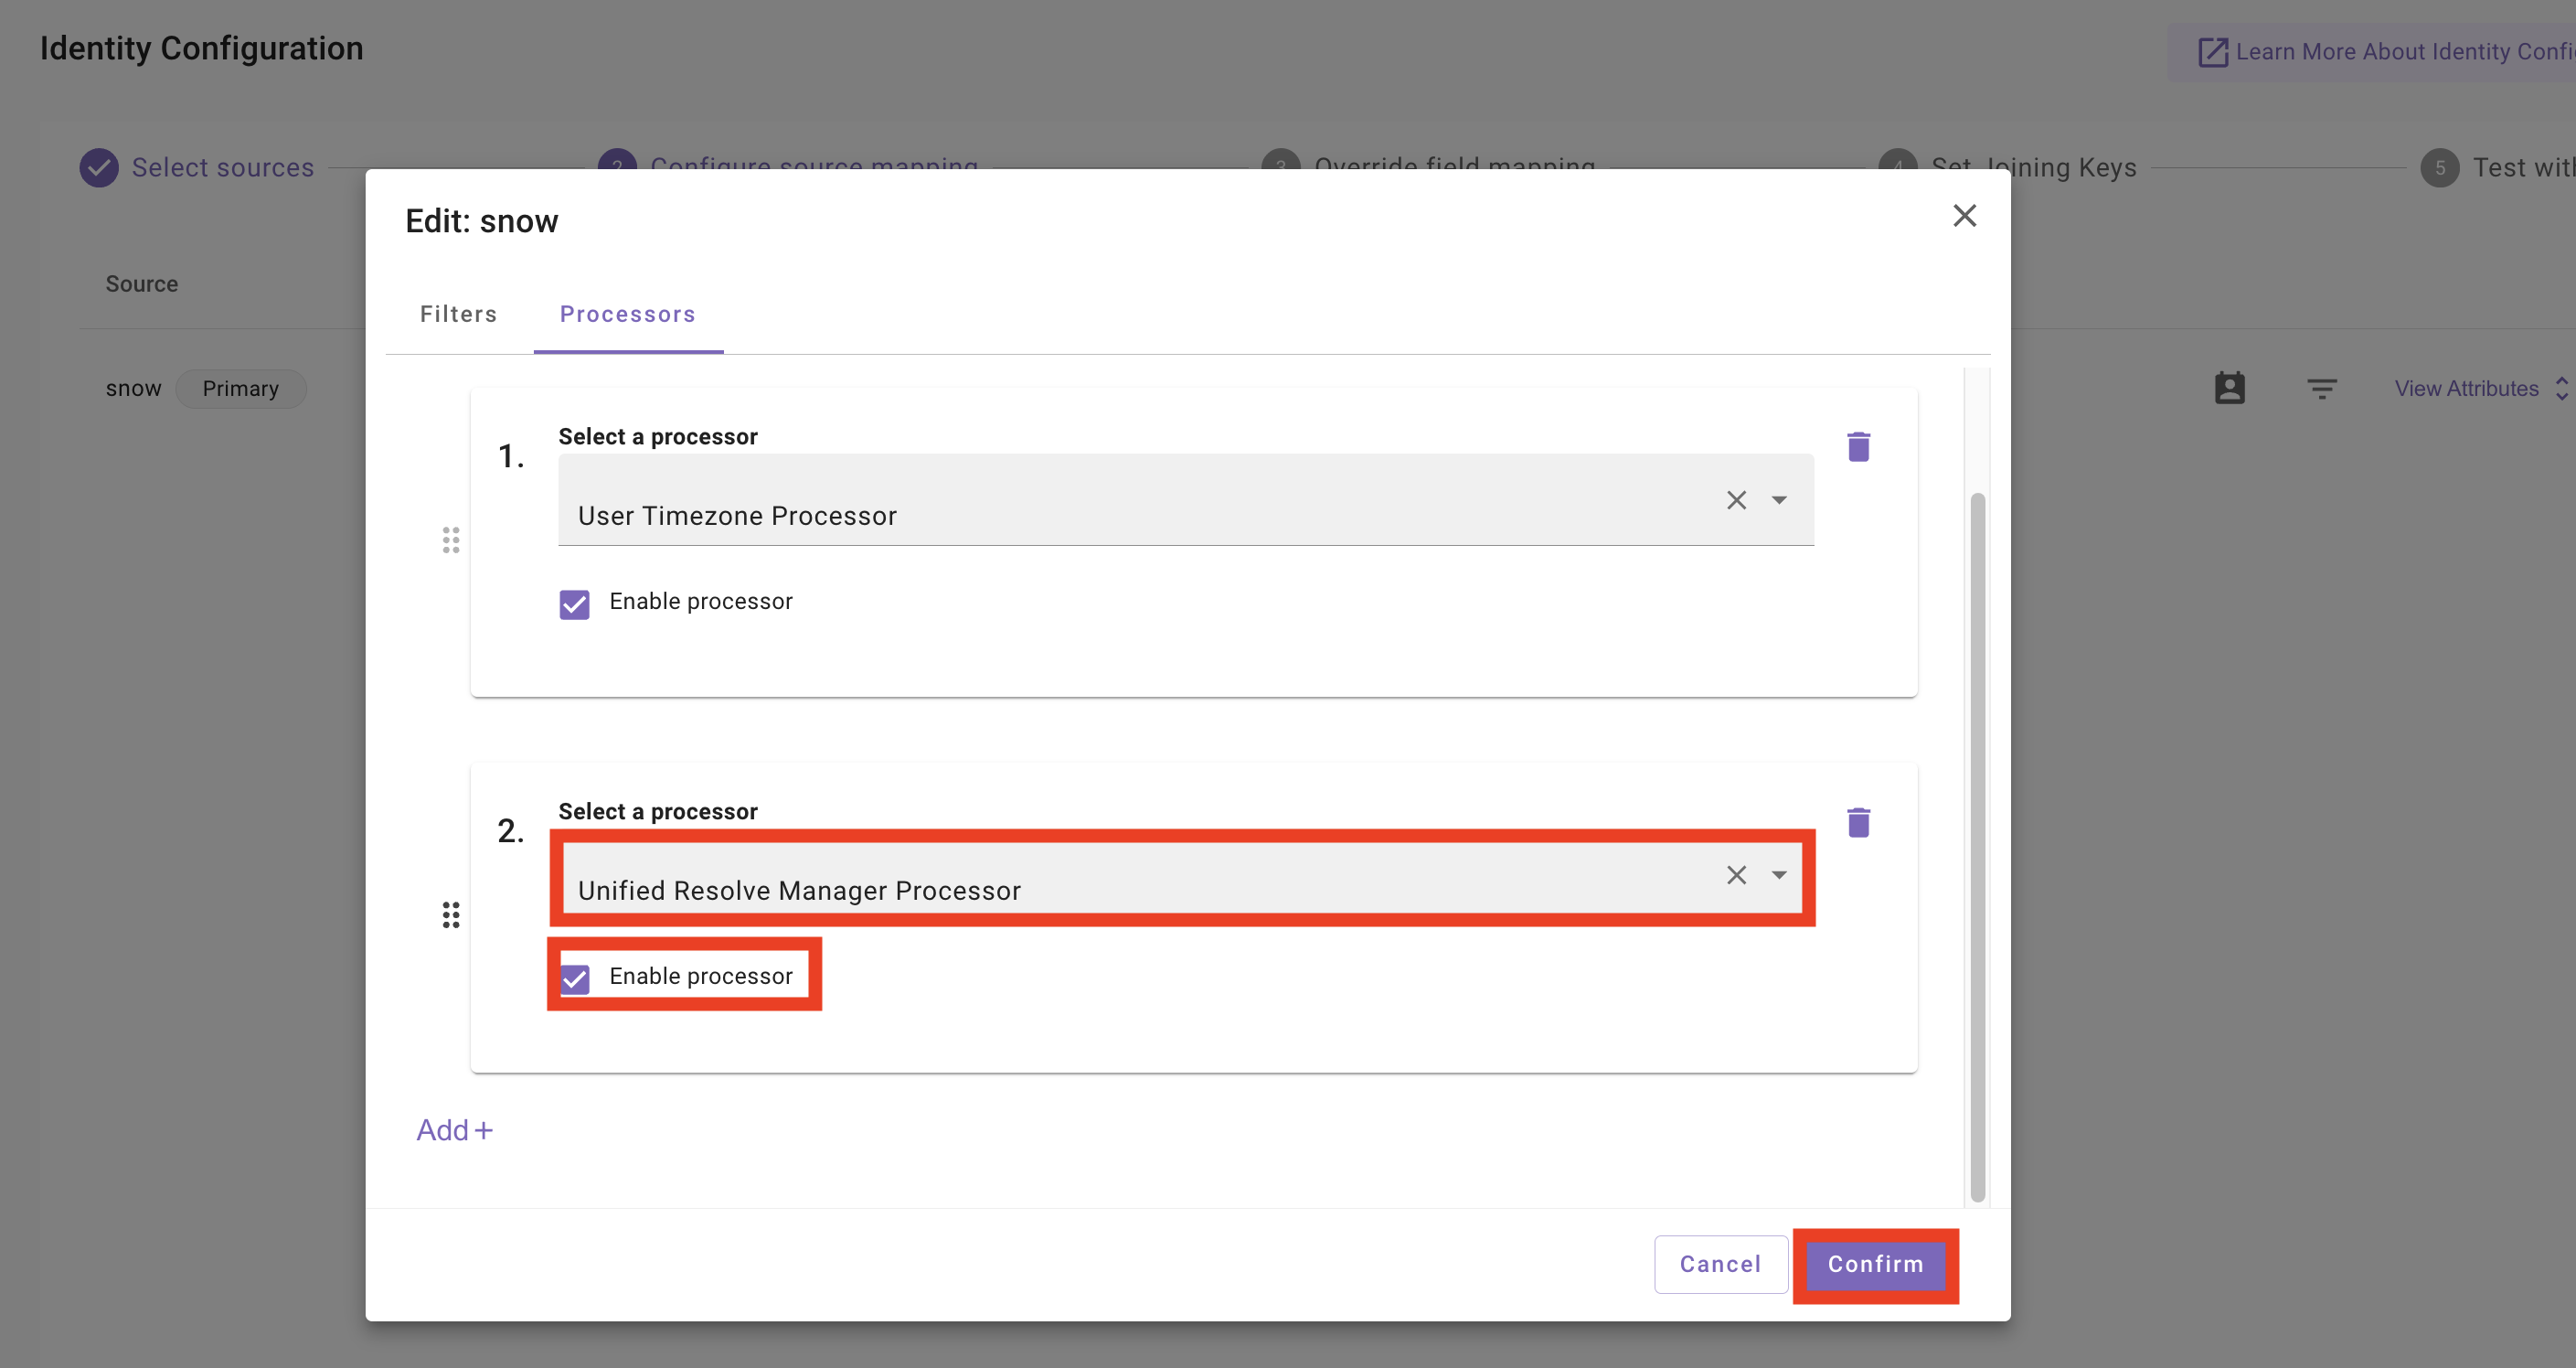
-
After clicking
Confirm, the dialog closes and you return to the source list. ClickView Attributeson thesnowrow.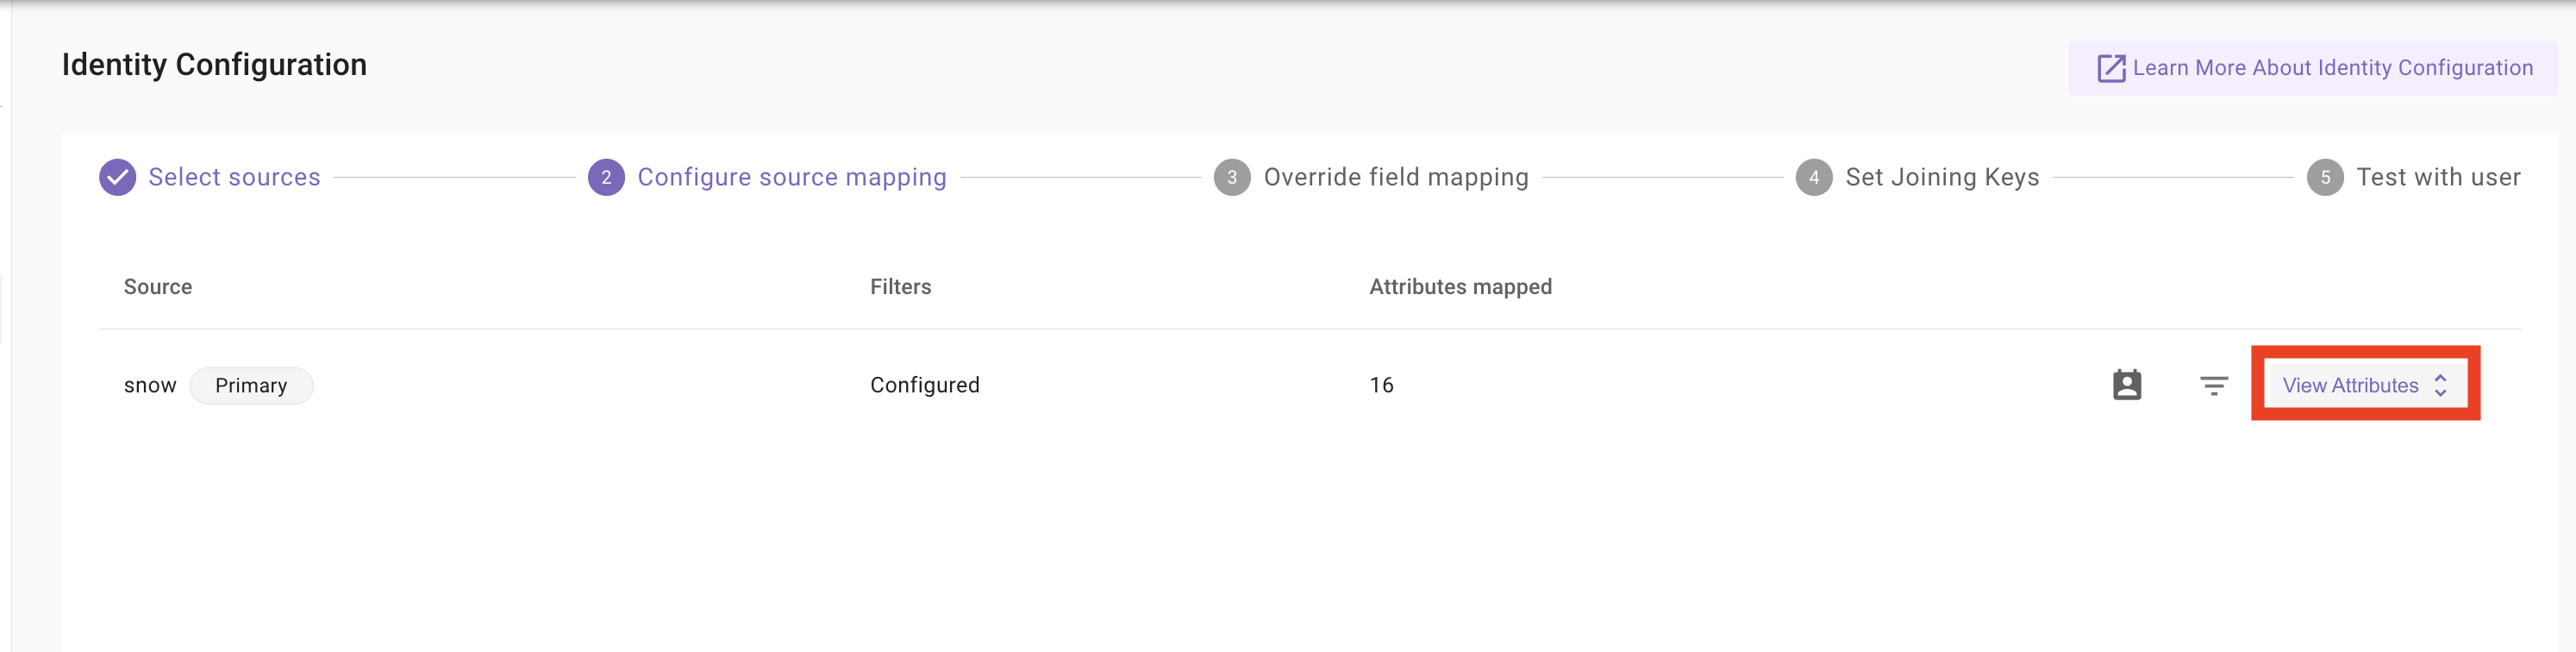
-
The row expands into the per-field mapping list, with sensible defaults for each attribute (for example,
departmentmaps fromdepartment.display_value). To inspect or override a mapping, click the pencil icon next to any attribute — we’ll usedepartmentas the worked example.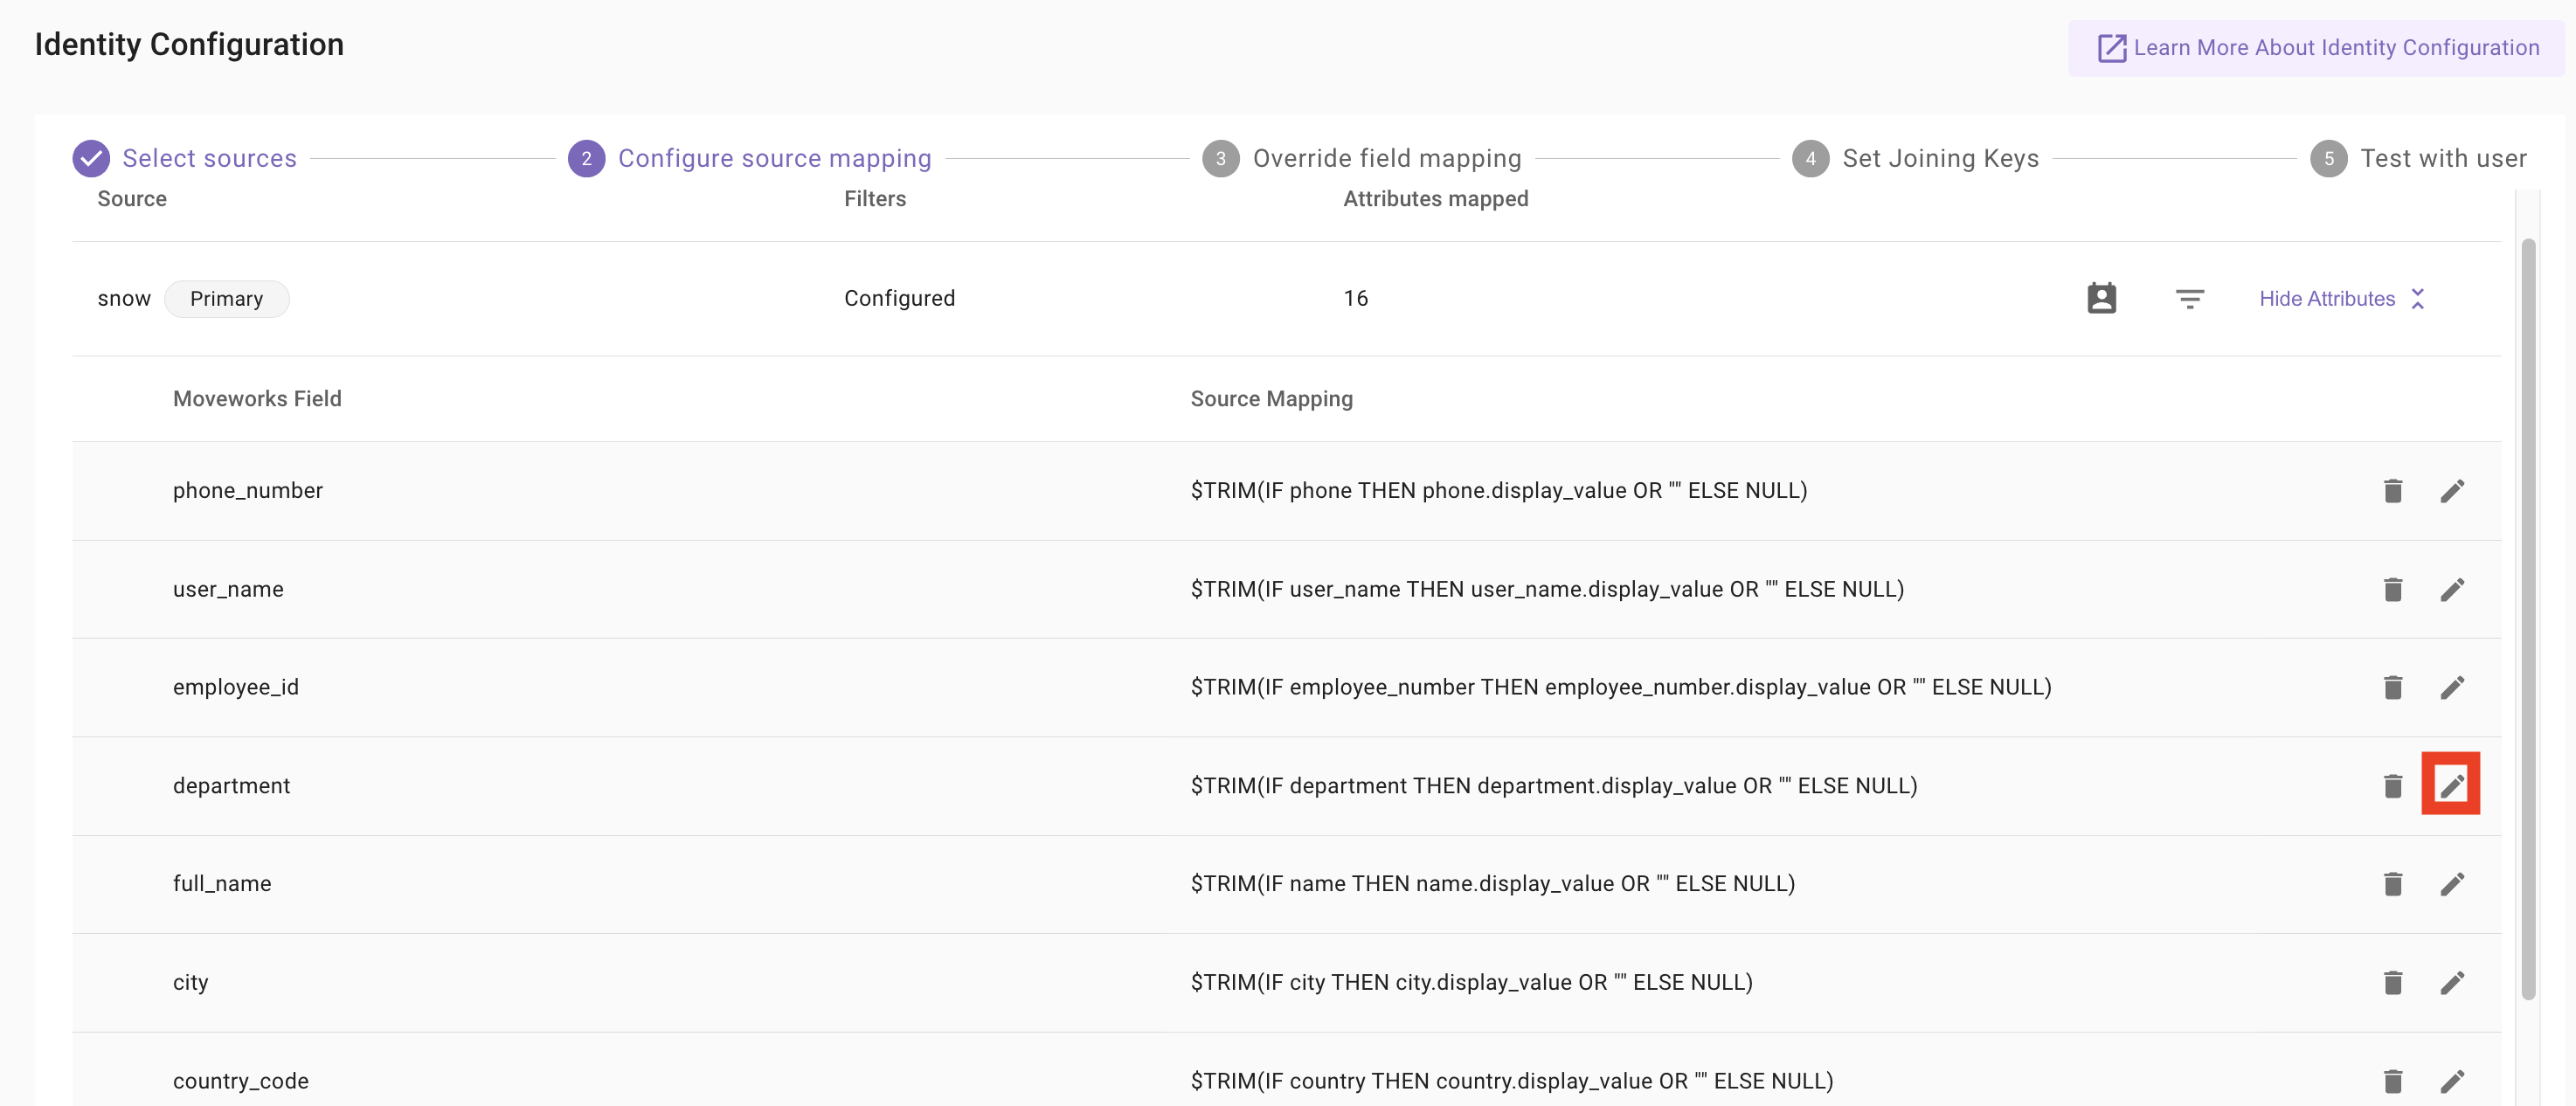
-
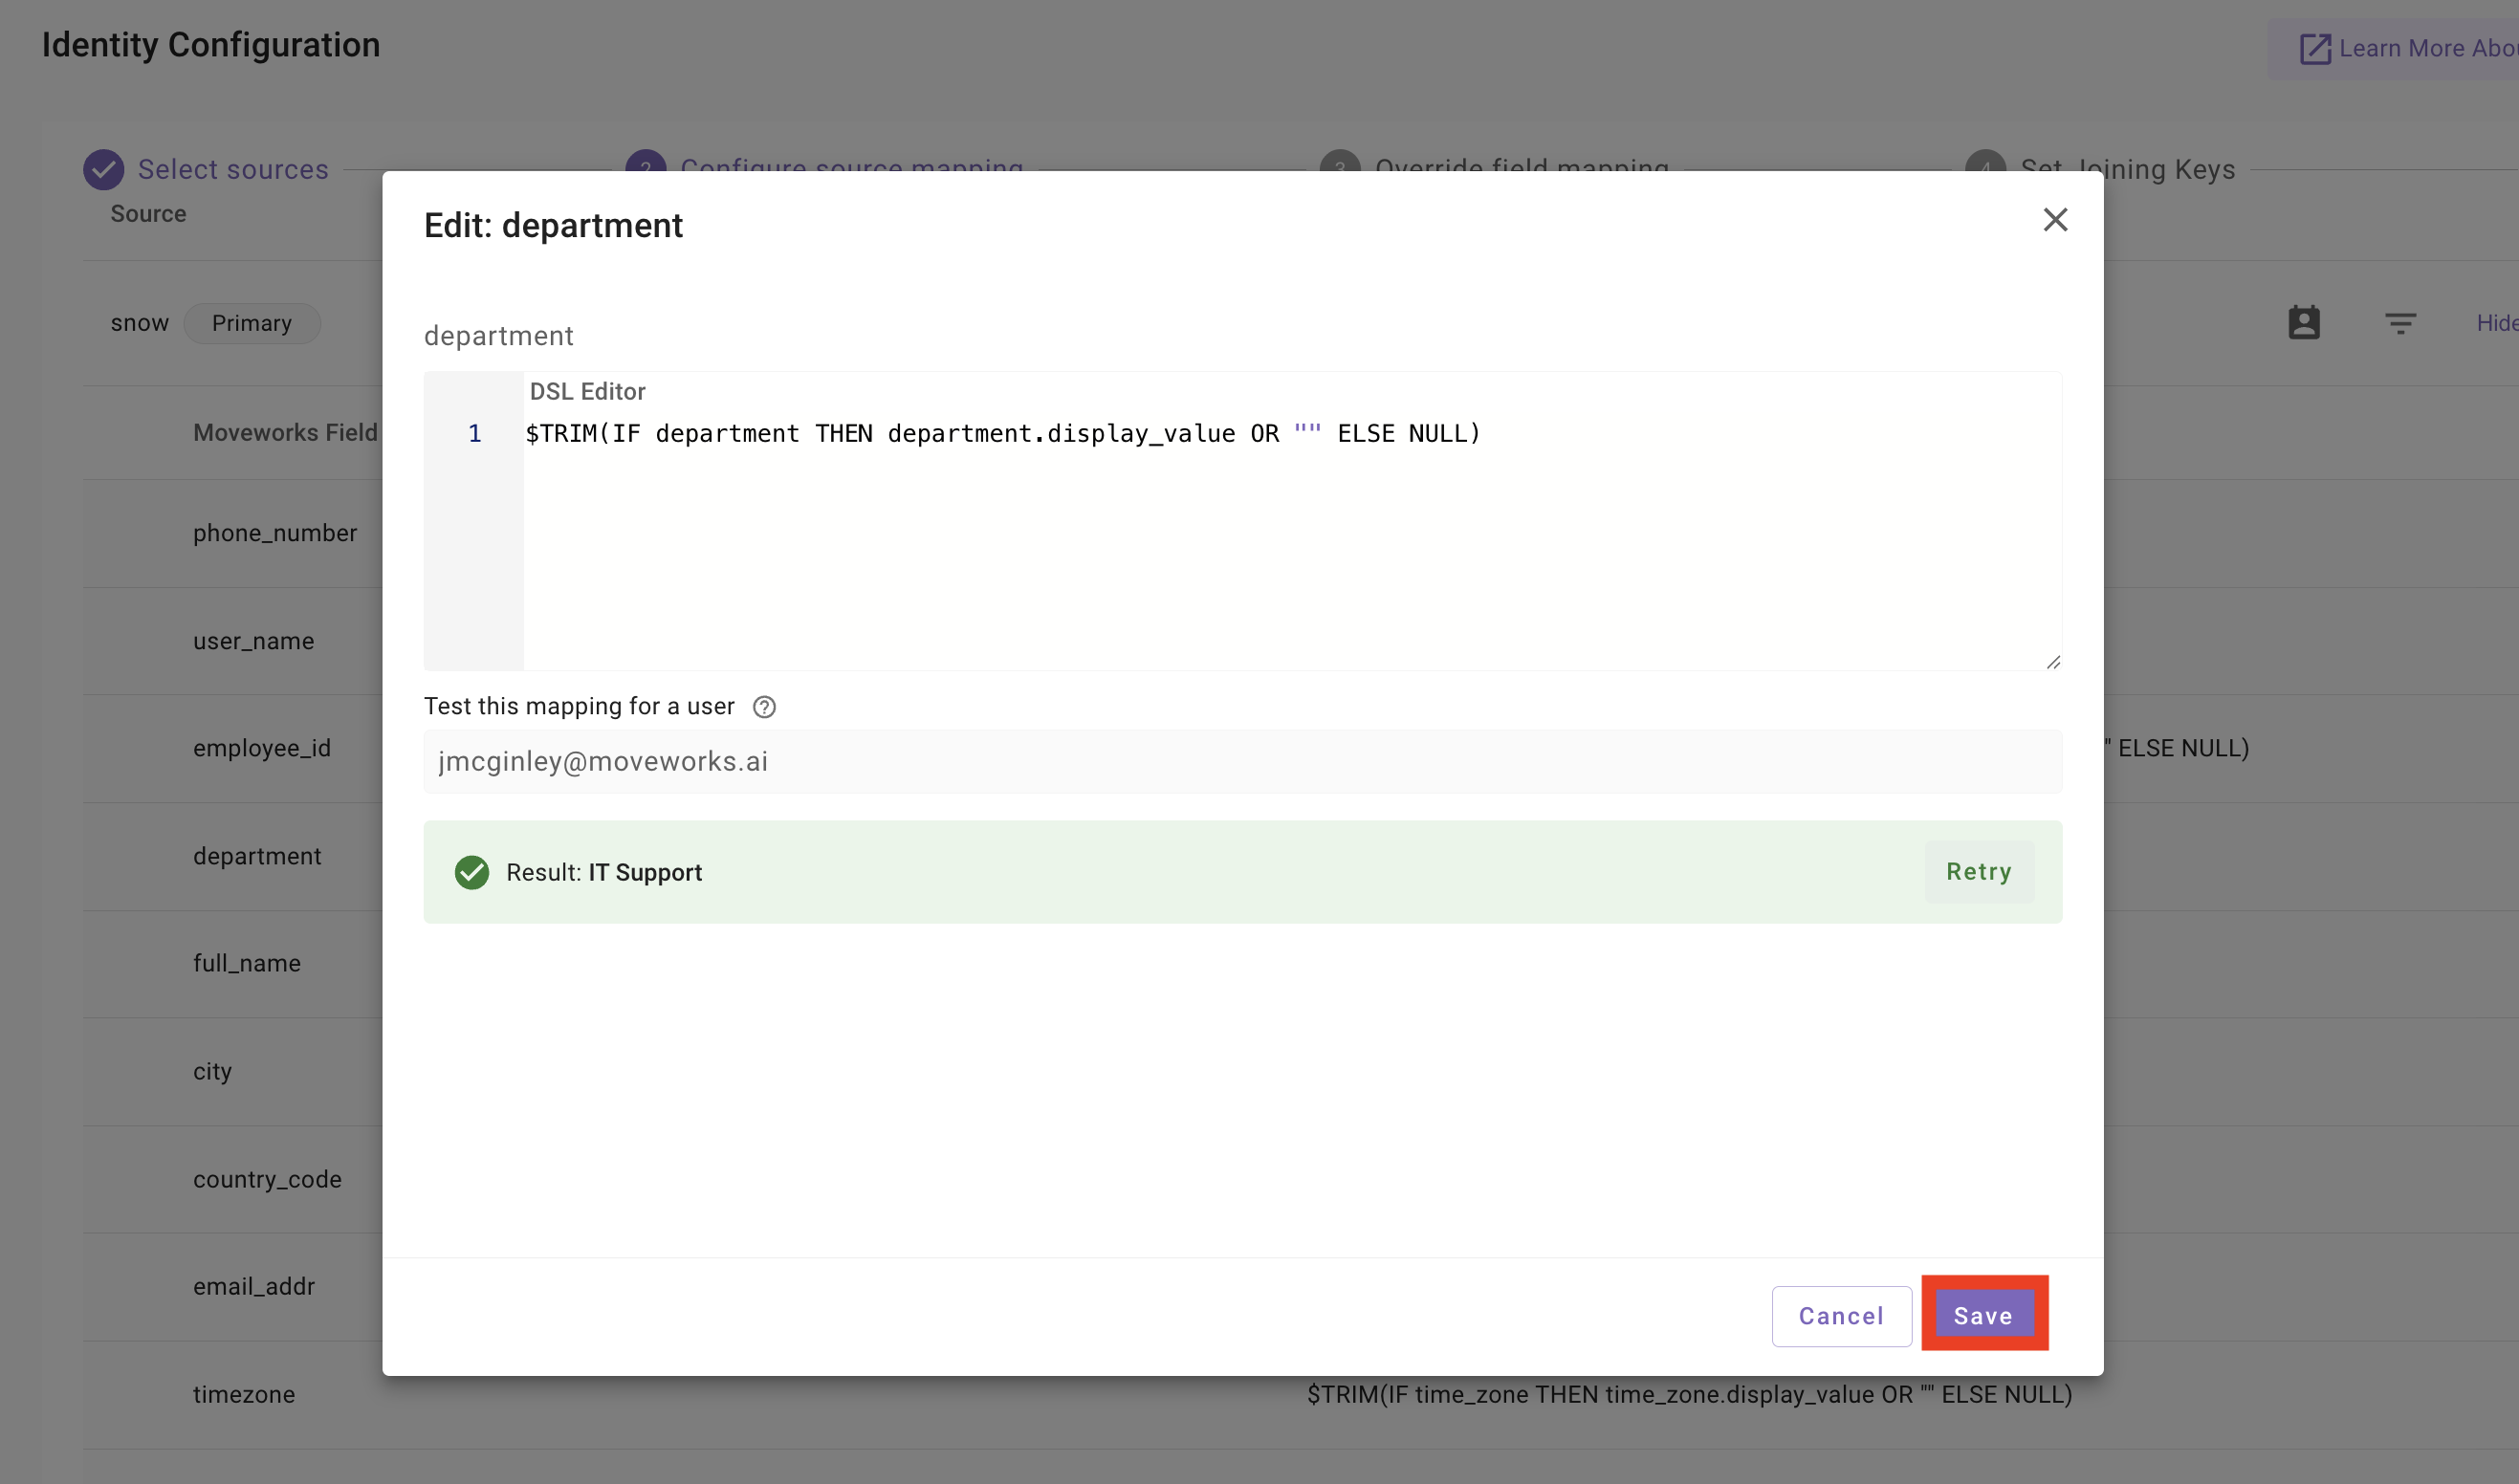
The DSL editor opens. Enter an email in Test this mapping for a user and click
Test Ruleto validate the mapping against a real ServiceNow record. When the result looks right, clickSave.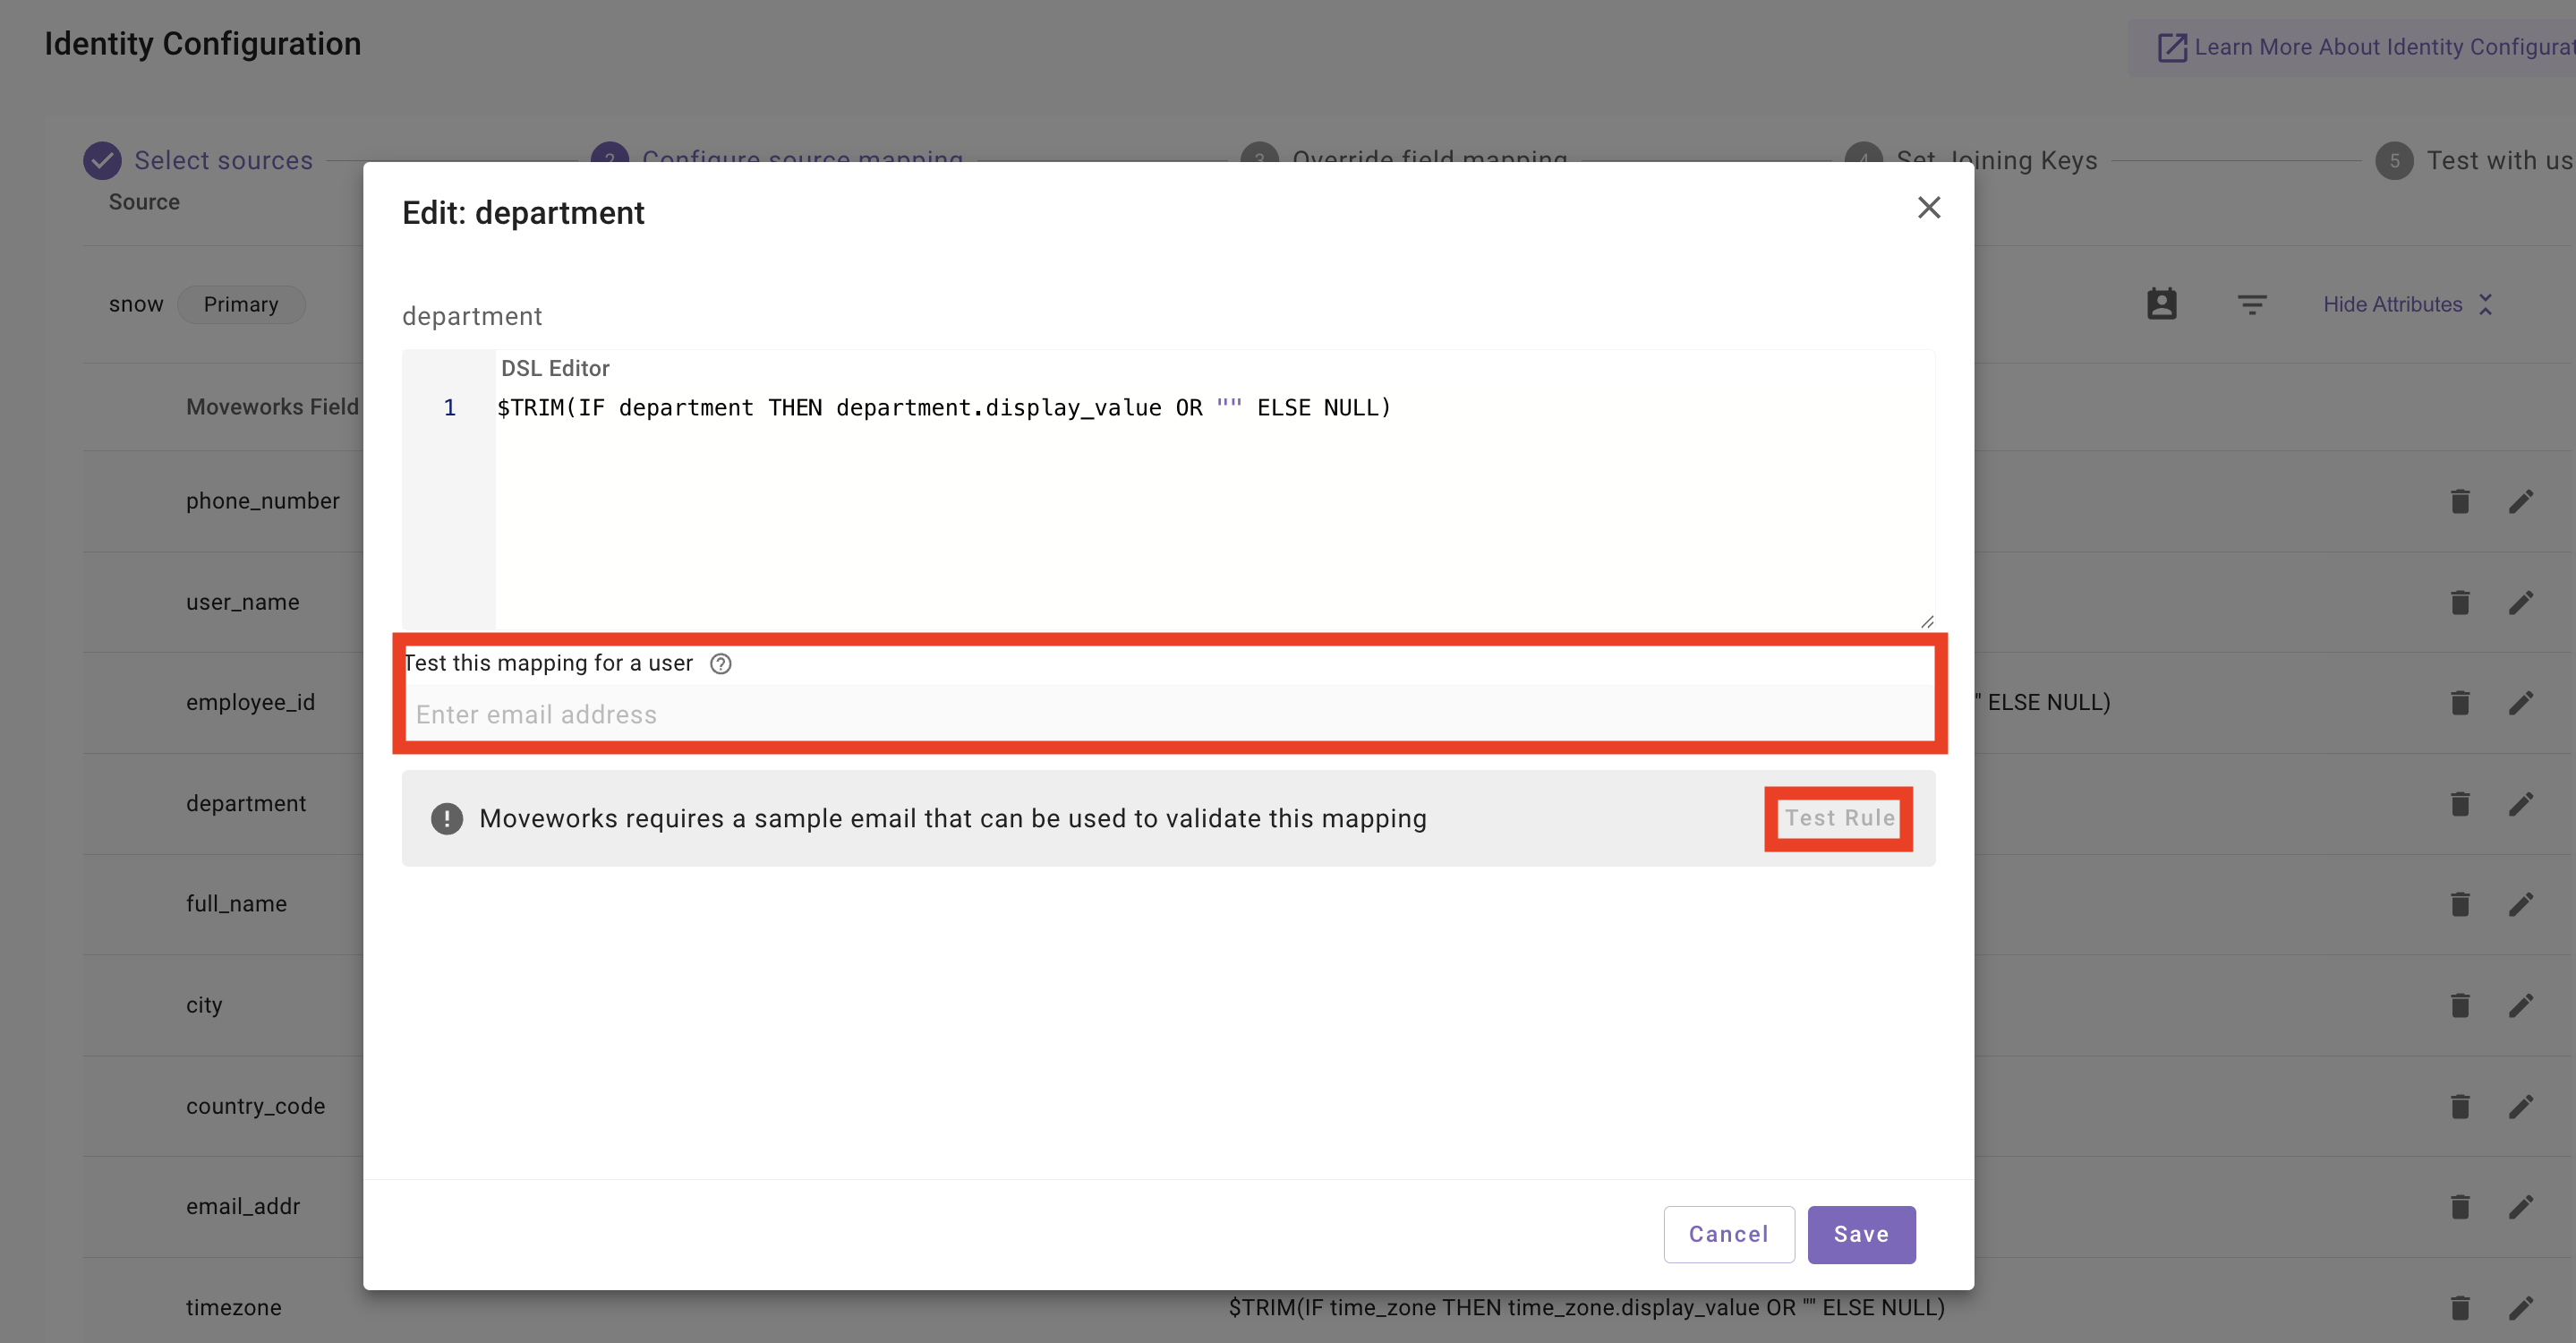
DSL Syntax Reference: The default rule pattern is
$TRIM(IF <field> THEN <field>.display_value OR "" ELSE NULL). The left-hand side of each row is an attribute on the Moveworks User Object; the right-hand side is a Moveworks DSL (Bender) expression that reads from the source record. Detailed instruction on Moveworks DSL syntax and logic will be covered in a subsequent laboratory session. -
Review the full list of mappings, then click
Next: Override Field Mappingat the bottom right.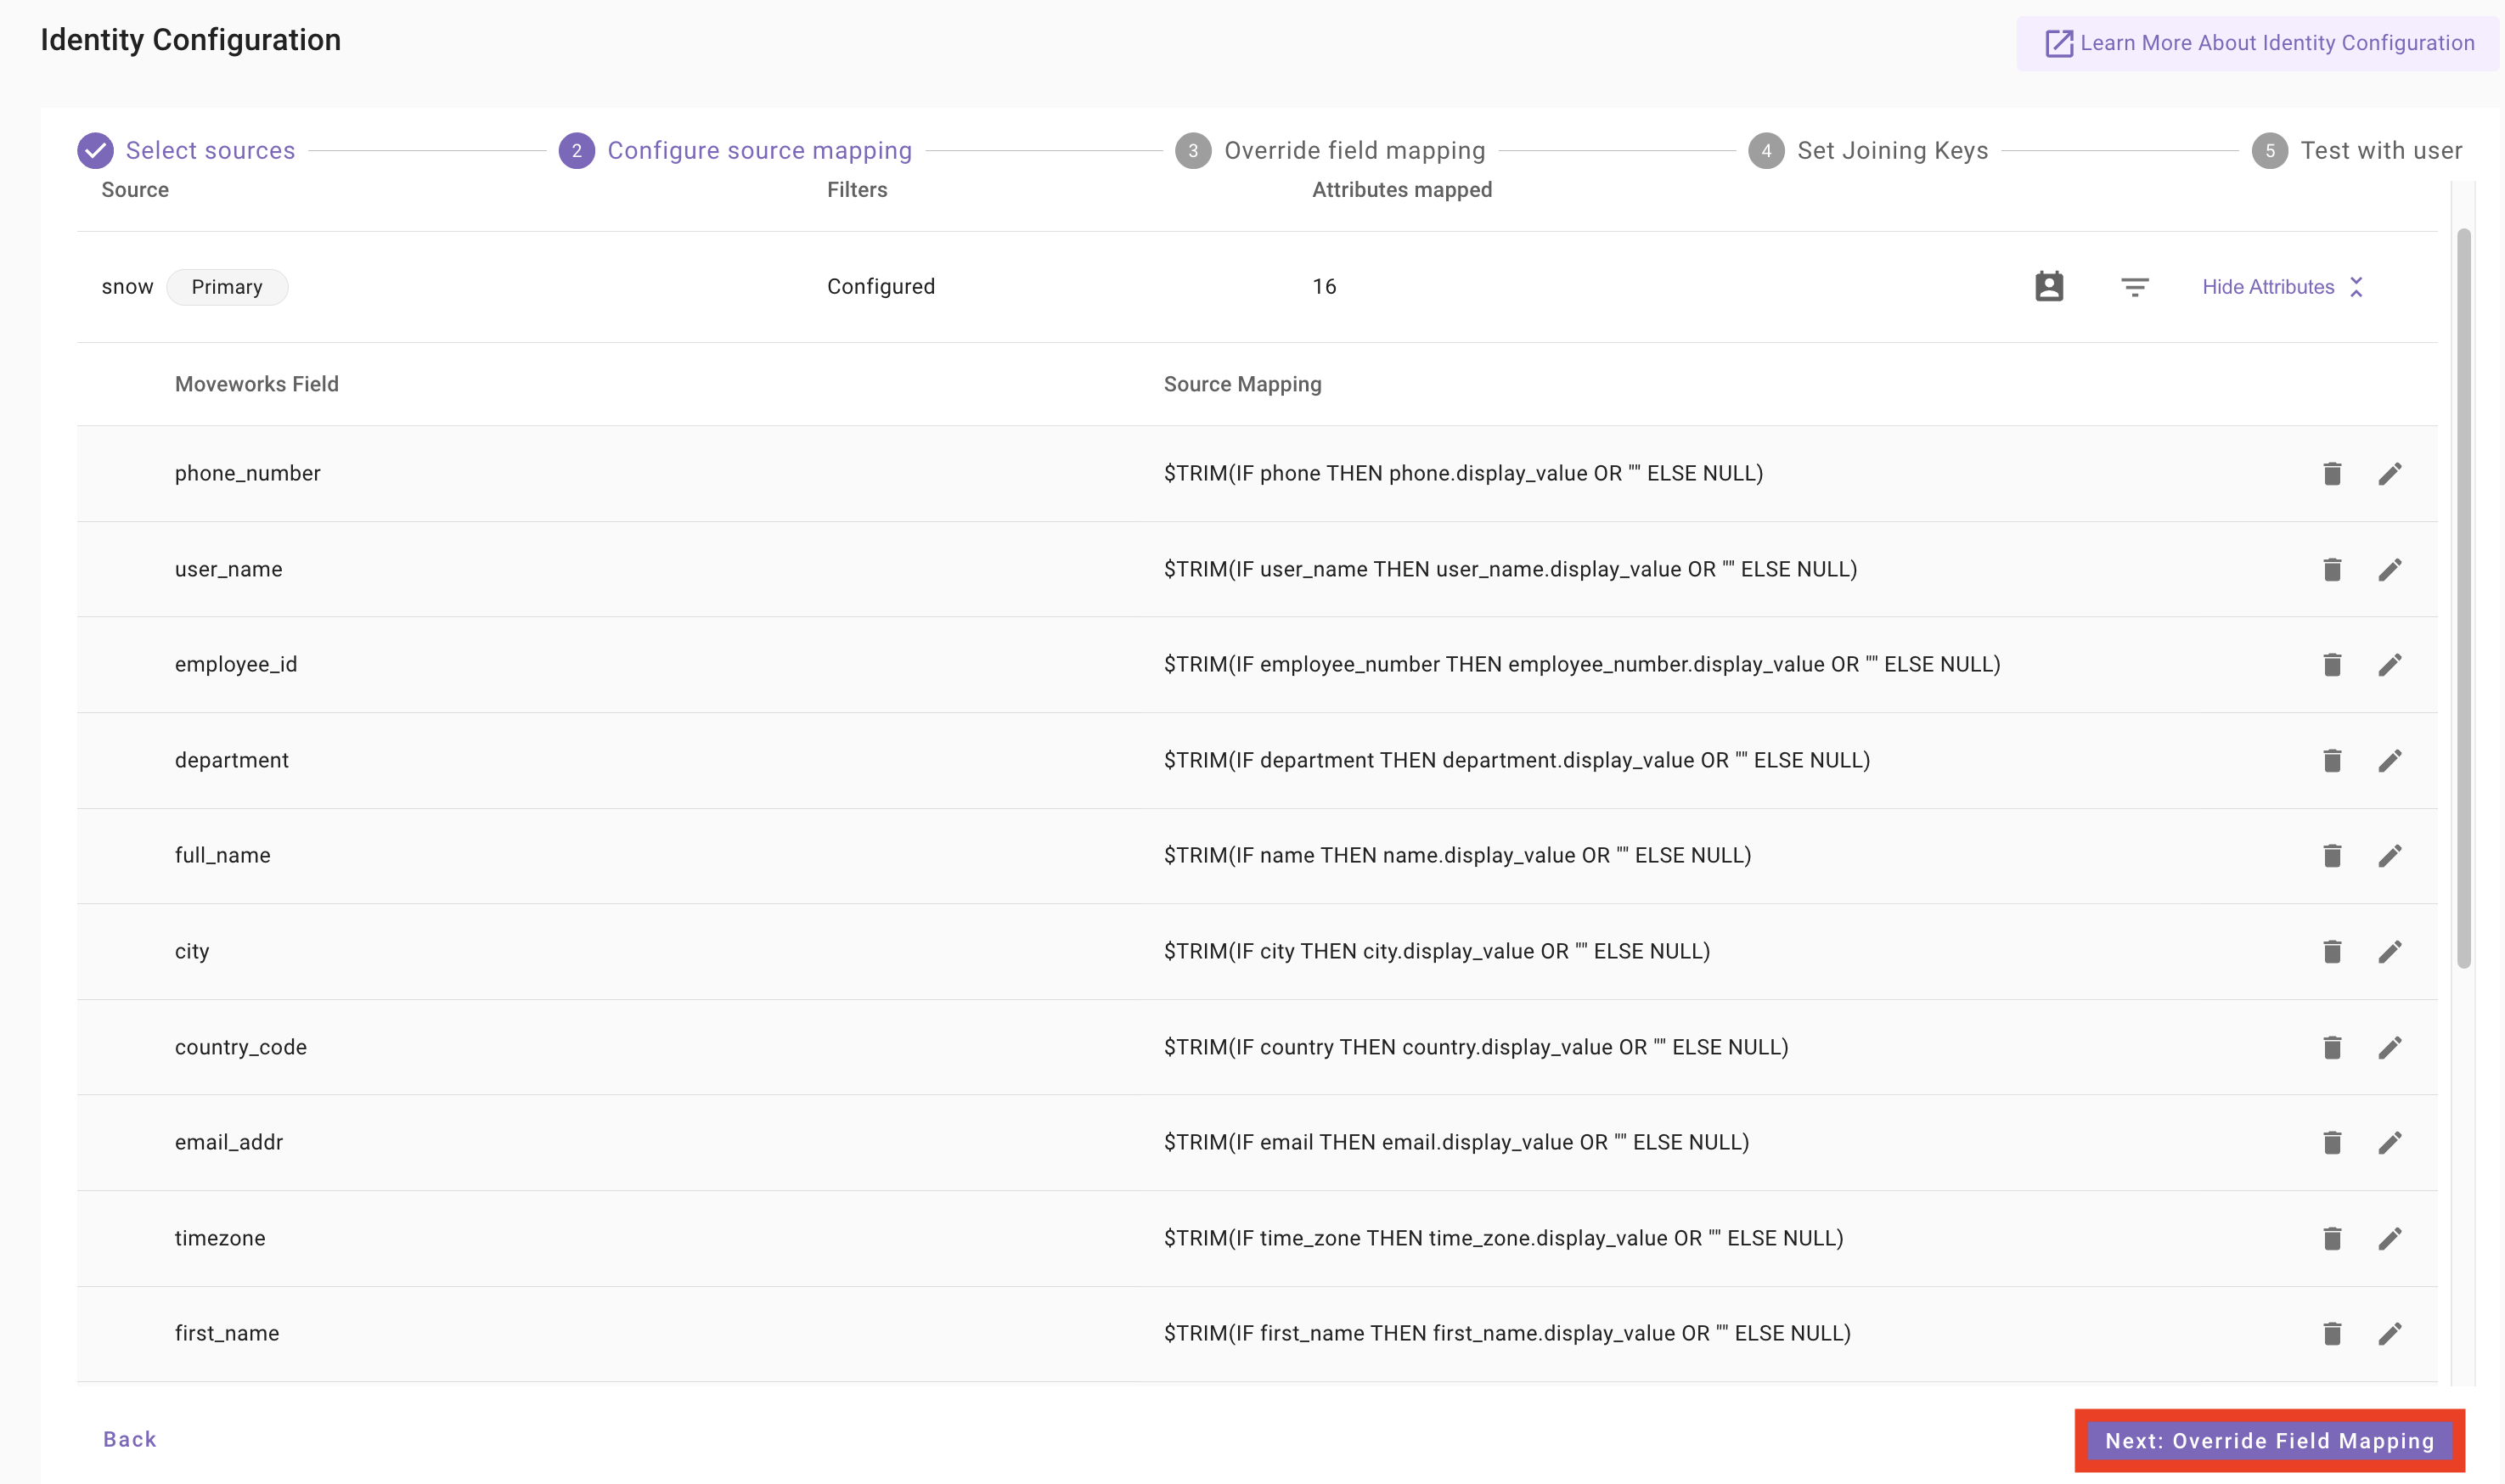
Step 3: Override Field Mapping
-
The Override field mapping step is only used when you have secondary sources and want a specific attribute to come from a non-primary source. Since
snowis our only source, leave this empty and clickNext: Set Joining Keys.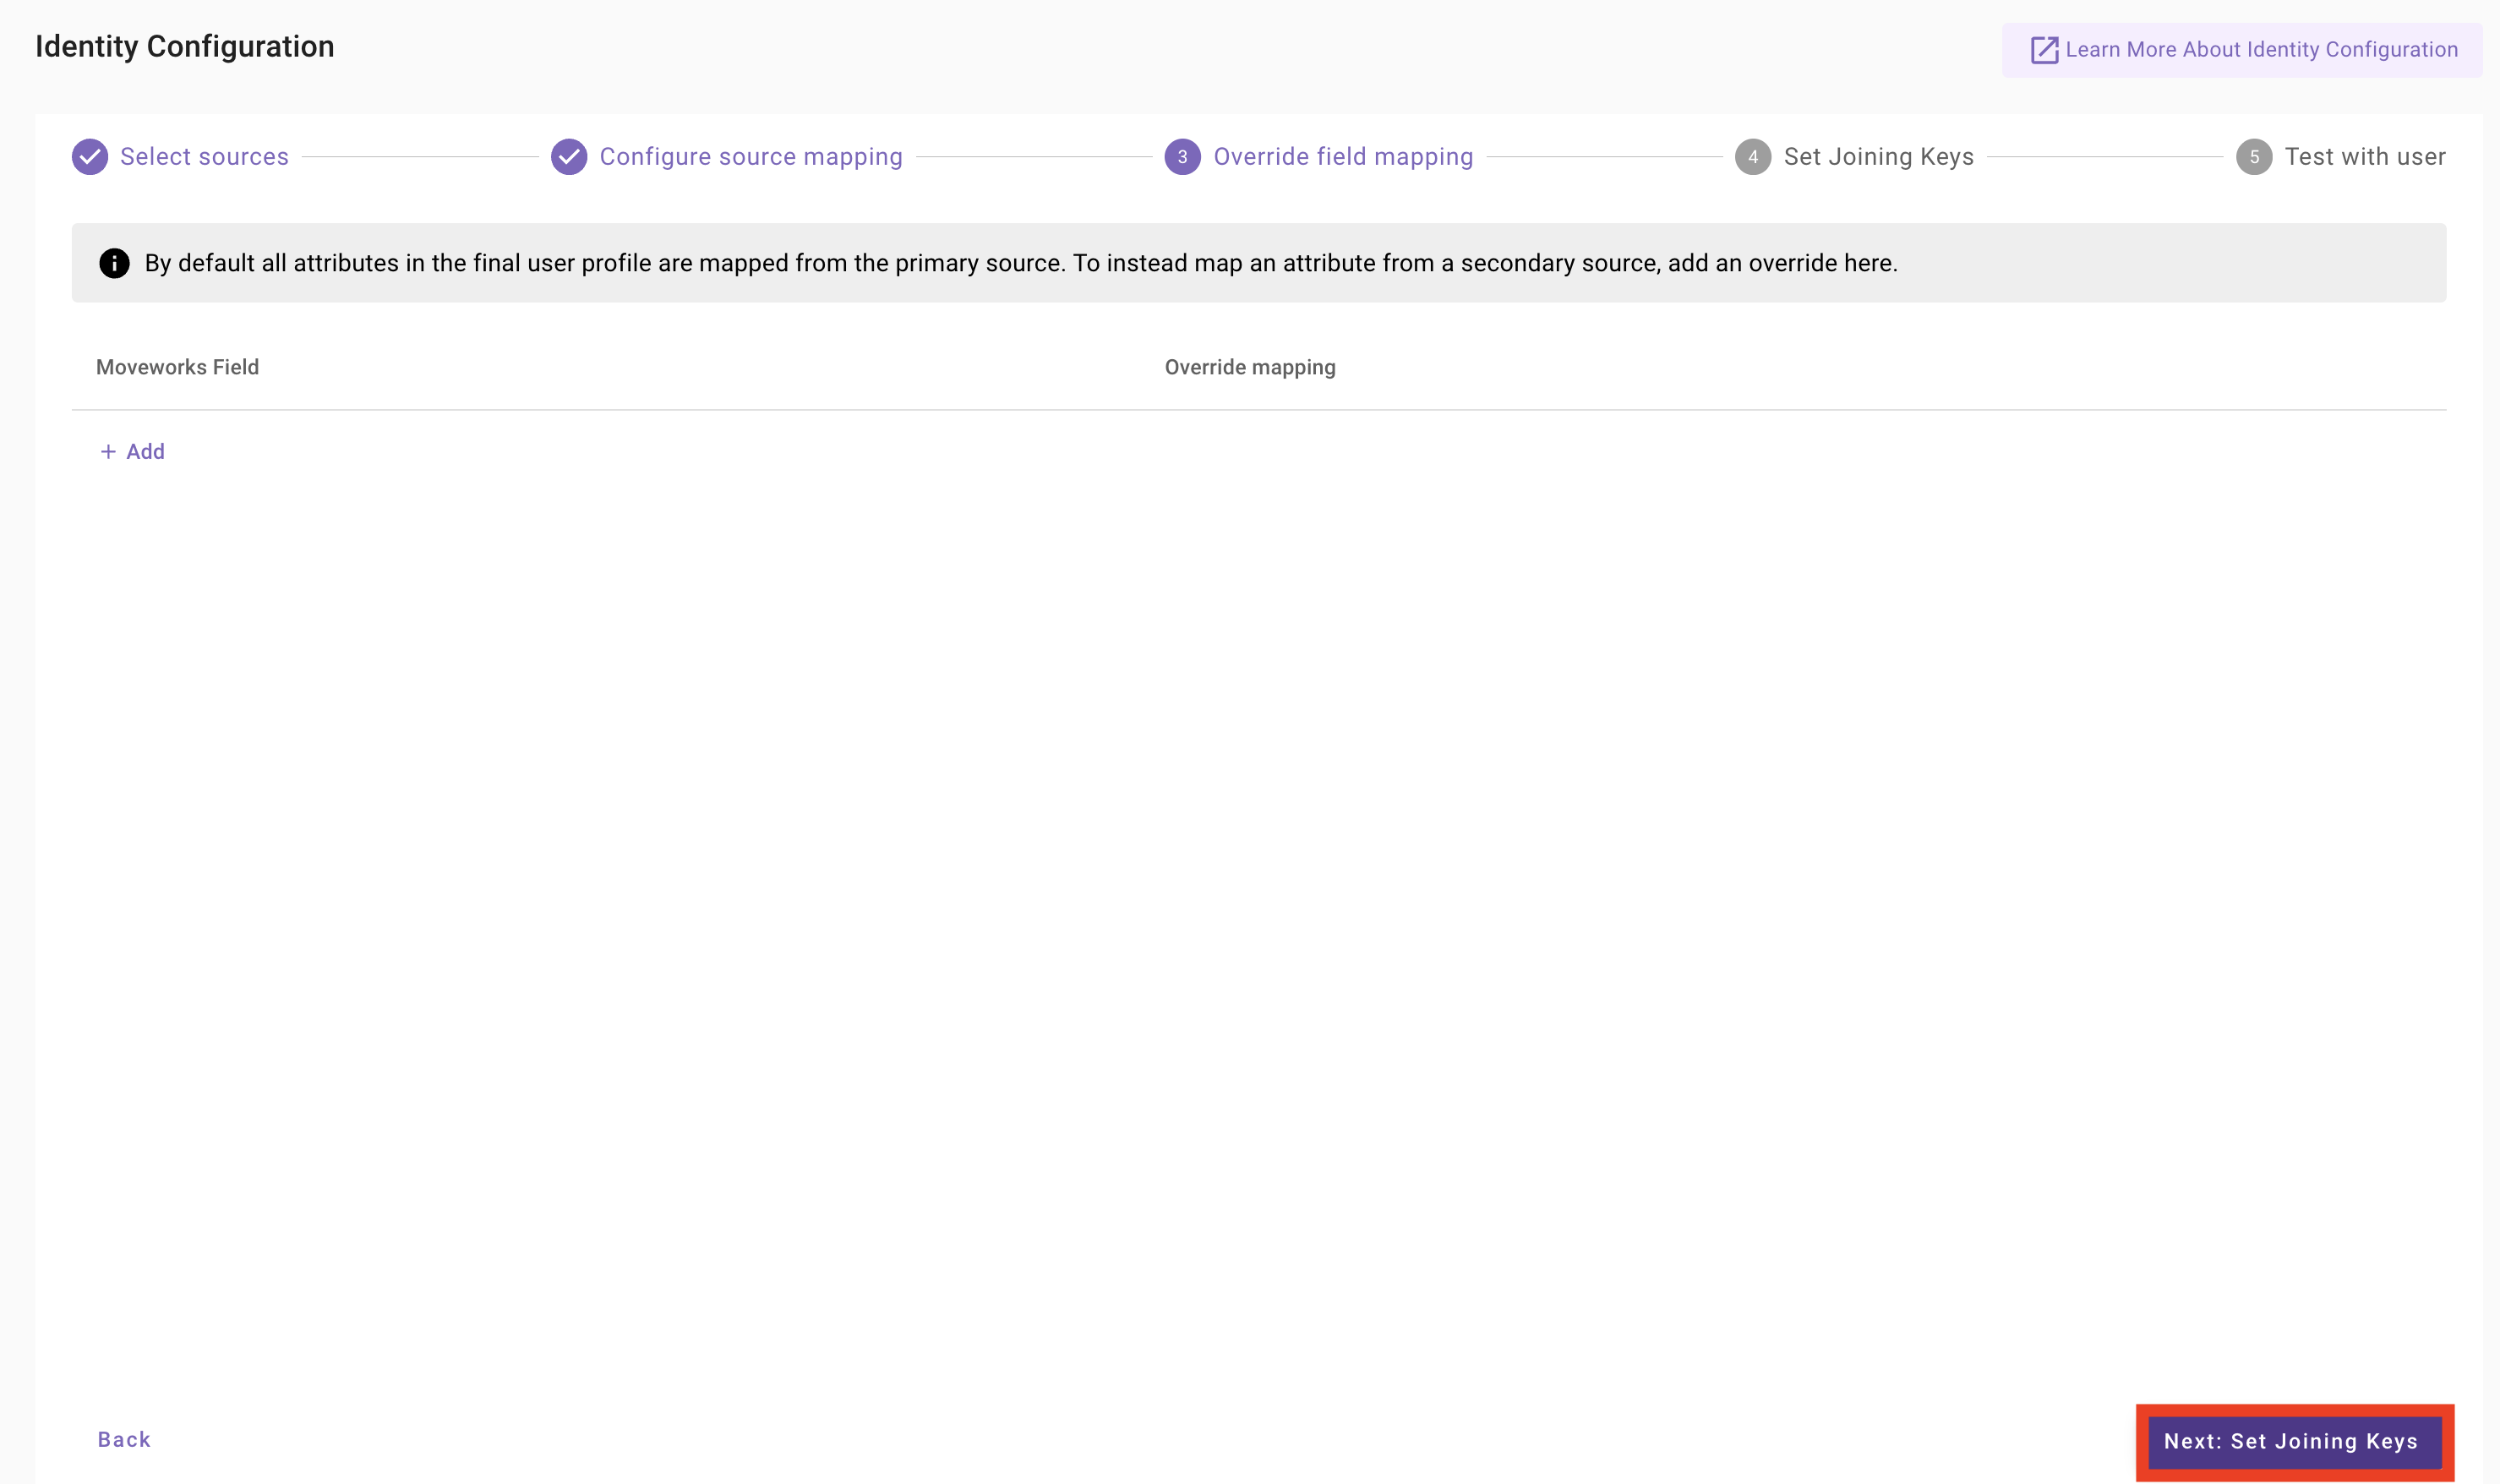
Step 4: Set Joining Keys
-
On the Set Joining Keys step, confirm the joining key for
snowis set to the email mapping:$TRIM(IF email THEN email.display_value OR "" ELSE NULL). ClickNext: Test With User.Why it Matters
-
Identity Resolution: Maps a chat user (e.g., Slack) to their backend records (e.g., ServiceNow).
-
Security: Ensures sensitive actions like password resets are tied to a verified, authorized identity.
-
Data Integrity: Prevents duplicate records during multi-source syncs.
Requirement: A joining key must be unique, immutable (permanent), and present across all integrated systems.

-
Step 5: Test With User
-
On the Test with user step, enter the email of a ServiceNow user (use your own lab user, or the ServiceNow admin email) and click
Show User Profile.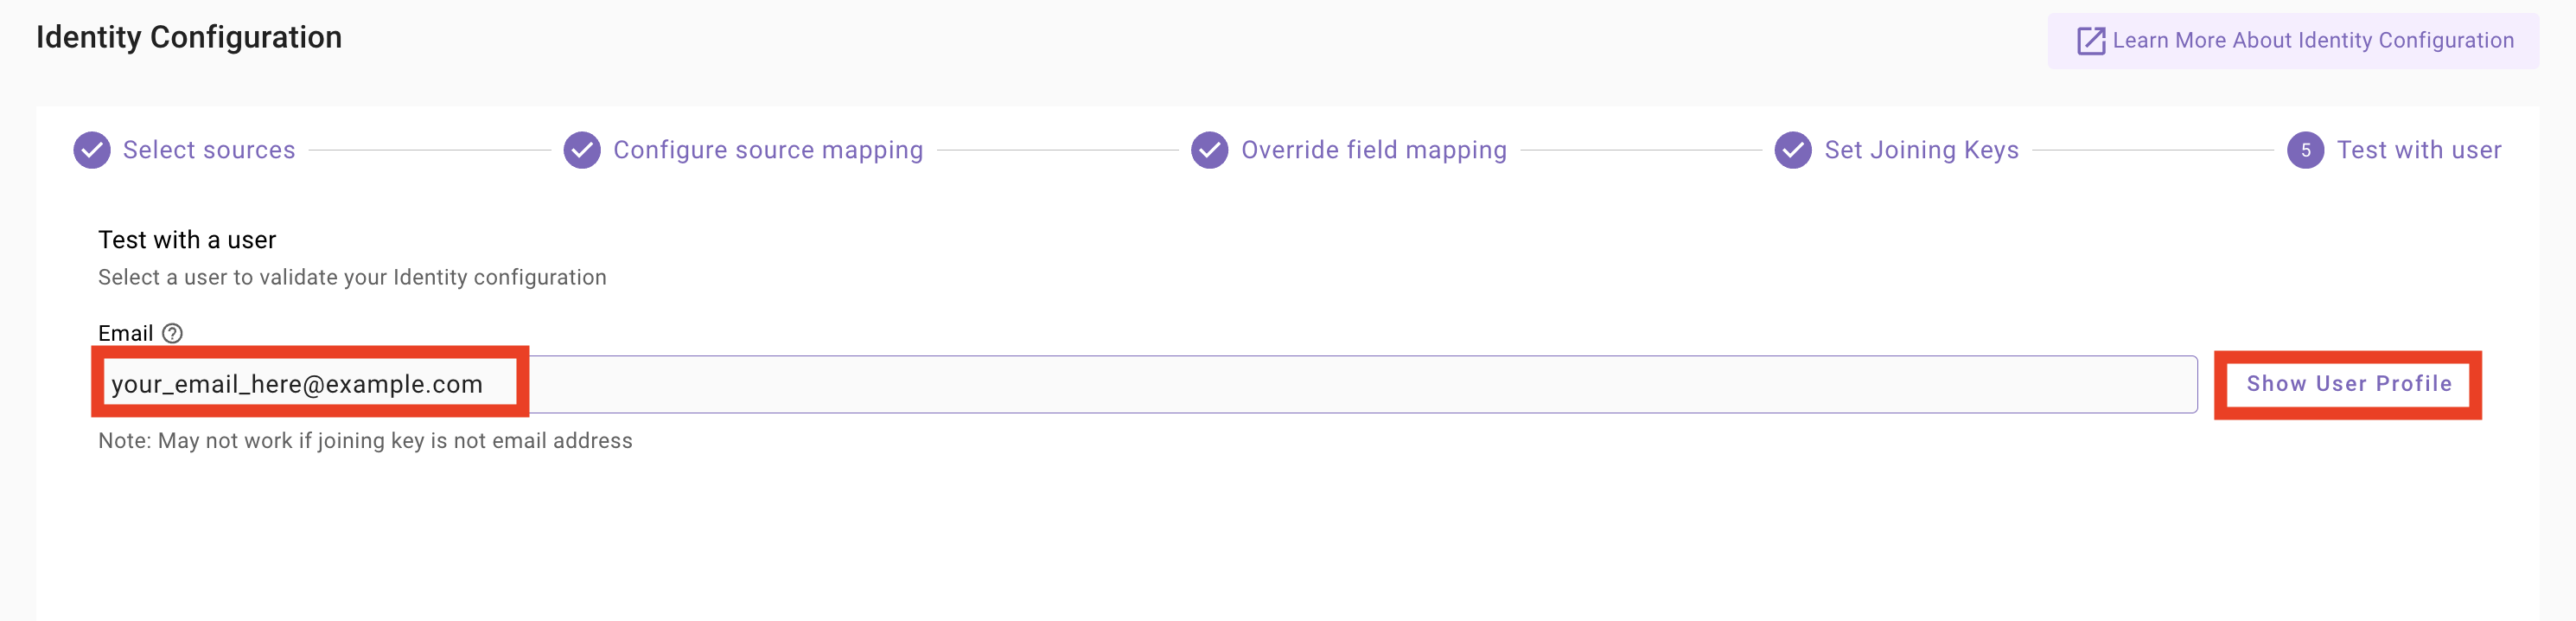
-
Review the Sample Results. You should see attributes like
moveworks.first_name,moveworks.last_name,moveworks.email_addr,moveworks.role, andmoveworks.departmentresolve to real values. Attributes flaggedNull: Attribute not configuredorNull: Primary source DSL evaluated to NULLare expected for fields you have not customized in this lab. When satisfied, clickSave Configuration.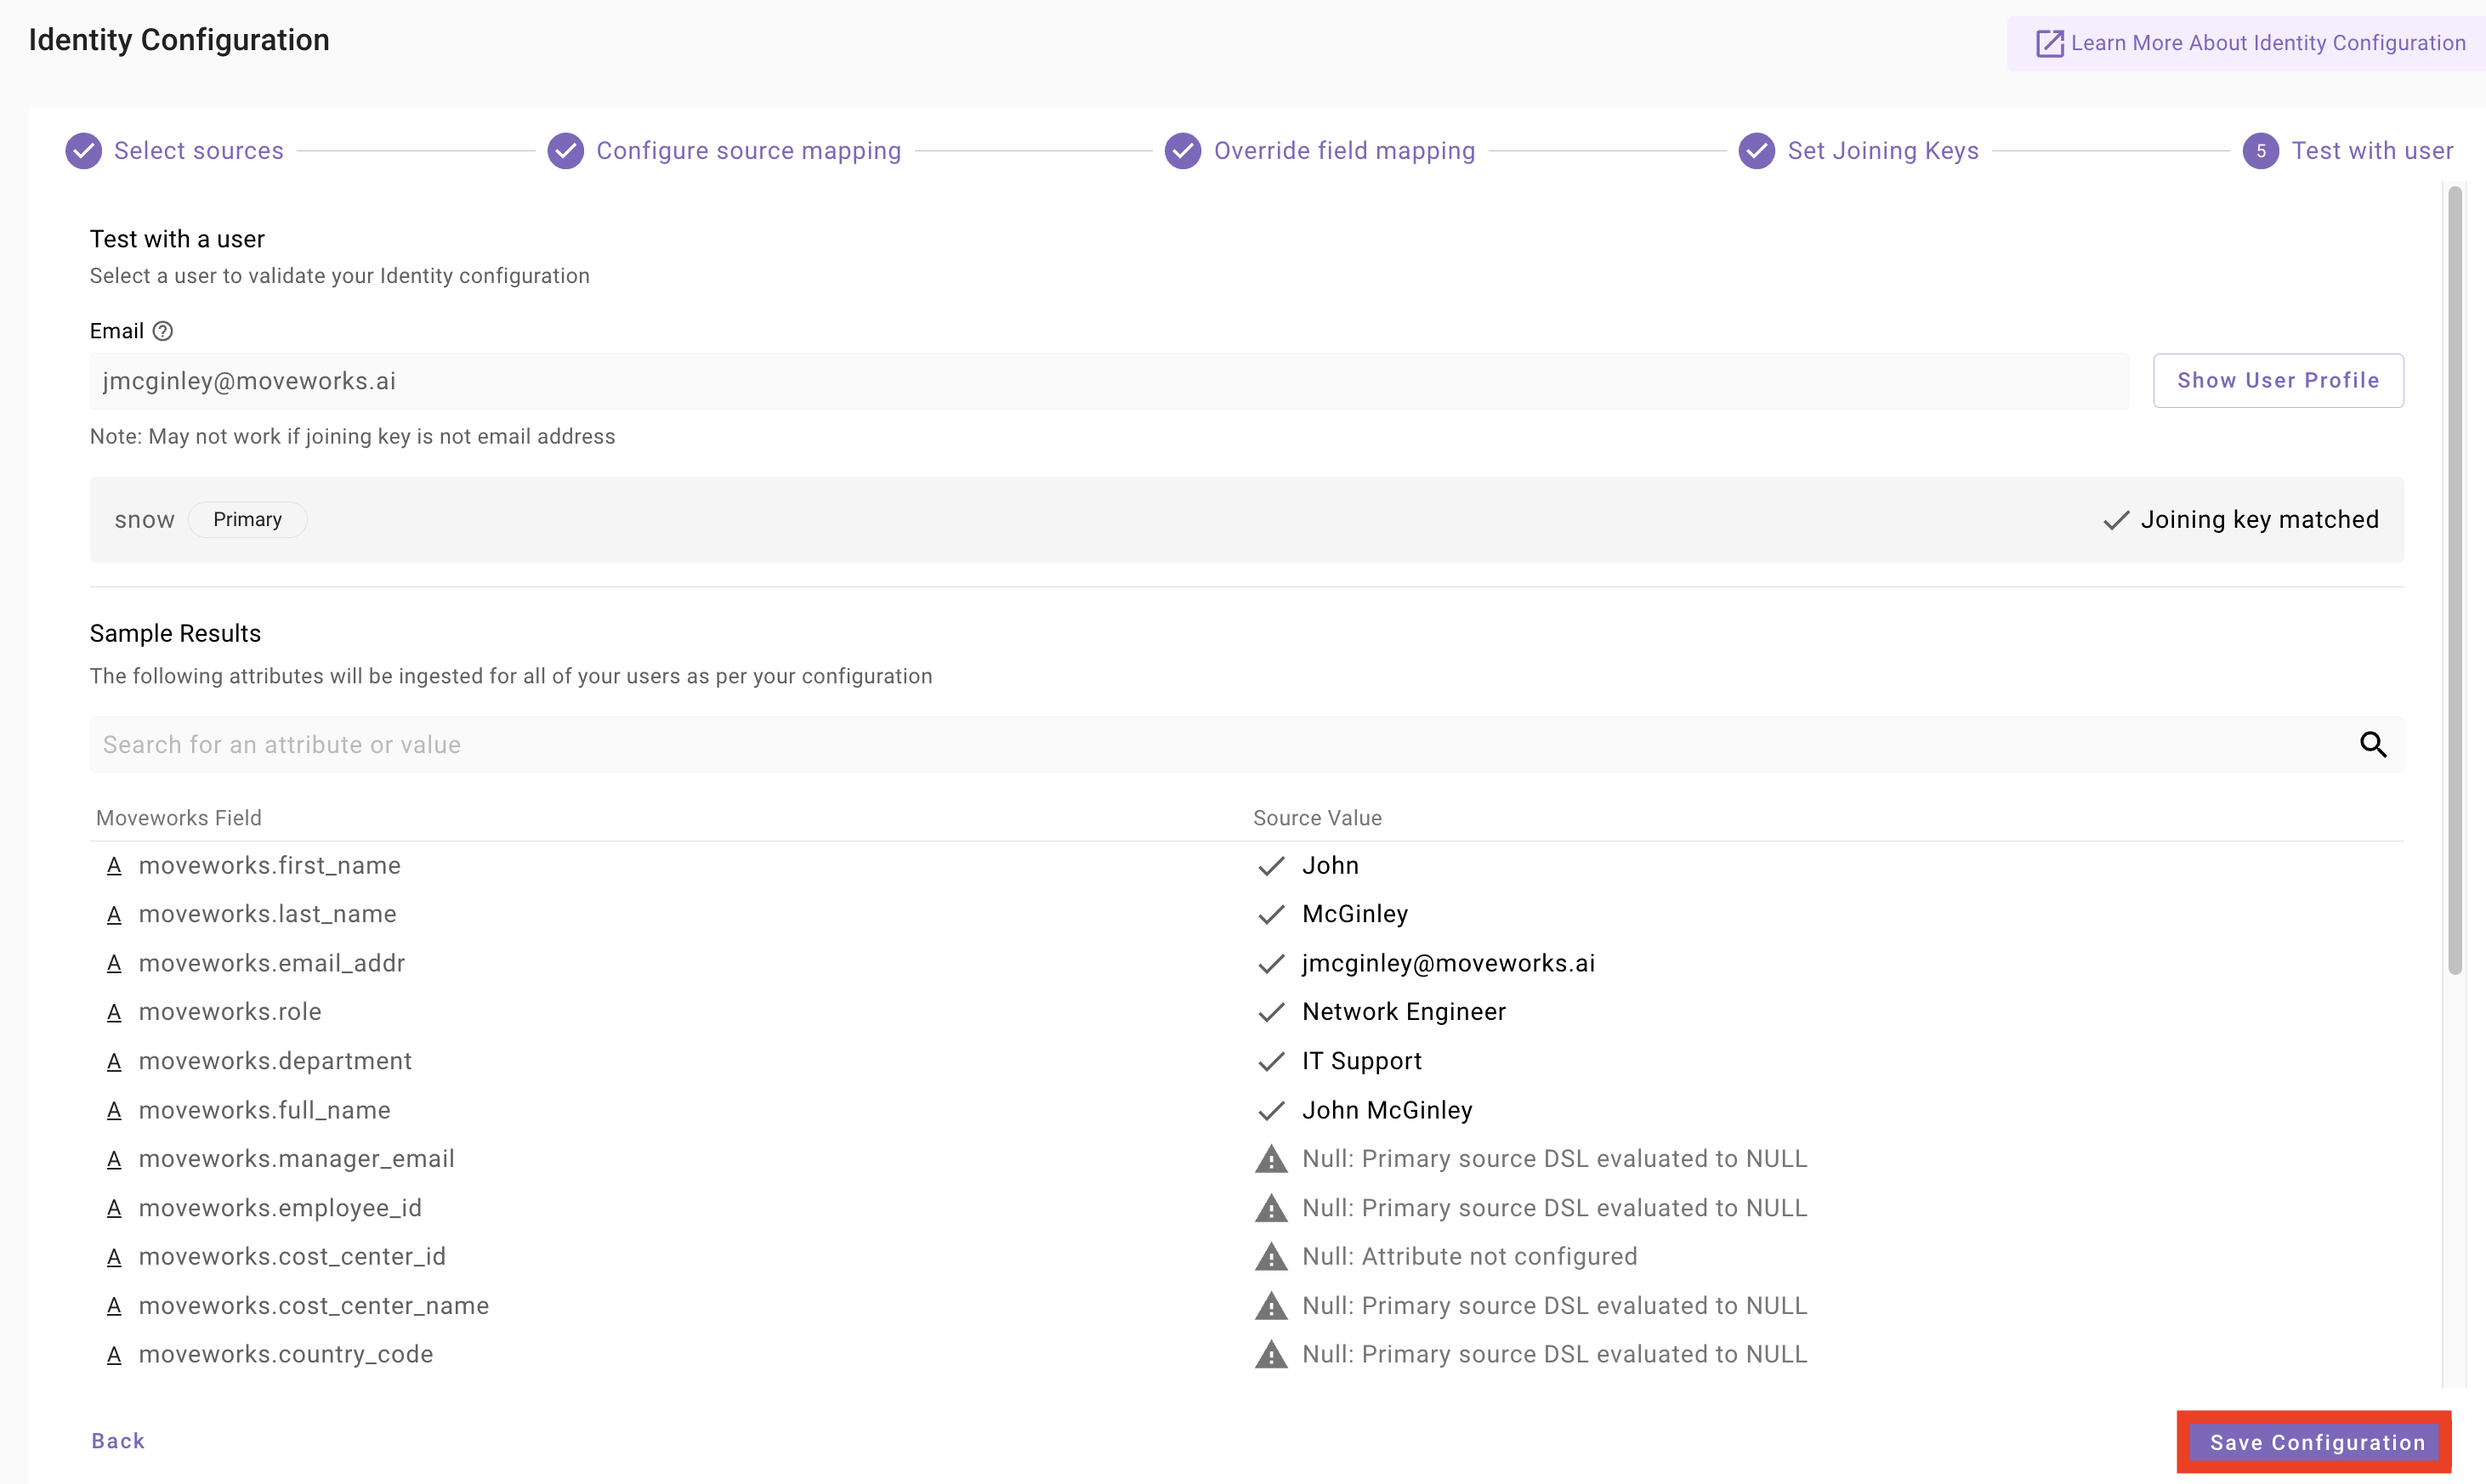
-
Confirm the Configuration passed test dialog, then click
Proceed To Save.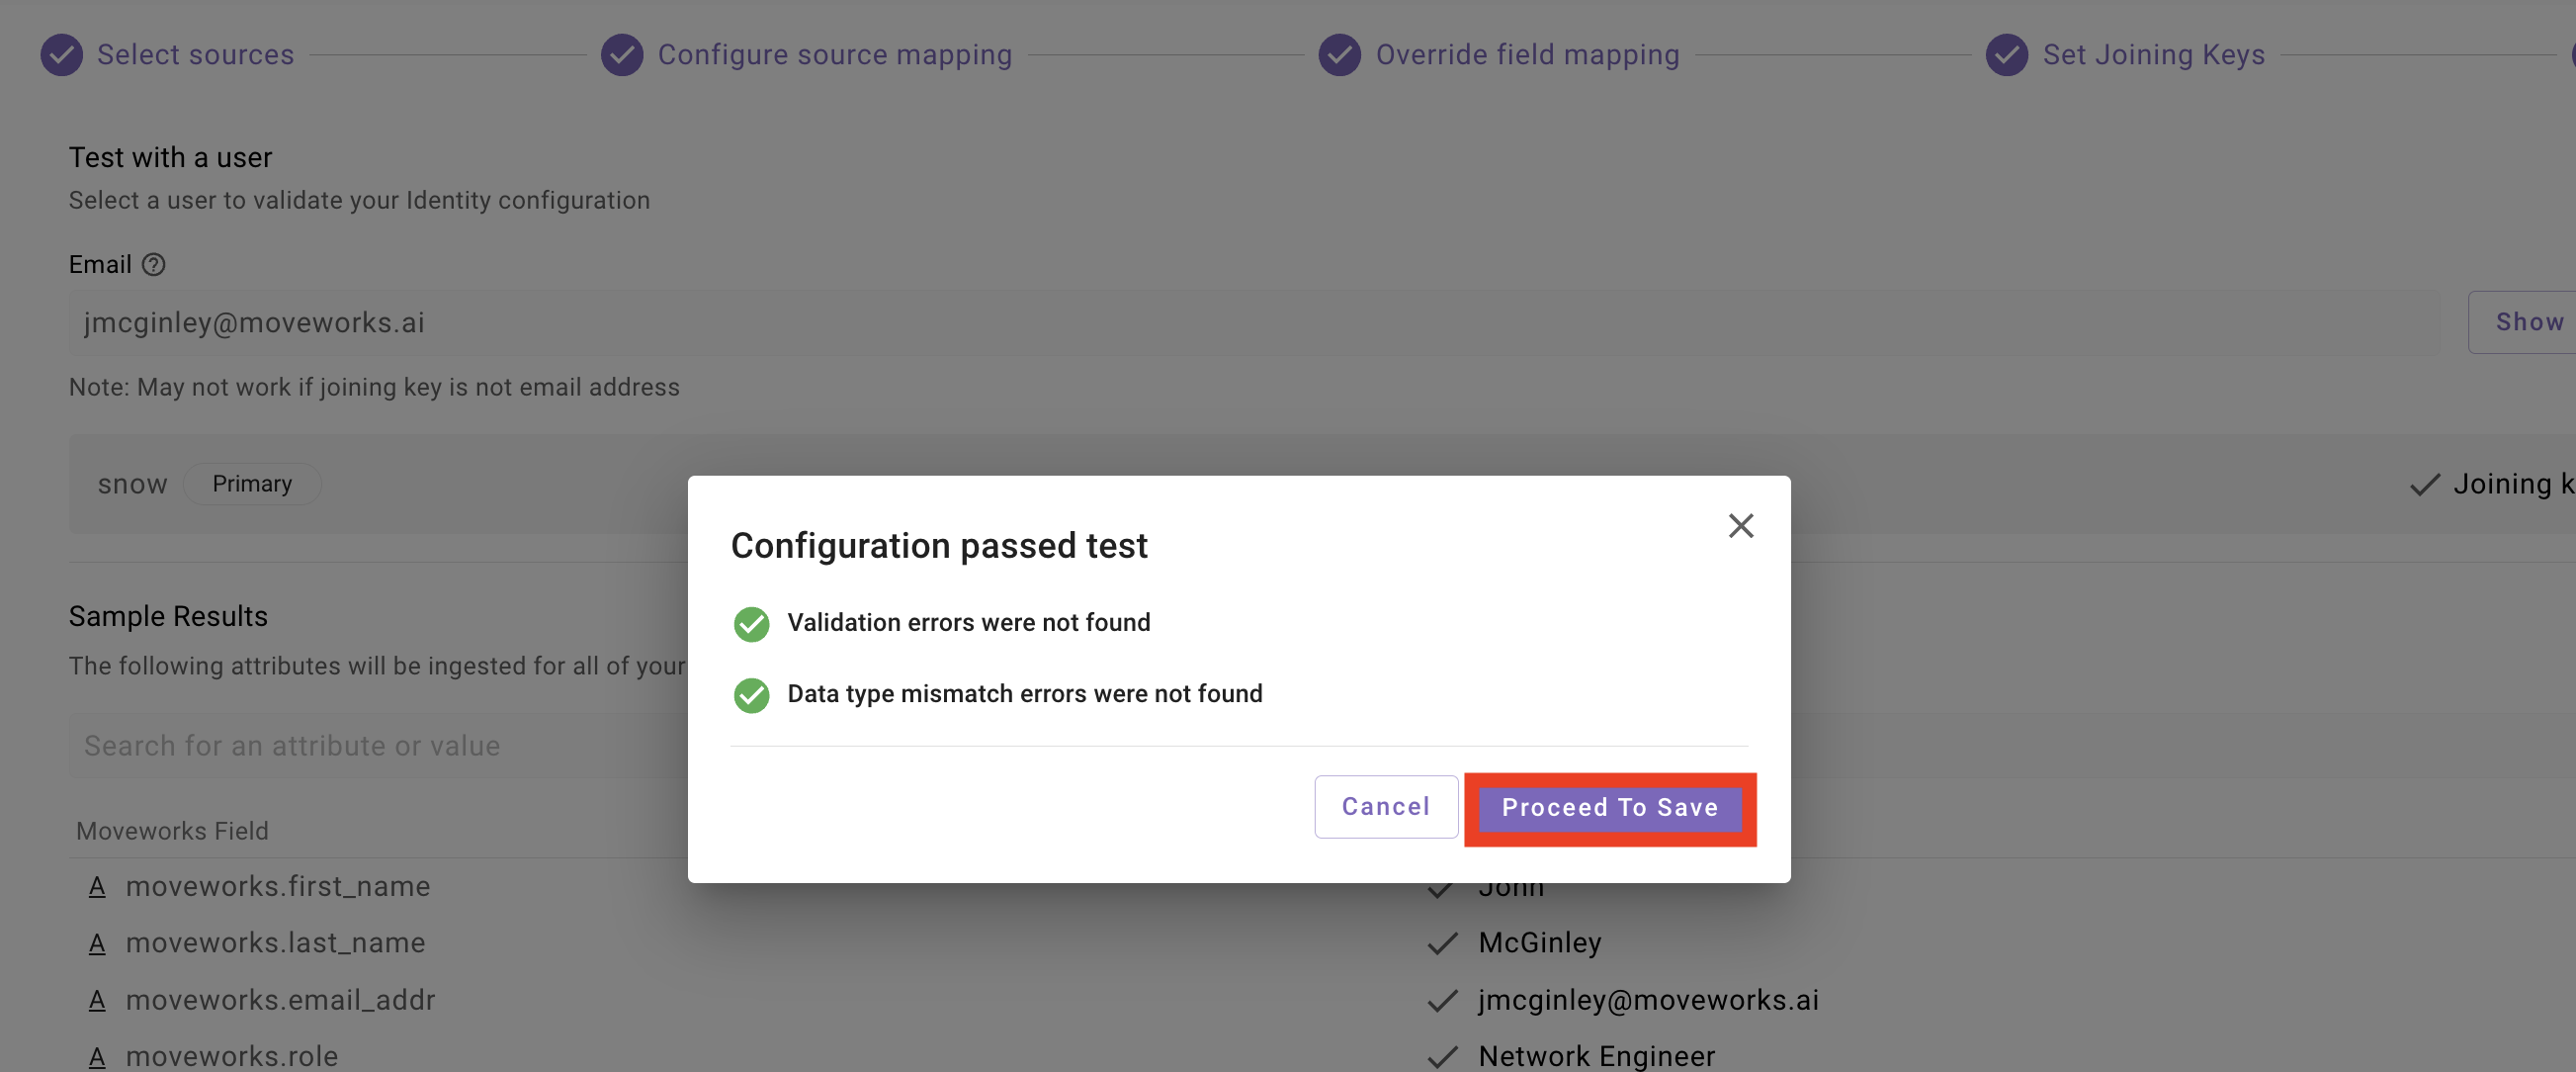
1.2: Setup the Moveworks Service Account
Note: When configuring this for a new implementation, we will add the relevant information for each integration that the Moveworks AI Assistant has a service account within. See the Moveworks Service Account Configuration Guide for more information on what a multi-system Moveworks Service Account looks like.
The Bot Account fields must exactly match your ServiceNow admin account. Using mismatched values will cause Moveworks to fail to authenticate actions on behalf of users. Use the table below to confirm the correct values:
-
Navigate to the
Bot Accountpage, and add the corresponding information for the Moveworks Service Account user for each field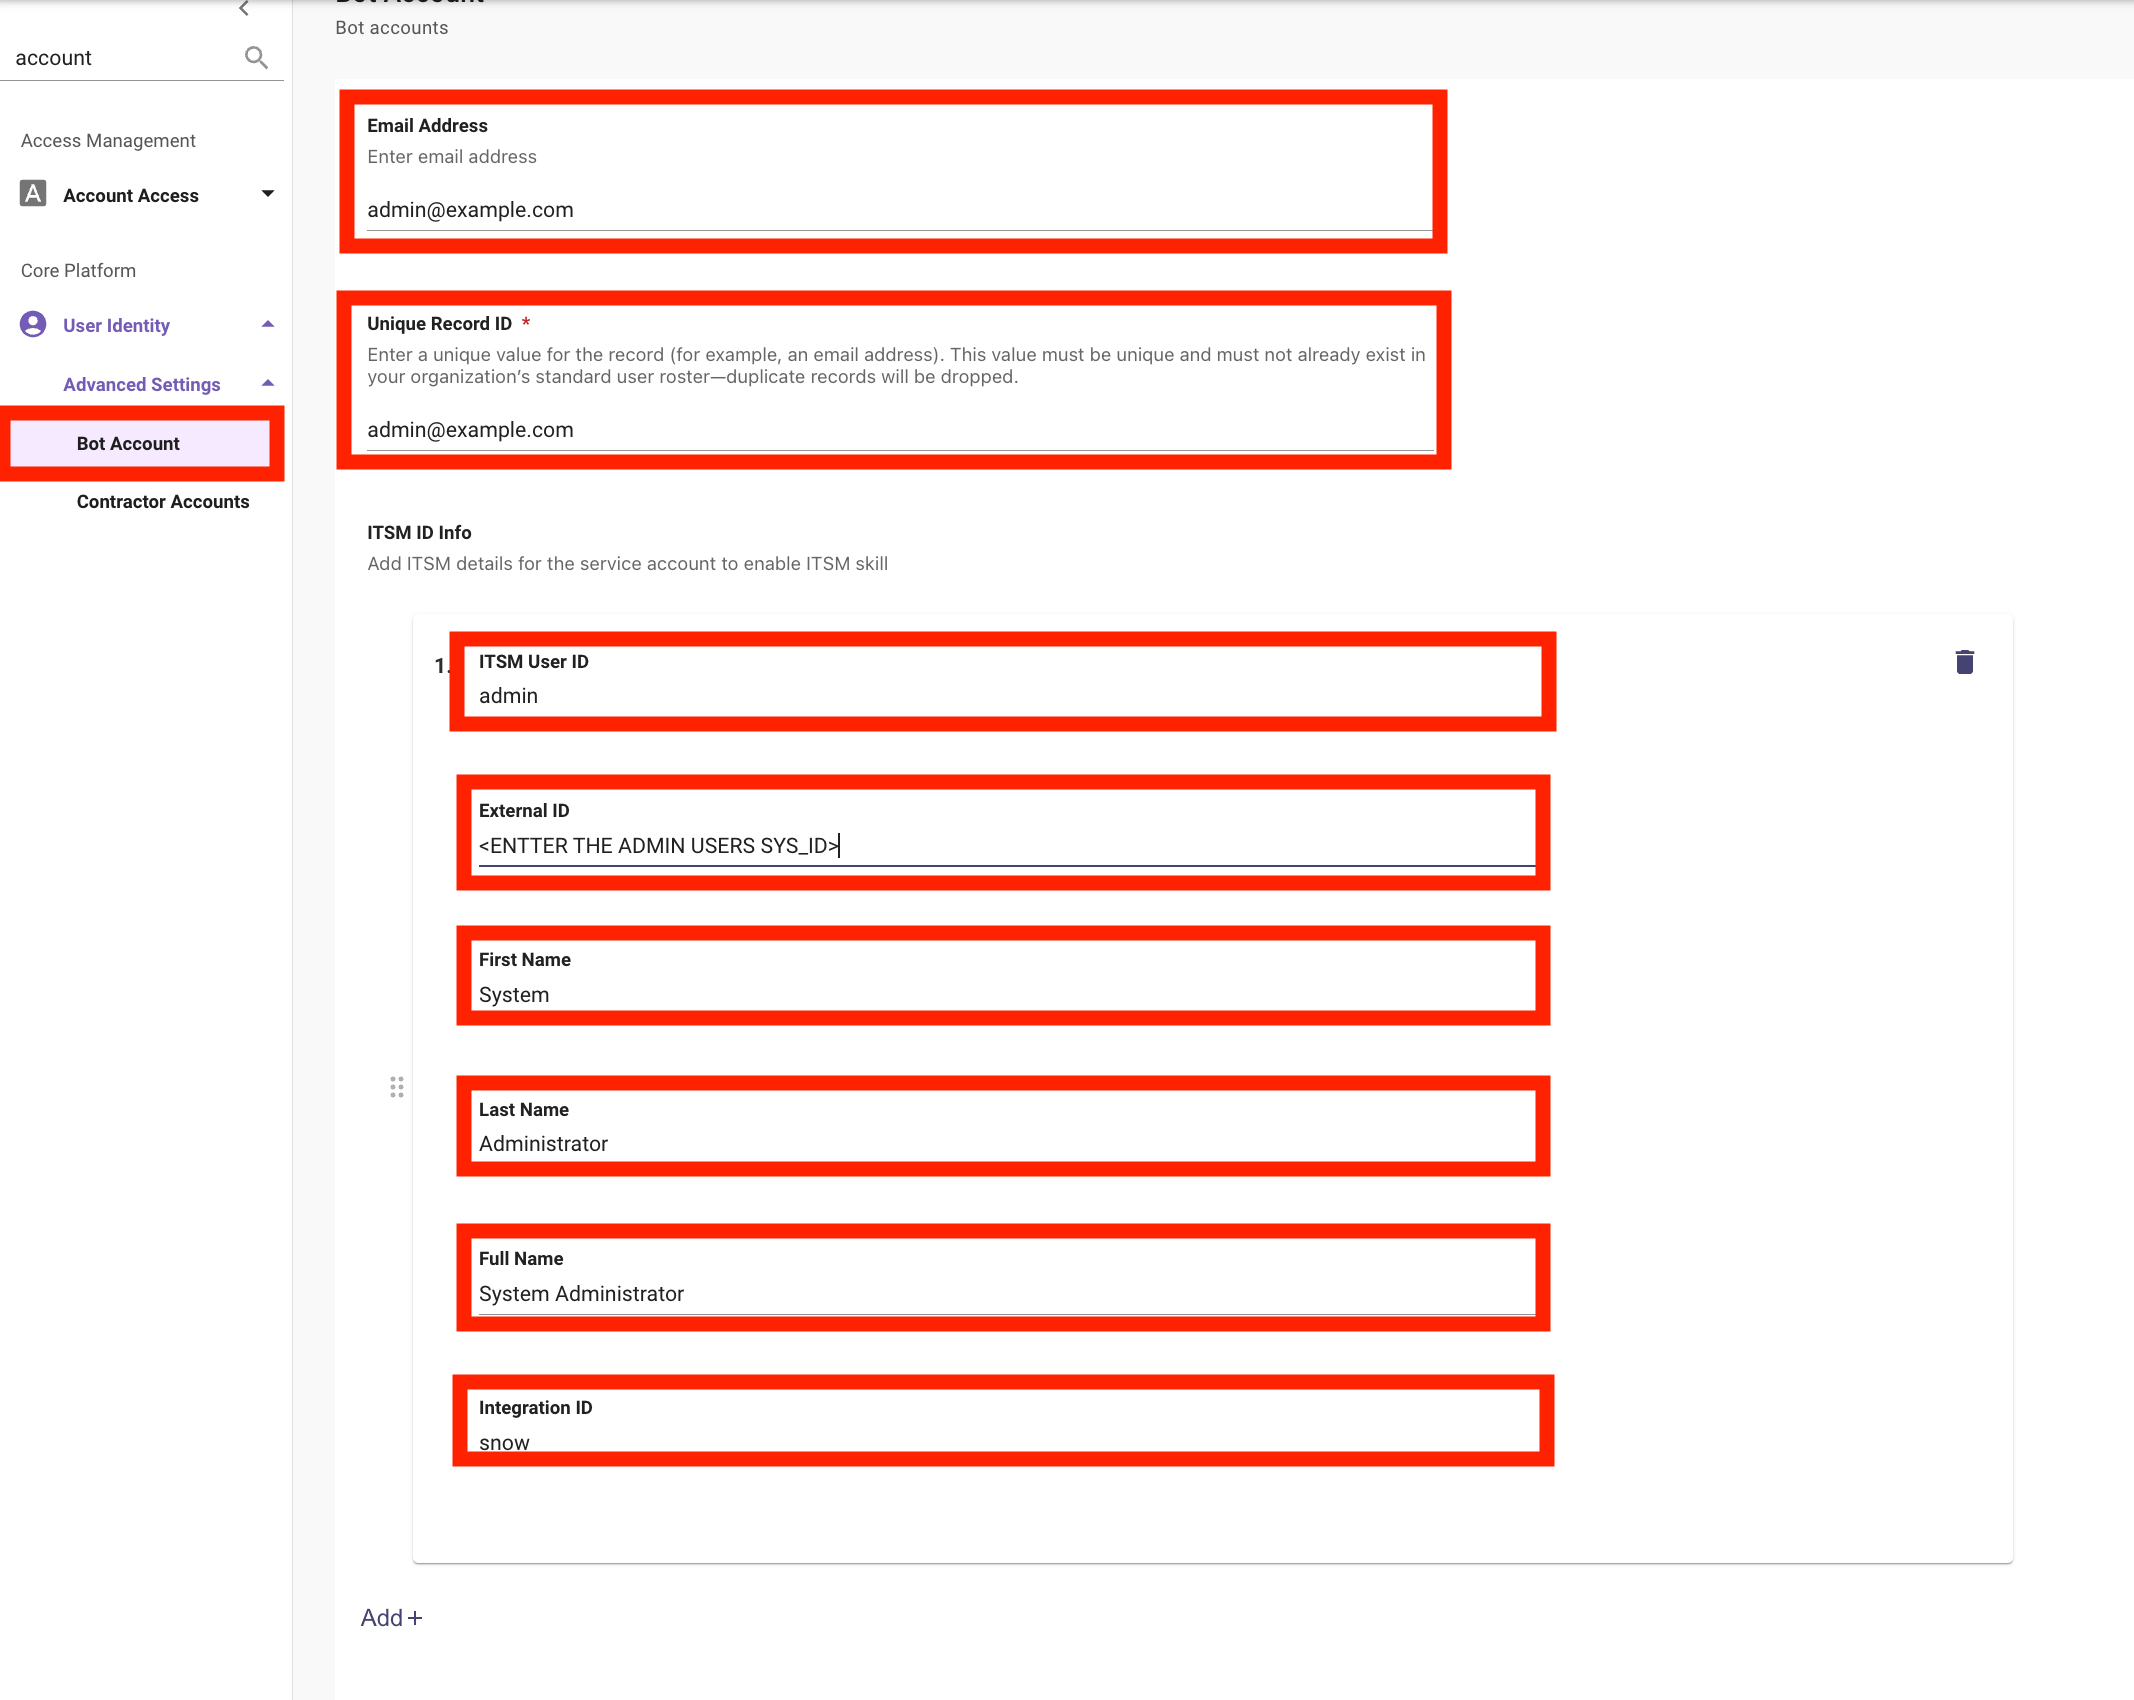
-
After you enter your configuration,
Submityour changes
1.3: Set up Bot Access Rule
Note: Setting the Bot Access Rule to TRUE will give all users who are ingested into Moveworks access to interact with Moveworks, but they must also have access to Moveworks via one of the following methods:
- Integrated Chat Platform:
- Access to talk to the Moveworks application in Slack, Teams, etc
- My Moveworks Access:
- Ability to select a tile in their IDAM platform that allows them to interact with the Moveworks on Web Assistant
- Embedded AI Assistant:
- Access to a Moveworks Assistant that has been surfaced on a web page controlled by IDAM SSO. This includes platforms like ServiceNow, Sharepoint, FreshService, etc
-
Navigate to
User Identity > Bot Access, set theBot Access RuletoTRUE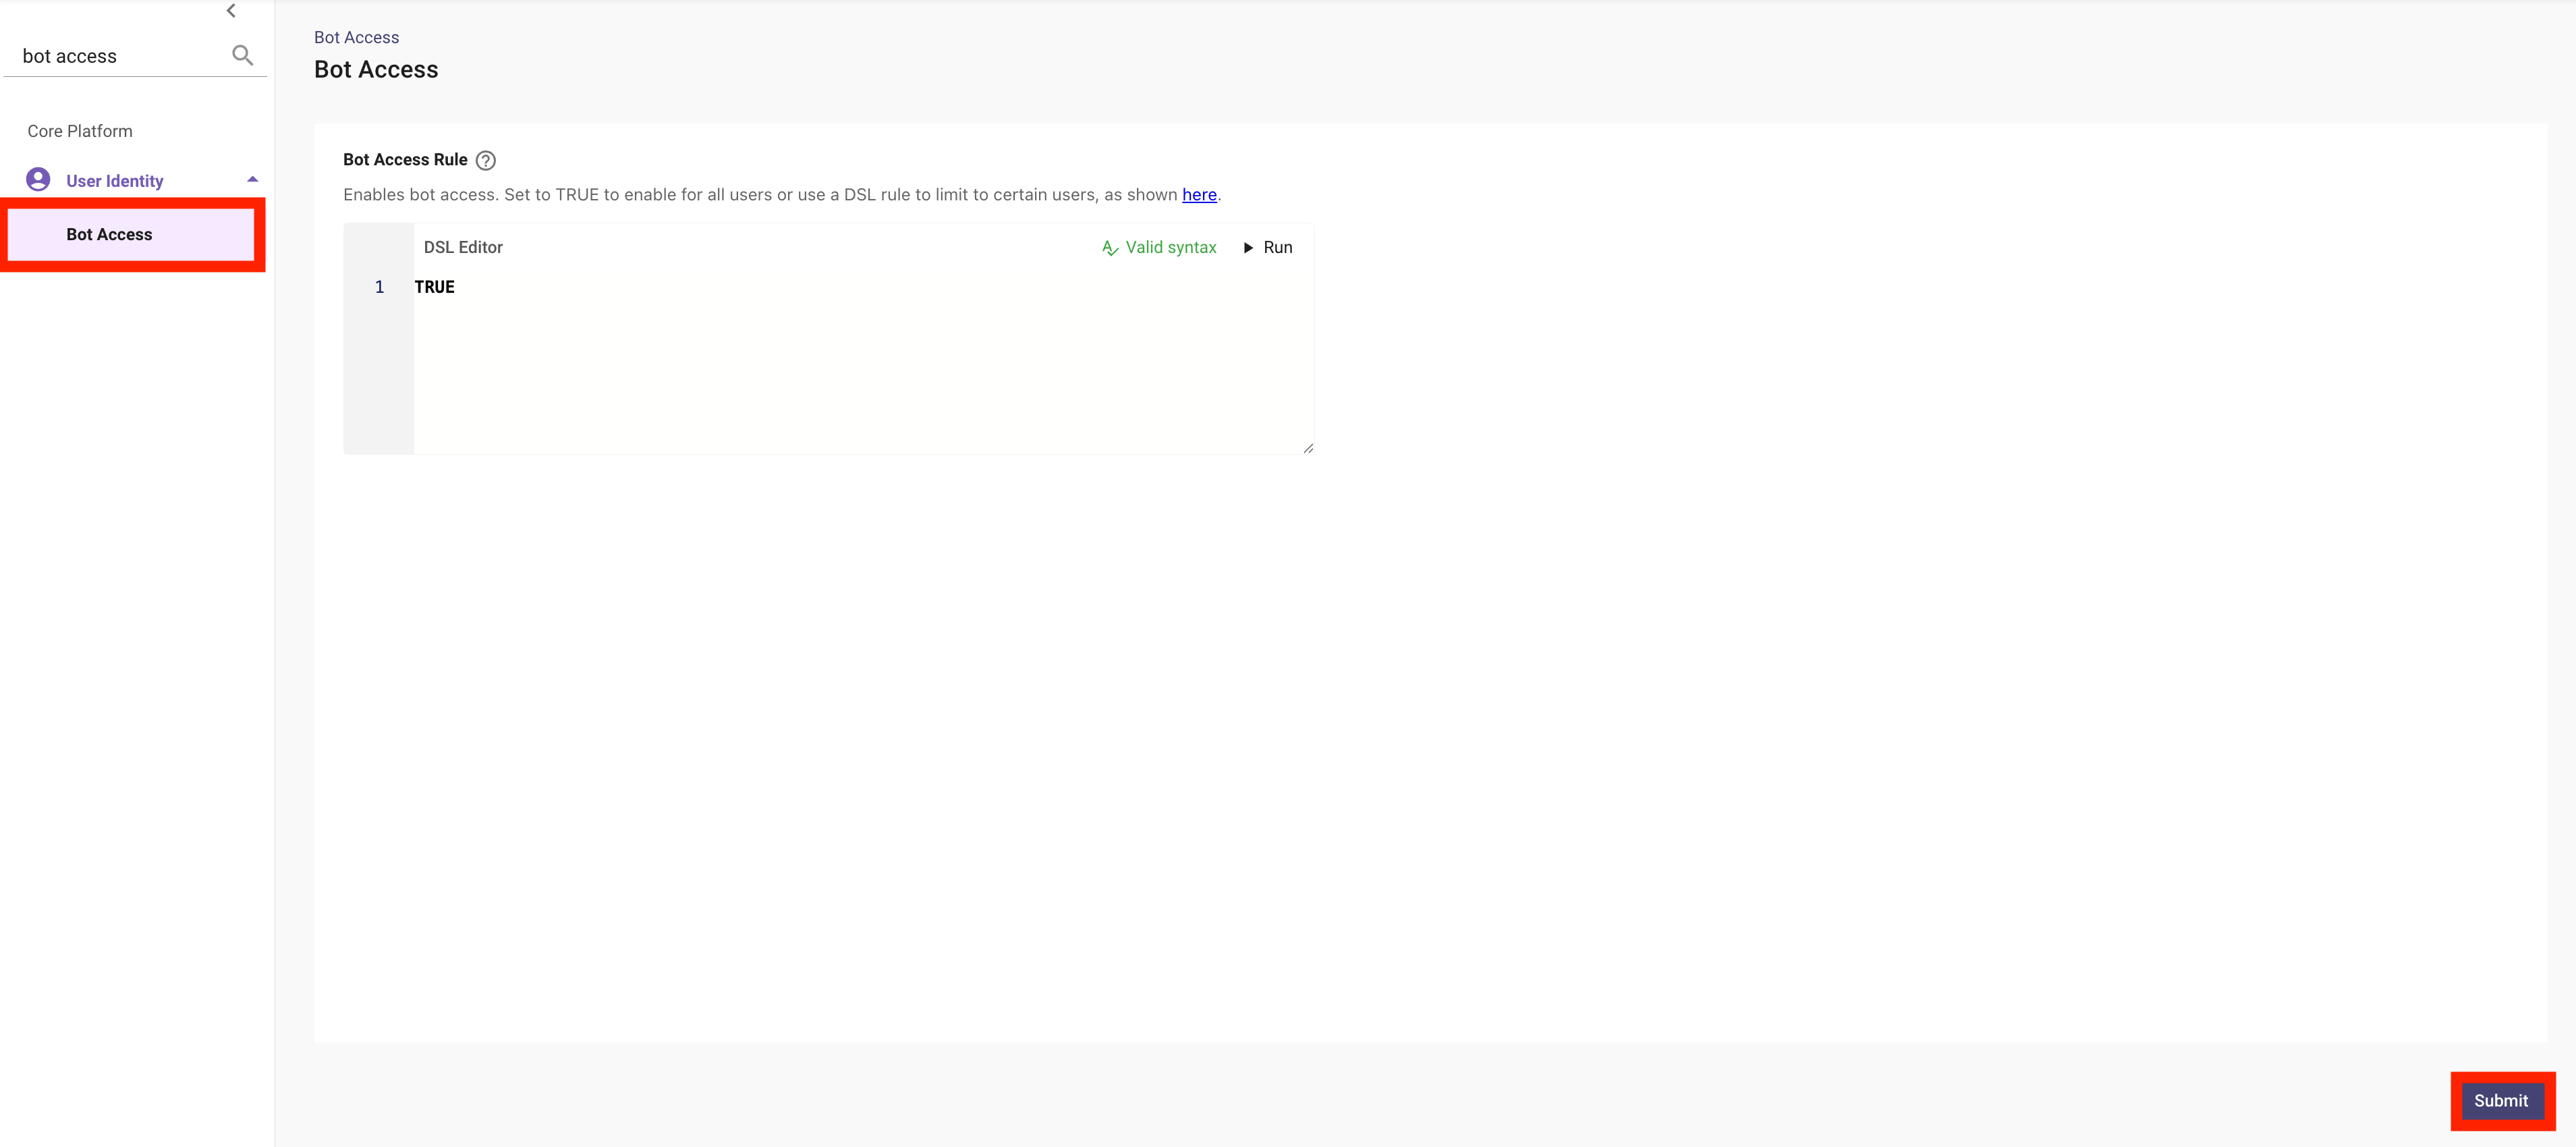
✅ 2: Verification & Next Steps
-
Wait for Processing:
- Now that we have configured the Moveworks User Identity Pipeline, we will need to wait for the user ingestion cycle to complete
- In a typical environment, the user roster refreshes every 4 hours
- If you are participating in a designated Moveworks Lab, your environment will refresh every 30 minutes.
- Now that we have configured the Moveworks User Identity Pipeline, we will need to wait for the user ingestion cycle to complete
-
Confirm Completion:
- Check the
Imported Userspage, and confirm that:- You are able to find yourself in the user roster
- The
Enabled Users&Bot Reachable Usersis greater than 0 - You see when the ingestion cycle completed and when it is next scheduled to run
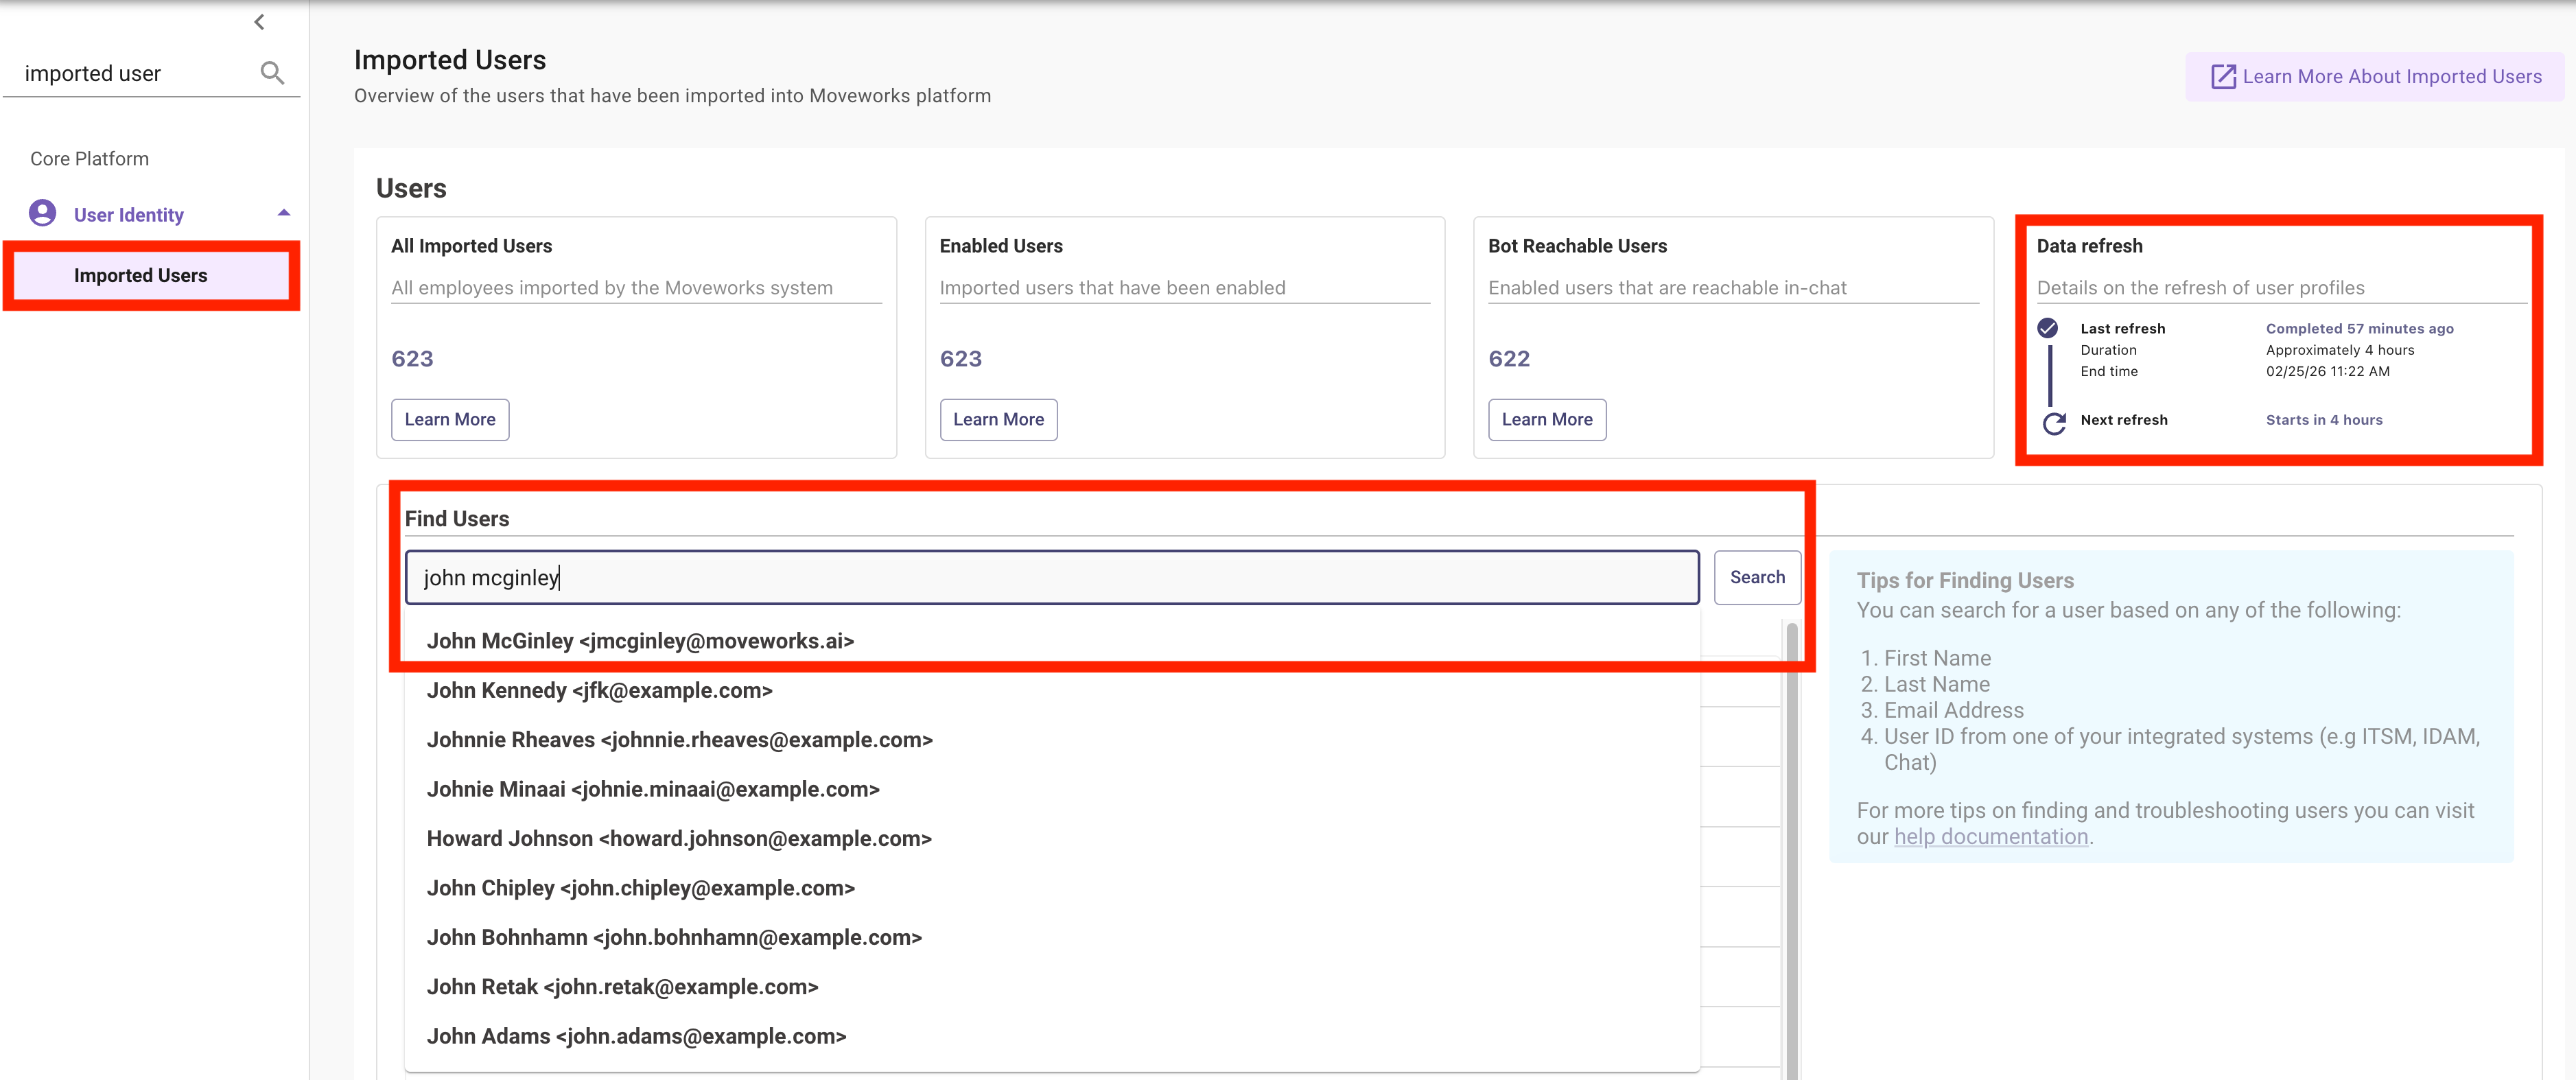
- Check the
Next: Pre-Req: Installing the Moveworks Update Sets into ServiceNow — required before Lab #3 (Enterprise Search). This installs the Moveworks-provided update sets your ServiceNow instance needs to support knowledge ingestion.
🪞 3: Reflecting on This Configuration
Through this guide, you’ve learned the following:
- How to configure Identity Sources within Moveworks using the 5-step Identity Configuration wizard
- How to filter source records (e.g.,
active=true) and apply processors like User Timezone and Unified Resolve Manager - How to inspect and override individual attribute mappings using the DSL editor, including testing a rule against a real user
- How joining keys link a user’s identity across sources, and how to validate the end-to-end configuration with Test With User before saving
- How to create the Moveworks Service Account user
- How to enable access to the Moveworks AI Assistant
- That Moveworks ingests users at a regular cadence, and you can see the currently ingested users + cadence in the
Imported Userspage
⚙️ 4: Configuration Details
Use the table below to fill in the required fields accurately.