
Connect ServiceNow
Prepare your ServiceNow instance and connect it to Moveworks so the AI Assistant can search knowledge, look up records, and act on tickets in your instance.
For administrators. This page covers the ServiceNow-side preparation, the Moveworks-side connection, and the user ingestion that joins the two. Once complete, continue to Configure Enterprise Search, Configure Forms, and Configure Ticketing.
Before You Begin
- You need admin rights in the ServiceNow instance you are connecting (or a ServiceNow admin who can complete steps 1 and 2 for you).
- You need access to Moveworks Setup in your Moveworks tenant. If this is your first time accessing Moveworks, see First-Time Login via Magic Link and Roles and Permissions.
- If you are connecting a production instance, follow your organization’s change-control process. We recommend completing these steps in a sub-production instance first.
- Open ServiceNow and Moveworks Setup in separate browser tabs, and keep a notes document handy: this task captures several values you will re-enter later.
Procedure
1. Install the Moveworks Update Sets
Install the Moveworks Update Sets in the documented order. At minimum you need moveworks.base (always first) and moveworks.acl (required for Moveworks to evaluate user criteria on knowledge and catalog items). Installing moveworks.base adds the moveworks_user role to your instance; you will grant it to the integration account in the next step.
On an instance with existing customizations:
- Preview each update set before you Commit, and resolve any preview problems with your ServiceNow admin. Collisions are normal on customized instances; do not blind-accept.
- Install in sub-production first and validate there before promoting to production.
- If you need to remove an update set later, use ServiceNow’s Back Out on the committed update set.
2. Choose and Prepare the Integration Account
Moveworks authenticates to ServiceNow as a single account. Anywhere Moveworks documentation or examples show admin, read it as the account you choose here: your values (user ID, email, sys_id, credentials) will differ accordingly.
You have two options:
- The built-in
adminuser (simplest). Appropriate for a Personal Developer Instance or a disposable sandbox, where the out-of-the-boxadminaccount already has everything Moveworks needs. - A new admin account you create (recommended for any shared or production instance). Create a ServiceNow user for Moveworks with the roles listed in the ServiceNow Access Requirements: ITIL, Approval Admin, Flow Operator, Catalog Admin, UI Policy Admin, and Personalize Dictionary.
Then, on the chosen account’s user record in User Administration > Users:
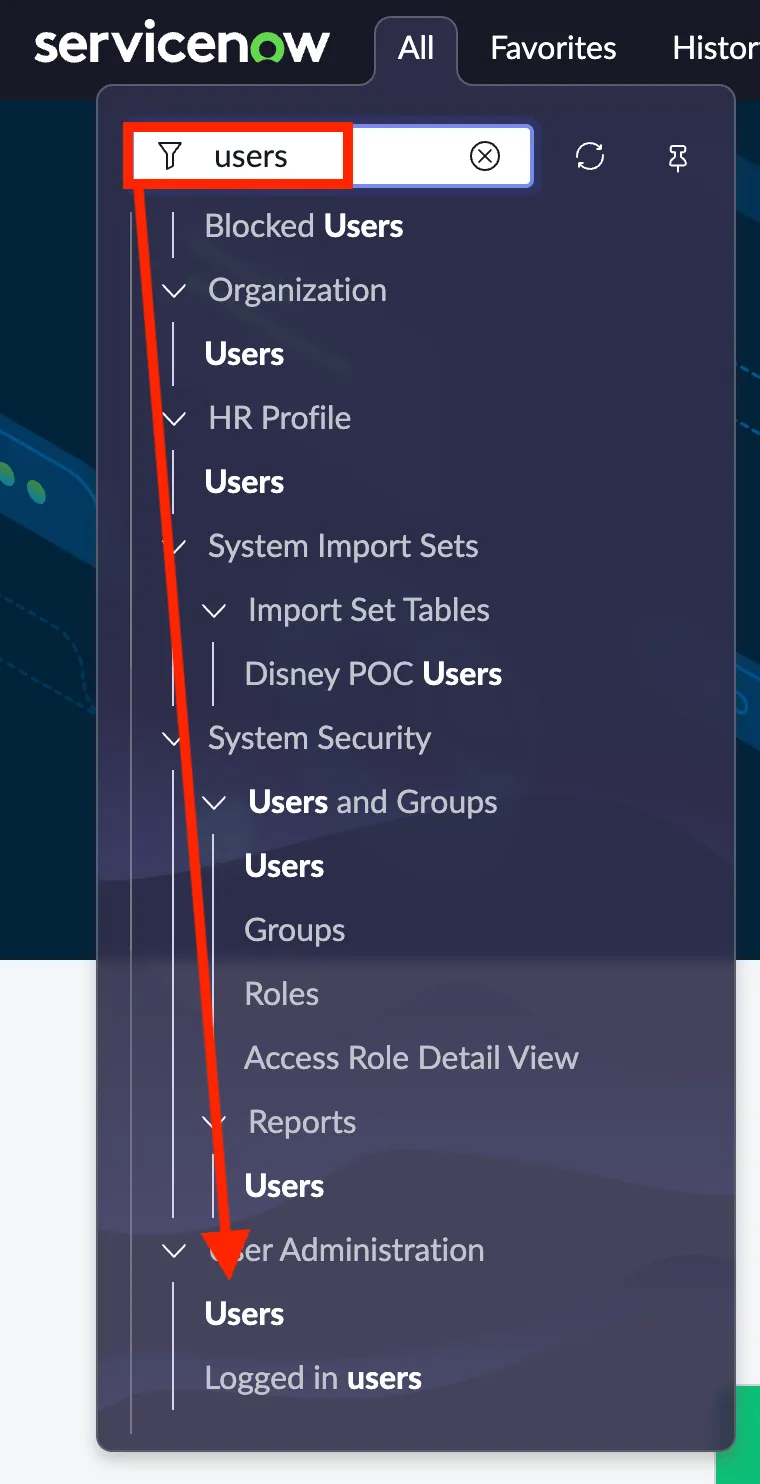
-
Grant the
moveworks_userrole (added by themoveworks.baseupdate set in step 1) and thesnc_basic_auth_api_accessrole. ServiceNow requiressnc_basic_auth_api_accessfor an account to authenticate inbound REST API calls with basic authentication; without it, the connector’s API calls fail even with valid credentials. -
Confirm the Email field is populated, and set it if empty. The built-in
adminaccount on a fresh instance often has no email. Moveworks requires this value in step 5: it is how the Bot Account joins to the ingested user roster. -
Set the Time zone field to
GMT. This keeps audit timestamps and scheduled behavior consistent between Moveworks and ServiceNow.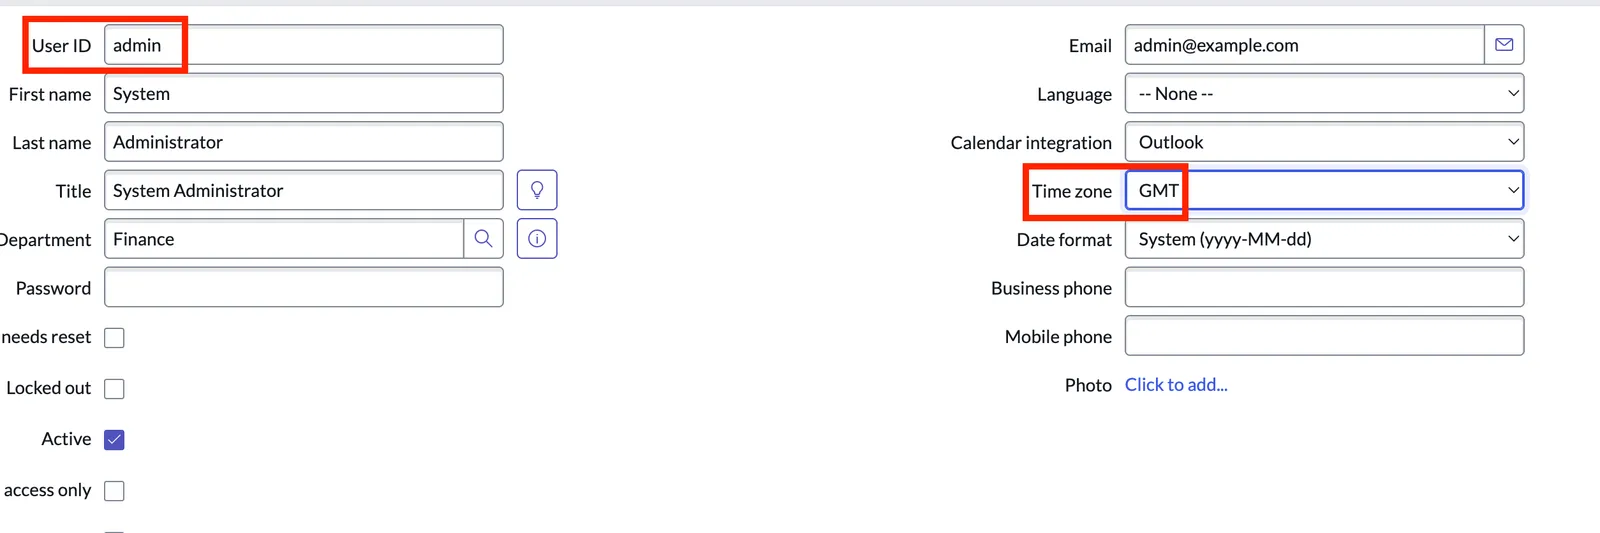
-
Capture the account’s 32-character
sys_id. With the user record open, use any of these:-
Click the hamburger menu (three lines, top-left of the form), then Copy sys_id.
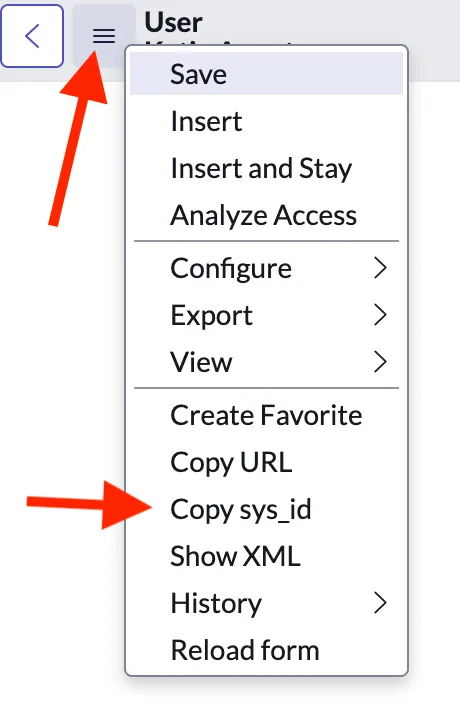
-
Right-click the gray form header, then Copy sys_id.
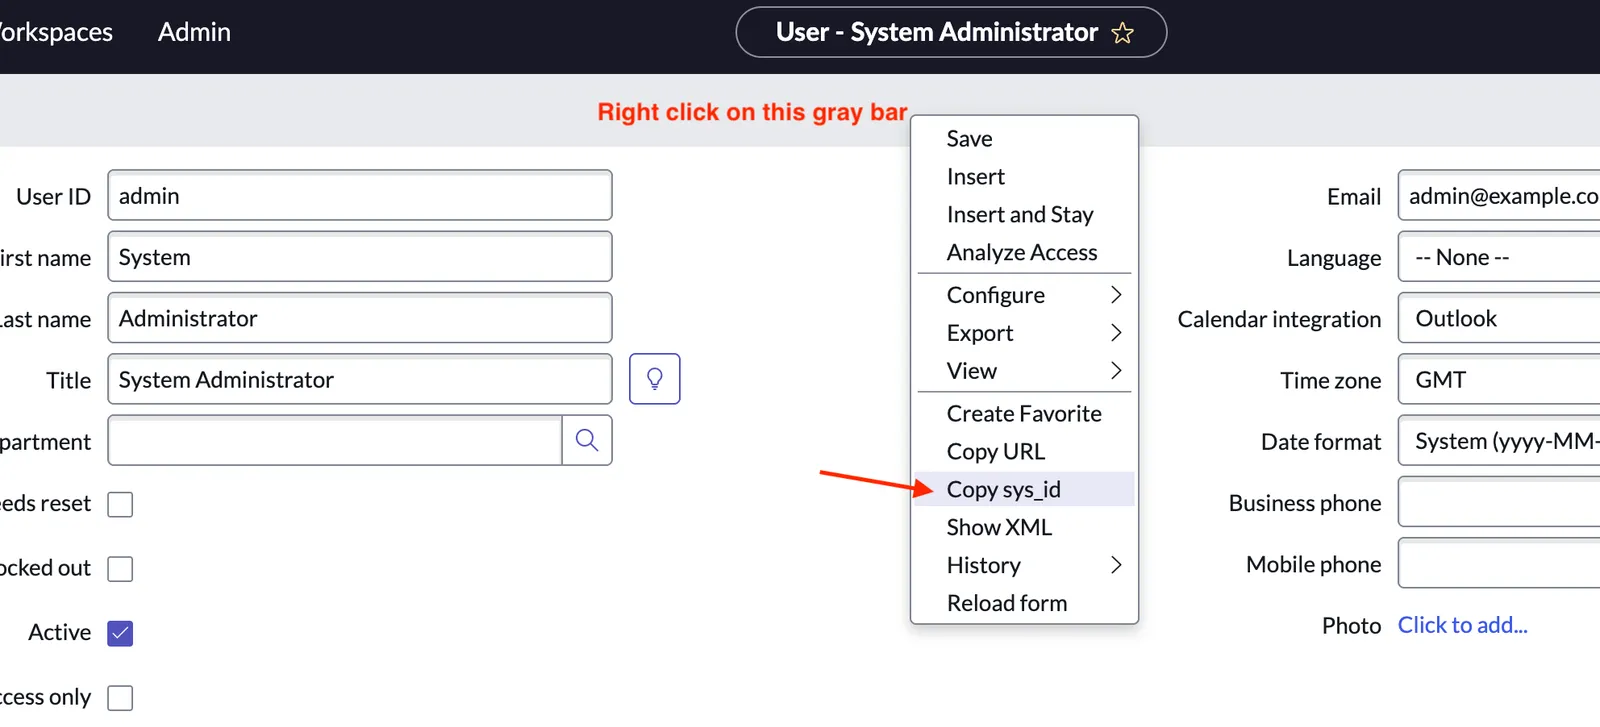
-
Copy it from the URL, which contains
sys_user.do%3Fsys_id%3D{sys_id}.
-
If you copy the sys_id from the URL, do not include the 3D prefix. %3D is a URL-encoded equals sign, not part of the identifier. The sys_id is the 32-character hex string that starts immediately after %3D: ed65ebcf8372e690cbcdc396feaad380, not 3Ded65ebcf8372e690cbcdc396feaad380.
- Record your instance URL and the account’s user ID, password, email, and
sys_idin your notes. Steps 3 and 5 consume all five values.
3. Create the Connector
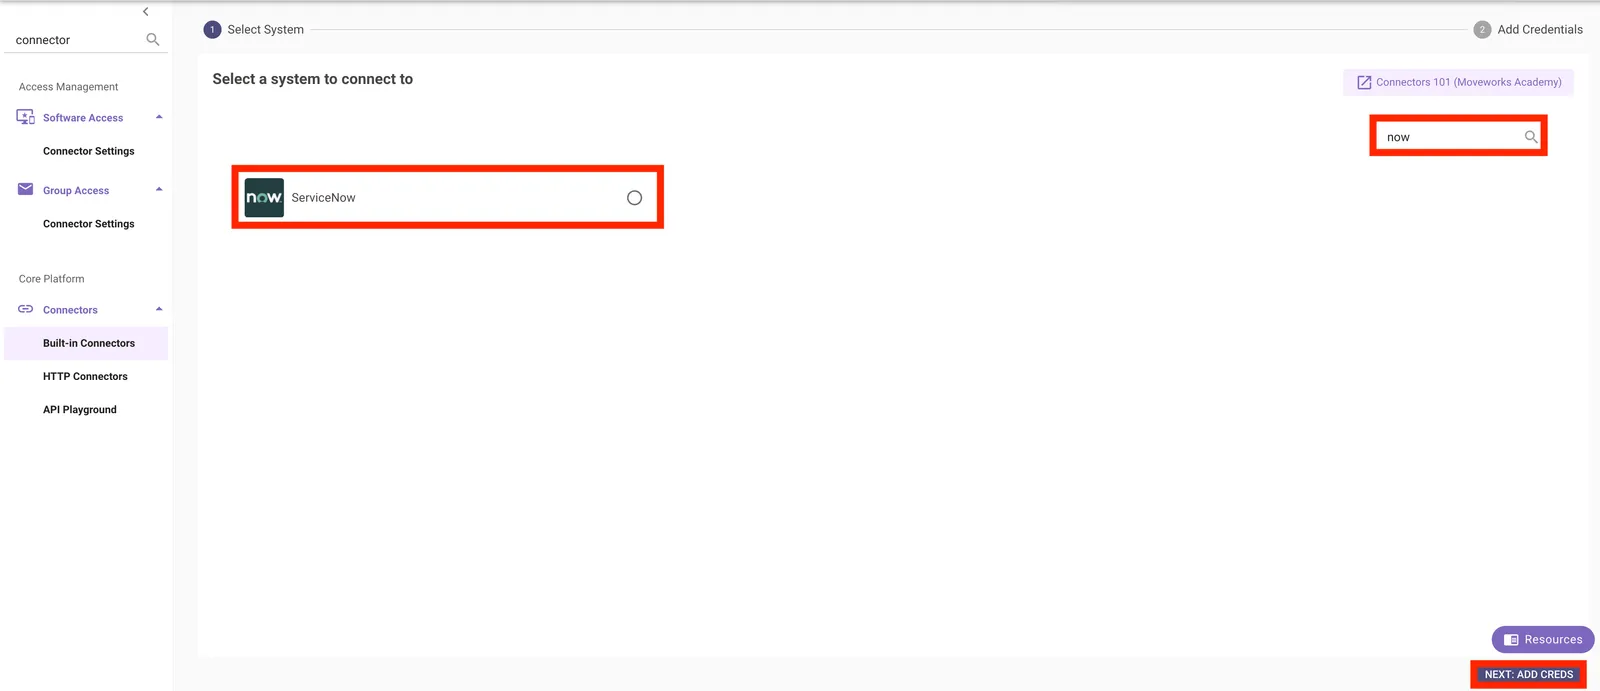
In Moveworks Setup, go to Connectors > Built-in Connectors, select ServiceNow, and create the connector using your instance URL and the integration account’s credentials, then test it. See Connectors for the step-by-step guide.
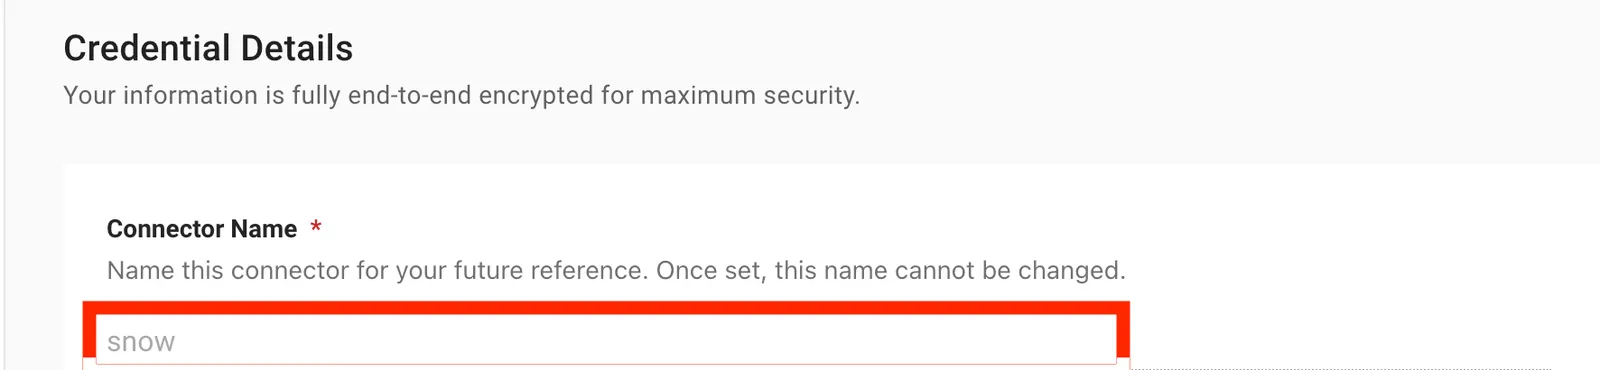
Choose the connector name carefully; it cannot be changed once set. Every later configuration that references this connector - user ingestion, Enterprise Search, Forms, Ticketing, and the Bot Account’s Integration ID - must use exactly the name you enter here. Record it in your notes, and wherever documentation shows an example connector name, substitute yours.
4. Ingest Users
The user roster is the backbone of Moveworks identity: it determines who can use the AI Assistant and joins each chat user to their ServiceNow records. Ingestion pulls user data from ServiceNow through your connector, and a joining key (email by default) matches each person across systems - which is why the joining key must be unique, permanent, and present in every connected system. See Ingest Users for full detail.
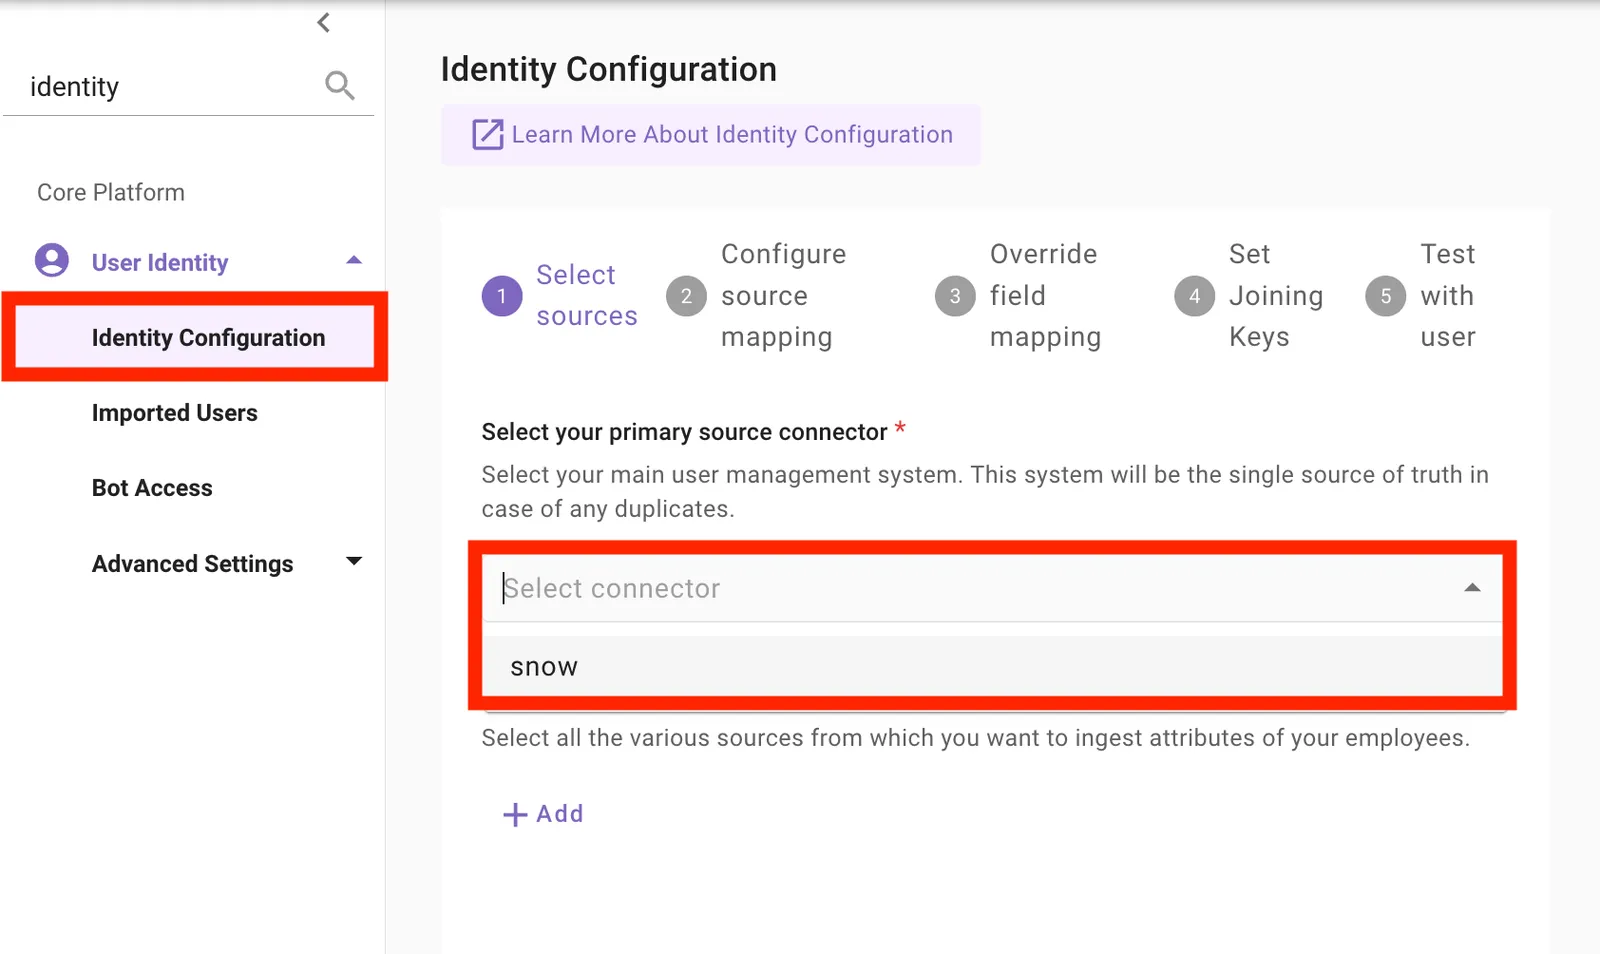
In Moveworks Setup, go to User Identity > Identity Configuration. The wizard has five steps:
-
Select sources. Choose your ServiceNow connector as the primary source and click Test to confirm it is reachable. Leave secondary sources empty unless you also ingest from an HRIS or IdP.
-
Configure source mapping. Click the person icon on your source row to view sample users and confirm real records return (if none do, recheck your connector credentials). Then open the filter (funnel icon) and add the API query string
active=trueso only active users are ingested. Under Processors, add and enable the User Timezone Processor and the Unified Resolve Manager Processor (resolves each user’s manager reference into a usable profile attribute). The per-attribute field mappings ship with sensible defaults; you can inspect or override any of them later.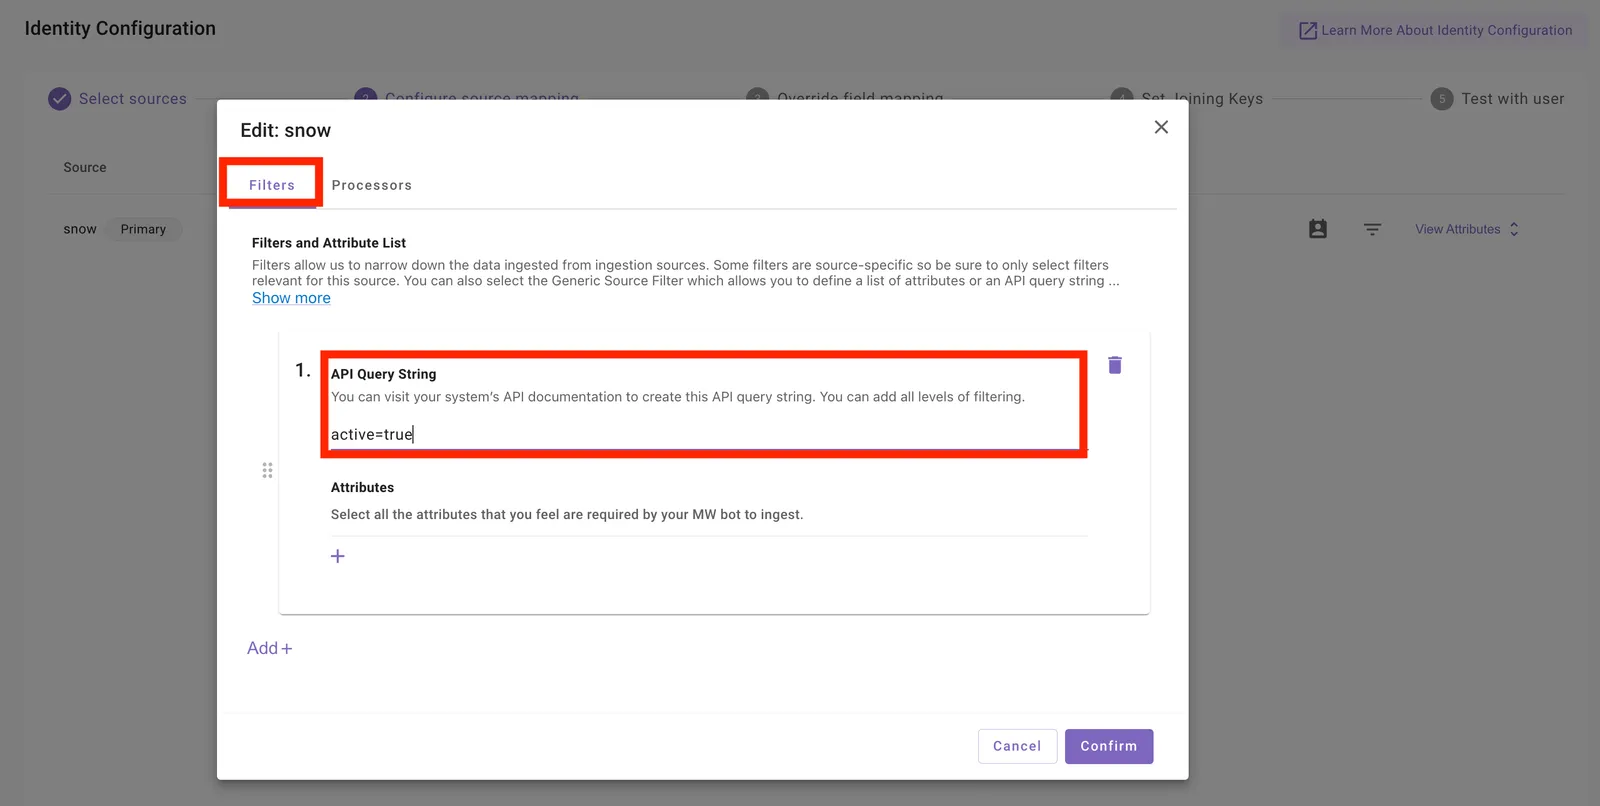
-
Override field mapping. Only used with multiple sources; with ServiceNow as your single source, leave empty.
-
Set joining keys. Confirm the joining key resolves to the user’s email address (the default).
-
Test with user. Enter your own email and click Show User Profile. You should see real values for attributes like name, email, role, and department;
Nullresults are expected for attributes you have not customized. When it looks right, click Save Configuration.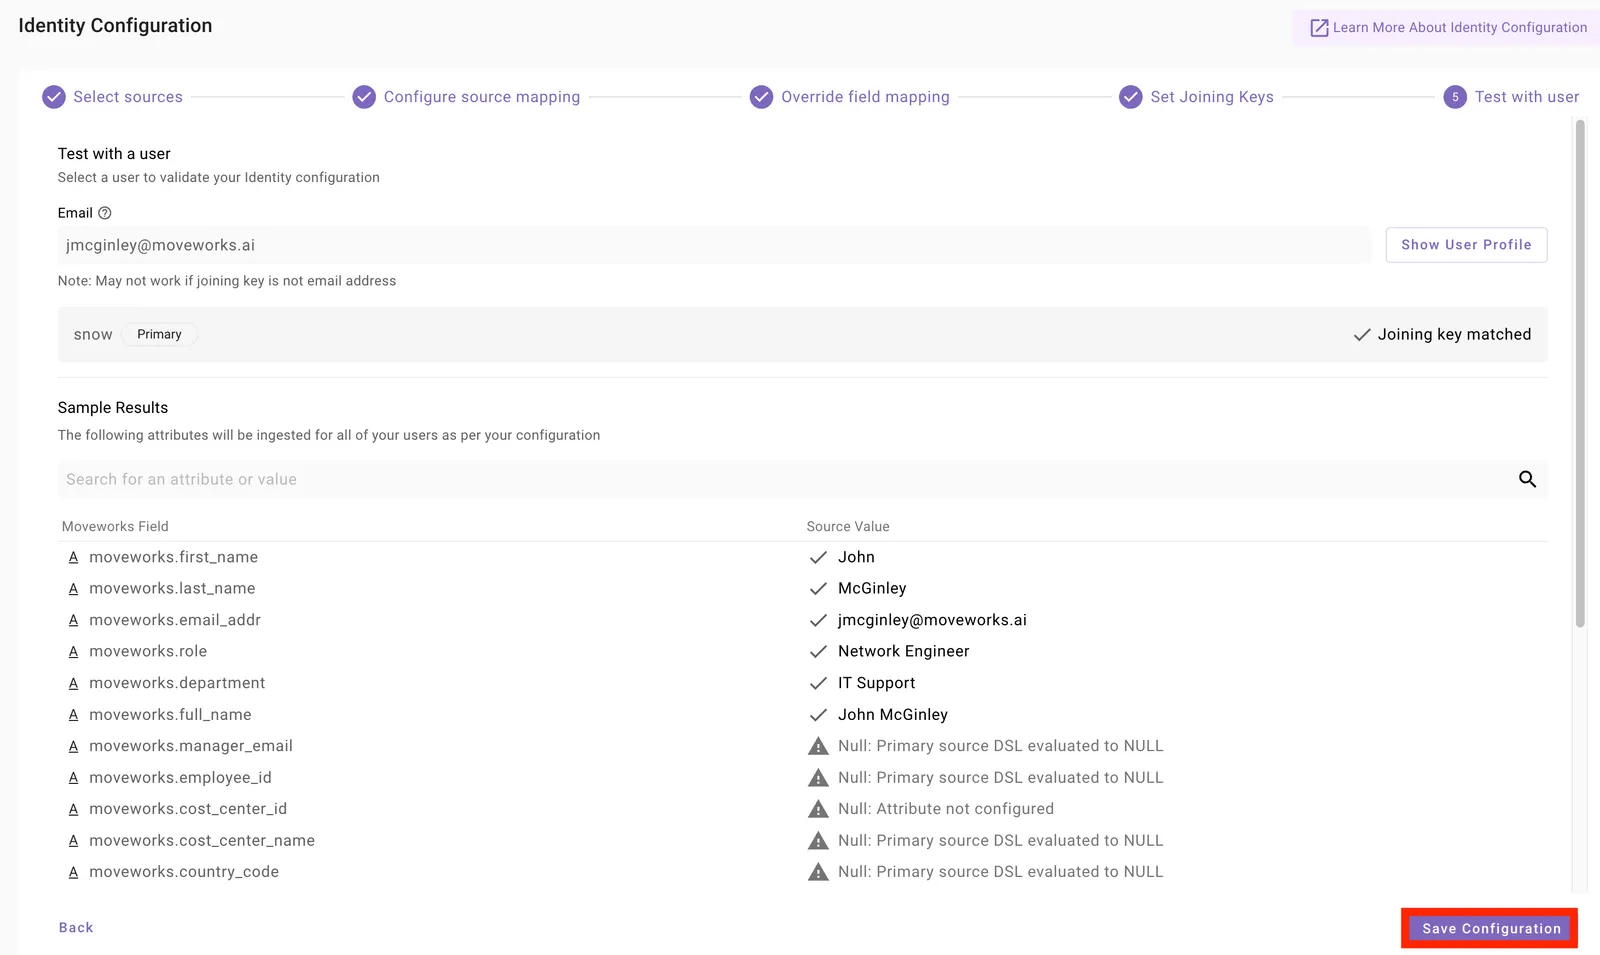
After saving, the ingestion cycle runs on a schedule (typically every 4 hours). When it completes, verify on the Imported Users page: you can find yourself in the roster, and Enabled Users and Bot Reachable Users are both greater than zero.
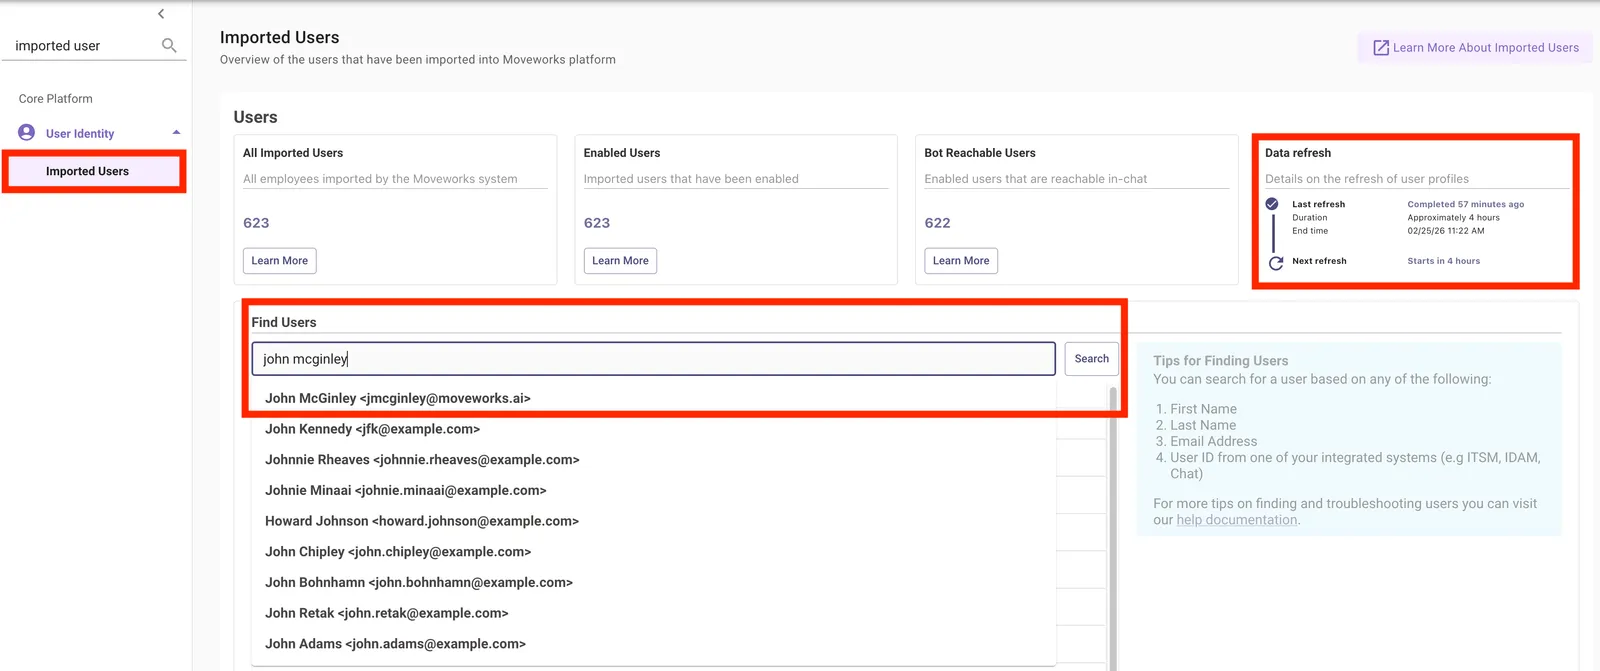
Never create a duplicate user record. Ingestion drops records with duplicate emails. If a person already exists in ServiceNow (synced from your identity provider), confirm their record is Active with a correct email instead of creating a second one.
5. Configure the Bot Account
On the Bot Account page in Moveworks Setup (User Identity > Advanced Settings > Bot Account), enter the values you captured in step 2. These fields must exactly match the integration account in ServiceNow; mismatched values cause Moveworks to fail to authenticate actions on behalf of users.
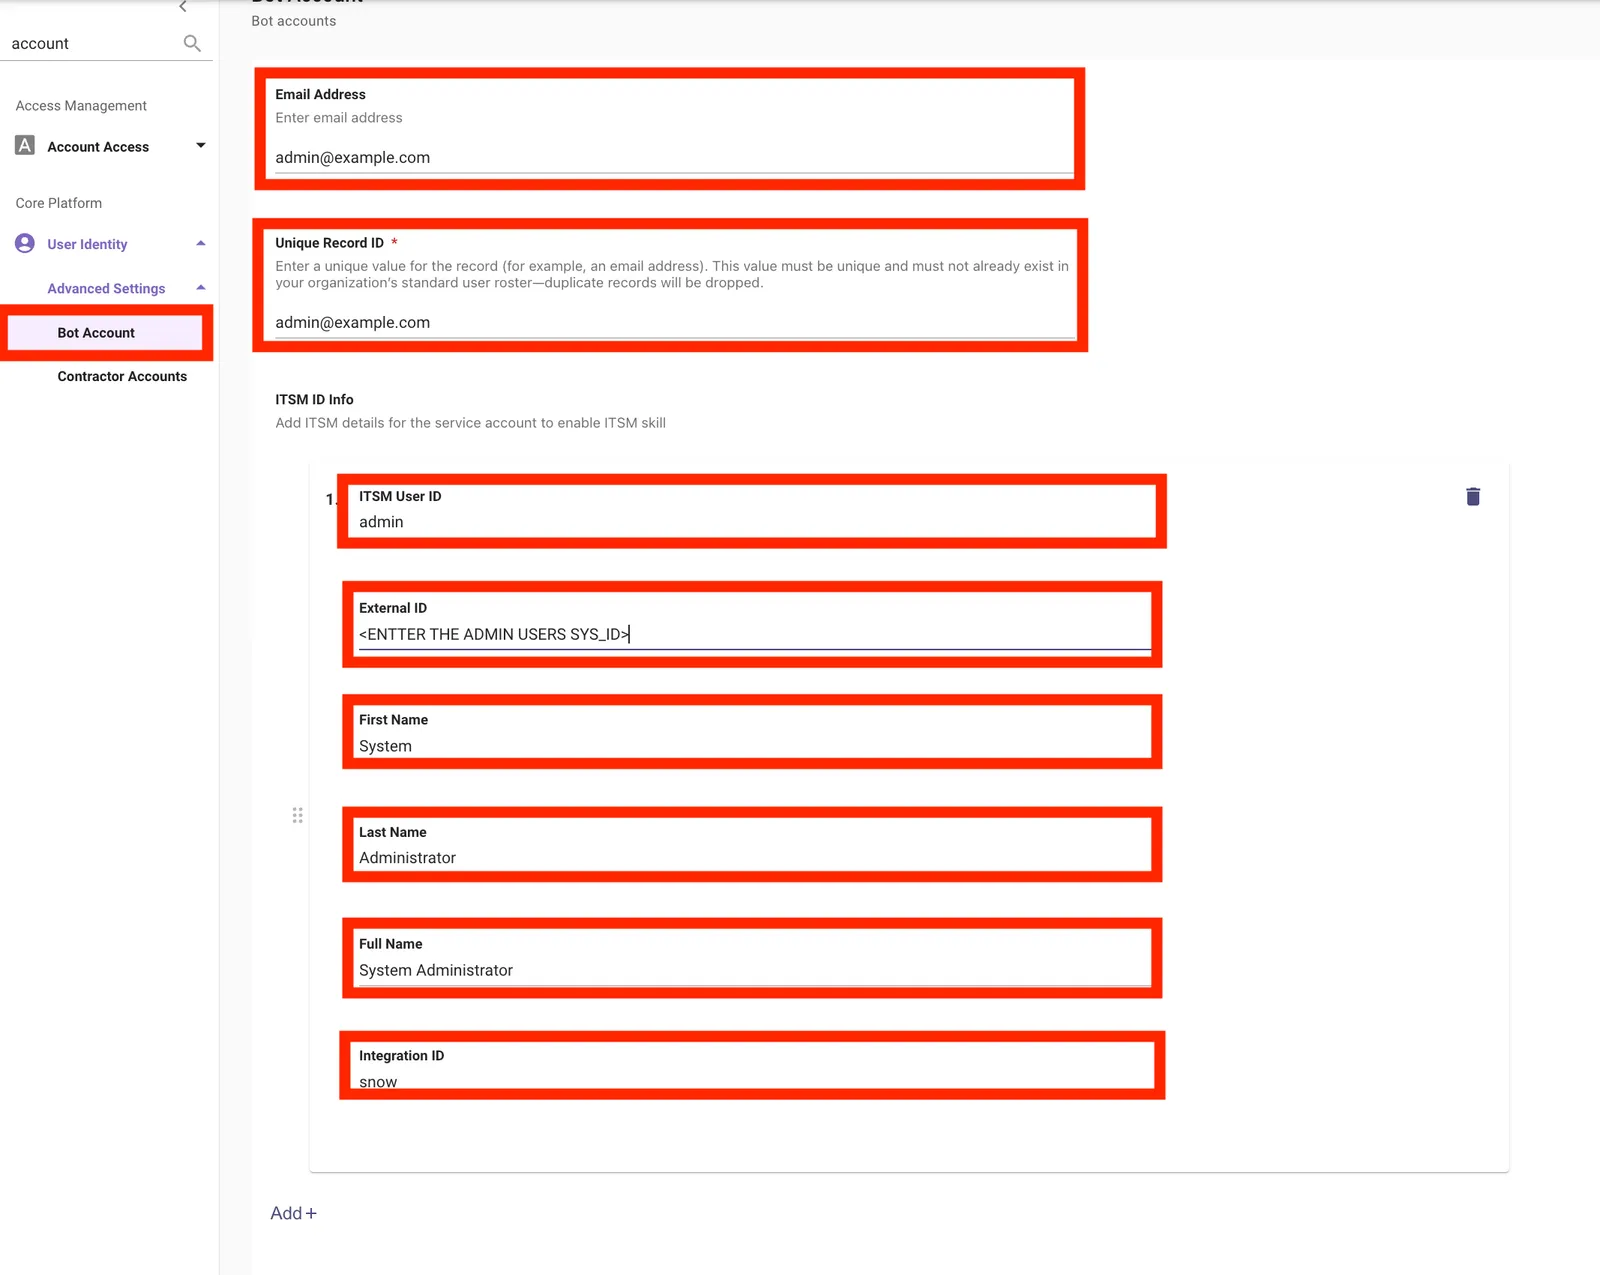
See the Service Account Configuration Guide for a multi-system reference example.
6. Set the Bot Access Rule
The Bot Access Rule is the gate that decides which ingested users are allowed to interact with the AI Assistant. Until it is configured, being in the roster is not enough.
- In Moveworks Setup, go to User Identity > Bot Access.
- Set the Bot Access Rule. Setting it to
TRUEgrants access to every ingested user; to roll out gradually, use a DSL rule instead (for example, scoping by department or a pilot group) and widen it later. - Save.
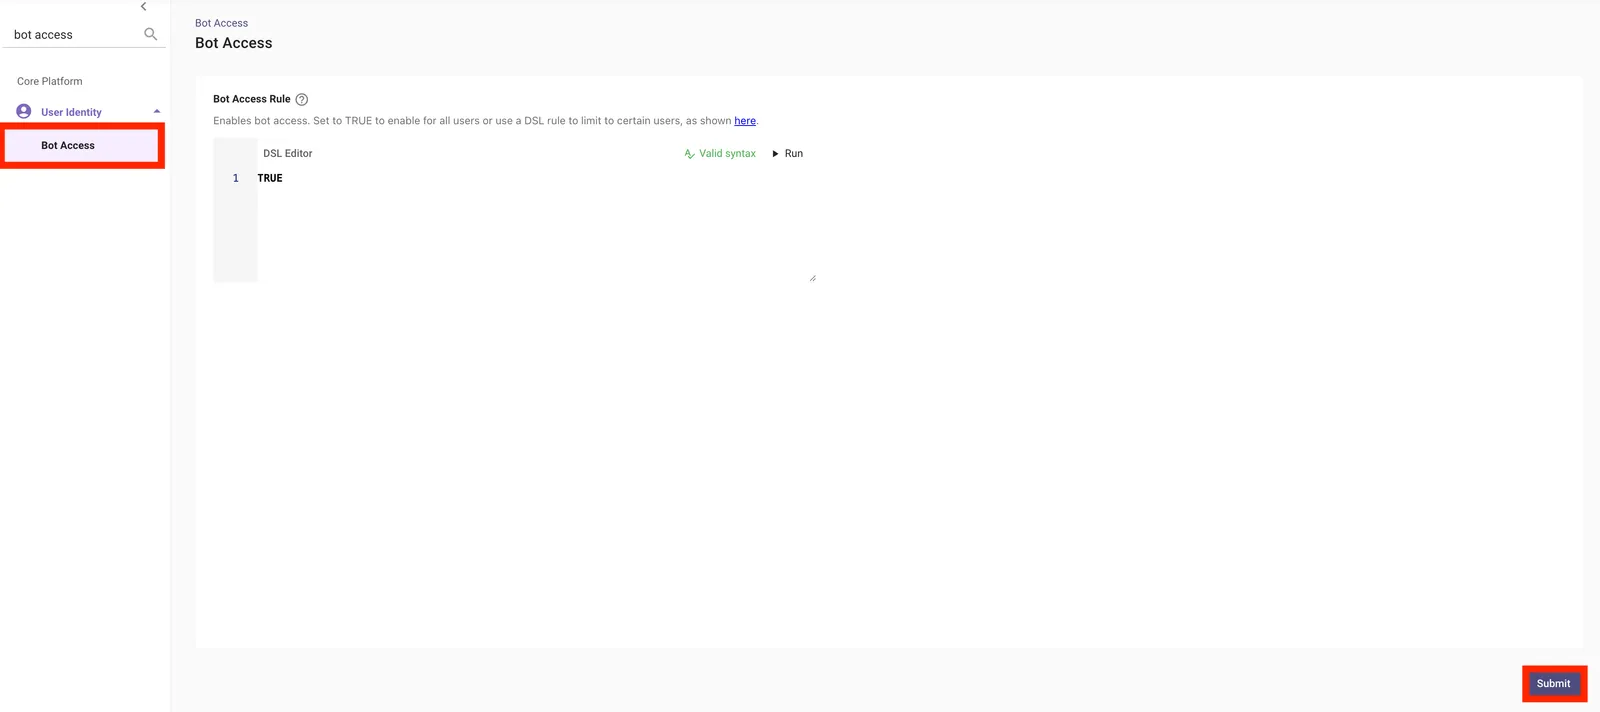
Passing the Bot Access Rule alone doesn’t make the AI Assistant reachable. Users also need at least one surface to talk to it: an integrated chat platform (Slack, Teams, and so on), My Moveworks on the web, or an Embedded AI Assistant on a portal behind your SSO.
Result
Moveworks is authenticated to your ServiceNow instance: the update sets are committed, the connector test passes, users are ingesting into the roster on a schedule, the Bot Account fields match the integration account’s real values in ServiceNow, and the Bot Access Rule defines who can use the AI Assistant.
What to Do Next
- Configure Enterprise Search so the AI Assistant can answer from your knowledge articles.
- Configure Forms so users can find and fill catalog items in chat.
- Configure Ticketing so users can file, track, and resolve tickets - and so form submissions complete.
- Work through the Moveworks Implementation Starter Guide for the full rollout, and complete the Launch Checklist before announcing the AI Assistant.