
Connect and Manage Servers
MCP Workspace is available to a limited set of customers. Moveworks is validating the experience and gathering feedback, so capabilities and limits may change. To request access, register your interest.
MCP Workspace is where an Agent Studio admin connects to MCP servers and controls which users can reach them. This page covers the connection paths, authentication checks, access controls, and the first-time user experience.
Before You Start
- Connecting servers is an Agent Studio admin task.
- A connected server does not grant anyone access to its upstream system. Each tool call uses the individual user’s credentials and permissions in that system.
- Start with apps and use cases that do not overlap with an existing plugin or Enterprise Search. See Configure and Test MCP Workspace.
Moveworks does not review, approve, or vet MCP servers or their tools. Review the full inventory before you make a server available. A server decides which tools and guardrails it exposes, including whether it offers write or destructive actions.
Add the Required Name and Description
Every MCP server in MCP Workspace requires a Name and Description. Complete both fields when you create a preconfigured or custom server.
- Name: Use the name of the application or service behind the MCP server. Match the words users are likely to use in requests. For example, name a Linear server Linear so a request such as “Check my Linear issues” clearly matches it. For a custom server, use the name of the application or internal service it exposes, not Custom MCP server or a list of capabilities.
- Description: Explain the server’s purpose, the kinds of tools it contains, and the range of functions and operations it supports. Include important boundaries, such as read-only access or operations the server does not provide.
The description is especially important for quality. The assistant uses it to understand the server’s purpose and decide whether the server fits a request.
For example, a custom server for an internal application named Acme Benefits should use Acme Benefits as its Name. Its Description could be: “Looks up employee benefit eligibility, coverage, policy cost, and policy text. The tools are read-only and do not enroll employees or change benefit selections.”
The MCP Workspace description is separate from the individual tool names and descriptions returned by the remote server. Both affect tool selection, so review the tool inventory after the server connects.
Choose a Connection Path
Connect a Preconfigured Server
Preconfigured servers have their connection details filled in for you. MCP Workspace uses DCR to discover their OAuth settings and register the client during setup.
Tool names and descriptions come from the server and are view-only in Agent Studio. The tools shown to an administrator are not necessarily the same tools each end user sees. MCP Workspace retrieves tools for each user at runtime based on that user’s upstream permissions.
Connect a Custom Server
Use the Custom Server path for a compatible remote server that is not in the preconfigured list, including a homegrown server.
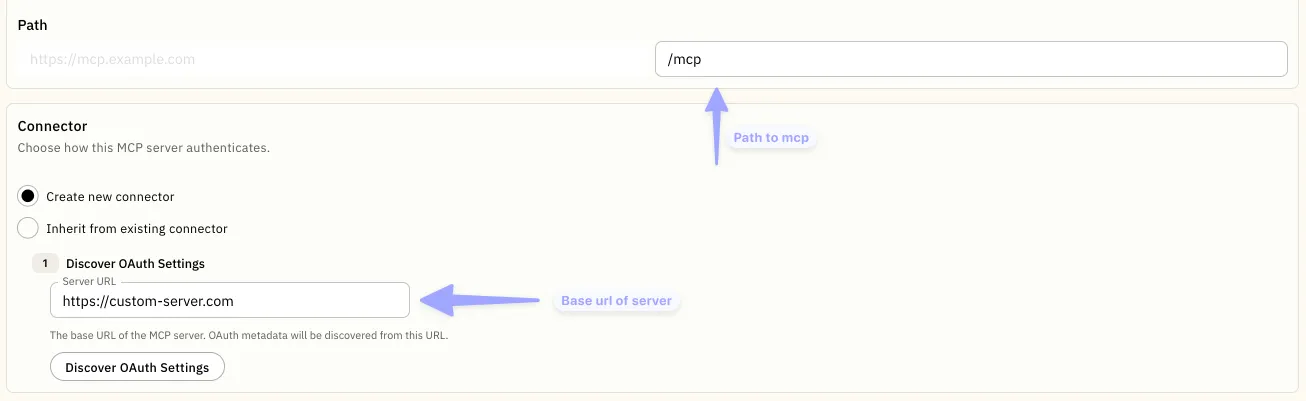
Enter the server endpoint
Select Custom Server, then enter the base URL and path from the server owner’s documentation. Enter the base URL without a trailing /, such as https://mcp.example.com, and enter the Streamable HTTP path in the separate Path field, such as /mcp.
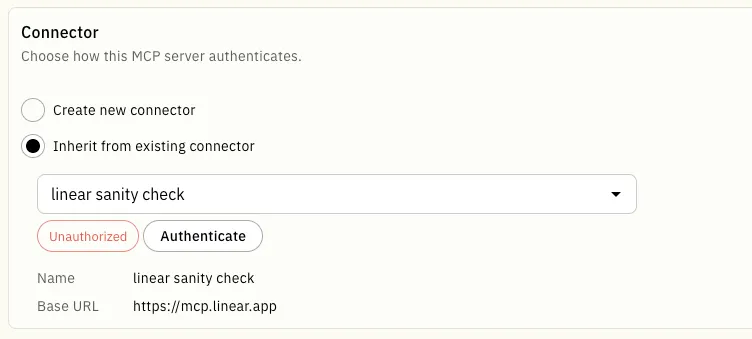
The server does not support DCR
Create an OAuth 2.0 Authorization Code HTTP connector before you connect the custom server. Collect these values from the server owner and authorization provider:
Register the OAuth client
Register an OAuth application with the authorization provider. Add the callback URL for your Moveworks data center, then save the client ID and client secret.
Create the HTTP connector
Follow the OAuth 2.0 Authorization Code guide. Use the MCP server’s base URL, choose the minimum required scopes, and select PKCE using SHA256 code challenge.
MCP Workspace supports DCR for both connection paths when the server supports it. Without DCR, a developer or administrator configures a custom server through an HTTP connector. Neither path grants end users access to the upstream system.
Verify Authentication
For a custom server that does not support DCR, configure the required OAuth 2.1 connection through an HTTP connector. Then generate a token in MCP Workspace and select Preview Tools to verify that the administrator connection can authenticate and retrieve the expected inventory.
Preview Tools validates the administrator connection. It does not guarantee that every user will see the same tool inventory. MCP Workspace retrieves tools for each user at runtime based on that user’s upstream permissions.
Set the Tool Approval Policy
Every MCP server has a tool approval policy. It controls whether a user has to approve a tool before it runs.
The policy applies to all tools on that server. Set it when you connect the server, and change it at any time afterwards.
How “Follow server guidance” decides
MCP servers can describe each tool with annotations. Moveworks reads three of them.
A tool skips approval only when all three of these are true at once:
- Read-only is
true - Destructive is
false - Open world is
false
In every other case the user is asked.
Annotations are set by whoever built the MCP server, not by Moveworks. A server that sets none of them will ask for approval on every tool. That is the intended outcome: when we cannot tell whether a tool is safe, we ask.
Set or change the policy
- In Agent Studio, go to MCP Servers and open the server.
- Find Tool approval policy in the server configuration.
- Choose one of the three options. Follow server guidance or Always allowed, confirm the change when prompted.
- Publish for the changes to go into effect.
Changing the policy takes effect on the next tool call. It does not require users to re-authenticate.
What your users see
When a tool requires approval, the user is shown what the assistant is about to do and asked to allow it before anything runs. If they decline, the tool does not run.
Existing servers
Every server that existed before this setting was introduced is set to Follow server guidance.
If your servers set tool annotations, read-only tools keep running without interruption and anything that writes or reaches outside the connected system starts asking first. If your servers set no annotations, every tool will ask for approval. Either way, review the policy on each server and change it if the default is not what you want.
Publish, Enable, and Set the Audience
After you verify the server, publish your changes. The Enabled toggle turns an MCP server on or off. Launch Configuration controls which users can reach an enabled server. Start with a defined pilot audience instead of launching a new server broadly.

MCP Workspace controls access at the server level. You cannot allow or block individual tools inside a server. Review the full tool inventory before you enable the server, especially when it exposes write actions.
MCP tools run in the Universal Assistant. Specialized Assistant support is not available during Controlled Availability.
Connecting a server does not grant access to its upstream system. Each user can use only the tools and data that the server and upstream system allow for that user.
What Users Do the First Time
The first time a user asks the assistant to use a connected app, the assistant prompts that user to sign in within the conversation. After they complete sign-in, later requests can use the server without prompting again.
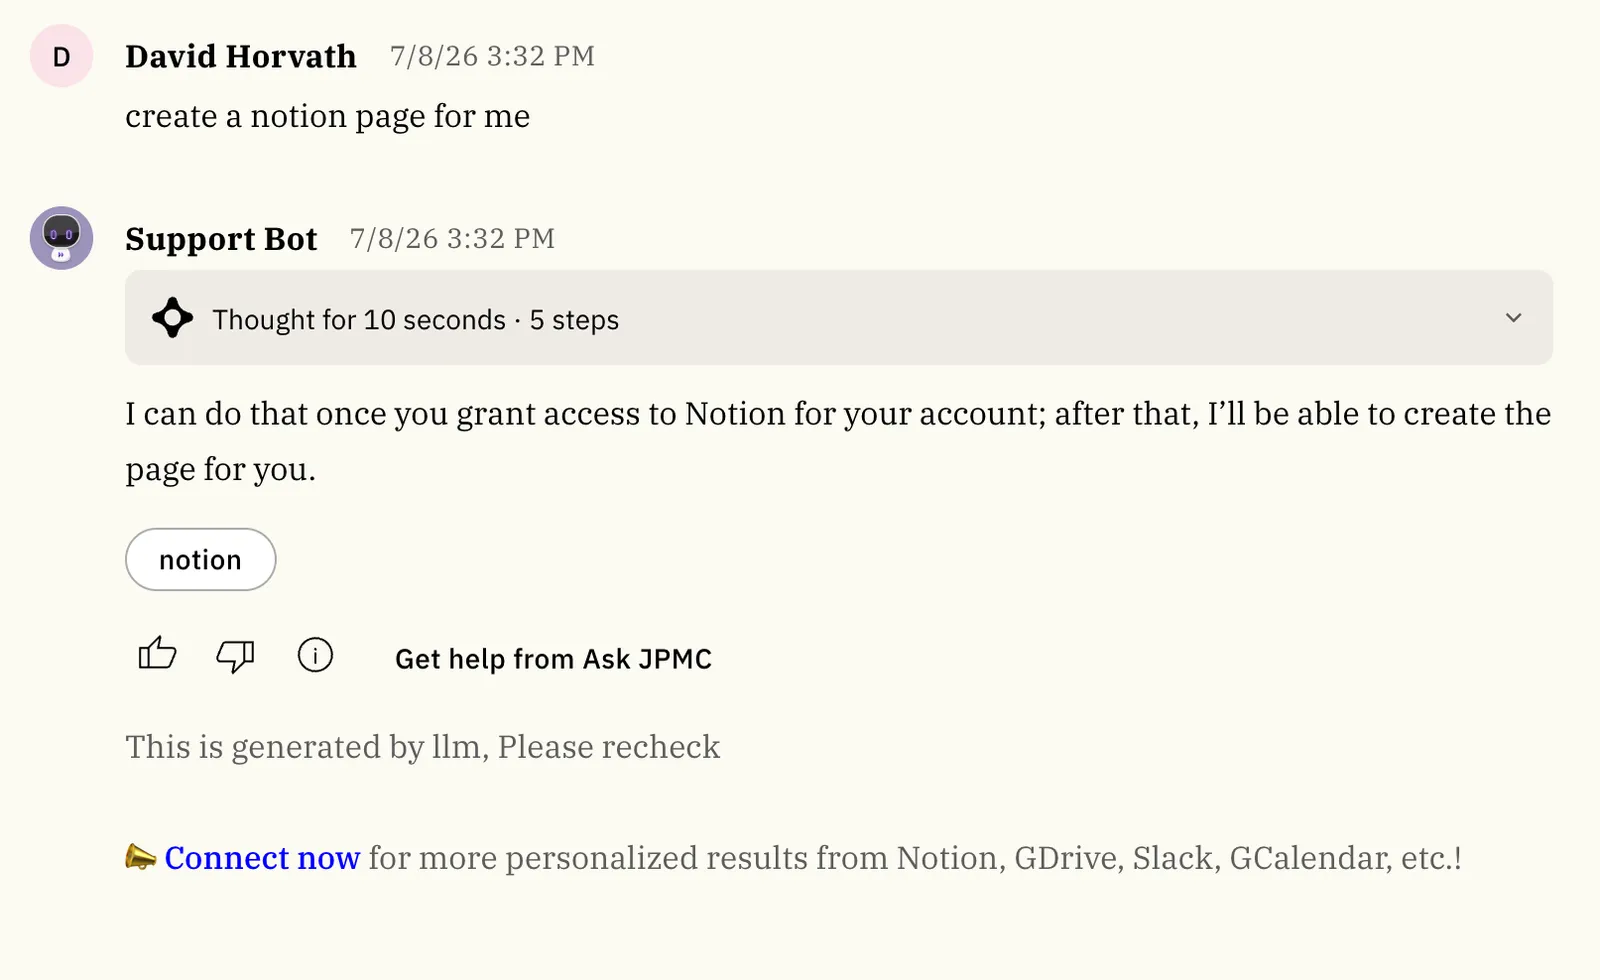
If a server works for some users but not others, check whether the affected users have completed this first-time authentication. Use Limitations and Troubleshooting when sign-in or a later request fails.